How to remove the interior lamp yourself? We act step by step
The question of how to remove the interior lighting lamp becomes quite relevant for the driver when the bulbs in the lighting have burned out - or you are planning to change them to more fashionable diodes.
There is nothing complicated in this process - you don’t call an electrician when a light bulb burns out, for example, in the bathroom at home. Changing it in a car is easy even for a beginner. You just need to know a few nuances and learn how to correctly and without interference remove the parts that interfere with this procedure (in this case, the lampshade).
see also
Comments 22
They shine well, but after a year they have become dark, that is, they either blink like a Christmas tree, or the light does not go out at all even when I set the alarm. Now I'm looking for original yellow lamps
Your red interior lighting is awesome...
Good evening gentlemen. Looks like I fit my mom's type of handy...
When replacing the light bulbs in the sun visors, it seems like I accidentally shorted the circuit...something is now not working...I already checked the fuse and everything is fine...I don’t even know what else to check.
Has anyone encountered such an oversight?
So I say “for some lampshades,” for example, for those for rear passengers: 08.856.50 GM 13 101 642. For my front lampshade, no modification is required. In addition, there are LED light bulbs like the ones you show in the first picture, I’m talking about them. And there are ones like this here: www.ebay.com/itm/11132545…_trks >
Some lampshades are made in such a way that a simple change in the LED contacts is necessary. Look how it looks on the original light bulbs, do the same and you will be happy.
Yes, they have been working for me for 2 years now and there are no problems.)))
sadness... Have you tried installing other diodes?
I’m lucky, but my rear lamps give interference and when turned off they shine slightly dimly
But I was only able to change one... When I install any second one, not a single light bulb in the cabin works)
Content
How to remove the interior lamp? Where to start and how to end this process? It should be noted that the work itself depends little on what kind of car you have. In all cases, the lampshade is usually secured with clamps - one or more.
The brand only affects the number of lamps in the cabin. In any case, before proceeding with the replacement, you should disconnect the ground. It won’t jerk you too much, even if the battery is in working condition (especially with the engine turned off). But the feeling in this case, frankly speaking, is not pleasant. So, it’s better to remember about an unloaded gun, which, by definition, can fire once in a lifetime! Let's consider, as an example, replacing light bulbs in various places in the car interior, for which it is necessary to first remove the lampshades protecting them.
Installation of additional interior lighting
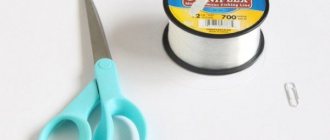
Before you carry out work on installing additional lighting in the cabin, you need to draw up a clear plan for the location of the lighting elements. You may have to order the services of professional designers. Next, you need to decide on the type of light bulbs, their color and size. LEDs can be bought on the radio market, they are inexpensive, but you will have to work hard with a soldering iron. In this case, to simplify installation, it is recommended to buy special ready-made tapes for the machine. As a rule, any repair work cannot be done without the use of appropriate tools. To carry out this process you will need:
- switch;
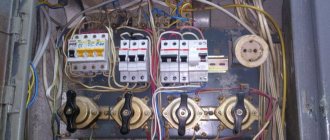
- fuse(see);
- classic screwdriver set;
- insulating tube for electrical cable;
- heads with star keys may be required to unscrew panels;
- elements that are indicated in the backlight manual.
When everything is prepared, you can proceed directly to installing the lighting yourself.
Often LED or neon lighting is installed from a car battery.
Main front lamp
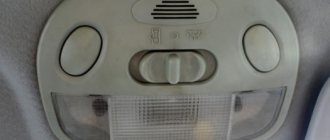
You should take care of it first (in your own interests). In the evenings, this source is the driver’s best friend. Especially if you need to write something down or find something, and daylight is no longer enough. It's funny that this lamp is attached simply, with just one clip. True, on new cars there are as many as three light bulbs, so it is more convenient to change them by removing the entire structure.
The lampshade is pryed off with a screwdriver from the side opposite the windshield and smoothly pulled towards you by hand. As a result, you have a lighting fixture hanging on wires. The protective panel can be removed by hooking your fingers on both sides. The main light bulb is immediately visible, the side ones are located on the sides, in sockets that can be unscrewed by turning 45 degrees counterclockwise. The entire procedure of changing and pulling out followed by putting it in place takes a few minutes at most.
Cosmetic mirrors
Their lighting is not built into all models and is not available on all brands of cars. However, if there is an appropriate light bulb, it should work, and more stable than all other lighting devices. It is unlikely that your family life will remain cloudless if your precious “half” does not get the opportunity to make sure that she, as always, is on top.
Lighting from behind
New cars, even budget ones, usually have autonomous lighting for those sitting in the back. And if it doesn’t work, and you want to hear less whining from the children shoved onto the back sofa, it’s better to fix it before you leave - nerves are more expensive. It's a little more hassle than changing a light bulb on a vanity mirror.
The lampshades here are wider, so there are more latches on them: there are 3 of them on the side opposite the switch. Each one is pryed off with the same screwdriver. There are two latches next to the button - they also need to be released
. Now the lampshade gently pulls down - and you gain access to the burnt out light bulb.
Obviously, the removal procedure is simple and easily accessible. And you shouldn’t go to a service station with such small things, since probably even a schoolboy can remove the interior lamp.
Why remove the car's dome light?
In fact, there are many reasons for removing the ceiling light in a car; each person finds certain problems or they find it. The process of removing the lampshade is quite simple - it does not involve installing an LED strip in the headlight, which, by the way, can be useful to many car enthusiasts. So, there are the following reasons:
- Replace the lamp with a more powerful one or it has burned out.
- Replacement of the diffuser, which can be easily damaged.
- Checking all contacts in the car when installing the backlight.
- A simple replacement for another lamp if you want to install different lighting in your salon.
As a rule, people try to change such lamps only if they are too bright or dim. You can also install multi-colored lighting, it will always look beautiful. For example, you have a blue LED backlight installed, you can install such a lamp without any problems.
What kind of service is this?
Car interior lighting is the most important element of its operation. Poor or no interior lighting is a serious problem, and replacing the interior light bulb
will increase the efficiency of vehicle management and operation.
As a rule, car interior lighting is divided into several types, depending on the location of installation of the lighting elements. But the main ones are the side and central lamps, which come standard with the car. You can additionally install LED lamps for better interior lighting, but do not overdo it - interior lighting should not distract from safe driving.
How to remove a courtesy light in a car
It is worth noting that there are a large number of different car brands, almost all of which have different removal methods. But, there are tricks that can be safely applied to all cars. In this article we will not talk about how to remove the ceiling light in the interior of a domestic car, this includes: 2101, 2105, 2106,2199, etc. – if you have such a car, try to find another article. Find out what types of electrical circuits there are.
Initially, we recommend watching a video on how to remove the ceiling light in the cabin, after which we will tell you a few more tricks.
There are two main ways to remove the lampshade, we will talk about them separately.
Nowadays the most popular products are attached to special flags with a spring clip. To open them, just pull the transparent cover towards you a little, this is how it looks in the photo.
The second option is when you need to pry a little with a screwdriver, you should notice a special hole. If it is not there, read on.
If you start trying to remove the lampshade using these methods, but nothing works, don’t try. Remember, the lampshade is always easy to remove; if nothing comes out, it means you are doing something wrong.
A very rare option is when you need to press the lampshade inward, loosen it a little and pull it out. This also happens, but it is very rare, so we do not place any emphasis on it.
After you have pulled out the lamp, be aware of the wires and turn off the power to the battery initially, it can short-circuit the wiring in the car. Sometimes, to change a light bulb, you just need to unscrew and insert a new one - this is an easy way. It can also be more difficult when all the wires are fastened with special terminal blocks, they need to be disconnected. Do this carefully, they are very easy to damage.
So we told you how to remove the ceiling light in the cabin and looked at the main methods. There is nothing complicated, but remember, if it doesn’t work, don’t touch it, you’ll only break it.
Related article: What to do if the power goes out.
How to replace dome light bulbs in a car?
Interior lighting works for a long time without the intervention of the car owner. If your vehicle's light elements frequently burn out, check the health of the vehicle's on-board electrical system. A common source of the problem is the generator (high charge voltage).
If the malfunction is not corrected in time, problems with the battery and other electrical equipment of the car may occur. If errors are made during the installation of the alarm system, the interior and trunk lights may also dim. Don't know how to remove (unscrew) a spare part? Find instructions (sometimes video format is clearer).
Before installing a new spare part, check the fuse in the interior unit and the door sensors. The end caps may oxidize.
Don't waste your time - use the Uremont search and get offers from nearby services with specific prices!
Reasons for replacing the interior courtesy lamp
As a rule, most drivers do not pay attention to the interior lamp as long as its operation completely suits them.
Therefore, the procedure for dismantling the lampshade may be due to the following reasons:
- The interior lighting has stopped lighting - this occurs both due to a burnt-out light bulb and due to a lack of contact at the input of the lamp itself.
- Insufficient lighting - in most cases is due to the fact that low-power or outdated devices are installed in the ceiling, producing a weak luminous flux. It can also occur due to the burnout of any part of the lighting devices in the ceiling.
- Flickering of the lamp - occurs due to poor contact or malfunction of the LED lamp driver. To diagnose the cause, it is necessary to remove the ceiling light.
- A broken lens glass or a cracked lamp housing is caused by careless actions of both the driver and passengers. It also occurs during the natural aging of plastic and the loss of its mechanical properties.
Regardless of what reason led to the need to dismantle the lampshade, you should take this procedure as carefully as possible, since careless actions can easily cause damage to both the lamp itself and the ceiling lining. Which will entail additional costs for their repair and restoration.
Replacing an interior light bulb - where are the bulbs located?
As a rule, there is always a central lamp (it turns on when the door is opened and from a button). The front part is also equipped with additional lighting (operated by switching a switch or tied to the door switches).
Access to the central lamp is most often simple: use a thin screwdriver to pry up the diffuser and remove it. The front lamp is somewhat more complicated. If it is located in the area of the glasses compartment, remove the bolts connecting the shelf and the ceiling (in some designs the glasses case must be removed). After this, the interior lamps are replaced.
Similar manipulations are needed if the light elements have burned out. The second reason is insufficient lighting. Let's understand the range of these spare parts to install suitable light bulbs.
How to choose replacement interior lighting bulbs?
Standard samples are flasks up to 3 cm long and with a power of up to 15 Watts - this is quite small. If such lighting is not enough, a good option would be to purchase diodes (they are economical and shine brighter). When choosing, pay attention to the length and base included so that the element fits your car.
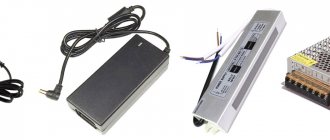
Is there an alternative to replacing interior lighting bulbs? If you need to additionally illuminate the car from the inside, consider the following devices as light sources:
What should you pay attention to before removing the ceiling light?
Before working with the side or central lamp, be sure to remove the power terminal from the car battery, as this may result in a short circuit in the circuit. Which can lead to additional damage and a seemingly simple procedure will result in a number of unexpected costs.
Before removing the lampshade, you will need to inspect the outside where the diffuser is attached to the body. As a rule, these are small depressions into which you can insert a screwdriver or some other flat object.
Rice. 1. Lock on the lamp
In each car model they can differ radically. But the most common are mechanical clamps and spring latches. The mechanical clamp can be easily opened using a screwdriver or other flat object. The spring latch can also be opened by pressing on it with a screwdriver or other object that can penetrate the hole.
It should be noted that at this stage the movement of the diffuser should be as easy as possible. If, after disengaging the lock, you cannot easily separate the diffuser from the lamp body, then somewhere there is an unreleased fastening unit. Therefore, it is better to check the entire body again, it is quite possible that there is an unnoticed lock somewhere, perhaps it is covered by a casing or a sticker. There is also a possibility that while opening the lock on one side, the lock on the opposite side could return back into the groove.
Opel Astra TURBO RESTYLING › Logbook › Replacement of interior lighting lamps!
Hello to all readers of my logbook!))) It’s immediately clear that the yellow light in the car is nothing... I decided to replace the standard lamps with LEDs!
They were replaced a long time ago, but I just couldn’t get it together, choose the time and create a BZ...))) I bought 5 baseless LEDs for the lampshades, 4 LEDs for illuminating the sun visors
Then I took the lights apart. Disassembling the lights is simple, all fastenings are snapped, carefully pry and remove...
I didn’t install a central LED, because I don’t need light when opening the door, and in the future the lights for the legs and doors will be connected to this connector, but more on that in the next blog…)))
Then we put everything together and here is the result:
The central section does not light up, only the outer sections light up. There is plenty of light...
Then we move on to the rear courtesy lamp. Everything is sorted out and changed in exactly the same way...
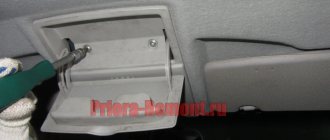
Then we move on to illuminating the glove compartment. The yellow light in it doesn’t inspire me either... So I took out the flashlight, pulled out the old lamp and inserted a new diode... To pull out the flashlight you need to pry it off with a flat screwdriver, as if from the inside...
The only thing left to do is to replace the lamps in the sun visors... As with all lampshades, it is extremely simple... The glass is removed, the lamp is taken out and the diode is installed... But there were some problems, the diodes were larger than the original lamps, so they had to be filed a little))) Unfortunately there are no photos of the finalization...
I immediately thought that the diodes would produce less light, but it turned out to be the opposite... Overall, I’m very pleased with the result, white light is much nicer!))) Don’t forget to comment and like!))) If you like it, of course!))) Thank you all for your attention! )))
Price: 500 ₽ Mileage: 1000 km
Step-by-step instructions for dismantling the lampshade
To do this, consider upgrading your interior lighting. The following example shows the replacement of a conventional incandescent light bulb in a lampshade with a more modern and efficient NIGHTON ML-6 LED board. This replacement will be relevant for the interior of Chevrolet Aveo, Daewoo Matiz, ZAZ VIDA with the same type of lampshades. This technology for dismantling the ceiling lamp will be relevant for other brands of cars. Carefully study the external design of the lamp.
Rice. 3. Lamp for dismantling
As you can see, near the switch there is a small groove, highlighted in the figure with a red circle. In order to remove the diffuser, it must be pryed off with any flat object. In this example, you pry up the lampshade with a knife and apply a little force towards the inside of the cabin.
Rice. 4. Pry off the glass with a knife
Please note that the knife should fit easily into the hole, but you will also need enough width. Since the thin fabric creates a large load at the pressure point. Also, you should not apply force only from the edge, since if it slides, the plastic may chip and you will damage the lampshade. Gently press down and remove the diffuser.
Rice. 5. Remove the glass
As you can see in the picture, you will see the lamp itself without glass. In this example, the housing is fastened with bolts on both sides of the ceiling lamp. To remove them, you will need a Phillips screwdriver of the appropriate size.
Rice. 6. Unscrew the mounting screws
To remove the fastening screws, jerking movements are not allowed, which could damage the bolt or cause the screwdriver to slip off. If excessive force occurs, you should first remove the lamp so as not to break it with a screwdriver or damage your hands or eyes from fragments.
Rice. 7. Unscrew the second screw
When unscrewing the second screw, it is better to hold the case with your fingers to prevent it from uncontrolled falling out. Since this can also break the light bulb or damage the housing.
Rice. 8. Take out the light
After unscrewing the bolt, carefully separate the lamp from the casing. At the same time, it should come off easily without any effort. If this does not happen, there may be an additional attachment point that you missed. Then inspect the surface again; you may need to pry it a little to determine the location of fixation.
Rice. 9. Power cord
After the lamp is separated from the casing, it is necessary to disconnect the power cord. If they have a plug-in fixation, then it is enough to open them; if they have a bolted fixation, they need to be unscrewed.
Also make a note of which wire goes where, as you will need to reconnect them. In this situation, the power wires for the lampshade are multi-colored and easy to navigate. If they all have the same color, they can be marked with a marker or electrical tape, depending on what you have at hand. The main criterion for such spontaneous marking is that you can easily determine the original location of the wires in the lampshade.
Rice. 10. Removing the lamp from the lampshade
If everything went smoothly for you and you have not yet dismantled the lamp, remove it from its mounting location. In this case, you should not apply force to the glass bulb; if the lamp does not come out freely, pry it out from under the metal clamp near the end.
Rice. 11. Installation of LED board
The mounting of the NIGHTON ML-6 board clearly fits the holes on which the lighting lamp clamps were fixed. Screw it with the same bolts as shown in the figure.
Rice. 12. Connect the black wire
The black wire must be connected to the closest of the lamp mounting bolts. As indicated in the instructions for the lighting board.
Rice. 13. Connect the green wire
The green wire is connected to the outermost contact in the connector; it is considered unused. The remaining pins (red and white) are connected to the power connector.
Rice. 14. Connect the wires back
Consider the drawing, the red and white wires are connected to the corresponding terminal block terminals as shown on the left to match their color coding.
Reasons for withdrawal
The main reasons for this event may be the following:
- replacing a damaged lens;
- replacing the light bulb with a more powerful one;
- checking contacts (if the light does not work);
- complete replacement of the lighting device.
To ensure that you do not damage the integrity of the mounts, diffuser, interior trim or the light bulb itself, you need to carefully dismantle it, which we will talk about later.
How to change the polarity on the interior lamp of a Lada Kalina
You can do this in two ways:
Swapping the + and wires is the easiest way. But the light will not work when the doors are opened.
The second option is more complex and involves replacing everything + that fits the lampshade. We need to replace the + with - on the base lamps, and ! we remake the “-”, which is taken from the body to the central lamp to “+”. Without this manipulation, nothing worked for me personally.
The pinout of the switch remains almost unchanged, with the exception of replacing “-” with “+”
Correct dismantling
Depending on the make and class of the car, removing the interior lamp can be done in different ways. The reason for this is the different design of the diffuser mounts. Today, products secured with special flags and spring clips are popular. In the first case, you just need to pull the transparent cover towards you. In the second, using a thin minus screwdriver, you need to pry off the cover in specially designated areas (we have highlighted them in the photo).
Please note that dismantling must be carried out with extreme caution. It doesn't take much force to remove the diffuser, so if there is resistance, it means you're doing something wrong. It is better to re-examine all the joints; perhaps the hole for the screwdriver is hidden somewhere else.
It should also be noted that sometimes the lid is removed by itself, and sometimes along with the “internals”. This depends on the design features of the device. As soon as you remove the first obstacle, a new one will appear - a light bulb. Depending on the type of base, the lamps can turn off in different ways: if you press on the spring or simply disconnect the contacts.
Next, you need to remove the car interior lamp with your own hands. It is usually secured to the casing with several screws (2 to 4) or a mechanical latch. Here you need to be extremely careful, because the electrical wiring from the battery is connected to the housing. All you need to do is disconnect the contacts.
Another important tip is to mark the wires for yourself, because you will have to install the interior lamp in the old place after the repair work. To do this, you can use electrical tape of different colors or a marker.
Replacing the interior light bulb of Lada Priora (VAZ Priora)
Interior lighting plays an important role in the dark: it creates comfortable conditions for the driver, makes it possible to better see the instruments, gear shift knob, etc. The interior lighting of the Priora does not always satisfy car enthusiasts. The article discusses types of lighting and provides instructions on how to install lampshades.
Features of interior lighting on VAZ cars
In the simplest configuration of the Lada Priora, there is only one interior lighting fixture. It is located on the ceiling at the front. They are equipped with C10W bulbs, which emit a soft but faint yellow light. Priora owners are not satisfied with such light, so they install an improved unit from the “Lux” version model.
Two lighting fixtures are fully equipped in Priora and Kalina. One is located near the driver. The second is located in the ceiling above the rear seats. Although an LED lamp is used, it shines no worse than light sources installed near the driver.
Instructions for installing new lampshades
To replace lighting fixtures in both the Priora and Kalina interiors, no special knowledge is required, since the procedure is simple.
Photo gallery “Step-by-step installation of lighting shades”
To replace the light bulb, follow these steps:
- First you need to remove the protective cover. This can be done by prying it with a screwdriver from the mounting side and lightly pressing the clip. Now the cover can be easily removed from the ceiling.
- Next you need to disconnect the power wires.
- Having disconnected the old lamp, a new element is installed in its place.
- Assembly is carried out in reverse order.
Installing an additional “Lux” lighting fixture will require care and time. First of all, you need to purchase a new block, which will be placed above the rear sofa.
The installation procedure consists of the following steps:
- First, you need to apply markings to the ceiling, deciding on the place where the rear lamp will be located.
- Then, according to the markings, a hole is cut in the ceiling covering.
- Next, you need to stretch the power wire from the front light between the roof and the ceiling covering.
- At the next stage, the unit to be installed is connected.
- To ensure that the lid fits tightly to the ceiling, you can cut a frame from some kind of rubber seal.
In the Priora “Norma” configuration, it is recommended to change the front unit installed from the factory. Replacing it is easy, since the characteristics of the devices are the same.
The replacement scheme is similar to replacing a light bulb: a new element will be installed instead of the old light source. When installing LEDs, keep in mind that they differ in brightness color. For the rear light, it is better to make the LED backlight brighter, and put medium-brightness LEDs in front (the author of the video is Repair and Tuning).
After replacing the lighting unit of the Priora Norma configuration with a higher-quality luxury one, the driver becomes more comfortable in the cabin.
Simplicity of installation and low time costs make it possible to replace the standard lighting unit with a more powerful one, or equip the cabin with an additional light source. At the same time, you do not need to have in-depth knowledge of electrical engineering; even a novice driver can perform the replacement.
Price issue
The block (diode) costs 460 rubles. The front Lux package costs 535 rubles.
There are two options to improve lighting by replacing it with LED:
- Replacing a conventional lamp with an LED one. Price 50 rub.
- Replacing a lighting lamp with an LED module - 350 rubles.
- To replace the unit you do not need to remove it, just remove the glass.
- This video demonstrates how to install a rear light in the interior of a Lada Kalina with your own hands (the author of the video is NBI12345).
- The reasons why you sometimes have to remove the interior lamp on a Lada Priora car may be the following:
- Failure of its backlight lamp
- Failure of the interior air temperature sensor
- Mechanical damage to the lamp housing (for further replacement)
In order to remove the lampshade with your own hands, you will need a minimum of tools, namely:
- Torx bit t 20
- Holder
- Flat blade screwdriver
Removing and installing the lampshade
First of all, we open the upper compartment, the so-called eyeglass case, and under it you need to unscrew the two fastening screws:
After that, using a flat-head screwdriver, pry off the cover - a decorative trim, under which there is a rear-view mirror mount.
And also unscrew the two fastening screws, as shown in the photo below:
Next, carefully move the lampshade to the side, but without sudden movements, since there are several more wires going to it.
And now you can disconnect the power wires by squeezing or pressing the clamps, depending on the type of their fastening:
Replacing the lampshade or temperature sensor, as well as backlight bulbs, occurs without any problems. After all the manipulations, you can install the lampshade in its place. The entire repair will not take more than 10 minutes. The price of a new lamp is about 1,500 rubles for the whole assembly with sensors, etc. For one element no more than 500 rubles.
Removing the interior lamp of a Lada Priora car is carried out to replace a burnt-out lamp or switch, as well as when carrying out other work in which its presence will interfere with the progress of their work. Prepare a standard set of tools, de-energize the car by disconnecting the minus terminal from the battery and perform the following sequence of actions:
- First of all, you need to remove the lamp diffuser. To do this, pry it up with a small flat screwdriver and, overcoming the force of the spring clips, remove it.
- We release the lock of the interior lighting lamp and disconnect the block with the power wires.
- Replace the lampshade or make any other repairs, then perform the installation in the reverse order.
Source: https://avtozam.ru/vaz/zamena-lampochki-podsvetki-salona-lada-priora-v.html
Removing the interior lamp on a Ford Focus 2
The process of improving a car does not end with external modifications or engine tuning. So, many motorists do not like the light in the interior of the Ford Focus 2. Therefore, they try to replace the lamps with LED ones, or even the entire lampshade. The article will tell you how to carry out the process yourself, and will also show visual videos and photographs.
Video about dismantling the ceiling lamp on Focus 2:
The video will tell you about replacing the ceiling light in a car.
Tuning interior lighting
Many car manufacturers, each in their own way, are trying to find new methods of improving the interior lighting of their creations, as well as car enthusiasts themselves who experiment with their cars on their own. In fact, lighting on your own looks good, it’s beautiful, convenient and practical. You can make the illumination of the thresholds yourself, which will be triggered when the doors are opened, or the illumination of the necessary panels. Of course, the illumination can be installed in any place where everyone wishes, but now we will turn our attention specifically to the lighting of the VAZ interior.
Note! Based on practice, it can be noted that the external lighting device will be relatively heavier, and not all manual changes to the machine are permitted by law.
For example, if neon underbody lighting is installed, there is a risk of not passing inspection. Yes, external lighting looks beautiful, but first you need to create convenience for the driver and passengers.
LEDs or neon
If it seems that the car interior does not have enough lighting of its own, but there is a desire to create a soft, relaxing light or give the interior a little uniqueness, it’s time to think about installing additional lighting. Today this is a completely solvable task. Before installing additional lighting elements, you need to choose the type of lamps; these can be LEDs or neon bulbs.
Most often, LEDs are used for such purposes; they have many advantages over neon:
- flexibility of design, light bulbs will not accidentally come off or break, which cannot be said about neons, which often break;
- easy soldering;
- you can buy any length of LED strip;
- Individual diodes can be installed almost anywhere;
- You can change the color of the lighting, this only applies to RGB strips.
In addition to the advantages, LEDs also have several disadvantages:
- if you buy a large quantity, LED bulbs will cost more than neon ones;
- neon lighting elements are characterized by a long service life.
At the moment, the quality of LEDs is growing rapidly every year, while their price is falling. Previously, it was possible to purchase only individual LEDs, later - strips and modules, but now you can cover the entire interior of the car with one complex, which will be controlled by a remote control or control panel. Maybe in the near future LED interior lighting will become a standard for installation in car manufacturing.
It is worth noting that neon is slightly relegated to the background, since it is a less convenient design, has lower brightness and limited operational capabilities. Despite this, there have been, are and will be neon lighting elements in the cabin, and they have their own significant advantages.
Note! These two types of lamps can be used in car tuning, the main thing is to find a suitable design solution.
The process of dismantling the interior lamp on a Ford Focus 2
General view of interior lighting.
Replacing the lampshades in the Ford Focus II interior is carried out in several stages. So, the removal process itself will take 10-15 minutes. After this, the remaining operations can be carried out.
So, to carry out the process you will need a flathead screwdriver or it is best to use a plastic spatula with a sharp end. Before proceeding directly to the operations, it is worth noting that all actions must be carried out carefully and calculate the force so as not to break the fragile latches of the lampshades.