The appearance of wires with an integrated load-bearing part has made it possible to increase the resistance of overhead power lines to external influences. When installing a SIP cable from a pole to a house, it is necessary to use anchors that securely hold the main line. If installed correctly, the wiring will last at least 25 years. Violations of technology lead to power failures or fires.
What is SIP cable
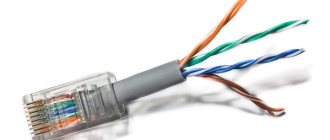
Self-supporting insulated wire is intended for organizing overhead power lines or creating lighting networks. Depending on the cross-section and insulator, the cable is designed for voltages from 600 V to 35 kV. The product was developed in the 60s. last century in Finland as an alternative to classic lines suspended on a steel cable.
The insulator is made of cross-linked polyethylene, resistant to temperature changes and ultraviolet light (the neutral or supporting core may not be equipped with a protective coating).
Varieties and differences
In accordance with the GOST 31946-2012 standard, several types of cables are produced in Russia (all equipped with aluminum conductors):
- SIP-1, designed for voltages up to 380 V and without an insulator on the supporting core;
- SIP-2, used in lines with voltages up to 380 V and equipped with a protective layer on the supporting core;
- SIP-3, designed for up to 20 or 32 kV (depending on the thickness of the insulator - 2.3 and 3.5 mm, respectively);
- SIP-4, which does not have a zero load-bearing core and consists of 2 or 4 cores (there are modifications with additional wires for organizing lighting);
- SIP-5, which differs from SIP-4 insulator made of light-stabilized polyethylene.
Reading Markings
The designation SIP stands for “self-supporting insulated wire”, the number indicates the type of cable. There are modifications with letters to mark special characteristics (for example, the letter “g” is used for a sealed cable model, and “n” is used for products with a flame retardant insulator). Standard insulation can withstand prolonged heating up to +90°C. There is a modification marked “t”, the protective layer is not destroyed at +120°C.
Both cable options are designed to heat up to +250°C during a short circuit.
Advantages and disadvantages
Main advantages of the carrier cable:
- the presence of insulation prevents short circuits when foreign objects fall (for example, broken tree branches);
- the supporting core increases the resistance of the line to breaks;
- the dimensions of the overhead line are reduced and the distance from the pole to the wall of the building is reduced;
- protection of the main line from theft of electricity is ensured by installing additional cables;
- long service life (at least 40 years);
- the smooth surface protects the highway from sticking wet snow;
- It is possible to carry out part of the installation work without turning off the voltage.
Product shortcomings noted by installation teams:
- the need to train personnel in working with cables of the SIP series;
- increased cost (compared to products with bare cores);
- risk of damage to the insulator due to prolonged contact with foreign objects;
- increased specific gravity due to the use of a load-bearing core and a thick insulator;
- flammability of the protective layer, limiting the use of products indoors.
Which one is suitable for connecting to the house?
For connection to a residential building or cottage with a load power of up to 3–4 kW, a 2-core SIP-4 cable with a cross-section of 16 mm² is suitable. If the building has heating boilers or household appliances with high energy consumption, then a 4-core wire rated for 380 V should be used.
In both cases, it is necessary to organize a separate grounding circuit to protect people from electric shock due to insulation breakdown.
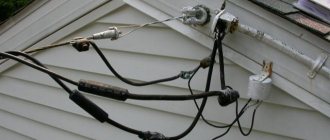
Cable entry into the house. Electrical supply by air
The air supply method is attractive because it does not require a lot of time and money. But the standards set requirements that not all houses meet:
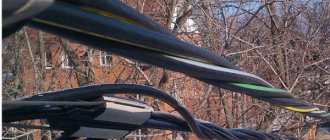
- The cable entry into the house must be located at a height of at least 2.75 m. If the height of the house is sufficient, a distribution panel with an RCD is mounted on the wall, and the cable from the pole is connected to it. If the house has a smaller height, a special rack (pipe rack) is installed. It can be of a curved shape called a “gander” (in the picture on the left) or straight (in the picture on the right). These two entry methods differ in the method of attachment to the walls of the house (see photo).
Methods for installing a rack for air supply of electricity into the house
- The distance from the pole to the entry point should not exceed 10 m. If this distance is greater, additional support is installed. The distance from it to the power line should not be more than 15 m.
- The tap from the power line is made: up to 10 m - with copper wire with a cross-section of 4 mm;
- from 10 to 15 m - with a wire with copper conductors with a cross-section of 6 mm.
- aluminum wires are used in any case with a diameter of at least 16 mm.
Connecting to a power pole by air
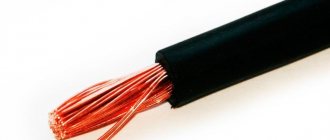
Although copper wires require a smaller diameter, they cost significantly more than aluminum wires. Therefore, the introduction of electricity into the house from a pole is most often made from cables with aluminum conductors. There are two ways:
- Stretch a torso or wire between the posts and attach a current-carrying cable to it with special clamps.
- Use self-supporting wires for which support is not needed: SIP (self-supporting insulated wire). It is connected using:
- insulators (glass, polymer, porcelain);
- special fittings.
Special fittings appeared not so long ago, but are becoming increasingly popular. It has a certain margin of safety. If it is exceeded (falling trees, massive snow melting, etc.), the fittings are destroyed, but the cable remains intact and the power supply is not disrupted.
From the place where the input cable touches the wooden wall of the house to the place where the shield is installed, the cable must be laid in a steel pipe
Inputting electricity into the house from a pole through a pipe stand
Air supply of electricity to the house also has disadvantages:
- The electrical wiring is exposed, which can cause damage.
- Hanging wires limit the possibilities for accessing large equipment (truck cranes, aerial platforms, etc.).
Selection of fittings for installation
When selecting components, take into account the facade material:
- Construction nails or screws are used for fastening to a wooden surface or plaster. Screws provide increased strength, but holes must be drilled into the material before installation.
- For concrete or brick structures, take plastic dowels and insert them into pre-drilled holes. If there is decorative trim on the surface of the wall, then it is necessary to install an amplifier under it, rigidly attaching it to the base. Otherwise, with a gust of wind, the cable will tear off the clamps and part of the building’s cladding.
Connection recommendations
Before starting work under power lines and within the radius of installation of equipment for adjusting and stretching cables, it is necessary to remove bushes and trees. Otherwise, when rolling out the conductor, the insulating layer may be damaged. It is also advisable to replace old supports and use modern fastening fittings.
Wire rolling
The cable reaches the consumer wound on a drum. Manual rolling of wires is allowed only with a cross-section of conductor cores up to 50 mm2 and a length of no more than 100 m. This is a fairly simple step, but there are some nuances that need to be remembered. Rollers must be used to protect the insulating layer. Rolling out the cable on the ground is prohibited, since when installing a piercing type clamp on a section of the conductor contaminated with earth, additional resistance is created.
The second important condition is the installation of a swivel, which allows you to protect the stranded wire from spontaneous unwinding of the wires. Ignoring this requirement can lead to the appearance of gaps between the current-carrying elements of the cable and their subsequent destruction. If rolling is carried out manually, then the speed should not exceed 5 km/h.
At this stage, you must adhere to the following algorithm of actions:
- The cable drum is installed on a rolling cart or screw stand to ensure free rotation of the coil.
- The stand is located behind the first support of the highway being created at a distance equal to the height of the pillar.
- A power roller is mounted on the support.
- Unrolling rollers are attached to all other posts.
- From the end of the line to the first support, a leader (auxiliary rope) is passed, passing between the roller fastenings.
- The cable is attached to the free end of the leader using a swivel and cable stocking.
- SIP is pulled along the poles through rollers.
This is interesting: the distance between lighting poles.
Fastening the cable to the support
The brackets are attached to the poles using mounting tape made of stainless steel. When the conductor begins to move through the unrolling roller installed on the last support, you can begin to attach the SIP. After this you have to tighten the wire. The starting point for this work is the first anchor post. The stocking clip is removed from the wire. The winch is then attached to the support cable on the outside of the anchor clamp.
It is necessary to place a band clamp with a hook on the pole, connecting it to the winch through a dynamometer . Having tensioned the cable to the required force, the SIP is fixed in the anchor clamp , and the winch with a dynamometer is removed. The cable can only be attached to the neutral. After completing this work, you need to remove the rolling rollers.
Entering the premises
It should be remembered that SIP can only be laid to the building by air. For a three-phase network, a 4×16 cable is used, and for a two-phase network, a 2×16 cable is used. If aerated concrete blocks were used during the construction of the house, then conventional anchors for attaching SIP to the house will not be suitable. To ensure reliable fixation of the conductor in such a situation, a metal plate with a hook and studs should be used. The wall is drilled through and a counter plate is installed on the reverse side. After this, the structure is tightened with studs.
Don't forget that you can only lay it by air.
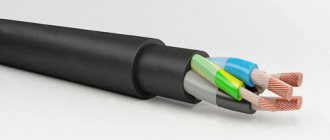
Since the cable insulation is made of flammable material, it cannot be immediately introduced into a wooden structure . The best scheme for connecting a SIP cable to a house is as follows:
- Depending on the number of phases, a two- or four-pole circuit breaker is installed. In this case, it must be placed in a separate box. The rated current of the machine should be slightly higher in comparison with the device installed indoors.
- A corrugated cable with a VVGng 2×10 type conductor is laid from the input circuit breaker into the house.
- The entrance to the room must be made of steel or plastic pipe and have grounding.
Regardless of who carried out the work, you can connect SIP to the house only after obtaining permission from the organization supplying energy. Specifications may vary from region to region, so please check them first. If the cable connection is done correctly, the conductor will last for many years.
Fasteners for SIP
To install a line of SIP series cables, use:
- anchor, support and intermediate clamps;
- brackets and mounting hooks;
- yokes and clamps for holding metal tape;
- insulated staples;
- spiral knits;
- die and mounting clamps;
- piercing and branch couplings;
- rollers and auxiliary fittings (for example, protective caps for cut cable lugs).
Clamps
To connect several cables into a single line, special clamps are used that are characterized by increased strength.
The design has an extended clasp that holds the line when branches fall. The clamps are made of plastic that does not lose strength when exposed to ultraviolet radiation or when the temperature drops to -50°C and below. Do not use standard cable ties, which will burst after 6–8 months of being outdoors.
Anchor clamps
To hold the SIP line on the wall, anchor clamps made of aluminum alloy and reinforced polyamide are used. The mounts are designed to withstand exposure to sunlight and low air temperatures. The clamps differ in maximum breaking load, cross-section and number of cores, and are suitable for organizing subscriber branches of power supply lines. The wedge clamp holds the cable and does not destroy the protective insulation.
Brackets
Brackets are used to hold wires on supports or walls. The use of existing structures (for example, mounting loops or reinforcement pins) is not permitted. The clamp is attached to the poles using a metal bandage tape clamped with a yoke. To make the clamp, stainless or galvanized steel is used, the edges of which undergo a machining cycle. The tape is characterized by increased elasticity and is supplied in coils with a length of 25 m. A special tool is required for installation and tightening with a yoke.
The fittings for fixing SIPs are made of glass fiber reinforced polyamide. Products vary in size, configuration and maximum load. The brackets can withstand cooling down to -60°C without loss of strength and are not destroyed under the influence of ultraviolet radiation. Fastening elements are designed for installation at sub-zero air temperatures.
There is reinforced fittings made of aluminum alloy using high pressure casting technology.
Materials
To install SIP from the pole to the house, special fasteners will be required. We will compile a list of required materials without indicating the manufacturer and product specifications, as they may differ. We will only indicate the names of the fastening elements.
List of materials for fastening SIP:
- Cable SIP-4 2x16 for single-phase power supply or SIP-4 4x16 for three-phase power supply.
Wires for single-phase and three-phase input
- Metal bandage tape for fixing the hook on the pole.
- Bandage and wall hook with anchor bolts.
- Two metal clamps for fixing SIP and bandage tape.
- Two anchor clamps.
- Eight piercing clamps for connecting three-phase voltage or four for inputting two-phase.
Attachment to different surfaces
If the cottage or residential building is located at a short distance from the power line, then it is necessary to lay a branch based on the SIP cable, and then supply power to the building. For installation work, you will need special fasteners, the range of which depends on the design and number of supports. Clamps are installed on poles and walls. SIP cable does not require cable tensioning or trench digging.
To the post
To fix the brackets on the supports, use a perforated tape made of galvanized steel and equipped with a clamping yoke. To connect insulated cable cores into bundles, special plastic clamps are used that can withstand up to 5 years of operation. Intermediate or anchor brackets are placed on the tape to hold the main line and the branch, respectively. Elastic metal allows you to fix lines on supports with a quadrant or round profile. The strength of the clamp depends on the correct tightening of the yoke.
Methods for switching from SIP to copper on the facade.
Where have we come to this point? We realized that SIP supports and joyfully spreads the fire. Therefore, his place is only on the street, and under no circumstances should he be brought into the house. We also saw how this combustion occurs and what the crappy aluminum contacts are fraught with.
Let's think about how we can arrange entry into the house so that there are no problems with it. Obviously, the most convenient way is an underground armored cable: bury it from a pole or metering panel on a pole - and run it into the house.
What about SIP? Bring it only to the facade of the house and there switch to a copper cable, which is already brought into the house. I’ll emphasize this idea once again: SIP was created ONLY for overhead lines - lines that run through the air openly outdoors. If you need to drag an overhead cable into a shed, then you are dragging copper from the house. On the front of the house, switch from copper to SIP and extend it to the barn. At the barn, switch to the copper again and take it into the barn. That's it and that's it!
A long time ago on MasterCity there was this photo of the ideal, as it was written there, option for switching to copper on the facade of a house:
An example of a transition from SIP to copper cable through special clamps
Yes, it can be used as a sample, because everything here is done correctly: the SIP is held on an anchor clamp by a ring screwed into the wall of the house. It is located at a distance from the facade and does not touch it. The copper cable is routed out of the house through a steel pipe, the outlet of which is bent downward to prevent water from pouring into it. Copper and SIP are connected to each other through special clamps, and insulating caps are put on the SIP cores.
Additionally, the author of this photo wrapped the copper wires with black electrical tape to make them light-resistant. This photo is quite old, and it is not known what kind of electrical tape it was. Either some kind of specially light-resistant one (possibly from 3M), or regular one. If it’s ordinary, it will quickly fall apart.
And here is a version of how one of the comrades with whom I corresponded via soap made the transition to copper. The idea is good, but I completely disagree with it: the SIP goes along the facade of the house in a plastic pipe and, although this pipe has a certificate of non-flammability, this is still not the right solution: it is not light-resistant and will sooner or later collapse. If there was steel here, it would be great!
One example of the transition from SIP to copper via terminals on a DIN rail
But sometimes a more complex problem arises when it is necessary to immediately solve the issue of introducing a self-supporting insulated insulation system, and surge protectors, and connecting the ground loop, and sometimes placing the meter in or near the house. And that’s where I came up with a comprehensive solution.
Installation of SIP from pole to house
The procedure for connecting a residential building to the power supply line using SIP must be carried out by a professional team. Installation work requires the use of special tools and a lift on the vehicle chassis. To move equipment under power lines, a permit is required, and since the wiring remains live, the operator must use protective dielectric gloves and boots.
Armature
To install the cable you need:
- piercing clamps with a protective cap (the number of elements depends on the number of wiring strands);
- anchor clamps (for example, for a standard single-phase 220 V line, 2 clamps are required for each intermediate support and wall);
- metal tape (1–1.5 m of material is required for a post);
- yokes for fixing the tape (the number depends on the number of staples);
- aluminum or plastic brackets, which are attached to the facade of the building with anchors, and to the supports using steel tape;
- plastic clamps;
- fastenings for the facade of the house.
Installation of fasteners and cable routing
Since it is unacceptable to violate the integrity of the power line support, steel tapes are used to install the brackets. The clamps are arranged in 2 rows and tightened with yokes. The wedge is removed from the anchor clamp and pulled through the resulting cable channel. The spacer is then hammered back in and the clamp is mounted on the wire bracket on the bracket. To correct the sag, a dynamometer is used, since weak or excessive tension causes destruction of the insulation and conductors.
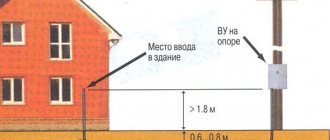
To create a branch, piercing clamps are used, allowing work to be carried out without turning off the power supply. The exposed ends of the wiring are covered with sealed caps, and the wires are tied together with clamps into bundles. If the clamp had to be removed during the work, reuse of the product is prohibited. The SIP branch is taken to the side of the house, the bracket is secured to the facade with screws or bolts. The line between the pole and the building must be located at a height of 2.75 m and have no sag. The distance from the support to the building is no more than 25 m.
Façade layout
Since the shell of standard SIP wires supports combustion, the line is not laid out along the facade. It is allowed to fix SIPn series products equipped with non-combustible insulation on the walls. At the place where the power line is attached to the facade, copper conductors are connected to aluminum conductors using bimetallic sleeves. The cable can be brought into the building through a pipe made of plastic or metal.
The location of the channel should prevent precipitation or condensation from penetrating into the structure.
Wire extension
To lengthen SIPs, couplings with a metal sleeve that is deformed with pliers or a press are used. For cables with an integrated load-bearing conductor, joining in the span is allowed. For SIP-4, which does not have a power core, the connection is made only on a support. It is allowed to join the segments using a piercing clamp for phase conductors and a die with a screw for the carrier line (if available).
Installation of inlet inside the house
All the main questions and disputes about how to properly install a SIP cable from a pole to a house arise when it comes to the entry of power supply into the house. Some people believe that the input should be solid and there is no need to make an additional connection, and in some ways they are right. But here we can make one recommendation.
If you purchased a simple SIP not of the NG brand (non-flammable), then make the connection inside the house with a VVgNg copper cable.
How SIP supports combustion can be seen in this video:
The cable itself must be led through the wall into the house in a plastic or metal pipe.
What else is worth paying attention to when installing SIP:
- ⚡if the SIP will run along the façade of the wall for several meters, you will need to use remote clamps (SF50, SFW50), because the distance from the SIP to the walls must be maintained at least 6cm
- ⚡before entering the house, be sure to bend the cable downwards so that water does not get inside through the corrugation or protective pipe. Any sealants will still dry out over time, lose their properties and dry out.
Be sure to coordinate all work on installing the SIP input into the house in advance with energy sales organizations. Since in each city and even in different districts of the same city, they may have completely different requirements (solid SIP to the meter or connection via cable, installation location of the meter - the facade of a house or a support, etc.). If the installation is carried out correctly and in accordance with the rules, you can be sure that this input will reliably serve you for many years.
Laying on the wall
Next, facade fasteners are used. If you purchase factory fittings, the distance is already regulated: at least 6 cm from the cable to the wall.
Then the cable route is marked and holes for fasteners are prepared. The distance between the fastening points is usually at least 70 cm. In bending areas, the frequency of fastening increases to prevent free sagging.
Important! If SIP is used, it is necessary to take into account the requirements for the geometry of the gasket. The bending radius is at least 10 cable diameters.
Then, using standard bolts, all facade fastenings are secured. To prevent corrosion and destruction of fasteners, the metal caps are closed with special plugs.
If house communications are located along the laying route, it is necessary to ensure a safe distance. At least 10 cm to water pipes, at least 40 cm to gas pipes.
Important! It is prohibited to form loose cable loops near metal structures.
Under wind load, the cable can fray the insulation and the wires will short out.
The use of fasteners that are intended for other purposes is not permitted. For example, pipe clamps or cable clips for indoor installation.
Features of SIP laying
Cables of the SIP series are designed only for aerial installation in open space (in accordance with the requirements of GOST R 52373-2005). The line is laid along the supports, providing a safe gap between the wire and the ground, and then stretched to the facade of a residential or industrial facility. It is not allowed to lay SIP underground, in closed pipes or cable ducts, or indoors.
To the intermediate support
If the distance from the power line pole to the facade of the building is more than 25 m, then the installation of an intermediate support is necessary. A bracket is fixed to the risers with metal tapes, onto which a pair of anchor clamps are placed. The laid cable is pulled with a hand winch and secured with wedges, leaving a small loop between the fasteners. There are special hangers for intermediate supports, equipped with clamps to prevent the wiring from shifting under the influence of wind.
To the load-bearing wall of the building
The line is drawn to the facade and secured using an anchor clamp located on the bracket. The base is fixed to the partition using screws or dowels, placing relief washers under the screw heads. If the building is built using frame technology, then the bracket is placed on a power beam. For fastening, use cap screws (nails should not be used due to insufficient connection strength).
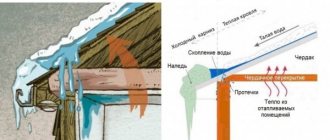
SIP in a wooden house
In wooden private houses there is a particularly high risk of fire, so you need to be extremely careful when connecting SIP. Most likely, the design organization will propose switching from a SIP cable to a cable with copper conductors, for example, VVGng. Fire-resistant insulation will help prevent fires. For complete safety, the cable is placed in a corrugated pipe, and metal bushings are installed in places where the wire passes through the walls.
In this way, the cable can be protected from shrinkage at home, as well as from rodents. In the event of a fire, metal bushings will prevent the fire from spreading to a nearby tree or any buildings.
It is better not to do hidden wiring in a wooden house for safety reasons. If you do choose this option, the cable must be placed in a steel pipe, which will contain the fire if it ignites.
Another option is to lay the cable along the plaster marking (the thickness of the plaster should be 10 mm or more). But craftsmen do not recommend this method, since cracks may appear in the plaster over time, as a result of which the safety of the house and its occupants will be at risk.
You can connect the SIP yourself, if only you are well versed in electrical work. Otherwise it is not safe. If you are not sure that you can handle a procedure on your own, which involves many details and complexities, contact a professional.
Safety precautions
Basic safety requirements when laying SIP cables:
- Do not carry out work in low light or high humidity (for example, during rain or fog).
- For installation, use serviceable tools and components that have certificates of compliance with standard requirements.
- Do not use components that have visible damage (for example, cracks or breaks in the insulation) or are not intended for the cable being used.
- Carry out installation in protective dielectric clothing. Equipment handles must protect the operator from electric shock. To insulate live lines, use special overlays. When performing work at height using lifting equipment, a work permit is required. In this case, installation can only be carried out by professional teams.
Advantages of SIP
A SIP type cable includes several cores, combined by twisting into a single structure. The entire surface of this bundle is covered with insulation, which is cross-linked or thermoplastic polyethylene.
The technical capabilities of SIPs allow us to achieve better technical performance in comparison with old type wires (A or AC). Legacy cables did not use an insulating layer, but rather each core was installed individually using dedicated insulators located on the crossarms. In SIP, the device is much simpler, since the harness pre-tensioned by a winch is simply fixed to the support.
SIPs can even be installed on walls, which was impossible with the old type of wires. This feature is especially important in urban conditions, since it becomes possible to use short supports and install cables near low-current lines.
SIP allows you to save material and technical resources. For example, such a cable does not require wide forest clearings for power lines, as is the case with old-style wires. In addition, SIPs are reliable: such wires are less susceptible to breaks and overlaps, and therefore to short circuits. And the SIP structure itself is stronger: breaking four tightly twisted wires is not easy.
SIP is resistant to moisture, low temperatures and temperature changes. If an ice crust inevitably forms on ordinary wiring in winter (resulting in broken lines), then the SIP wires are protected by an insulating layer that prevents icing of the material.
The only exception to the above is the two-core modification SIP-1, in which the load-bearing conductor is not covered with insulation. In other cables, the supporting conductors are either inside the bundle (SIP-4) or insulated.
It should be said that SIP has become a technical standard: all energy sales organizations require the use of this particular type of cable to organize new connections.
One of the motivations of marketers: SIP allows you to avoid unauthorized connections (in other words, theft of electricity), which is easy to organize in the case of uninsulated wiring.
In addition, thanks to special devices, it is possible to arrange branches from the main cable without turning off the power. This possibility is provided by the presence of an insulating layer. Consequently, another advantage of SIP is operational safety.
And, finally, another advantage of SIP is the smallest losses among competitors when transporting energy over long distances. This is achieved by low reactance (for old type cables this figure is three times higher).
Installation errors
Common mistakes when installing SIP wires:
- Insufficient or excessive line tension, leading to increased load and premature failure of the load-bearing core or insulation. To ensure the required cable slack, use a dynamometer built into the hand winch.
- Repeated use of piercing clamps that does not allow the cable to be properly secured. SIP fasteners are disposable and must be disposed of if removed.
- Weak tightening of steel bands. Under the influence of temperature changes or wind, the brackets begin to slide along the surface of the pole. The defect can be easily eliminated by tightening the clamp with a special tool.
When laying wires, you should check the condition of the insulation: damage to the sheath leads to short circuits or electric shock to people. The cable is unwound on a surface without sharp objects. If tears are detected on the protective layer, the defective area is cut out. To join pieces of SIP, crimp sleeves are used, followed by insulation of the coupling. The use of artisanal connection methods (for example, twisting of cores) is strictly prohibited.
Features of connecting to electrical networks
For electrical installation, self-supporting insulated wires (SIP) are used. Conventionally, SIP wire can be divided into two categories: main wires and tap wires. To connect the line to the consumer's home, a sealed type of wire is used - this is SIP-4.
Electricity is connected from the pole not directly to the connection point (house input). On a support, or on a pipe stand next to the support, according to the electrical diagram, an electricity meter is installed, or more precisely, an outdoor electrical panel with a meter and a circuit breaker. From this point a power line is already stretched to the house.
Electrical installation work itself is carried out quickly; such work does not pose a problem for construction company specialists. The work is carried out in strict accordance with the power supply project. After installing the line from the main to the meter, electricity is supplied to the house with an internal network connection, which, at the customer’s request, can be done with an above-ground wire or an underground cable. If electricity is supplied to an area where there are no buildings, the work ends when connecting the line to the meter. The owner has the right to carry out the installation of internal networks, including the installation of additional distribution panels.
Thus, connecting electricity from a pole is a multi-stage process that requires knowledge of many nuances. Therefore, the work should be trusted to professionals who can ensure that all stages are carried out correctly. In addition, the services of specialized companies are not too expensive, and there is no point in saving on a high-quality connection.
It is not recommended to carry out the connection yourself, even if you have a complete package of necessary documents and do not need to install additional supports. Work with electrical networks must be carried out by qualified specialists; independent connection is fraught with errors that can lead to emergencies of various sizes, and subsequently to fines and possible disconnection from the line for violating the rules.
Our company provides services for the implementation of an electrical supply project, which includes the calculation of the SIP wire boom and the selection, if necessary, of the type of additionally installed support. Also, we take on all the functions of performing construction and installation work.
If you have any questions, our specialists will be happy to help you. Call us right now by phone, or use the feedback form.
Electricity in residential areas of cities and villages is carried by wires strung on poles, but the old wiring breaks down and needs to be replaced. Similar operations are performed during the construction of a new house or cottage and, if necessary, connect electricity to the house from a pole. The connection diagram should indicate the type of cable and the method of its installation.