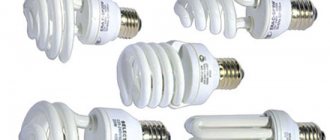
To ensure good lighting, it is possible to choose among different types of lamps. Technologies are developing rapidly and the frequently used varieties are being replaced by new ones that work better, more reliably and more durable. Those who use phosphor lamps have the opportunity not only to replace them with others, but also to largely maintain the same design. To decide whether it is necessary to replace fluorescent lamps with LED lamps, you need to learn more about these types of lighting and the specifics of their installation.
Bases for fluorescent and LED lamps Source odinelectric.ru
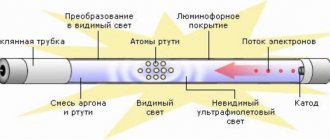
Fluorescent lamp device
It is a tube closed at both ends. The tank contains a gas mixture consisting of argon and mercury vapor. The inside surface is covered with a layer of phosphor. Under the influence of electricity, discharges occur here, which cause the gas mixture to glow. It represents UV radiation. The role of the coating is not only that the energy is reduced to the visible range, but also that it does not transmit hard ultraviolet radiation, making the lamp safe for use.
Container for waste fluorescent lamps Source svetosmotr.ru
Each lamp contains at least 2 milligrams of mercury, a substance dangerous to the human body. During operation, it is hermetically sealed, which guarantees the safety of those who are near it.
Not everyone likes the cold light created by this lighting fixture. The strobe effect that occurs during operation requires some getting used to. The features of fluorescent lamps presented here make users think about replacing them.
LED lamp design Source svetosmotr.ru
Advantages of LEDs
Fluorescent (energy-saving, as they are also called) lamps are gas-discharge structures that in a short time replaced the usual incandescent lamps due to their efficiency and durability. Now their superiority ends with the advent of LED samples. Initially, they appeared almost simultaneously with energy-saving ones, but the difference in price limited their use for some time.
Fluorescent types are a modern modification of the familiar fluorescent lamps. They have disadvantages:
- There is a small amount of harmful mercury inside the flask;
- starting fluorescent lamps is possible only with electronic ballasts (electronic ballasts);
- during operation, flickering occurs, noticeable to the naked eye, harmful and in some situations dangerous;
- recycling of failed lamps is carried out only by specialized organizations;
- During operation, the lamp may make a sound;
- The color rendering of energy-saving devices is not of good quality; the light has a deathly, unnatural hue.
LED designs are completely free of these disadvantages. The ice lamp has the following advantages:
- complete environmental safety;
- smooth, non-flashing light;
- the lamp turns on instantly, without delay;
- a wide choice of glow colors, from cold blue to warm red;
- durable flask, resistant to external influences.
As soon as prices for LED lamps dropped to an acceptable level, users actively began to replace them with this type of lamps.
Video description
How to replace fluorescent lamps with LED ones.
One lamp usually contains several LEDs. Power is provided using a special circuit - a driver. The design must include a radiator designed to remove excess heat to the outside. The LEDs are located on a long and narrow textolite board. Soldering is not used to connect them. Special gold-plated slots are used to fix the contacts.
Despite the fact that the design of all LED lamps is similar, there are a large number of different lamp designs. By adding special substances to the crystals, the desired shades of the resulting light are achieved. It can be warm or cold.
One of the important tasks of the driver is to convert the input AC voltage to DC. For this, a diode bridge is used, which is located at the input of the circuit. The transparent shell is designed to protect the interior and provide optimal light diffusion.
The principle of operation of a lamp with phosphor Source svetosmotr.ru
How does an LED lamp work?
The light source in an LED lamp is a light-isolating diode, consisting of a semiconductor crystal with two terminals (cathode and anode) and an optical system. Further in the text the abbreviation SD or LED will be used.
When electric current passes through a semiconductor in the forward direction, charge carriers (electrons and holes) recombine. As a result of this, optical radiation of photons occurs (due to the transition of electrons to another energy level).
The lamp also contains a driver (a special microcircuit) that provides power to the LED. The radiator (cooling system) collects and removes excess heat. The diffuser minimizes light loss.
Schematic representation of an LED
In the diagrams, LEDs are conventionally designated as diodes with arrows that indicate optical radiation.
Manufactured 220V LED light bulbs may differ in external design, but the principle of the internal structure remains the same for all models.
Light emission in lamps is carried out by LEDs, the number and size of crystals of which can vary depending on the power and cooling capabilities. Their color spectrum is determined by the substance included in the structure of each crystal.
To get to the starting driver, you need to carefully remove the protective “skirt” of the lamp. A printed circuit board or assembly of interconnected radio elements will open under it.
At the driver input there is a diode bridge connected to the electric base of the lamp in contact with the socket. Thanks to it, the alternating supply voltage is rectified into constant voltage, supplied to the board and through it supplied to the LEDs.
To better dissipate the emitted flux and protect the crystals from touch, as well as to avoid their contact with foreign objects, a scattering protective glass (transparent plastic bulb) is installed outside. Therefore, in their appearance they are very similar to traditional light sources.
To screw the light bulb into the socket, their bases are made in standard sizes E14, E27, E40, etc. This allows you to use ice lamps in your home network without resorting to any changes in the electrical wiring.
Pros and cons of LED lighting
If you install LED lamps instead of fluorescent ones, you will get the following advantages:
- Such lighting devices do not require maintenance. Regular dusting is enough to maintain its appearance.
- LED indicators have a higher resistance to voltage surges.
- Lighting devices of this type can be designed for different supply voltages, ranging from 85 to 265 V. At the same time, fluorescent lamps require 220 V to operate.
- Fluorescent lamps must be disposed of in a special way, as they contain harmful substances. For LED lamps this is not necessary.
- If previously a fluorescent lamp poorly illuminated the room, you can install an LED lamp of increased brightness in its place.
- These lamps have relatively high durability. They, depending on the model, have a service life of 30-40 thousand hours of operation or a longer period.
- Energy consumption is 60% less compared to the use of fluorescent lamps.
The significant cost of premium types of LED devices is noted as a disadvantage. We must remember that they create directional lighting. Sometimes you need to rotate them appropriately to select the one you want.
The procedure for simultaneously connecting several lamps Source svetosmotr.ru
Previously, fluorescent lamps were advantageous to use compared to LED lamps, as they provided acceptable lighting at a significantly lower cost. As technology develops, the latter have become significantly cheaper, which, together with their operational advantages, attracts more and more users.
The installation of an LED lamp instead of a fluorescent lamp is shown in detail in the video:
Basic connection diagrams
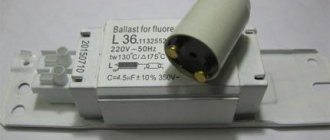
Before replacing certain lamps, you need to study the diagram and decide in advance how to connect the T8 LED lamp. Conversion and connection can be done in several ways. In the first case, ballasts (ballasts) are used, consisting of a choke, a starter and a capacitor (Fig. 1).
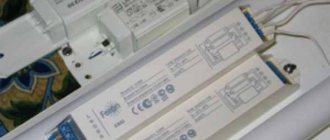
Another option uses electronic ballast or electronic ballasts (EPG), which includes a single unit - a high-frequency converter (Fig. 2).
For example, raster ceiling lights, consisting of four fluorescent lamps, require connection to two electronic ballasts at once. Instead, a combined ballast can be used, consisting of 2 chokes, 4 starters and 1 capacitor.
In contrast, the T8 LED lamp does not require so much equipment and the modification of so many additional components. All necessary actions are provided by drivers - stabilized power supplies installed inside. Next to it there is a plastic or glass diffuser, under which there is a board with LEDs mounted on an aluminum radiator.
The supply voltage for the LED lamps is supplied to the driver using pins located on the base. They can be located on one or both sides, depending on the modification and manufacturer. In the first option, the pins are located on one side and at the same time act as a fastener. With a double-sided arrangement, one or two pin contacts are used on each side.
Since the circuits differ, you should study each of them well before modifying the lighting fixture. The diagrams are applied to the lamp body or reflected in the technical documentation. The most widespread is the T8 diode lamp, to which phase and zero are supplied from different sides.
Why is it profitable to replace
It is beneficial to start using a new type of lighting for the following reasons:
- The re-equipment procedure is quite simple and accessible even to an inexperienced worker.
- After replacing fluorescent lamps with LED ones, they will not flicker, thereby creating additional comfort for the eyes. Such lamps are well suited for installation, for example, in kindergartens.
- This significantly increases the service life of lighting equipment.
- With built-in reflectors, light spreads in different directions.
- If you insert LED lamps into fluorescent lamps, then such devices are insensitive to power surges in the network.
- The brightness of the LEDs can be continuously adjusted when turned on.
- Due to wear and tear of the luminescent layer, such lamps gradually lose their brightness. This does not happen with LEDs.
- When replacing, the owner does not have to provide special disposal.
- The phosphor fades over time, significantly reducing the lighting level. After replacement, the quality of work remains stable for a long time.
After replacement, the equipment will be completely environmentally friendly.
Installing a lamp Source svetosmotr.ru
T8 LED tube
Technical advantages
The main feature that ensures a long service life of a 220-volt LED lamp is well-thought-out heat removal from the light elements. The main radiator, which provides heat removal, duplicates an additional device in the form of a longitudinal plate along the entire length of the tube. As a result, the equipment does not overheat, which means it does not fail longer.
In addition, there is a third point of heat removal - this is a double-sided printed circuit board made of a special fiberglass laminate with increased density.
LED tube structure
Features of the board
Surprisingly, the contacts on the diode lamp board are not soldered. Installation is carried out using innovative contact connections, which are gold-plated to improve reliability and increase service life.
The driver is made on the basis of microcircuits that minimize dimensions and make it possible to do without parts such as a high-voltage electrolytic capacitor. As a result of these innovations, the operation of the lighting device is improved, voltage surges are reduced to zero, in particular when it is supplied to the lamp, and there is no electrical interference.
The stabilizing device is mounted using PWM (pulse width modulator), which maintains the required voltage on the LEDs when these indicators differ from 175 volts to 275 volts.
The maximum permissible load on the pole width modulator is 35 watts. Therefore, even under heavy load, the temperature of the device does not increase.
LED tube with modular system
How to replace
If you have decided to install an LED lamp instead of a fluorescent lamp, then in this case you can proceed in the following ways:
- Completely dismantle the old lamp and install a new one in its place.
- Use the old chassis to install new lamps.
In the first case, the sequence of actions for the home master will be as follows:
- Before starting work, the lamp must be disconnected from the network.
- Disconnect the fluorescent lamp. Subsequently, it will be necessary to ensure its correct disposal.
- Next, you need to dismantle the chassis.
- Install a new lamp at this location.
After this, the lighting device is connected to the power supply.
Connectors for installing lamps Source svetosmotr.ru
To make a replacement using the previous chassis, it is necessary to prepare a type whose dimensions are suitable for the installation location. The following will tell you how to replace a fluorescent lamp with an LED one:
- The lighting fixture should be de-energized.
- The connection diagram for an LED lamp instead of fluorescent lamps implies that it is necessary to remove the inductor, starter block and smoothing capacitor, which were previously used, from the previous chassis.
- Power is supplied directly to the base column. Excess wires need to be removed.
- If more than one tube is used, then the power supply to them is carried out in parallel.
After installation is completed, the lighting device can be used. Immediately after replacing fluorescent lamps with LED lamps in the luminaires, you need to do a test run to make sure it is working properly.
LED lamps Source 220.guru
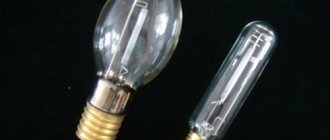
Features of connecting a T8 lamp
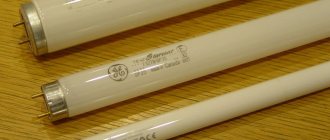
T8 is a familiar fluorescent lamp. The technical designation for this flask shape is linear design. They are used in most public, office buildings and premises.
A special feature of connecting such tubes is the presence of 4 contacts, which are installed in pairs at opposite ends. 2 contacts located opposite each other are connected to the power supply network through chokes, and the starter is connected to the additional pair.
These elements provide heating of the electrodes and an electromagnetic pulse. Hence the short pause between the lamps turning on and starting to glow.
Installing multiple lamps
Sometimes several fluorescent lamps were previously used in one place. Although you can choose a bright enough LED to obtain full illumination, sometimes it is better to install the same number of new ones. The following must be taken into account.
Sometimes the connection is provided with one wire on each side. This option is less convenient, since if the first lamp is missing, current will not flow to the subsequent ones. A more reliable solution would be to use separate wires to power each of them.
The three-row arrangement of LEDs creates uniform illumination Source sovet-ingenera.com
Options for using backlights
As an example, let's look at options for using backlights in Legrand products.
The backlight mode in the illustration is indicated by a picture of the month, the installation of a switch with an operation indication is indicated by a picture of a light bulb.
A single-key switch with night illumination is connected according to the classical scheme: a light bulb on contacts L. To indicate operation, a working zero must be set to the backlight lamp.
Connecting a two-key switch is done in the same way. Each operating line has a separate indicator light. The circuit provides separate indication of the double switch, each backlight works for its own line.
The three-key switch works exactly the same way. There will only be three indicators. By the way, this is another argument for opponents of the backlight: a three-key switch in display mode spends 3 times more energy than a double switch.
The pass-through switch can also work with backlight. Only the switching diagram will be different. The indicator is connected to those contacts that will be open when the key is in the “down” position. As a result, if you turn on the light with one of the “pass-throughs”, the backlight on it goes out.
When using the backlight as an indication of lamp operation, the indicator is connected to the lamp side, and a separate working zero is connected to it. Regardless of the position of the “feeders”, when the lighting is turned on, the indicator will light up.
Legrand sells backlight lamps separately. In essence, it is an ordinary LED with a quenching resistor and a freewheeling diode, packaged in a heat-shrinkable tube.
If you don’t want to overpay for the logo on the price tag, you can make a spare indicator yourself. The circuit is simple: in order to prevent reverse current from flowing through the LED element (we have alternating voltage in the network, the polarity changes with a frequency of 50 Hz), a reverse diode (type D226) is installed. And since the voltage drop across the LED is 2–3 volts (depending on the color), a current-limiting resistor is installed in the circuit. Diagram and part values in the illustration:
Any switch can be equipped with such an indicator, the main thing is that the light breaks through the plastic.
We’ve figured out how to install a backlit switch, now we’ll deal with stray light. Cunning craftsmen are already offering for sale certain modules that are connected in parallel with housekeepers and LED lamps.
In fact, these are ordinary load resistors. They actually block unwanted light while using as much energy as a low-wattage incandescent lamp. That is, your lights are turned off, but the meter continues to wind.
To “make friends” between a backlit switch and LED (economical) lamps, you need a pass-through switch.
You connect a working lamp to one output, and an indicator with a separate working zero to the second. In this case, the phase works only for one consumer: either the main lamp or the indicator. In principle, there can be no parasitic glow.
Yes, the connection circuit is more complicated (you will have to draw the neutral wire). But you have to pay for the comfort of use. Electricity consumption is minimal, power no more than 1 watt.
Installing cartridges
For a fluorescent lamp, the socket is mounted in different ways. It can stand horizontally, vertically and even at an angle. LED lighting is directional. Before installation, you need to decide in what position it should be fixed. Then you need to install the cartridge correctly.
It is easiest to use those that do not have a rigid fixation. Designs are available that allow rotation of 35 degrees. In this case, it is possible to adjust them after installation.
There are various designs of fluorescent lamps Source sovet-ingenera.com
What needs to be redone
If the starter is not removed from the circuit, when replacing the LB lamp with an LED one, a short circuit can be created.
The overall dimensions of LED lamps are similar to the dimensions of fluorescent lamps, so the ceiling lamp itself does not have to be structurally altered. Changes concern only the internal electrical circuit. LED lamps operate directly from the network and do not require ballasts, so this unit must be removed from the lamp.
Rework involves the following actions
- starter removal;
- short circuit and subsequent removal of ballast;
- disconnecting the capacitor.
After completing these steps, you can begin to implement the final luminaire circuit.
Before converting a fluorescent lamp to an LED one, you need to pay attention to the type of base. They are rotatable and rigidly fixed. The most versatile are the rotary type. They can be installed in any converted lighting fixture, regardless of the type of slots in the socket - horizontal/vertical. In addition, rotating bases allow you to change the angle of the light flux.
Which lamps are best to choose as replacements?
It is recommended to use a standard principle that has been repeatedly tested by the personal experience of many users. The first recommendation is to choose devices from the range of well-known manufacturers that guarantee high quality products. Such devices are usually expensive, but quickly pay for themselves due to economical energy consumption.
The second selection principle is the number of LED elements per unit area of the working surface of the lamp. The more LED elements placed on the surface, the higher the dissipative ability of the lamp. Therefore, if you need to illuminate a large area of the room, you should choose products with the maximum possible number of LEDs.
This LED lamp, where the placement of working elements is marked in a three-row design, is close to fluorescent devices in terms of light dispersion
Out of habit, a potential buyer chooses light fixtures with an eye to the power parameter. In this case, the power is determined slightly differently - taking into account the ratio of 1 to 10, when compared with a conventional direct incandescent lamp. For example, if the power of a conventional device is 100 W, then the LED analogue will correspond to 10 watts.
It is also important to focus on the color temperature of the lighting fixture. We wrote more about this parameter in the next article.
Based on the operating conditions, lamps are selected according to the protection class. For domestic use, IP40 is usually a satisfactory option. For rooms with higher requirements - protection class 50 and higher. We talked in more detail about the protection class and decoding of values here.
High protection parameters are necessary for luminaires installed in special rooms with an explosive environment.
Replacement instructions
The scheme for converting a lamp from fluorescent to LED lamps is quite simple, even an inexperienced electrician can handle it.
Algorithm of actions:
- disconnecting the circuit breaker and checking the absence of voltage;
- removing the luminaire cover to gain access to the circuit components;
- removal of the capacitor, starter and choke from the electrical circuit;
- separation of wires going to the cartridge terminals. They need to be connected directly to the phase/zero wires;
- removing or insulating remaining wiring;
- installation of the LED lamp and test switching on.
To convert fluorescent lamps with an electronic ballast, you need to unsolder or cut the wiring that goes to and from the ballast. Next, the phase/neutral wires are connected to the wires of the lamp sockets, both left and right. The connection itself must be insulated. Finally, you can replace the light source with an LED lamp and apply mains voltage to it.