Modern complete and distribution equipment is characterized by significant compactness. A panel with ten circuit breakers with an electric energy consumption meter, zero protective and operating busbars occupies an area of no more than one square meter on the wall, without at all spoiling the aesthetic component of the interior.
High compactness is ensured through the use of modular, that is, unified technology. Small-sized automatic machines, residual current devices, relays, meters and starters, like parts of a children's construction set, are easily assembled in any order.
When we talk about children's construction sets, we mean that unified equipment is not only compact, but also easy to install. Assembling a switchboard with modular elements does not require special equipment - it is enough to have several types of screwdrivers in your arsenal. The main time spent during installation is associated with marking and connecting wires, and not with installing modules.
Ease of installation was made possible thanks to the ingenious and simple invention of German engineers - DIN rails.
Expert opinion
It-Technology, Electrical power and electronics specialist
Ask questions to the “Specialist for modernization of energy generation systems”
Mounting on a DIN rail: what does DIN mean, scope of application, installation methods? A standard electrical panel with DIN rails is distinguished by the convenience and simplicity of the installation process of modular unified devices. Ask, I'm in touch!
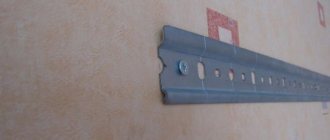
DIN rail mounting
A DIN rail is a complex perforated metal profile. On the cross section they have special jaws, which, in fact, hold the modular elements. Thanks to this design, installation of equipment occurs in a simple manner:
1. The DIN rail is secured with two screws or self-tapping screws in the niche of the distribution board.
2. Movable clamps on the body of modular devices - switches, meters, RCDs, etc. are moved away and installed on the rail.
4.Movable clamps grip the lower lip using a return spring.
5.The installed device moves to the desired location and the next one can be installed.
What kind of lighting do you prefer?
Built-in Chandelier
During operation, the devices may move due to vibration, so special plugs must be installed on both sides. You can also fix the modular elements with pliers - by straightening the jaws of the rack.
The use of modular technology greatly simplifies the work with electrical equipment. The German Institute for Standardization has developed a series of different profiles for working with DIN rails.
The most common profile used in the assembly of distribution boards is called Omega. Its width is 35 centimeters, and the height of the lips is seven centimeters. Omega is used in modern apartment input, distribution and metering panels.
From overload (emergency heating) and overcurrent (short circuit). Typically, circuit breakers are installed in a floor panel or. The ease of installation of the circuit breaker allows it to be installed both at the stage of assembling the electrical panel and in an already assembled and installed electrical panel.
Types of DIN rails
It is divided into types of din rail according to size, shape, strength, current, weight.
- Ω-type rack. Its height is 7.5 millimeters. Width – 35 millimeters. In profile, slats of this type resemble the letter Ω, hence the name. This type of din rail is the most common. Such fasteners are used for floor and wall panels.
- Din-rail type "C". It differs in that its edges, when viewed in profile, are curved inward, and not outward, like the previous type.
- Din-rail type “G” is similar to the previous one in its shape. The machine is mounted on a DIN rail, which requires a fastening element with similar parameters.
In addition, such slats may differ from each other in color and length. According to the standard, the length of the slats is two meters. But on sale, most often, you can find slats 200 millimeters long. Stores sell them in this form because it is convenient for customers.
The most important thing is to choose the right rail that is suitable for your particular case.
Expert opinion
It-Technology, Electrical power and electronics specialist
Ask questions to the “Specialist for modernization of energy generation systems”
Din-rail (din-rail) - what it is made of, main types The distance from the front plane of the mounting rail to the front plane of the front surface of the module mounted on the rail should not exceed 44 mm, while the distance to the plane of the protective material of the module should not be less than 47 mm . Ask, I'm in touch!
What are they?
Types of din rails are determined by different installation conditions and profile capabilities, represented by the following classification:
According to the section configuration
The G-type is a "G" shaped rail where one curved end is shorter and lower than the opposite edge. It is rare to find such a profile on the domestic market, since it is designed for installation of equipment of European standards.
The C-type is symmetrical and more common. The edges of the rail are equally curved, which provides reliable fixation for terminal blocks and clamps of other devices.
Omega-type has a completely different cross-section, similar to the Greek letter “omega”: the ends of the bar are sharply bent in both directions from the rail, forming peculiar “ears”. This design is adapted to almost all electrical elements and devices.
According to the presence of holes for fastenings
Cast, without factory holes and consisting of a single plate. It is considered more reliable and durable, and for some electricians even more reliable, since the mounting holes are made independently at the required distance.
Perforated ones have holes approximately every centimeter, which greatly simplifies the process of installing the slats.
- according to the material of manufacture:
- made of aluminum;
- made of stainless steel (more common).
Specifications
The product material is steel with zinc or anodized coating, as well as aluminum alloys.
The slats can have different lengths, depending on the manufacturer. In addition, some types have transverse notches. The spacing with which they are located corresponds to the standard width of various electrical boxes. Such cuts allow you to accurately break off a part of the required length without using a grinder or a hacksaw.
When planning the placement of devices, they proceed from the standard of their width, which allocates 18 mm to the distance between the centers of adjacent devices. The standard pitch between slats is 125 mm. Companies that manufacture boxes for mounting devices use these dimensions as a guide when placing mounting holes for DIN rails.
The accuracy of profile manufacturing, dictated by DIN, is ±0.04 mm.
Expert opinion
It-Technology, Electrical power and electronics specialist
Ask questions to the “Specialist for modernization of energy generation systems”
DIN rail (din rail) - installation of modular equipment. din rail dimensions - main standard rails The use of old types of panels in this case is irrelevant due to the lack of appropriate dimensions and the danger due to outdated components. Ask, I'm in touch!
Features of application
DIN rail is a foreign invention that takes its name from the German standard designated DIN 43880-1988. In our country, their use is regulated by GOST R IEC 60715-2003. These products are sometimes called mounting rail. The full name looks like this: “mounting rail for fixing protective devices in low-voltage distribution and control equipment for electrical networks.”
In accordance with this definition, its scope extends to the following cases:
- the need to install electric meters and other types of measuring equipment in the distribution cabinet;
- the need to place protective equipment there (RCDs, automatic circuit breakers, voltage relays, etc.);
- If desired, install special connecting fittings into the cabinet.
The decisive factor determining the capacity of such a rail is the width of the machine module or similar protective equipment installed on its base.
When assessing the width of the machines, they are based on the specific number of protective devices used in the panel, which can have a single-pole or multi-pole design. The second option concerns three-phase networks. In general, its use is limited to this particular set of functions, but in certain situations other directions for using the DIN rail are possible.
Dimensions and installation method
In domestic conditions, standard strips with a profile width of 35 mm (TN 35), having a shelf height of about 7.5 mm, are traditionally used. Different versions of the product may differ in the declared thickness of the profile (1-1.5 mm) and the diameter of the holes filled during perforation (4 or 5 mm). To attach them to the distribution board guides, you will need bolts of the appropriate size.
The installation product is fixed at the two extreme points of the strip in such a way that there are no parts protruding beyond the cut of the guides. That is, the length of the workpiece is selected exactly to size, for which the side excesses are cut off in advance.
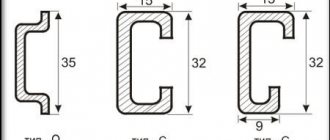
Types of din rails
- The most common is TH 35, which resembles the Greek letter Ω, after which it is sometimes called the omega profile. 35 is the width of the element in millimeters. Rarely, there are omega profiles with a width of 15 mm (TN15).
- “C” type profiles are quite common. Unlike omega, their edges are curved inward and form an unfinished rectangle.
- The little-known “G” profile differs from the previous one in that the cross-section of one edge is larger than the cross-section of the other: 15 and 9 mm, respectively. The profile width is 32 mm.
The slats can also be solid or perforated. In the latter, the wall along its entire length has a number of holes: round or oval-shaped. Perforation is used for connection with other profiles, for fastening to the walls of electrical cabinets, boxes or any other structure. Each type of profile has modifications provided for by GOST or carried out on individual orders.
Installation of the machine
As an example, we can consider installing a circuit breaker to a mounting rail in an electrical panel.
There is a special clip on the instrument body for mounting on the rail
The rail is fastened to the panel body using screws. Electrical panels can be supplied disassembled, and are often equipped with an already installed strip.
Next, you should install the circuit breaker on the rail, for which one edge of the device is attached to the top of the bar and press the body of the circuit breaker until it clicks lightly. In principle, this completes the installation of the device.
Each modular device on a mounting rail can be freely moved in all directions horizontally. This allows you, if necessary, to change the location of the machine by simply moving it.
The wires to the circuit breaker located inside the panel are connected through a power cable and a wire coming from the electricity consumer.
First, the power wire is connected, for which you need to:
- Unscrew the fastening latch located on top;
- connect the power wire to the terminal;
- tighten the fastening.
To connect a consumer, the same steps are performed.
Installation on old panels
Installation of rails in old-type electrical panels is often carried out on surfaces that are not suitable for such work. There is nothing to be surprised here - Soviet-made shields were manufactured at a time when DIN rails did not yet exist.
The need for installation in an old electrical panel is due to the installation of new equipment in it - replacement or installation of additional circuit breakers or other devices:
- RCD;
- automatic machines;
- relay for phase control;
- voltage rise limiters;
- modular devices;
- small-sized electricity meters;
- packagers and other devices.
Unlike modern electrical panels or boxes, in which the DIN rail is placed in already prepared places and secured with self-tapping screws or bolts, you will have to tinker a little with old panels.
Installation of the rail in the old panel is carried out in the following sequence:
- two holes are made in the shield platform made of metal;
- threads are cut in the holes;
- the rack is secured using two bolts;
As a rule, there are enough holes in the platforms of old panels, so you can do without drilling.
Din rail dimensions and profile type
The manufacturer usually stipulates that the DIN rail is an integral element of the panel board. However, if necessary, such a rail can be simply installed in any required place. For this purpose, the profile of the rail is perforated with holes, thanks to which it can be secured in the required place with bolted connections or self-tapping screws.
When installing the rail, you just need to take into account the width of the machines that are mounted on it. In order to cut a DIN rail, it is best to use a grinder, but this can also be successfully done with a hacksaw.
The use of standard rails in electrical panels greatly simplifies the maintenance of the latter. To replace the machine, you just need to loosen the screws securing the wires on the terminals to disconnect them, after which the device lock moves down and the machine is removed from the rack.
As already mentioned, depending on the profile, there are several types of DIN rails, the dimensions of which depend on the equipment mounted on them. The most common is the Ω type (Omega type slats). The ends of such a rail are curved outward in such a way that in cross-section it looks like Ω - a letter of the Greek alphabet.
Expert opinion
It-Technology, Electrical power and electronics specialist
Ask questions to the “Specialist for modernization of energy generation systems”
How to hang kitchen cabinets on a mounting rail: step-by-step instructions and advice from experts It should be phosphated because the filler inside the plasterboard sheets is a powerful oxidizing agent, and such a coating will protect the self-tapping screw from corrosion. Ask, I'm in touch!
Let's look at an example of how to hang a cabinet in the kitchen using a mounting rail.
Tools you will need:
- Impact drill or hammer drill.
- Several dowels with a diameter of 10 mm and a length of at least 6 mm.
- Two canopies and a mounting plate.
- Metal scissors or jigsaw.
- Concrete drill with a diameter of 10 mm.
- Drills 4 and 2 mm.
Fastening awnings
Let's prepare a cabinet for attaching awnings. To do this, if it is not removed, dismantle the back wall. It is usually made of fiberboard. We insert the canopy inside the cabinet and make sure that its upper part fits snugly against the cabinet body.
The hook, when released, should extend beyond the cabinet body by 4mm.
Use a 4 mm drill to drill a through hole for attaching the canopy.
We do not drill the second hole for fastening the canopy through it, but go through it with a 2 mm drill to screw in the screw.
In practice, two fastenings use screws, but for greater reliability it was decided to use a through screw and nut. The disadvantage of this method is that the screw head will be visible on the side of the cabinet. But even with ordinary screws the cabinet will not fall off.
When the hole is ready, fasten the parts with a screw and washers.
You should not clamp them too tightly so as not to break the canopy body.
We screw the screw into the second hole.
We do the same on the opposite side.
There are “left” and “right” canopies, and they need to be inserted accordingly.
The body is marked with the letters “L” and “R”.
Having secured the canopies to the side walls of the cabinet, we cover the back wall of the fiberboard with a panel, cutting out the places where the hooks exit. This can be done either with metal scissors or with a regular jigsaw.
We nail the panel to the body with thin nails.
Installing the mounting plate
The cabinet is prepared, we determine the height of the mounting plate. It should be assumed that the distance from the sink or countertop to the bottom of the cabinet in the kitchen should be 500 - 600 mm. If this value is less than 450 mm, the cabinet may interfere with work on the work surface of the kitchen countertop. Consider the height of the owner and the depth of the closet. When we have decided on this value, we add it to the distance from the bottom edge of the cabinet to the hooks. This will be the height of the mounting plate.
What does it look like?
Ω-type DIN rail
The modern metal standard rail TN35 is a special profile with a width of 35 mm. It was developed by specialists from the German Institute for Standardization, after which it was adopted as a European Standard (EN) by the International Electrotechnical Commission (IEC). In 2004, the TN35 rail was adopted as a national standard in Russia.
There is also a rail with a reduced profile width and thickness, on which terminals, but not devices, are installed. A standard 35mm wide DIN rail is usually produced in 2m lengths.
Useful tips Connection diagrams Principles of operation of devices Main concepts Meters from Energomer Precautions Incandescent lamps Video instructions for the master Testing with a multimeter
Tires on rack
A bus on a din rail is necessary to combine the ground wire and the neutral wire. Can be used at voltages up to 400V.
The bus is a plastic structure equipped with a mechanism for mounting on a DIN rail. The design contains from 2 to 4 bronze bars, between which there is a transparent material. The design is protected from third-party influences by a transparent panel.