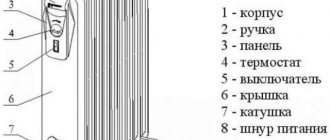
Sooner or later, developers or future homeowners have to face one of the most troubling issues: how to choose the right heating system. There are quite a lot of options for arranging a heating system, but increasingly, owners of new buildings deliberately choose electric infrared heaters and convectors for heating. Unlike bulky water and gas heaters, using electrical appliances is much easier and cheaper. You just need to choose the right layout and install an infrared heater in each room of the house. Nothing complicated at first glance, but there are certain nuances in installation and use.
Device installation
If you still decide not to trust the installation of an infrared heater to specialists, but to do it yourself, you should take into account all the features of this difficult task. First you need to consider the type of fastening.
Mounting in a suspended ceiling
If the device is built-in, then you first need to lay the cable, then mount a suspended ceiling with a designated space for the device.
Ceiling mount
If the equipment is not built-in, then it needs to be mounted on special brackets. A prerequisite is a distance to the ceiling of at least 5 centimeters. Don’t forget that infrared heaters weigh from 2 to 30 kilograms; a heat-resistant ceiling must withstand this weight.
Wall mount
If you need to place the IR heater on the wall, it is important to consider the distance to the ceiling. The minimum is 50-70 centimeters.
You should not place the device in hard-to-reach places, as this will make it more difficult to clean.
If it is necessary to install several devices, they are mounted in parallel.
General rules for installing IR heaters
It is very important to consider:
Heater power and technical characteristics
If an infrared ceiling heater is hung too low above the work area, it will strongly heat the heads of people in the radiation zone, which will lead not only to overheating, but also to various diseases.
It must be taken into account that during operation the surface of such heaters becomes very hot, so the distance to curtains, curtains, and pieces of furniture should be at least 1 meter.
If the heater is intended to be used in constant operating mode, then its height must be at least 2 meters above the working area.
After completing the installation work, you must make sure that there are no interferences in the radiation path: the devices cannot be covered with anything and there should be no foreign objects nearby.
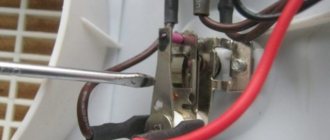
Safety at work
When installing equipment, pay attention to the grounding of all contacts, as well as the quality of all electrical cables.
Despite all the benefits they bring, IR heaters are quite dangerous if installed or used incorrectly. Problems may occur if the device is placed near an outlet or if it is not connected to a grounding wire.
Never turn on the heater if the protective cover is removed. Also, although infrared models can work outdoors, it is not recommended to place them in rooms with high humidity.
The basic safety rule is not to touch a working heater. Radiant panels get very hot during operation (up to 250°C). Therefore, it is best to be at a distance of two meters from the device.
It is also important to connect the device to the network: the device must operate from a separate outlet.
Installation of gas IR heaters
If the device is powered by a gas cylinder or the gas container is located inside (outdoor gas heaters in the form of a lantern), all precautions must be observed when working with gas.
A good ventilation system is required, as gas combustion products remain in the room
A good ventilation system is required, because... gas combustion products remain in the room.
When installing, be sure to comply with the requirements for safe placement of burners to avoid fire hazards.
If all installation rules are followed, you can create a reliable autonomous heating system and significantly reduce heating costs.
Here you will learn:
Infrared heaters can create a comfortable atmosphere with minimal labor and financial costs. They are compact, safe and efficient, and can be used in premises for various purposes. Installing an IR heater is not difficult; even a novice craftsman who already knows how to hold tools in his hands can handle it. In this review we will look at all the intricacies of installation work.
Warranty service
The service center will not work with equipment that has been damaged as a result of improper use or violations of safety rules.
Don’t forget that trying to fix the heater yourself will also not lead to anything good. Of course, you can fix some problems without “opening” the equipment. For example, if the device does not heat well, we advise you to check the network voltage, as well as the temperature value set on the thermostat. The cause of the malfunction may be a broken thermostat or problems with the power line.
The warranty service itself consists of repairing equipment or replacing defective parts. Defects obtained in production are recognized only by specialists during an examination. To ensure that your heater does not experience any breakdowns or malfunctions, trust installation, installation and maintenance to professionals.
Source
Advantages and disadvantages
Ceiling heaters have a number of important advantages, including:
- efficiency;
- increased heat transfer;
- low noise level;
- autonomy;
- there is no problem of oxygen absorption;
- do not emit unpleasant odors;
- small sizes;
- no need for design work;
- it is possible to install it yourself (although the seller will probably impose his own installation);
- Can be installed on suspended ceilings;
- ease of operation.
In addition to the advantages, infrared devices also have disadvantages:
- possibility of overheating during prolonged use;
- considerable cost;
- stationarity of equipment.
Infrared heater for ceilings and walls: pros and cons
To decide whether to opt for infrared heaters, let’s determine all the pros and cons, which are presented in the table:
| Behind | Against |
| Fast heating of the room. | When turned off, the room temperature drops quickly. |
| High fire safety. | Possibility of drying solid objects. |
| Service life from 20 to 50 years. | Uneven heating due to directional action of IR. |
| Precise temperature control. | Negative effects on humans with prolonged intense exposure (dry skin, dehydration). |
| The emitters destroy viruses harmful to humans. | A bright light that stands out strongly in dark rooms. |
| Quiet operation. | Strong heating of the bulb and reflector in high-temperature IR (dangerous for children and animals that may touch the device). |
| High efficiency. |
Advantages and disadvantages
Any equipment has both positive and negative sides. The advantages of infrared heaters include:
- Cost-effective (especially when using devices as an additional heat source).
- The device does not burn oxygen.
- No harmful effects on human health (scientists have proven that devices can even have a positive effect on the body).
- When mounted on the ceiling, they take up minimal space in the room.
- Safety for children.
- Quiet operation. In addition, the products can be used as a light source.
- Many models are equipped with a built-in thermostat, with which you can maintain the optimal temperature level.
- The heat remains for a long time, because heated objects release energy into space.
- Infrared systems are resistant to moisture, so they can be installed in gazebos, bathrooms or on terraces.
Many models have a thermostat, which helps maintain a comfortable temperature level.
The only disadvantage of the products is their high price.
Detailed instructions for DIY installation and connection
You can enjoy all the above benefits only by installing the device correctly. The work is carried out in 5 stages and requires strict adherence to the instructions.
Preparatory stage
First, you need a set of tools so that you don’t have to be distracted during installation. Must be present:
Where and how to install an IR heater?
At this stage, the location of the infrared heater is determined. It can be installed on a wall, ceiling, or with a slope.
IR with a power of up to 800 W is installed in residential premises. If we are talking about public buildings, then the power starts from 1.5 kW.
The surface must be strong to support a load of 20-30 kg.
Location and height from the floor
IR is recommended to be installed next to surfaces that absorb heat.
Wood, carpets, and stone surfaces work well. Reflective surfaces should be avoided, since when using the device the owner will receive a minimal effect. Electrical wiring must be laid on a non-combustible base. The location of the heater largely depends on the specifics of the premises. There is an optimal scheme for placing IR in residential buildings. It looks like this:
Installation of the device
You can do the installation yourself without spending a penny. The only difficulty is that it requires certain skills and knowledge, as well as knowledge of the installation process.
Progress:
Electrical connection
To save energy and provide a comfortable temperature, the infrared heater is mounted together with a thermostat.
The device automatically turns off the IR when the room reaches the specified temperature. As soon as the air in the room cools down, the thermostat turns on the IR. Connecting to the network together with the thermostat takes place in 4 stages:
Connection diagram for several heaters via a thermostat
The connection involves connecting the cables of several devices to the thermostat. Next, the thermostat is connected to the junction box.
Important information about the operation of IR heaters
The device of infrared heaters has zonal and spot heating. The connection diagram for this equipment is shown in the following image: Fig. 1.
Before starting work, you will need to prepare installation tools and a house plan. The tools are as follows:
- perforator;
- screwdriver;
- roulette;
- Screwdriver Set;
- pliers.
Figure 1. Connection diagram of an infrared ceiling heater to a thermostat.
Before starting installation, you will need to collect complete information about the house, on the basis of which a wiring diagram for the installation will be drawn up. Determine the area and size of all rooms, find out the characteristics of thermal insulation, window structures, etc.
You will need to measure the voltage in the network at the highest possible load on the thermostat. To do this, you need to turn on as many different electrical appliances as possible at the same time. The voltage should be about 220-230 V with a deviation of no more than 10-20%.
If there is a greater deviation, use stabilizers. You will definitely need an individual connection diagram, for which you need a house plan. If there is none, draw it yourself. Below is an example of a calculation for a standard private house.
Recommendations for installing a ceiling device and basic mistakes
To mount and hang the heater from the ceiling, it is advisable to use the fittings that come with the device.
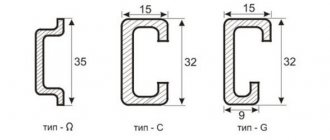
To prevent cable routing from being noticeable, a U-shaped profile is used along the wall and ceiling.
Thermostat
When installing, owners often make the same mistake, forgetting that when installing several devices at once in one room, it is necessary to take into account the total power. This applies to units that are connected to one thermostat.
Failure to comply with this rule will result in device failure and electrical failures.
How to connect to the network securely
To ensure safety, you can ensure that the device is grounded. To do this, the yellow-green cable is connected to the appropriate terminal.
Connection via a thermostat plugged into an outlet
The main disadvantage of the previous scheme is the lack of automatic adjustment of the heater. This can be solved by using a thermostat.
In this case, the simplest option is to purchase an additional thermostat that plugs into a standard household outlet and connect the heater to it. The same principle is obtained when using a heating device with a built-in regulator, which is connected to a standard outlet in an apartment or house.
Main disadvantages
— binding to the location of sockets
As in the previous option, you remain tied to the existing location of the outlets.
— the need to purchase additional equipment - thermostat for socket
Additional purchase costs will be required, and in addition, such specific equipment is not available for purchase everywhere.
— There is no possibility of connecting several heaters to one independent thermostat
If you plan to use several heaters, for each of them you will have to use its own individual thermostat in the outlet.
— Installation appearance
All conductors remain visible, the socket is occupied.
Advantages:
— Simplicity
Implementation does not require any preparatory work or skills and knowledge.
— Possibility of automatic adjustment and maintenance of the desired temperature
You get a fully automated heating system.
Detailed instructions for installing and connecting an infrared heater to the ceiling and walls
Infrared heaters are gaining increasing popularity due to their efficiency, safety and high performance. You can enjoy all of the above benefits only by installing this device correctly.
Preparatory stage
Infrared heaters can be used as the main source of heat in a room. In this case, you cannot do without a careful calculation of heat losses. They depend on many factors, such as room size, materials, wall thickness, ventilation and region, since each region has a minimum permissible temperature.
List of required tools
At the preparatory stage, it is necessary to decide on the place where the heater will be mounted and prepare the following tools:
This is the required minimum of tools, without which it will not be possible to install the heater. In addition to them, you can use a pyrometer for calculations when installing several devices at once.
Where and how to install an IR heater?
The location of the infrared heater depends on its type and heating plan. It can be installed on the ceiling, on the wall, with or without a slope.
Safety precautions
Remember that installing IR heaters involves working with electricity. Therefore, it is important to maintain maximum caution and follow safety rules:
To use the heater more efficiently in your home, place it near materials that have high heat absorption rates, such as wood, carpets, and stone walls. U
The mounting surface must be strong enough, as some heaters can weigh up to 28 kg, although many, of course, are lighter.
Location and height from the floor
One of the important requirements for installing an IR heater is the distance to a person’s head, especially in work areas, where a person spends a lot of time practically motionless. This distance should be at least 1.5 - 2 meters. In fact, it is determined by the power of a particular heater. If its power is up to 800 W, then it can be placed at a distance of 70 cm from the human body. If the power is 1-1.5 kW, then the permissible distance starts from 1 meter.
The specifics of different rooms determine the features of installing the heater and the optimal layout of the devices.
Where to place the heater:
| Room | Recommended place |
| Bedroom | The area above the headboard so that at least ⅔ of the bed is exposed to infrared radiation. |
| Kitchen | It is recommended to install the heater so that its rays are directed towards the window, the place where cold air flows from the street into the room. |
| Bathroom | On the ceiling, if this is the only source of heat in the room, or opposite a small area where people most often visit, if the IR heater is considered as an additional source of heat. |
| Hallway | On the ceiling, pointing down to the floor. It stays warm and dries very quickly. The same goes for shoes - they also dry quickly and remain warm. However, it is important to clean it so as not to dry it out, thereby spoiling it. |
When heating open areas, it makes sense to install several devices at once, so that infrared radiation reaches most of the surface of the body.
IR heaters can provide different temperature conditions in certain areas of the room. To do this, several devices with different power levels are installed in one room.
Infrared heater installation instructions
Each heater comes with step-by-step instructions for its installation and operation. Study it carefully, as they are all different, there may be discrepancies in the recommendations for different devices.
Installation of the device
Attaching the heater to the wall is carried out in a very simple way. You will only need basic skills in working with common construction tools, such as a drill, hammer drill and screwdriver. Keep in mind that the design of different heaters may differ; do not ignore the recommendations from the manufacturers.
Electrical connection
Any infrared heater is mounted with a thermostat, a device that maintains a constant temperature. Any single-phase network is suitable for connecting them.
In normal apartment conditions you won’t have to worry about this.
The thermostat constantly monitors the room temperature to ensure and maintain the user-specified temperature. It automatically turns off the heater if the room temperature begins to exceed a preset level. The electricity supply to the heater will be restored as soon as the air in the room begins to cool.
Of course, you can abandon them altogether, but in this case the heaters will consume much more electricity and the room will not be as comfortable.
Connection diagram for several heaters via a thermostat
The connection diagram for IR heaters should not be intimidating - a simple adjustment of the cable of one or several devices to the thermostat, and then to any junction box.
The best option is to create a separate circuit breaker in the distribution board specifically for heaters. This will protect the network from overloads.
Where to go and how much does the work of the masters cost?
You don't have to do everything yourself. If you do not have enough experience in installation work with electrical equipment, contact one of the companies offering their services. The cost of installers' work averages from 1,500 rubles for 1 heater. Many of them guarantee their work, so there are no other good reasons to refuse these services other than the desire to save money.
| Company | Address | Telephone |
| Moscow | ||
| IcoLine | st. 3rd Institutskaya, 12 | (495) 589-33-44 |
| Moscow Climate | B. Trekhsvyatitelsky lane, 2/1 | +7 8 |
| BERMINA GROUP | Aviamotornaya house 50 building 2 room XIV room 56 | +7 |
| Saint Petersburg | ||
| SPb-Heating | Ave. Tram building 17 building 2. | 8(800)775-50-94 |
| ObogrevSpb.ru. | St. Petersburg, st. Yesenina, building 5-B, shopping center "Yarus", 2nd floor, 46 | 7 +7 |
| RUSMARKET24 | Krasnoputilovskaya. house 34 | 8 |
Installing infrared heaters should not be intimidating - this is not a reason to abandon one of the most economical methods of heating an apartment or house today. With the help of specialized companies that are ready to help install heaters, difficulties should not arise.
Source
Installation of a ceiling IR heater
In general terms, the instructions for installing an infrared film heater on the ceiling are as follows:
Laying insulation
Installation diagram of a ceiling infrared heater
The IR film must be separated from the ceiling structures by a heat-insulating layer at least 5 mm thick. If the heater is not equipped with a reflective screen, then you should choose foil insulation. The method of fastening depends on the material of the ceiling: if it is made of wood, use a construction stapler and staples; if it is made of concrete, the insulation is pressed with strips secured to dowels at intervals of 500 mm.
Heater mounting
This operation is practically no different from the previous one. The IR film is fixed using staples or dowels, depending on the ceiling material. We remind you that the heater is equipped with special strips in which holes can be made for fastening elements.
Electric installation work
Heater connection diagram
To connect the ceiling IR heater, a cable line is pulled separately from the distribution board. For this purpose, you can use single-core wire PV-3. The heater should be connected through a thermostat installed on the wall. Its installation is practically no different from installing a regular socket or switch.
To connect IR heaters with a large area and, accordingly, power consumption, a magnetic contactor must be included in the circuit.
For aesthetic reasons, the main line should be laid in a box or channel made in the building structures.
At the final stage, ceiling infrared heating is tested.
For more efficient operation of heating devices on the balcony, it is recommended to first insulate it. Read our article on how to insulate a balcony with polystyrene foam.
The infrared radiation system is also actively used in “warm floors”. We talked about infrared and other types of heated floors for balconies and loggias on our website.
Is insulation and heating ready? Then it's time to decorate the room, for example, make a winter garden. And what is required for this, read here https://balkonsami.ru/interer/ozelenenie/zimniy-sad-na-balkone-svoimi-rukami.html
Is it possible to hang an infrared heater on the wall?
Among heating devices, infrared heaters occupy a separate niche, gaining increasing popularity. When deciding whether such a device is suitable for specific operating conditions, it is worth considering its varieties and operating principles, as well as taking into account all the pros and cons of infrared heaters, so that the choice is correct and the result satisfies expectations.
Connection diagram
There are no difficulties in connecting such heaters after their installation - we need to run the cable from one device or group of heaters to the thermostat, and then to the nearest junction box. Our thermostat simply breaks one wire (phase), no additional cables or conductors are needed. If the power of a heater or group of heaters is 3 kW or more, lay a separate solid line to the distribution board and equip it with an RCD.
Features of different types of infrared heaters
The result of an IR heater is similar to the effect of the Sun. Radiant heat immediately warms a person, bypassing the air, which increases the efficiency of the device. Walls and objects gradually heat up, which also begin to reflect heat. According to the type of energy carrier, all infrared heaters are divided into electric, gas and liquid fuel. Electric and gas infrared heaters are used to heat domestic premises. At the same time, gas ones are used much less often.
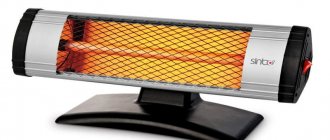
Electric IR heaters
Electric infrared heaters can be divided into light and dark. Light or short-wave IR heaters have glass tubes with spirals enclosed inside as a heating element. They are capable of heating up to temperatures of more than 60 0 C and emit quite bright light. These devices produce very intense heating in the direction where their heating elements are facing.
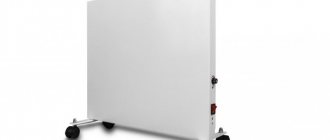
Dark or long-wave IR heaters have an operating temperature of less than 60 0 C and are available in the form of heat-generating panels and films. Most often, such heaters have an operating temperature from 30 0 C to 40 0 C. This allows such devices to be hung on a wall or ceiling. IR heaters of this type are not capable of overheating the human body; they can be turned on for a long time.
The operating principle of an electric infrared heater is to apply voltage to the heating element, where, thanks to the internal design, thermal energy is converted into electromagnetic waves emitted in the infrared range, and a metal reflector facilitates their propagation throughout the room. In the case of thin plates (wall-mounted models), the heat spreads over short distances.
A person senses IR rays in the range from 5.6 to 100 microns, based on which heaters with short (2-4 m), medium (3-6 m) and long-range (6-12 m) action are produced. Depending on this, heaters are used both in ordinary houses and apartments, and in production for heating workshops and hangars.
Electric IR heaters are produced in vertical and horizontal housings. According to the type of installation, they are floor-low, floor-mounted with a high stand, wall-mounted and ceiling-mounted. The equipment is effective both indoors and outdoors.
Gas IR heaters
The principle of operation of a gas infrared heater is ultimately similar to an electric one - it also produces radiant heat in the infrared range. But a ceramic plate is used to create it. It is heated by a supply of natural gas and air, which combine in a mixing chamber where flameless combustion occurs. As a result, the main heat is transferred to the porous ceramic plate. The heated ceramics begin to emit infrared rays into the room.
This type of equipment is more mobile because it is powered by a cylinder. The latter is installed nearby or can be moved away from the device thanks to a long hose. The design of some heaters allows you to hide the cylinder inside the housing.
By shape and type, gas IR heaters are:
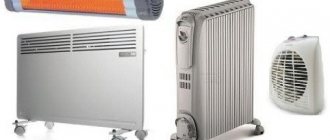
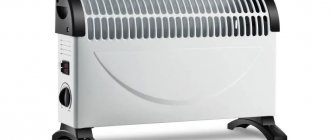
Now, understanding the operating principle of the main types of this equipment, let's look at the advantages and disadvantages of infrared heaters relative to oil or convection heaters. This will help you make the right choice for heating your apartment, house, open area or workplace.
Given the low prevalence and slightly different principle of operation of gas models, we will omit their comparison and focus on electric heaters.
Principle of operation and varieties
A characteristic feature of such products is the release of heat, which helps to heat various surfaces - walls, floors, ceilings, etc. It should be noted that the air is heated partially, because the main flux of radiation is directed towards objects, which subsequently give off heat from themselves.
Infrared radiation is not afraid of wind, drafts and can warm you up even on a windy day
The device consists of a reflector and an emitter. The latter is responsible for the transmission of radiation during the heating process. The reflective element is a reflector, which is made from heat-resistant materials with high reflectivity. The heating elements can be:
- plates;
- open or closed spirals;
- quartz, infrared or halogen lamps;
- heating elements;
- carbon conductors.
According to energy sources, all heaters are divided into several types:
- Electrical. The most popular type of devices that are installed in any premises. A mandatory element in the system is a mirror reflector for transmitting radiation in the required direction.
- Gas. Best suited for open areas or industrial buildings. Due to their high power, they are rarely found in residential areas. The fuel is a gas-air mixture.
- Diesel. They are in demand in rooms where wiring is weak. Such devices are often found on the street or in garages. The device does not require chimneys; cleaning is carried out through several filters.
- Film - often used in residential areas.
Pros of infrared heaters
A clear advantage of infrared heaters is their simple design and low price, compared to oil and convection heaters, which have a larger number of internal parts. But there are other advantages.
Direct heating
Other types of heaters use a two-stage heating system: first, the device heats the air, and the walls and the person heat up from the increased room temperature. Therefore, by expending a certain power, the equipment transfers less heat to the end consumer.
With infrared heaters, thermal radiation acts directly on the user, bypassing the air. Of course, the latter also gradually heats up, but this already occurs from warm walls and objects. Therefore, the electrical energy expended is completely transferred to the heat received by a person.
High heating rate
It takes about 30 minutes for a person to feel warm from the switched-on oil radiator. Time is spent heating the oil with an electric heating element, then the air in the room, and only then the user.
With convector models this happens a little faster, but the process is still complicated by the fact that warm air heated from the panel rises upward, and the person, remaining lower, continues to experience discomfort. And only when the entire air volume is heated and mixed, then you can warm up.
Infrared heaters begin to give off heat immediately after heating the coil, which takes 27 seconds. After this time, heat rays shine on the user, warming him up. When you come home from work, you don’t need to sit for a long time in a cold room, but you can immediately create a comfortable mini-climate.
Economical
Since IR heaters do not need to heat the entire room, they can be used at a lower power level compared to other types. For example, for oil heating it is optimal to use 1500-2000 W to warm up a large bedroom. It is enough for an IR device to consume 500 W when directed at the consumer. Even this simple example shows that energy consumption is reduced by 30-75% depending on the settings and distance from the user.
No convection air currents
According to the law of physics, warm air from other types of heaters always rises, and the lower a person is, the colder it is.
The directed heat from an infrared heater falls to a specific location, regardless of the altitude. IR rays do not propagate from bottom to top, but along a given vector, being directed by a reflector.
When convector heaters operate, there is constant mixing of air masses. This movement creates drafts and promotes the rapid airing of food left in the room and the movement of dust. Infrared heaters do not cause air movement, which ensures pleasant conditions.
Local heating
When the room is large, infrared heaters are practical because they allow local heating, maintaining an elevated temperature in only one part of the room. For example, in a large office, this could be an area with employees sitting at desks, while the filing cabinet side of the room remains cooler. In a warehouse, you can heat the area with the issuance of goods, where people directly rotate, and leave the racks at a lower temperature.
Quiet operation
IR heaters do not have fans, oil boiling, or other moving parts. It is set to a certain heating level, upon reaching which the device turns off. Of all the sounds produced, you can only hear the periodic clicking of the relay, which can be eliminated by setting the heater to maximum (so as not to turn off) and limiting the power of the heating element with a toggle switch (so as not to overheat). This silent option is optimal for the bedroom and children's room, and will not interfere with your rest with unnecessary sounds.
Possibility of heating in open spaces
If you install an oil radiator outdoors, its heat will evaporate upward, and in a light breeze it will cease to be felt at all, even at close range. IR heaters operate with infrared radiation, which passes “through” wind and drafts, continuing to warm people and objects. This allows them to be used on verandas without glazed windows, in gazebos, terraces, street cafes, VIP areas on sports grounds, and open workplaces.
This is of particular advantage in cases where ventilation and heat preservation are simply necessary at the same time. For example, when welding or painting, it is allowed to open all windows and doors in the room, but the device will invariably continue its warming effect.
Long service life
Ecological cleanliness
The heating elements are covered with glass tubes, so sometimes (after a long period of inactivity) you can only smell a slight smell of burnt dust, which quickly passes. During operation, no by-products are released (combustion of carbon, smoke).
There are no harmful materials in their design (only steel, glass, ceramics, dielectrics and PVC, in areas of the body that are not subject to heat), so no toxins or poisons evaporate during operation. The heat is gentle, like sunlight, and does not affect sleep or active life. If they break, they will not leak oil that contaminates the floor covering.
Wide range of installation possibilities
Unlike other types of heaters, IR devices can be installed at different angles relative to the user and in all spatial positions.
It can be done:
High mobility and unpretentiousness to the place of use (for example, models on a high stand with adjustable position) allow you to use one device in different conditions without having to buy several others (wall-mounted and ceiling-mounted) instead.
Main process
Hanging the case
First you need to determine the installation location of the infrared heater in the house (or apartment). As we said above, the housing can be placed both on the ceiling and on the walls, depending on the individual preferences of the owners.
The first thing you need to do is mark out the mounting locations yourself. To do this, use a tape measure to measure the same distance from the ceiling to the selected area. It is also recommended to use a building level, with which you can level the brackets in a horizontal plane.
After marking, proceed to drilling. If the ceiling (or wall) is made of wood, drill holes with a drill. If you have to deal with concrete, you cannot do without a hammer drill. You need to drive dowels into the created holes and screw in the brackets, after which you can install the infrared heater in its place.
Please note that the design of the unit varies. Some products have guides that are fixed into brackets. A simpler option is chains attached to the ceiling (special holders attach to them). Also on the market you can see infrared heaters on a leg, which are simply placed on the floor.
Electric installation work
As we said at the beginning, the process of connecting an infrared heater to the network will be carried out using a temperature controller.
First you need to connect the contacts of the collapsible electrical plug to the thermostat terminal blocks, which are installed in the product body. Each “socket” has its own designation: N – zero, L – phase. It should be noted that there are at least two of both zero and phase terminals (from the network to the regulator and from the regulator to the heater). Everything is quite simple - you strip the wires, insert them into the seats until they click (or tighten the screws). Be sure to follow the color coding of the wires so that the connection is correct.
For your attention here are the correct connection diagrams:
As you can see, connecting an infrared heater through a thermostat is quite simple, the main thing is not to mix up the wires and tightly tighten them in the terminal blocks.
A very important nuance is the correct choice of location of the regulator. You should not install the product next to a heater, because in this case, the incoming warm air will negatively affect the accuracy of the measurements. It is best to place the device in a more distant area, at a height of one and a half meters above the floor.
Also note that you need to install the controller in the coldest room, otherwise the heating problem will not be completely solved. As for the number of infrared devices served by one temperature controller, it all depends on the power of the heaters. Typically, one 3 kW controller is used for several products, with a total power of no more than 2.5 kW (so that there is a reserve of at least 15%).
You can read more about connecting a thermostat to an IR heater in our separate article, which provides several installation diagrams!
So that you can clearly see the entire connection process with your own hands, we provide these lessons for viewing:
Video instructions: connecting an infrared heater with your own hands
How to connect a temperature controller
Cons of infrared heaters
Despite all the advantages of infrared heaters, compared to oil or convection heaters, this type of equipment still has disadvantages. They are insignificant, but they should be taken into account when choosing a heating device for an office, home or apartment, since this will affect ease of use and safety.
Rapid decrease in temperature when the heater is turned off
If you turn off the oil heater, the heat from the heated liquid will continue to spread throughout the room for some time. This allows you to alternate intervals of activity and inactivity of the device so that it consumes less electricity, but does not stop heating.
Infrared heaters give off heat only when turned on. As soon as the voltage stops flowing to the heating element, the radiant heat stops. The user immediately feels cool. If the device has been working in the room for a long time, so that the walls and objects have time to heat up, then the comfortable temperature will last a little longer. When turned on for a short time, as soon as the device is turned off, it will immediately become cold.
Uneven heating
Another disadvantage of an infrared heater is uneven heating. All his work, due to the use of electromagnetic waves in the infrared range, has a directional effect. As a result, in a room with an area of 5x5 m, the heat will be felt by those people who are in the zone affected by the heater. The rest will be cool. For example, if in a children's room there are two beds in different corners, then you will have to place them side by side or use two IR devices at once.
Uneven heating also manifests itself in the fact that radiant heat warms the area like light from a flashlight - wherever it hits. Therefore, on the one hand, the human body may even feel hot, and on the other, the coolness of the surrounding air can be felt. When operating the device in the open air, you will have to periodically rearrange it or turn it yourself to keep warm from all sides.
Negative effects on humans with prolonged intense exposure
In general, IR heaters are safe for health, but problems can arise if you stay under a high-temperature device that is constantly on for a long time. It’s the same as sitting under the sun for a long time - you won’t be able to tan from the infrared rays, but the concentrated heat will dry out the skin, and the body will not have time to compensate for the loss of moisture by removing sweat in this place. Overdried skin can then bake and peel. Therefore, it is not recommended to sit with one side of your body exposed to a constantly turned on heater.
Hazardous for children and pets
High-temperature IR heaters with spiral heating elements can cause burns if a person touches the bulb or reflector. Although the heating element of the IR heater is enclosed in a glass tube, the surface of the latter still gets very hot.
The heating element of the device is often covered with a metal grid with large cells, so children, out of curiosity, can easily stick their hand in there. In view of this, you should not leave the IR heater on and children in the same room unattended. A pet with long hair may be harmed if it rubs against the heater and the fur accidentally touches the heated coil bulb.
Bright light
Infrared heaters with tubular heating elements have another drawback - a bright glow. In daylight, this is hardly noticeable and only helps to see whether the device is working or not. In the setting of a street cafe, it is even attractive in the evening.
But in a room at night, such a “light bulb” can interfere with rest, continuing to shine brightly in the eyes. It is impossible to turn the housing in the other direction, because then the heat will be directed past.
Fire risk
This drawback again applies only to high-temperature models. The heater's tall stand allows it to be mounted at different levels to customize the direction of radiant heat depending on the user's location. The stand has a stand with four support points that provide a stable position, but a large dog in the house can easily knock over the device when running past. If this is not seen, touching the carpet or continuing to shine the light on the wood flooring in this position can cause a fire.
Having considered the topic of pros and cons of IR heaters from all sides, it will be easier for you to make your choice. And you can find out already tested and popular models that have positive reviews by looking at the next page of the site, which describes the best infrared heaters of all types.
Source
Connection
All infrared heaters are connected to conventional single-phase networks. The exception is high-power industrial designs that require a power supply of 380 Volts. The connection diagram for an infrared heater is extremely simple - they are mounted and connected to a thermostat.
The thermostat is an important part. It provides support for a given temperature regime, focusing on the temperature of the surrounding space. Control method: mechanical, with dry contacts. As soon as the temperature reaches a preset limit, the thermocouple is activated and disconnects the equipment from the power supply. When the air cools, the contact closes and the supply of electricity is restored.
If there is a good grounding circuit and three-wire wiring in the house, use a VVG 3x1.5 or VVG 3x2.25 cable - one grounding conductor here. The optimal height for placing the thermostat is 1.2 m, but in no case close to the heaters.
In order to connect IR heaters after they are installed, we need a good wire that can withstand heavy loads. The best option would be VVG 2x2.5, which should be laid in the walls and ceilings, and then hidden under a layer of plaster. Considering the not very high power of the devices, it would be possible to use a VVG 2x1.5 wire for these purposes, but it is most often used to connect lighting devices - for power loads it is recommended to choose a cable with a large cross-section.