Any heater - oil, infrared or convection, regardless of its type, type and manufacturer, even the highest quality and reliable, can break down at any time and require repair. This is what happened with the Bimatek PH300 micathermic heater, which a friend brought to me. The heater did not heat up, the temperature indicator did not light up, although the heater only worked for six months and was still under warranty.
Anyone who has dealt with the repair of household appliances under warranty knows that this is a troublesome task. You need to find a warranty workshop, take the heater there, wait a month and then spend time picking up the repaired one. It is not a fact that the repair will be free. If the workshop decides that the heater has failed due to your fault, you will also have to pay for the repair service. Therefore, if a product, for example a heater, is simple, then it makes sense to try to repair it yourself. As it turned out, the protective thermal fuse had failed, but to get to it, we had to almost completely disassemble the heater.
Attention! Before starting work on inspecting and repairing the heater, it is necessary to disconnect it from the power supply by unplugging the heater's power plug from the socket.
Is it possible to repair an oil heater with your own hands?
The oil heater is subject to wear and tear and may break during intensive use. Some faults require professional intervention, since their elimination requires in-depth knowledge of electrical engineering. But you can actually fix other failures yourself if you correctly determine their cause.
If the heater is completely new and is still under warranty, it is better to take it to a service center. If the free service period has already expired, it makes sense to first try to carry out repairs at home.
Electric heater repair instructions
Repair of any electrical appliance begins with an external inspection. The first thing to check is the power plug. It should not have visible mechanical damage, darkened plastic or cracks in the body. The pins of the plug must be firmly fixed in the housing and not have any blackening. The power supply cord must not have any mechanical damage. You need to especially carefully inspect the place where the cord exits the plug body. This is where the cords often fray.
It is also necessary to look through the mesh or perforation inside the heater body and make sure that there are no broken or burnt wires in the visible space, the wires are not burnt at the points of connection to the connectors and fixed with nuts, and the heating elements (heating element or nichrome spiral) do not have mechanical damage.
If an external inspection does not reveal obvious defects, then to further search for the causes of the heater failure, you will need a measuring device. A dial tester or a multimeter turned on in low resistance measurement mode is best suited for these purposes.
Without disassembling the heater, you can use a tester to check the serviceability of the power cord at the point where it exits the plug housing. To do this, you need to set the heater switches (if any) to the operating position, connect the ohmmeter probes to the pins of the plug (conveniently using an alligator clip), and press the cord to the plug body along the line of its exit from the plug, swing from side to side. If the tester needle or multimeter readings change even for a moment, it means the repair is almost complete. All that remains is to replace the plug. The resistance value of the heating element is, depending on the power of the heater, 10–150 Ohms and, if desired, you can accurately calculate it using the online calculator below.
| Online calculator for calculating the resistance value based on power consumption | |
| Supply voltage, V: | |
| Power, W: | |
Electrical circuits of heaters
The photo below shows five standard, widely used electrical circuits for heaters.
Scheme No. 1 is the simplest, it is a power plug with a cord that is connected to the heating element directly or through a terminal block using a threaded connection or slip-on terminals. According to this scheme, a heater of the Tram stove type is assembled. To turn on a heater made according to this scheme, just insert the plug into the socket.
Scheme No. 2 differs from the previous scheme in that, for convenience, it is installed on the body of the electric heater switch. As a result, during operation it is no longer necessary to insert and remove the plug from the socket each time to turn the heater on or off.
Heaters assembled according to scheme No. 3 are supplemented with a thermal fuse, which will open the power supply circuit of the heater if it overheats when dropped on the side or if, in violation of the operating rules, things are placed on the heater to dry. In some models, in addition, in series with the thermal fuse, a position sensor is installed that turns off the heater if its position deviates from the working one. As a rule, the operating position of the heater is vertical.
Scheme No. 4 has two heating elements and an additional switch. Heating elements can be of the same power or different. This circuit solution allows you to regulate the power of the heater by simply turning the switches on or off, thereby regulating the heat it generates. For example, if the heater has two heaters with a power of 1000 and 2000 watts. Then, when On1 is turned on, the power will be 1 kW, when On2 is turned off, but On1 is on, the power will be 2 kW, and when On1 and On2 are turned on, it will be 3 kW.
For convenience, some types of heaters are equipped with a biscuit switch. When turning the switch knob clockwise, with each click the power increases by 1 kW.
According to scheme No. 5, electric heaters of the fan heater type are manufactured. An electric motor with an impeller is additionally installed in them. To prevent overheating of the heating elements, it is impossible to turn them on without turning on the fan. This is ensured by the additionally installed switch On1. Fan heaters must be equipped with a self-resetting thermal fuse to turn off the heating elements in the event of a fan failure. If you do not turn on the heating elements, the fan heater can be used as a regular fan for cooling in hot weather.
In expensive models of electric heaters you can find a temperature controller. When the regulator sets the set air temperature, when it is reached, the heater will turn off and turn on only after the air temperature drops below the set value.
Indicators of operating modes on neon bulbs or LEDs can be installed in the electric heater circuit. Some models have backlit switches that already have neon bulbs installed. The indicators do not directly participate in the operation of the heater, but only signal its operating mode.
How to disassemble an electric heater
If the heater stops heating and an external inspection does not allow us to determine the cause of the malfunction, then it will have to be disassembled for repair.
Let's look at the repair sequence using the example of a modern micathermic heater Bimatek PH300 (photo at the beginning of the article), assembled according to the most complex of the electrical circuits presented above. Knowing how to repair such a heater, simpler ones can be repaired without difficulty.
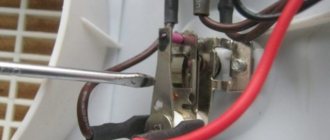
You need to start disassembling from the input side of the power cord. Typically the cord enters the lid from the side. To remove the side cover from the Bimatek PH300 heater, you need to unscrew all the visible screws holding the cover and two more countersunk screws. One of them is closed with a decorative plug, which is located below the control knobs.
To remove the plug, use the blade of a screwdriver or knife to pry the plug from the side of the latch and pull the latch inward. The plug will come out easily.
A hole will open in which there is a screw for the side fastening of the cover to the base. The second secret wine was hidden under a sticky sticker, next to which there was another yellow sticker with the warning message “If the seal is damaged, the warranty is void!”
So if the heater is still under warranty service and you are not confident in your abilities, if possible, it is better to contact a service center for repairs under warranty.
The side cover has been removed and access to all contacts of controls and heating elements is now open. All that remains is to use the tester to find and replace the failed part.
Design and diagram of an oil heater
By design, the oil heater consists of several parts:
- metal case with coolant inside;
- control unit on the side cover;
- heating element;
- temperature controller;
- connecting wires and sensors.
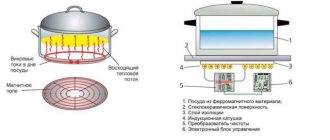
The operating principle of the device is simple. When the unit is turned on, the heating element heats the oil inside the housing. As a result, heat is first transferred to the walls of the device and then goes into the surrounding space. After the heater reaches the maximum temperature, at the command of a special sensor, the heating element turns off, and then returns to operating condition again when the indicator decreases.
The most vulnerable part of an oil heater is its control unit
Principle of operation
The surface of the device heats up by only 70°C. The design provides a simple circuit where two devices are located:
- emergency thermostat, which is activated if the temperature exceeds 80°C;
- the second thermal fuse, which trips at a temperature of approximately 62°C.
The first thermostat is installed on the electronic section of the radiator. All the oil is located in sections that are connected to each other by welds. Heating radiators are mounted on a special movable surface. The sections are flat, they have a lower and an upper channel, they are connected by small veins. At the bottom there is a heating element (heater), to which a thermal fuse is screwed. It is additionally protected by a special heat-resistant fabric. Even when the oil boils, the response temperature will not exceed 62 °C. However, this figure still needs to be reached. The upper thermal fuse, with a fixed temperature of 80 °C, is attached to the metal case. Therefore, no matter what temperature is set, the limit will not be exceeded.
What can break in an oil cooler?
Breakdowns of oil heaters and methods for repairing them are usually divided into two main categories:
- Electrical. Most often, with intensive use of equipment, sensors and fuses, as well as the thermostat and heating element, fail. In some cases, problems arise with wiring, both external and internal, located in the housing.
- Mechanical. The oil cooler can break due to corrosion - small holes or serious holes appear on the body. Devices made from cheap materials are most susceptible to deformation.
Attention! If the radiator leaks oil, then we are definitely talking about a mechanical fault. Electronic failures cannot produce such consequences.
Basic faults
There are not many reasons why an oil heater does not work. Conventionally, they can be divided into two parts – electrical and mechanical. Failures in the operation of electrical equipment most often occur in heating elements and control communications - thermal relay, switch, thermal fuses. There may be a problem with the wiring, but this is extremely rare.
Mechanical damage includes various holes in the housing, as well as the formation of shells on it through which oil leaks. As a rule, these are the fruits of corrosion activity. Determining the type of malfunction is not very difficult. Mechanical failures are always associated with oil stains under the heater. All other faults are related to the electrical part.
Causes of oil heater failures
A home radiator may fail due to initially poor quality or too long service life. But more often you have to repair the heater yourself as a result of improper use of the device.
Several factors accelerate oil cooler wear:
- Overheat. The problem occurs when the radiator is installed close to surfaces that interfere with heat dissipation. Wear occurs faster in the absence of care, for example, if the device is not wiped clean of dust at all.
- Use for drying clothes. Many people hang wet socks, towels and large items of clothing on an oil heater, just like a regular heating radiator. But a radiator powered by electricity operates on different principles. If you constantly cover the body of the device, it will overheat and break.
- Improper storage. During the warm season, the oil-type heater must be kept in a vertical position in the pantry or garage. If this is not possible, and the radiator has to be placed on its side, then before use it must be installed according to all the rules and not turned on for some time. The oil should drain to the bottom of the device.
Incorrect connection can lead to radiator failure and subsequent repairs. The electrical appliance is quite powerful, so you need to provide a separate grounded outlet for it. Adapters cannot be used for an oil heater.
The oil heater can only be used in dry rooms
Major breakdowns
Extraneous noise
During operation of the device, crackling, hissing, etc. may occur. This is the case when there is no need to disassemble anything: most likely, the heater tilted, fell, etc. There was a movement of oil and air in it. Place the device in an upright position for several days. The problem will resolve itself.
Electrics
To begin with, plug the heater into another outlet, in case the problem is there and not in the device.
If it’s the heater that’s broken, arm yourself with a multimeter.
With its help, we check the serviceability of the electrical part (you need to start with this, if the device does not heat up, the indicator light does not light up).
We check:
- serviceability of the socket and plug;
- Is there a short circuit between the parts of the radiator?
A common problem: wires burning out at their connections.
The de-energized device is checked to ensure that all switch keys are working properly . This is done using a tester or multimeter:
- in the ON position, there will be a short circuit at the ends;
- and in the OFF position - nothing.
The thermostat is checked with a multimeter (there should be no short circuit, and the resistance should be small). Other damage can only be reached by disassembling the case.
We inspect the contacts in the control unit: they can burn out, oxidize and weaken. Maintenance involves treating with alcohol. Loose contacts are tightened using a screwdriver. The oxidized ones are cleaned with sandpaper and isolated. The most heat-resistant insulation is fiberglass tape (withstands up to 200 degrees).
Check again for a short circuit. Perhaps this will be the end of the repairs. If the heater does not work, we will look for another breakdown.
Thermal fuses
There may be several of them. Having called and found the faulty fuse, we remove it, and insulate the wires and connect them together. This procedure is safe if there is more than one fuse; if the only one fails, then it will have to be replaced with a good one.
Bimetallic plate
It may be deformed and the plate needs to be replaced.
For this:
- The temperature regulator is disassembled.
- The minimum heating temperature is set.
- The regulator handle is removed from the screw, the nuts are unscrewed, and the frame is removed.
- The bimetallic plate is removed and a new one is installed.
Severe damage to the plate often causes an oil leak.
Oil leak, tank repair
If there is an oil leak, it means there is damage in the housing. Repairing a tank is a responsible and not always justified undertaking. If you decide to do it, it is important to know the following:
- The oil needs to be drained.
- When sealing the tank, it is not tin solder that is suitable, but brass, silver or copper-phosphorus. You need to use a torch.
- In order for the seams to “seize”, it is necessary to thoroughly clean the edges from rust.
- During work, water is poured inside the tank (to protect against fire), and after work the container must be dried.
- When the work on repairing the tank is completed, you will need to change the oil. There are also certain subtleties here:
- Oil should fill 90% of the tank, and the rest should be air.
- Transformer oil will do, but not waste oil (it will clog the heating element with scale)!
- Mineral oils are not compatible with synthetics.
Failure of the heating element
This element cannot be repaired, only replaced! But it only makes sense to take on replacing the heating element if your heater is made with a removable heating element. A new heating element is selected that is equal in power and, preferably, copper. Pay special attention to the joint between the housing and the heating element. The gasket is supplemented with sealant.
But even in this case, there is a possibility that after some time cracks will appear in the sealant and the repair will need to be repeated.
If the heating element is non-separable, then it will be extremely difficult to roll it back after flaring and replacing the part.
Drop or position sensor
This safety element is in the form of a weight that turns off the device at a certain angle of inclination of the heater.
To check the serviceability of this element, place the device on its side and ring the contacts.
It is not recommended to repair it - it is better to replace it.
So. Indeed, there are several problems with oil heaters that are quite easy to fix, for example: noise, oxidized contacts, or faulty wires. Anyone can do the simplest repair of oil radiators with their own hands.
But if, after disassembling the device, you discover a more serious breakdown, think about whether the “game is worth the candle”? Wouldn't it turn out that repairing a heater, in terms of time and costs, would be more expensive than buying a new device?
microclimat.pro
How to repair an oil heater if it leaks
If there is an oil leak, repairing an oil heater with your own hands involves welding, since we are talking about damage to the housing as a result of corrosion or a strong impact. The algorithm of actions looks like this:
- Remove the control unit from the device and remove the heating element located underneath it.
- The contacts are disconnected from the heating element, then the oil is drained through the mounting hole and the device is filled with water.
- The detected leak on the body is cleaned with coarse sandpaper or sanded using a grinder.
- A patch of the required size is cut out of a steel sheet 1-1.2 mm thick, applied to the treated hole and secured by welding.
At the end of the procedure, the seam must be sanded, and then, if necessary, boiled again and painted over with a heat-resistant compound. When the coating is completely dry, the radiator will need to be refilled with oil and the removed parts will be returned to their place.
Attention! The coolant inside the device body is only filled to 80%.
It is worth carrying out repairs using welding for models with a flat body.
Video on how to repair an oil heater with your own hands, they note that if there is a leak, it is better to send ribbed models for service. Such units are made using special laser technology from very thin steel, and it is usually impossible to repair them yourself.
Water or oil?
There are certain nuances associated with filling with water.
Mistake #8
For the home, it is water that is recommended, and not some kind of chemical antifreeze (ethylene glycol, antifreeze, antifreeze).
As it works and heats up, the liquid will evaporate in any case and find its way out through the upper valves. You don't want to breathe such chemicals in your home.
But for a garage, shed or cottage with good ventilation, whether you like it or not, you will have to pour anti-freeze. Choose the most environmentally friendly one (sweet winter, warm house, etc.).
Otherwise, a battery with water that is disconnected for a long time will simply defrost.
Those who have the opportunity add oil. Not a spindle or working off, but a transformer one. With it, the battery will never freeze.
This oil is also an excellent insulator. There will be no need to be afraid of current leaks when the heating element shell is destroyed.
Just keep in mind that with such “refueling” you will have to look for a special oil heating element.
Mistake #9
An ordinary water one will overheat and quickly fail due to thick oil and poor convection.
For fire safety purposes, heating in direct contact with oil should not exceed 250 degrees. In addition, the oil will quickly corrode all the rubber gaskets between the sections.
How to repair an oil heater if it breaks and won’t turn on
If the heater does not turn on at all, then there is an electrical fault. Its appearance is usually caused by oxidation and burning of contacts, as well as loosening of fasteners. Do-it-yourself diagnostics and repairs as follows:
- Remove the panel located at the end of the housing from the de-energized oil radiator. It can be held in place by both screws and latches.
- When gaining access to the control unit, each contact is carefully inspected before repair. With prolonged use of the radiator, some of them may darken or oxidize, sometimes individual wires simply burn out and come off.
- If faulty elements are detected, they are cleaned. First, the contacts must be degreased with a cotton swab dipped in alcohol, and then sanded with your own hands until the shine is restored. The screw connections are tightened using a screwdriver, and the torn wires are soldered back into place.
- When repairing an oil heater with a fan, the contacts going from the control unit to the blower system are also checked. A cooler breakdown does not always affect the overall performance of the unit. But it can lead to overheating and, as a result, failure.
After repair, the oil device is put back together and tried to start. If the contacts are restored successfully, the device will start to turn on.
To clean contacts with your own hands, use fine-grain sandpaper
Recommendations for selection
When choosing a heater, pay attention to the features of the heated room, as well as the presence of additional functions. The power of the heater must provide complete heating of the room. This indicator is important. It is he who influences the creation of comfortable conditions. You should pay attention to the temperature of the walls, as well as the presence of windows and doors. These indicators affect power.
Electric radiators are available with different numbers of sections. To heat a large room you need many sections. The next point is that heaters must be equipped with an automatic thermostat. It helps regulate the temperature.
Additional functions include: timer, mode for drying clothes, fan, control panel. However, such models require financial costs.
Oil cooler doesn't heat up
In some cases, the oil unit appears to be in good working order, but does not heat up at all. A breakdown can be recognized even by the absence of characteristic clicks from the case - if there are none, this means that the metal does not expand under the influence of heat.
One of the common causes of oil heater failure is a failed fuse. If the device experienced a power surge the last time it was used, the protective element may have burned out.
The fuse in the heater cannot be repaired, but changing it is quite simple. The diagram looks like this:
- The side panel is removed from the device by unscrewing the fastening screws or bending the latches.
- A fuse is found on the inside of the removed unit - usually it is located at the junction of the power cord with the control board.
- The part is inspected for integrity. In most cases, the power surge fuse turns black on the inside, melts or breaks.
- If the part appears to be in good working order, it is called using a tester and the presence of an electrical circuit is checked.
The blown fuse must be removed from its seat and purchased exactly the same new element. You install it into an oil heater yourself using a soldering iron, and then assemble the device and put it into operation.
Before repairing, you need to study the markings of the old fuse so as not to be mistaken in buying a new one.
The most common problems and their solutions
If the radiator does not turn on when you connect it to the network, first check if it works in another outlet. If there is no reaction, then it is necessary to examine the plug and heater wire for darkening, creases, and melting. You can test the control panel using a multimeter: if its light comes on when touched, then the radiator is working, there is a problem with the power supply to its components. In a situation where the keys do not light up or the device does not respond to being turned on and off, then test it with a multimeter in a de-energized state. In the on position, it should show the short circuit symbol.
How to change the heating element
In older oil-fired devices, the cause of failure is often the tubular heater. It can be easily repaired with your own hands, or rather, replaced independently at home. The algorithm is as follows:
- The radiator is disassembled and all contacts and fuses are checked using a tester. If the elements of the device are in good working order, then, most likely, the cause of the breakdown lies precisely in the heating element.
- The tubular heater is called, the multimeter can show either the presence of a short circuit between the phase and the body, or the absence of a circuit between the phase and zero.
- On a faulty heating element, the fastenings are loosened, and then the part is unscrewed using an adjustable wrench.
- Buy a similar replacement heating element and install it in its original place. At the same time, install a new sealing gasket to prevent oil from leaking out of the heating element socket.
If the heater in the device is not removable, then you will not be able to carry out repairs yourself. To do this, you first need to flare the old heating element, and then properly seal the new one, which is almost impossible to do at home.
After repairing the heating element, place the heater vertically and watch for several hours to see if any leaks appear.
Filling the radiator with water
How much liquid is needed for such a heater?
Mistake #10
When filling a radiator, you don’t want it to end up 100% full of water.
Filling occurs through the hole of the already installed passage plug. First, fill the radiator up to the neck.
Then you set it perfectly level and unscrew the plug or the Mayevsky valve (not the fitting itself), draining the excess volume.
If the battery is already hanging on the wall, you can use a small watering can with a tube or hose stretched over the spout.
Mistake #11
Try not to use regular tap water.
The water should be soft. A hard one will kill your heater very quickly.
Distilled or rainwater is best (it's free). As a last resort, water from an osmosis filter.
Just enough water is needed so that it stops flowing through the hole under the Mayevsky tap. That is, the liquid level should end exactly at the level of the small hole in the passage fitting.
When pouring water along the edge of the hole, you will automatically get the desired level of the liquid column, which will ensure uniform, proper circulation.
One section of a cast iron battery (MS 140-500) holds about 1.5 liters of water. In aluminum (height 500mm) - no more than 0.35-0.45 liters. The required volume is calculated by the number of ribs.
How to fix a temperature controller
The serviceability of the oil heater depends on the condition of the temperature controller. If the node fails, the device will not be able to turn off and start up again in time. Repairs are performed as follows:
- Open the control unit of the device and ring the section from the power cord plug to the thermostat.
- Set the lowest temperature and test the relay - the circuit should be open.
- After turning on the heating element, the dialing is performed again. At this moment the circuit should be closed.
- If a malfunction is detected, the regulator is removed from its seat and replaced with a new one.
There is no point in repairing the thermostat in an oil heater. It is difficult to do this yourself, and purchasing a replacement part does not require large expenses.
The temperature regulator in the oil cooler is located at the top of the control unit
Advantages and disadvantages
Advantages:
- safety;
- noiselessness;
- simplicity;
- compactness;
- durability;
- maintainability;
- aesthetics.
Safety is maintained by strict adherence to instructions and timely repairs in case of malfunction. The devices do not make noise, with the exception of the built-in fans. However, if the fan is of high quality and in good working order, the noise is almost imperceptible. The simplicity of the design allows you to quickly master the control method; it does not require time to start or stop the structure.
Some electric heaters provide for replacement of the heating element. The weak point is the body, which should be protected.
Flaws:
- high energy consumption;
- When the automation fails, the housing becomes very hot and can cause burns.
How to check a bimetallic strip
Modern oil radiators are equipped with a bimetallic plate to protect against overheating. When the coolant pressure in the device reaches critical values, the part opens the circuit and forcibly stops the operation of the device.
The bimetallic strip may become deformed. Its serviceability is checked as follows:
- Open the radiator control panel and use a relay to set the temperature not too high to change the position of the plate.
- A powerful hairdryer is applied to the part until it reaches the specified degree of heating.
- They look at the reaction of the plate - a working element should bend and disconnect the contact. The deformed part will remain motionless after exceeding the set temperature.
The broken bimetallic plate is replaced with the same new one. After doing the repair yourself, you must first make sure that the part is working correctly and test it according to the above diagram, and then assemble the heater.
Advice! If the new plate also does not unbend at the required moments, it is adjusted by changing the pressure of the element to the contact corresponding to the minimum temperature.
If the bimetallic plate breaks, it is easier to replace the entire thermoregulation unit
Electrical connection diagram
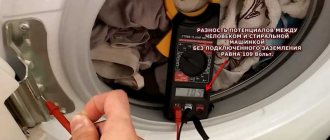
As for ensuring safety when connecting voltage, the entire circuit must be powered only through an RCD or differential circuit breaker with a leakage current of 30 mA.
Mistake #14
A simple modular machine is not suitable for this.
Otherwise, you will have to move around this miracle only in rubber boots and gloves. The water shadows are destroyed over time and the heating coil, initially protected by the shell, is exposed.
Upon contact with water, current leaks to the metal body of the heater. As soon as you touch any of the sections, you will find yourself energized.
Something similar happens in electric titans or boilers, when the water from the tap begins to “pinch” and “shock”.
RCD saves you from all this. True, it will only work on its own when the battery is grounded.
Otherwise, the RCD will wait until you touch the battery with your hand. The RCD starts to knock out - immediately change the heating element.
The thermostat itself is connected with a flexible PVA wire 3*2.5mm2.
A Euro plug is mounted on one side of the wire, which is plugged into the nearest socket.
Do not clamp a stranded wire without lugs under the screws of the thermostat.
This is especially true for powerful heating elements of 1.5-2.0 kW. To ensure reliable contact, the ends of the cores must be crimped with NShVI sleeves.
Mistake #15
Another problem is exposed contacts on the thermal relay.
If there are small children and pets in the house, this is very dangerous.
Some craftsmen advise covering the top of the thermostat with a plastic case from the socket box. It's just the right diameter.
What to do if the heater does not turn off when tipped over
Most modern oil heaters automatically turn off when changing position. The role of the sensor is performed by a special plumb line with a weight, which is sensitive to deviations from the vertical.
The element is simple and quite reliable, but in an old heater it can turn sour in one position. Do-it-yourself repairs are carried out as follows:
- Remove the cover of the device to gain access to the internal parts.
- Manually test the heater again, tilting it to the sides, and monitor the position of the plumb line.
- If there is no reaction, clean the mechanical sensor from accumulated dust, and then develop it with careful movements.
If the weight moves too tightly even after repair, it is better to change it.
The plumb line with the load should be located at the top of the device next to the thermostat
How to check the power cord
A faulty power cord is a simple failure, the repair of which is not difficult. If the oil device is in order, its internal parts do not require replacement, but it still does not turn on, you must:
- Inspect the cable of the de-energized device along its entire length for breaks, twists and frayed windings.
- Check the connection between the power cord and the control board for breaks or oxides.
- Clean the darkened contacts with fine-grained sandpaper or re-solder.
- Ring the treated area with a tester and make sure there is a chain.
If the power cord is damaged, you must replace it with a new one and after repair, make sure that the cable does not twist or fray.
The heater must be installed so that the power cord is not pinched by furnishings.
Let's check the thermostat
When the contacts were open, it did not show the circuit, which means that measurements can be made without removing the terminals with wires from it. By rotating the regulator clockwise, you will hear a click and the contact, both visually and according to the readings of the measuring device, is closed.
And again the cause of the failure was not found.
Recommendations and precautions
Repairing an electric oil heating radiator always involves certain risks. In the process you need to follow a number of rules:
- Before diagnosing and repairing the heater with your own hands, it is completely disconnected from the network.
- When repairing the device, do not smoke or light open flame sources near it.
- After performing complex work with your own hands, for example, welding housing defects, the radiator is first turned on at minimum temperatures.
- If there are uncharacteristic sounds after repairs, new leaks or unusual odors, the device is sent for service.
Diagnosing and repairing a home heater can be time-consuming. But if leaks and signs of other faults appear, you need to start repairs as soon as possible. If the appliance is malfunctioning and leaking oil, but is still heating, it still should not be used due to the risk of explosion, fire, or electric shock.
Types of convectors
Depending on what coolant is supplied to the heating system, you can choose a water or gas convector. The internal structure of the devices will be slightly different, but the principle is the same: the coolant heats the elements inside the device, through which air passes and picks up heat, then leaves the heater and warms the room.
Gas
Gas convector heater
Inside the convector there is a burner that heats the gas. The device has an air intake, one end of which is located outside. Oxygen is needed to support combustion. A chimney is needed to remove combustion products from the combustion chamber.
Gas convector heating at home does not require water, it is safe, since the combustion chamber is completely insulated.
The disadvantages of gas appliances are as follows:
- To install a convector, you need to obtain permission from the gas industry. The problem may arise due to the design of the house and the impossibility of installing a chimney.
- When heated with gas, the body temperature is above 60 degrees, so the process of thermal decomposition of dust particles begins, which settle on furniture and other interior items.
Mermen
Water heating convector
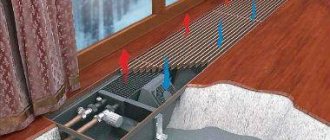
Water convectors can be installed in autonomous and central heating systems. They are reliable and durable, and are also capable of transferring up to 95% of the generated heat.
According to the type of installation, water heaters can be in-floor, baseboard, wall, floor, or basement. They are connected to pipes of any diameter through a series of adapters. The case temperature usually does not exceed 30 degrees, so small children cannot get burned by touching the device.
Water heating convectors built into the floor are planned at the stage of building a house, as niches are built under them and pipes are supplied. Once the floor is poured, it will be impossible to install such models.
Wall-mounted water heating convectors are usually placed under windows to reduce the flow of cold air if the double-glazed window is single-chamber.
If you need to hide the heating system, you can buy built-in models. They are mounted in special niches in the wall or mounted on furniture.
Among the advantages:
- Light weight, which allows you to install devices on plasterboard partitions.
- Compact due to slim body.
- You can customize and regulate the temperature.
- There are models with one or two heat exchangers.
Electrical
Electric floor convector heater
Electric convectors are considered the safest. Most manufacturers produce devices with the highest degree of electrical protection: not a single wire comes into contact with the housing. Thanks to this, the models can be operated without grounding.
The water heating temperatures are low enough so that oxygen does not burn and dust does not break down into microparticles that have a bad effect on the state of the human respiratory system. Low heating temperatures are compensated by the volume of heating elements.
Any heater consumes fuel. In this case, it is electricity, for which you do not need to go or travel far, such as for firewood or gasoline. Electricity consumption can be high if the premises are rather large in size or if the temperature in the winter season drops significantly below zero degrees. To save money, it is advisable to install double-glazed windows with argon coating, which prevents heat from escaping.
Infrared
Convection Infrared Heater
If a typical convector heats air by circulating it through a heat exchanger, then the principle of infrared heating of a house with convectors is different. The device heats surrounding objects using infrared radiation, and the objects give off heat to the surrounding space. In this regard, it is desirable that the device be installed in a place where its radiation on objects or walls will be maximum. Then the heat transfer will be high.
It is better to use infrared heaters as an additional source of heat, since when turned off, the room quickly cools down.
There are only two models of heaters in the infrared series - floor and wall. They require a working outlet with high-quality wiring. It is not advisable to use extension cords if the appliance will be operating at full power.