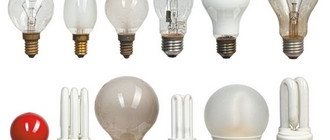
The service life of energy-saving light bulbs (ESL) is long. But often, due to the manufacturer’s dishonesty or improper handling, the lamp stops working after a month. Consumers are wondering whether it is possible to repair energy-saving lamps with their own hands. Everything is possible. But you should evaluate whether it is worth producing it, study the principle of operation and repair.
Is it worth repairing energy-saving lamps?
The question of whether it is worth repairing an energy-saving lamp with your own hands is approached individually. Some people don’t want to bother and will buy a new one or exchange it under warranty. Someone will want to figure out the cause of the breakdown and rule it out. But you should understand that repairs are made if there are several faulty light bulbs. Since out of three failed lamps, one working one will be assembled.
Each light bulb is designed for a specific period and has limited reserves. Such data is indicated on the individual packaging.
You must understand that for repairs you will have to spend money on spare parts if it is impossible to get them from a number of broken lamps. It will also take time to travel to the store, find the cause, and repair.
Often after repairs, light bulbs light up late when turned on.
Repairing a lamp with a burnt-out filament
It is necessary to immediately warn that such repairs will lead to the ballast operating abnormally. As a result of overload, the ballast will fail. As a rule, it operates in this mode for no more than a year, the duration depends on the elements involved in the circuit and their condition.
If only one filament has burned out, it must be bridged with a resistance, as this is shown in the figure.
Installing a shunt on a burnt filament
As a shunt resistance RШ, it is theoretically necessary to install a resistor with a value corresponding to the resistance of the second (whole) filament. But, as practice shows, this is not entirely true, because we measure the resistance of a “cold” thread. As a result of such repairs, the device will fail within 10-15 minutes, “burning” most of the active components. Therefore, we recommend using a 22 Ohm resistor with a power of at least 1 Watt.
Operating principle and diagram
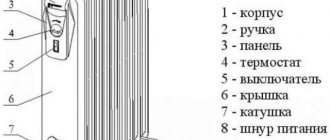
When making repairs, it should be taken into account that the ESL consists of several elements: electrodes in the bulb, base (threaded, pin), starting device. Thanks to the built-in last element, the device is small in size.
Operating principle: when turned on, voltage is applied, resulting in heating of the electrodes. After which the released electrons interact with mercury atoms, ultraviolet radiation occurs. It is invisible to the eye. To do this, the system includes a substance called phosphor, which absorbs this radiation and produces the light we are familiar with.
The operation of an energy-saving light bulb is understood by examining the circuit. As an example, we describe the operation of an 11-watt light bulb.
Diagram of operation of an 11 W lamp
From the diagram it can be seen that it consists of power circuits, which include inductor L2, fuse F1, four 1N4007 diodes make up a diode bridge, C4 is a capacitor, C2, D1, R6 are circuit elements, dinistor, D2, D3, R1, R3 - elements of the protective function. Not all light bulbs contain protective elements; manufacturers remove them to save on parts.
When the light bulb is turned on, a pulse is sent to C2, R6, it is supplied to transistor Q2, and it opens. After startup, diode D1 blocks part of the circuit. Transformer TR1 is excited by transistors. Capacitor C3 transmits voltage from circuit L1, TR1, C3, C6. The tube lights up when a voltage of 600V is reached at capacitor C3. When the lamp is ignited, the first transistor opens and the TR1 core is saturated.
Lamp 2 - Maxus
26W, 2700k, E27 base
Failure: the lamp does not light.
There was an atypical and very interesting malfunction here. This part of the video contains only those repair stages that are of particular interest. Those steps that are similar to repairing the first lamp are skipped for this lamp (disassembly, disconnecting the bulb filaments, etc.). For this lamp I had to draw a circuit from the board.
Repair: unusual damage that led to a partial short circuit (details in the video).
The pinout of transistors must be checked with a tester! It may vary from manufacturer to manufacturer!
Causes of light bulb failure
To understand the cause of the breakdown, you need to understand the structure of the energy-saving lamp.
All actions are carried out sequentially:
- The workplace is being prepared.
- All the tools that may be needed in the process are assembled - a screwdriver, a multimeter, a soldering iron, a soldering kit.
- ESL is understood.
- The cause of the breakdown is determined - the filaments in the light bulb are checked with a multimeter. If the threads are in good condition, the ballast is checked. And vice versa.
- Eliminated.
- The system is being assembled.
Download reference data for transistors for fluorescent lamps
Now – I’m posting files on the topic, as usual, everything can be downloaded for free and freely.
• mje13001 / Datasheet for transistor mje13001, pdf, 88.67 kB, downloaded: 7444 times./
• MJE13002 (UKT9145B), MJE13003 (UKT9145B)_40W / Datasheet for transistors, pdf, 187.82 kB, downloaded: 10015 times./
• MJE13004 MJE13005_75W / Datasheet for NPN transistors, pdf, 184.15 kB, downloaded: 4454 times./
• mje13005_on_75W / Datasheet for transistors for energy-saving lamps., pdf, 135.38 kB, downloaded: 4431 times./
• mje13006 mje13007_80W / Datasheet for transistors for energy-saving lamps., pdf, 192.8 kB, downloaded: 4007 times./
• MJE13007-On_80W / Datasheet on NPN transistors for energy-saving lamps., pdf, 127.07 kB, downloaded: 10688 times./
• mje13008 mje13009_100W / Datasheet for NPN transistors for energy-saving lamps. Several datasheets from different manufacturers have been collected into one file., pdf, 1.07 MB, downloaded: 5188 times./
How to disassemble
When disassembling the light bulb, the bulb is disconnected from the base. In this case, care must be taken, since the base is easily damaged. Use a screwdriver to disconnect the parts secured by the latches (the screwdriver penetrates the gap and turns the halves apart) - moves along the contour until the base and bulb are completely disconnected.
The wires that are directed to the filament are detached.
All work is carried out very carefully, since it is unacceptable to tear off the wiring that extends from the base.
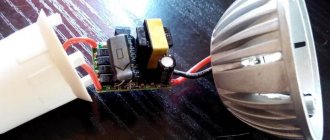
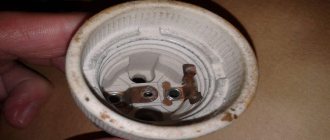
Once opened, the board of the electronic unit itself will be visible - a kind of starting device that is found in all original fluorescent lamps. Only modern ones are electronic, and in old ones there is a starter and throttle.
Signs of LED Burnout
How to repair an LED lamp? Not all lamps are capable of meeting the service life declared by the manufacturer. Differences in quality and price categories play an important role in this case.
When a lamp that costs one hundred and fifty rubles breaks down quite quickly, and when used at low power, a feeling of resentment arises. After all, in fact, one and a half and two years is not a long time for such a model. But most of them can be repaired.
Most lamps fail due to a malfunction of the LED, of which there are twenty-four in one product. The reason in many cases is the uncomfortable mode, since there is no aluminum radiator during acceleration much higher than the nominal value.
Wherein:
- The light bulb works like a regular backlight;
- Generally does not “want” to work without apparent reasons for burnout;
- The LED part darkens.
Troubleshooting and repair
Failure may be a short circuit or breakdown. To do this, the electronic board is initially inspected for elements of visible damage. The inspection is carried out from both sides. Damage to the board - deformation, black spots, breakdowns.
If damage is found with the naked eye, then a surface check of the entire board is still required.
Fuse
The fuse is easy to find. This system is located in the combination of a base and a board. It is covered with an insulating layer on top and is connected to a resistor. To determine the functionality of the fuse, you must use a multimeter. To do this, one tentacle is connected to the fuse, and the other to the board. This is how resistance is measured.
If normal, the resistance will show a value of approximately 10 ohms. For damage - 1 Ohm. If this element malfunctions, it is eliminated and a new one is soldered.
Flask
The breakdown may consist of burnt-out electrode threads in the bulb. The faulty thread must be replaced. If there is no thread, then it is possible to install a resistor with the same resistance. To do this, it is soldered in parallel with the spiral that burned out. Next, you need to check the functionality of the entire board (semiconductors).
Transistors and resistors
To check the serviceability of the transistor, first it is removed from the circuit. This is a mandatory point, since the transitions are in the winding. If a transistor is found to be damaged, it is replaced with an identical one. Replacement with an element with other parameters is not allowed. In this case, the body part may be different, this will not affect the progress of the repair.
When checking the resistor, a multimeter is also used. We look at the nominal value on the device body. All elements must be checked sequentially.
Capacitors
Capacitors are checked in the same way as prescribed. Repair involves replacing the faulty element. A failed capacitor takes on a deformed shape - leakage, swelling of the housing.
Capacitor failure is the most common cause of failure of energy-saving lamps. Especially those made in China.
Ballast repair
If the bulb is working properly, then the breakdown should be looked for in the ballast. He inspects for burnt elements. If burnt marks, swelling, or deformation are noticed, then replacement of the failed elements is required. If the lamp's functionality is not restored after replacing these components, the entire circuit must be tested.
Sequence for troubleshooting ballast:
- Replacing the fuse resistor is a common ballast problem.
- Capacitors are desoldered. (After soldering, a check with a multimeter is required - the bridge diodes are checked without first desoldering them).
- If checking the previous elements did not find any faults, then the work moves on to finding faults in the transistor. This requires desoldering the element.
- When all parts are replaced, the assembly phase begins.
Repair for burnt thread
When repairing a burnt thread, work is carried out in the ballast in emergency mode. When high voltage is applied, the starting part breaks. With the same voltage supply, the lamp will last up to 1.5 years. Also, the service life depends on the quality and type of built-in circuits. If one thread has burned out, it is shunted with a resistance. To do this, it is necessary to install a resistor with a resistance equal to the resistance of the surviving thread.
We recommend watching the video instructions:
Determining the extent of repairs needed
When answering the question of how expedient the repair is, it is worth taking an individual approach to solving the problem. And if you don’t mind the labor intensity, which, by the way, does not take much time due to the simplicity of the circuit, then it comes down to the availability of spare components.
Thus, it makes sense to start repairs only when at least ten light bulbs have accumulated. Then, having spent a little effort and time, as well as using the repair instructions, you can safely engage in such activities and reassemble two or three light bulbs suitable for use.
Another factor is working time. If the lamp has already been in use for one or a year and a half, then there is no need to “reanimate” it. There will be no required color rendering. In addition, part of the energy will be spent on heat during operation. The lamp should work for a short period of time, about the first few months.
Assembling an energy-saving lamp
After all parts of the ESL have been restored, it needs to be tested before assembly. To do this, it is screwed into the cartridge and it is observed to ignite. If there is no flickering, the next step is to assemble an energy-saving light bulb.
If the starting device is not suitable for the niche, then the resistance capacitors are bent. In this case, it is necessary to monitor the absence of short circuits. Next, the lamp is assembled in the opposite direction. The parts damaged during disassembly are glued back together.
Finding faulty ballast elements
The condition of the board is first assessed visually. It is recommended to carefully examine all elements of the circuit from both sides. Under severe operating conditions, a short circuit or breakdown may occur.
In this case, it is easy to notice a change in the external characteristics of one or more board elements (deformation, blackening, etc.). If there are obvious problems, you should still check the entire circuit.
Prevention
To reduce the percentage of failure of energy-saving light bulbs, it is necessary to apply prevention methods:
- A properly functioning ventilation system improves heat transfer. This will reduce the number of short circuits that occur due to overheating of light bulbs or ballast circuits.
- Installation of stabilizers. They allow you to normalize the voltage supply. Since sudden changes cause breakdown of the starting device. This often happens when manufacturers install a cheap starting device.
- Installation of an NTC thermistor between the filaments. It will help regulate the current supply. This reduces the likelihood of thread burnout.
- The lamps should not be subjected to mechanical stress, as this will lead to failure of internal parts or surface cracks.
The thermistor should not be installed near the ballast, as the thermistor will overheat and break.
Determining the degree of damage
Before you begin repairing an energy-saving lamp, you need to assess the extent of the breakdown and the scope of work as a whole. If the light source does not respond to attempts to turn on, it is recommended to inspect the bulb. Towards the end of the service life declared by the manufacturer, the phosphor fades and the light becomes dimmer.
This phenomenon is completely natural for such light bulbs; accordingly, it is useless to disassemble the housing, since the bulb cannot be repaired.
But in the case when the light source stops turning on much earlier than scheduled, the main causes of failure are a burnt electrode thread and failure of one of the elements of the ballast. In both cases, you will have to disassemble the product.
Having examined the design of the lamp more carefully, you can see that at the base of the bulb there is a housing where the ballast, consisting of two parts, is hidden. It needs to be opened, for which special latches are provided. The housing elements can be disconnected using a simple screwdriver.
All actions must be performed slowly, as there is a risk of damaging the wires. The performance of the electrodes can be checked with a multimeter. The resistance of these threads is in the range of 10-15 Ohms (normal).
Accordingly, it will be quite simple to identify which of them burned out. If there are no doubts about the performance of the electrodes, the breakdown is probably caused by problems with the ballast.
Tips before starting repairs
Tip 1. Before you start inspecting the lamp for defects and breakdowns, you should prepare a workplace for yourself and take the tools: a set of screwdrivers, electrical tape, wire cutters, a multimeter (tester), it measures voltage, current and resistance, and some types are checked and capacitors, diodes and transistors. This device allows you to check the throttle, starter and the lamp bulb itself. In most cases, the reason lies in these elements, however, it is possible that the tungsten filament burns out, but this happens less frequently. If you don’t have such tools, you can easily buy them at any hardware store.
Tip 2. You should study the lamp model and understand its structure, since due to ignorance in this matter, you may not open the lamp, but simply break it. The manufacturer and model are indicated on the base of each drug, so you can easily find out this information.
Tip 3. Be sure to follow safety precautions, since the drug contains a small amount of mercury. Therefore, everything should be done extremely carefully.
We calculate the capacity of the required voltage
To save money, capacitors with a small capacity are used. The ripple indicator of the incoming voltage will depend on them. To reduce ripple, it is necessary to increase the volume of capacitors; this is also done to increase the ripple rate only in the reverse order.
To reduce size and improve compactness, it is possible to use electrolyte capacitors. For example, you can use capacitors that are built into photographic equipment. They have a capacity of 100µF x 350V.
Twenty watt power supply
To provide a power supply with an indicator of twenty watts, it is enough to use a standard circuit from energy-saving lamps and without winding additional winding on the transformers. In the case where the choke has free space and can accommodate additional turns, you can add them.
Thus, you should add two to three dozen turns of the winding to be able to recharge small devices or use the UPS as an amplifier for equipment.
20 watt power supply circuit
If you need a more effective increase in power rating, you can use the simplest copper wire coated with varnish. It is specially designed for winding. Make sure the insulation on the standard inductor winding is good enough, as this part will be affected by the incoming current. You should also protect it from secondary turns using paper insulation.
The current power supply model is 20 watts.
For insulation we use special cardboard with a thickness of 0.05 millimeters or 0.1 millimeters. In the first case, two words are needed, in the second, one is enough. We use the maximum cross-section of the winding wire; the number of turns will be selected by trial. Usually quite few turns are needed.
Reducing the transverse diameter of the wire used will of course increase the number of turns, but this will only have a negative effect on the power.
100 watt power supply
To be able to increase the power of the power supply to hundreds of watts, it is necessary to additionally tighten the pulse transformer and expand the capacity of the filter capacitor to 100 farads.
100 watt power supply circuit
To lighten the load and reduce the temperature of the transistors, radiators should be added to them for cooling. With this design, the efficiency will be around ninety percent.
Transistor 13003 should be connected
A transistor 13003 should be connected to the electronic ballast of the power supply unit, which can be secured using a shaped spring. They are advantageous in that there is no need to install a gasket with them due to the absence of metal platforms. Of course, their heat transfer is much worse.
It is best to carry out fastenings using M2.5 screws, with pre-installed insulation. It is also possible to use thermal paste that does not transmit mains voltage.
Connection to a 220 volt network
The connection is made using an incandescent lamp. It will serve as a protective mechanism and is connected in front of the power supply.
In this case, the lamp serves as a ballast, which has a non-linear indicator and perfectly protects the UPS from network malfunctions. The lamp power value must be selected in the same way as the power of the switching power supply itself.
Since it is possible that the power supply will transmit high voltage, make sure that all its connections and contacts are properly insulated. The same applies to all transistors; they should also be isolated from the external environment, because they can pass current through their housing.
Causes of premature burnout
Let's consider all the reasons why a saving lamp can quickly burn out, in more detail. This will help you operate lighting fixtures correctly and make the most of their resources.
- High humidity. CFLs do not tolerate high humidity, as their ballast mechanism and other electronic elements suffer from it. If you install a lighting device in a bathroom or sauna, you can be sure that it will not work for the required time.
- High ambient temperature. At temperatures above +25°C, CFLs glow rather dimly. This is due to the fact that they themselves heat up when voltage is applied to the cathode and anode, and the additional heat negatively affects the state of the phosphor, which turns ultraviolet into light visible to us. This fact is quite important, since in Russia temperature changes can range from +40° C to -40° C and below.
- Low temperature. At low temperatures, the luminous flux of CFLs decreases significantly. It will decrease by about half for every -10°C drop in temperature. It is worth noting that some lamps stop lighting altogether if they are used in extreme cold for electronics. The service life is reduced in proportion to the deviation from the permissible temperature regime.
- Wiring fault. Often in rooms where old electrical wiring is installed, temporary interruptions in the operation of electrical appliances occur. Energy-saving lamps react especially sharply to poor insulation or winding, and therefore quickly fail. If a sharply increased voltage in the network passes through dilapidated wires, then a switched-on CFL may even explode.
- Incorrect combination with other elements. Manufacturers clearly indicate on the packaging of energy-saving lamps that they cannot be used with:
- dimmers (brightness controls);
- motion sensors;
- noise sensors;
- backlit switches.
However, few people take this information into account, which often leads to the lamp starting to flicker when the light is on or even off. This means that the device is turned on and off very often, which reduces its service life by hundreds of times. Now you can find special CFLs that are compatible with dimmers, they are called dimmable housekeepers. But it is best to replace the backlit switch with a regular one so that the capacitor does not receive the voltage that is provided to charge the LED in the keys.
You can also solve this issue by other methods, for example, by connecting an ordinary incandescent lamp into the circuit, which will take on the charge; make the switch backlight parallel, not sequential; disconnect the LED power wire in the control box; use a shunt resistor.
- Unsatisfactory quality. Manufacturers do not always take a responsible approach to the manufacture of CFLs, especially for cheap models produced in China. Trying to save on all components, lamps are equipped with low-quality electronics, a monocomponent phosphor that quickly burns out, and fragile housings. All these factors negatively affect the service life of lighting fixtures.
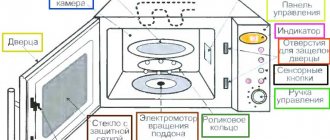
Operation of the lighting device
A fluorescent lamp (FL) is a gas-discharge light source in which, due to the interaction of incandescent filaments and mercury, an electrical discharge is formed, creating an ultraviolet glow, which is converted into visible light using a phosphor. It is worth noting that the current that passes through the filaments is evenly distributed along the contours of the lamp, promoting shunting, reducing the heat, so these devices do not heat up, which is one of the advantages.
There are the following types of fluorescent lighting devices: 1. LS with chokes and starters. Fluorescent lamps in terms of mass use are at the peak of their popularity. They can save up to 50% of electricity, unlike conventional lamps. To maximize the service life and uninterrupted operation of the device, it is necessary to use elements such as a starter and a choke.
The choke plays the role of a transformer and is capable of stabilizing the operation of the lamp. It protects the fluorescent lamp from voltage surges and overheating. This type is characteristic and inconvenient in that when starting up they begin to blink (this effect is given by the starter, it passes current and gradually fryes the filaments) for the first 2-3 seconds they hit the eyes with sharp flashes of light, and then they ignite and burn normally.2.
Fluorescent lamps without a starter with a balancer. Unlike the previous type, such devices do not have a starter. This allows you to avoid flickering of the lamp in the first 2-3 seconds, and start it immediately after turning it on. Looking at the diagram, you can see that instead of a starter there is a balancer. This element refers to ballasts that limit current. But if you compare the balancer and the starter, the latter is better.
READ MORE: Flat slate sheet dimensions GOST application technical characteristics pros and cons of asbestos-cement coating
3. Energy-saving lamps. Conventional drugs are often confused with energy-saving ones, but this is not entirely true. Of course, when compared with incandescent lamps, any fluorescent lamp is many times superior to them in terms of service life. But if you choose between types of drugs, then among them there are sales leaders - energy-saving models.
All types of modern lamps use new technologies that provide reliable inverter feedback, which makes it possible to control the current strength. Inverters are used in electronic ballasts (electronic ballasts), which guarantees their greater durability, efficiency and practicality.
Lamp 3 - e.next
11W, 2700k, E14 base
Failure: a few seconds after normal switching on, the lamp blinks (flickers) for some time, after which it works normally, but sometimes it still “blinks”.
This lamp differs from the first two in that it has a triple bulb, it has a smaller base (E14), and a simpler circuit. The breakdown of this energy-saving lamp turned out to be very simple, but in this part of the video there are some comments on the circuit and typical breakdowns.
Advice:
. To sketch the circuit, it is most convenient to photograph the board on both sides and work with the photo on the computer:
Repair: soldering of board contact pads.