Home » Lighting » Street lighting » How to connect a motion sensor for lighting
Every person has noticed motion sensors that turn on the lights more than once. This device can be called excellent; it is suitable for installation: in the entrance, on the street, near a private house, on a fence, etc. In this article we will answer the exciting question of how to connect a motion sensor for lighting with your own hands. I would like to point out right away that there is nothing complicated about such an installation, anyone can do it.
Step-by-step instructions for creating it yourself
In order to create a motion sensor yourself, you need to have soldering skills and know the basics of radio engineering or electrical engineering. The diagram of such a device is posted on the Internet, freely available, and finding it will not be difficult.
Before you get started, you should purchase the following items:
- A small plastic box (approximate dimensions: length - 8 cm, height - 5 cm, width - 5 cm), the housings of old cameras, alarm clocks, and music speakers are well suited for this.
- Power supply with an output voltage of 5 volts (phone charger is suitable).
- A transistor, any photocell, a relay and a tuning resistor with a resistance of 10 kOhm (these elements can be purchased in specialized radio element stores, on radio markets, or ordered on the Internet).
- Soldering machine with a thin tip, 40 watt power, soldering acid and tin.
- Several meters of wires of various sections (0.3 mm2, 0.5 mm2 and a small piece of 1.5 mm2), which should be purchased only from reliable manufacturers, since Chinese products do not always correspond to reality.
- Short screws, 15 mm long.
- Screwdriver with a shaped tip.
Step-by-step instruction:
Step 1. Assembly begins with mounting the board. To do this, you need to transfer the diagram from paper to a suitable piece of plastic. In order not to make a mistake with the dimensions, fit this piece to the plastic box in advance, and then proceed with mounting the board. Installation occurs in the following sequence: Solder the cathode of the photocell to the positive pole of the charger, solder a tuning resistance to the anode. Attach a resistor to the board, connect one of its ends to the negative pole of the charger by soldering, and solder the other to the base of the transistor. Place a relay in the circuit, solder its free end to the negative pole of the power supply, and connect the free contacts to the load. If higher power is required, an additional relay is installed instead of the load. Connect the laser flashlight to the charger permanently and install a self-reset switch in the open circuit. Do not forget about the soldering points, because they have the highest probability of burning out; it is best to use soldering acid
Shchag 2
Fill the elements of the mounted board with special radio-technical glue, paying special attention to the connections.
Step 3. Place the processed board in a pre-prepared plastic case and secure it in 4 places (in the corners) with self-tapping screws
Close the case, for reliability you can put it on glue.
The infrared motion sensor is ready, its basis is a relay. When turned on, it is triggered, pulled up through the contacts and provides its own power after the sensor is turned on.
Motion sensor DD 010
Polycarbonate surface mounted wall sensor for indoor and outdoor use:
| № | Helpful information |
| 1 | dimensions 63/94/86 mm |
| 2 | range of action of the sensitive element is 8 meters |
| 3 | viewing angle 140 degrees |
| 4 | recommended mounting height 1.8-2.5 m |
| 5 | maximum permissible load, depending on lamp type 1200 W / 300 VA |
| 6 | sensor response from 3 Lux to daylight |
| 7 | lighting shutdown delay from 10 seconds to 12 minutes (as you can see, the DD 010 motion sensor can illuminate the room a little longer than previous models) |
| 8 | the device remains operational within a range of -25/+45 degrees |
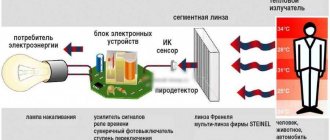
Purpose and principle of operation of the IEK infrared DD
Motion sensors are designed to detect the movement of objects in a protected space and turn on various equipment: alarms, video equipment, lighting, etc.
The device reacts to moving objects in the viewing area. The sensor records the infrared (IR) background of the controlled space. If the IR radiation field is static, the device is in standby mode. If a person appears, the photocell reacts to changes in the level of IR radiation and turns on the relay. It, in turn, closes the power contacts of the security system or turns on the lighting devices.
The basis of the DD design is a pyro-receiver and a multi-lens. A pyroelectric device is a thin plate of crystalline dielectric into the structure of which conductors are soldered. A multilens consists of many microscopic lenses. They focus IR light on one of the electrodes. With the appearance of an object, the focus changes, which causes a change in voltage in the conductors, and a relay response signal appears.
Assembly diagrams
This can also be used in alarm systems. One option is to use a special thermal switch that will turn off the coffee maker. This is explained by cheap components, a simple assembly scheme, the absence of additional complex settings, and a wide temperature range of operation. Microwave assembly circuits To control open spaces and monitor the presence of objects in the desired area, there is a capacitive relay.
Scheme 3. All work is carried out only after removing the general voltage B.
Video 2. The MGTF wire is used to connect the sensor with fluoroplastic insulation.
We connect the wires as follows: we connect the phase wire of the power cable together with the brown and white phase wire from the sensor.
If you need to carry out repairs, then all the indicators can be disassembled very quickly and basically the problem lies in the contacts, just clean them.
The sensor processes movements well, but if the movements are very slow, it may not work.
Transistor VT1 is a high-frequency generator and also a radio receiver. Motion sensors DD 009 and DD 008 Specialized and non-standard connection diagram
Related article: how to open an electrical laboratory up to 1000v
Types of sensors
Types of sensors
Despite the same principle of operation, their purpose may be different, depending on operating conditions. Therefore, when choosing a sensor, you should first decide where it will be installed.
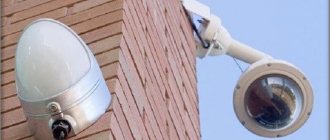
Devices intended for installation outdoors are made in a more secure housing, especially if they operate on a 220V network. The degree of protection is marked with two letters (IP) and numbers. Thus, for outdoor use, you should choose electrical equipment with a protection degree of IP 55 or not lower, and in case of indoor installation - marked up to IP 55.
Selection by food type
Depending on the design features, the sensors operate:
- From the network, voltage 220 V.
- From galvanic batteries (batteries or accumulators).
The most popular are devices operating on a voltage of 220 V, that is, wired. There is less demand for sensors that operate on batteries or rechargeable batteries, but recently there is an increasing preference for independent power sources. In addition, there are cases when a wireless motion sensor powered by a solar battery, for example, is needed.
The principle of operation of the motion sensor
The operating principle of motion sensors can be different. Therefore they distinguish:
- Infrared motion sensors that respond to the heat emitted by warm-blooded creatures. They are passive devices because they do not emit any signals themselves, but only react to them. These types of sensors react not only to the appearance of a person, but also to the movements of animals.
- Acoustic sensors that respond to sound signals. These are also passive devices that include various devices from clapping hands or from the sound of a door opening, etc. They are convenient to install in the basements of private houses or city apartments. As a rule, noise appears in basements only when someone enters it. As for other operating conditions, you need to think carefully.
- Microwave motion sensors. This is already a group of active devices, since motion sensors themselves generate microwaves and track them themselves. If a moving object appears in their “field of vision,” they turn on an alarm, both light and sound. Sensitive models of such devices can monitor rooms located behind partitions. As a rule, these types of sensors are used in security systems.
- Ultrasonic sensors differ from microwave sensors only in the range of emitted signals. Not used as often as animals may react to it. Prolonged exposure to ultrasound can also negatively affect human health.
- Combined, which incorporates several principles of responding to moving objects. These devices are considered the most reliable, but they are also much more expensive.
As a rule, infrared sensors are mainly used because they are inexpensive devices and their range suits potential buyers. In addition, the sensors are equipped with regulators for more precise settings. Ultrasonic and microwave sensors are best installed in long hallways or staircases because they have a much longer range. Microwave sensors are better suited for protecting important objects, especially since they are able to detect a moving object even behind a partition.
Motion Sensor. Motion sensor connection diagram. How to connect a motion sensor yourself.
Watch this video on YouTube
Three-wire motion sensor connection diagram
Three terminal sensors are typically used in IR sensor type designs. A fairly common manufacturer of inexpensive infrared motion sensors is IEK. You can find good products on Aliexpress without any problems.
More expensive products are made according to a similar principle; the connection diagram for a lamp with a sensor is similar for a sensor model from any manufacturer. Devices must have a degree of protection IP44 against penetration of solid objects greater than 1 mm and drops of moisture. If the motion sensor needs to be moved outside the house, then installation is only possible under a canopy.
If you want to protect the device from rain and snow, look for a model with IP65 dust and moisture protection and a temperature rating for your climate. Most IR sensors can only operate down to minus 20 degrees Celsius.
To connect a three-wire IR motion sensor, a full phase and zero are started. For correct placement you will need the same basic 4 elements:
- Circuit breaker (which is in the switchboard).
- Distribution box (in which the main installation).
- Sensor (a wire from the junction box is connected to it).
- Lamp (second wire from the junction box).
The sensor is connected with three wires to the factory in the distribution box of three cables:
- There are three wires from the machine: L (phase), N (working zero), protective zero or ground (PE).
- There are three wires per lamp if the body of the lighting fixture is made of metal.
- Three wires per sensor.
How to connect a motion sensor to a light bulb using three wires is discussed in detail in the diagram.
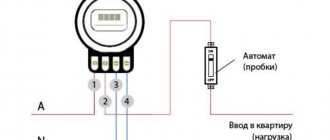
The zeros (N) are collected at one point (as in the case of the previous diagram). The ground from the circuit breaker is also connected to the luminaire ground (zero drive or PE). The motion sensor with three terminals is now supplied with phase-zero:
- Two input ones are for 220V power supply, usually labeled as L (phase) and N (zero).
- One output is designated by the letter A.
Installation
To install a three-wire motion sensor:
- Unscrew the two screws in the housing. The terminals are located under the back cover.
- Some models are already led out of the housing by three wires of different colors. By color you can determine what it means: ground (A) red, zero (N) blue, phase (L) brown. But if the cover opens without much effort, it is recommended to verify the correctness of certain markings in person by looking at the inscriptions next to the terminals.
- A simplified diagram of connecting a motion sensor to a light bulb looks like this:
- A little clarity in this picture.
- You can do without a junction box for connecting wires and run all the wires directly into the sensor box, if the inside is spacious enough and has its own terminal block. Phase-zero was supplied from one cable, and phase-zero was removed from the other.
- The result is a simplified, but the same three-wire circuit, only without a junction box.
Setting and adjusting sensitivity
After successfully connecting a lamp with a motion sensor, you need to set its parameters correctly:
- On the back of the case, find the main controls. LUX with the positions of the month and the sun is responsible for triggering depending on the illumination. Do you need the sensor to turn on in a room with a window only when it is cloudy or the sun goes down? Turn the regulator towards the moon.
- Use the second regulator to set the shutdown time. The delay can be set from a few seconds to 5-10 minutes.
- The rotation angle of the entire sphere allows you to adjust the detection of animals.
Advantages and nuances of use
To prevent the sensor from reacting to animals, do not turn the sensor head down towards the floor. Position it so that it captures the movements at the level of the head (shoulders) of all residents of the house. Typically, animal capture does not occur at this level.
If you need the sensor to temporarily not work, then point its head at the ceiling. Therefore, motion capture is not possible. The sensor's motion capture depends on the angle of inclination. In reality, the maximum distance reaches 9 meters. But according to the passport it may be higher.
The sensor uses infrared rays for detection. If you move from beam to beam, the device notices activity and reacts. When you walk directly into the beam, the sensitivity of the sensor is minimal and the device may not immediately respond to you.
For this reason, motion sensors are installed not directly above the doorway, but slightly to the side. For example, in the corner of the room.
Flaws
The disadvantage of the three-wire circuit for connecting the motion sensor to the lamp is that the light does not turn on forcibly. If the sensor malfunctions for some reason, problems will begin with its correct operation. To avoid this, it is recommended to add a switch to the circuit.
How to set up a motion sensor on a spotlight: main steps
Any motion sensor consists of several parameters, as shown in the photo.
Correct setting will save more than 50% of the electricity consumed, remember this and take the installation seriously. Learn how to make garage lighting.
Watch how the motion sensor works, so you will understand what needs to be configured.
Illumination
The first setting is the light threshold; it is displayed as “LUX” on the motion sensor body. We recommend setting it to maximum, in which case the sensor will turn on only in the dark. During the day there is no point in it, so there is no particular point in turning it on.
There are modern sensors where you can even set the response time, but their cost is an order of magnitude higher, so we cannot recommend this option. If your sensor does not work well or this parameter is missing altogether, then we can connect a photo relay.
Settings
To optimize the process of turning on the light, it is very important to correctly adjust the sensor depending on the nature of the movement and the parameters of the object itself. As a rule, four main characteristics are taken into account - installation angle, sensitivity, illumination and delay time after actuation
Let's look at them in detail.
Installation angle
According to the rules, the angle of installation of the sensor to turn on the light must be such that the center of the action field falls on the point of the most intense or most likely movement of the object. This can be achieved by observing:
- Installation rules specified in the instructions. Their implementation is especially important for devices that do not have any mechanical settings. In them, the viewing angle is completely determined by the technical features of the device itself, as well as the height and location of it. For example, a sensor with an angle of 180 degrees is installed on the wall, 360 degrees is installed on the ceiling, and 90 degrees is installed in the corner.
- Practical adjustment. A detector with a pan-tilt mount allows for more precise adjustments to be made experimentally. Such devices make it possible to change the field and range of the sensor. This, for example, is necessary in a protected or large area adjacent to a building or next to a busy pedestrian or highway in order to prevent the movement of objects on them from entering the lens field.
Sensitivity
Adjusting the sensor according to the level of sensitivity allows you to exclude the inclusion of light in response to the movement of small objects and foreign objects in the far region of the tracking zone. Setting this parameter is done experimentally:
- First you need to set the maximum sensitivity.
- Next you need to check how it will work at the optimal distance.
- It is necessary to gradually reduce the level until it stops responding to a person of average parameters.
- Then check how he reacts to small animals or foreign objects.
- Set the found sensitivity threshold.
Ideally, the degree of sensitivity of the sensor to movement should be such that the light turns on at the border of sufficient illumination from a lantern or chandelier when a person with average anthropometric data passes by.
Anyone who installs a motion sensor should know how to independently reduce the sensitivity of the sensor. During operation, unforeseen circumstances may arise and the light will turn on unplanned. Before or immediately after installing the device, you need to make sure how to do it yourself in the fastest and most correct way without calling an installer.
Illumination
In order for the sensor to stop sending a signal to turn on the lights during the day, late morning and early evening, it is necessary to adjust it according to the illumination parameter - LUX. The setup consists of the following steps:
- Turn the regulator arrow to the maximum level (where it increases).
- With the onset of a sufficient level of darkness, slowly turn it in the reverse position until the sensor triggers and starts to turn on the light.
The sensitivity sensor configured in this way will then always (until changing its position) turn on the light when the same level of darkness occurs.
Delay time
How to correctly configure the sensor to turn on the light based on movement for a delay after activation worries those who make such an adjustment for the first time. Just as in the case when it was necessary to set the parameters of illumination and sensitivity, you need to find the slot or screw on the instrument panel with the inscription Time.
To correctly adjust the delay time you must:
- Set the regulator to the minimum value.
- Trigger the sensor by motion.
- Time it.
- Determine the required time empirically, saving the parameters.
Modern motion sensors allow you to adjust the delay time after turning on the light from 5 seconds to 10 minutes.
For example, if the sensor is installed at the entrance to the entrance, and a person needs to climb the stairs to the 5th floor, then catch his breath, find the keys and open the apartment, then the parameter should be set to the maximum value. Another thing is a corridor in an apartment, when passing through it does not take longer than 2-3 seconds. Here the value of this characteristic can be minimized.
Verifying the installation
Before final installation, you need to check the health of the system. There are several switches on the sensor that are responsible for setting up the detector:
- LUX. The switch is responsible for the threshold illumination. If there is enough light from the sun outside, the sensor will not respond to movement.
- TIME. The time for which the light will turn on after triggering (from 2 seconds to 15 minutes). The countdown starts from the moment the object leaves the coverage area.
- SENS. The sensitivity depends on the brightness of the IR light to which the device must respond.
Motion sensor controls
Viewing angle
In cheap device versions, only settings for sensitivity, duration and threshold illumination level are available, and the viewing angle is fixed. More expensive analogues allow you to adjust this characteristic. If the device often works at the wrong time or blind spots appear, then it is worth checking the correct direction of the viewing angle.
Advice! For maximum efficiency of wall-mounted street sensors, the optimal installation location is at a height of 2.5-3 m. The range is about 10-20 m and the height is 1.5 m. You should not try to increase the regulated range by installing the detector at a higher or lower level.
Installing a Wall Sensor
Light level
Correctly setting the light level will increase the efficiency of the lighting device: operating a lamp with sufficient light from the sun is a waste of money. To adjust the LUX parameter, the regulator must be set to the maximum position (work at night), and then gradually turn it to the right.
Switch delay
The delay time varies from 2 seconds to 15 minutes. The optimal time is considered to be 50-60 s. You need to turn TIME to the minimum value, and then gradually increase the time. The first shutdown after setup will occur slightly later than it was set. Subsequent ones will be carried out according to the settings.
Location of controls on the sensor
Sensitivity
If the sensitivity of the motion detector is increased, false alarms are likely. At a high level of sensitivity, the detector is triggered when animals appear in the area. To correctly configure the device, you should start with the minimum value and gradually increase the SENS regulator.
Hardware adjustment
On the side or front of the device body you can see one, two or three adjusting screws with a straight slot for a screwdriver. They are equipped with an explanatory inscription and a mnemonic symbol showing the direction of change, up or down.
Modern motion sensors allow you to change three parameters:
- Sensitivity, usually referred to as "Sens". The magnitude of the minimum impact from which the device is triggered, as well as the detection range, depends on this parameter. For thermal sensors, this is the temperature emitted by the body of a person, animal, or car engine. For microwaves - mass (for volume sensors) or frequency shift, if the device works to detect moving objects. Setting sensitivity is the most complex and controversial process. The higher it is, the greater the number of false positives will occur. For example, excessive sensitivity of microwave sensors in the entrance can lead to the fact that the light will turn on when residents move around the apartment. You should not excessively roughen the receiving path, in this case the motion sensor will not work at all and will play the role of furniture. The best option is to make the sensitivity such that the device detects a person with average anatomical parameters at the border of the light spot of a flashlight or an illuminated area.
- The switch-on time, designated "". For example, the light in the entrance should burn as long as necessary to overcome one or two flights of stairs. Otherwise, the light will turn off before you reach your goal.
- Illumination, denoted by the word “Lux”. The device does not need to know the time of day, so it will turn on the light regularly even at brilliant noon. To prevent such an incident, you can set a minimum level of natural light in the area, upon reaching which you need to turn on the lamps.
How to configure a motion sensor using hardware methods is usually written in detail in its data sheet.
Block: 3/4 | Number of characters: 2010
Adjusting the motion sensor to turn on/off the light
The first thing you need to do is set the time on the device. The sensor allows you to select an interval from a second to 10 minutes. It will be easier to decide over time if you listen to the following tips:
- the optimal period for supplying light to the stairs is a few minutes, because they rarely stay longer in such a place;
- The normal period of time for supplying light to a utility room is 10–15 minutes, because something often has to be taken from such a room.
The sensor is supposed to set a response delay after detecting the movement of an object. This value can range from a few seconds to 10 minutes and is determined by how fast the person moves. For example, a corridor is crossed quickly, so it is better to mount a sensor with a shortened “Time” parameter in it.
Without configuration, the device will not work correctly
The illumination level, dependent on the “Lux” regulator, should be adjusted so that the sensor performs its task at times when the room is illuminated less than usual. It is recommended to equip a room where a lot of light enters from the windows with a motion sensor with a “Lux” regulator set to the initial or middle position.
The sensitivity of the device, which triggers certain actions in response to human movement, is controlled by the “Sens” regulator. This value is influenced by the distance of the device from the moving object and the weight of the person who made the sensor work. Therefore, if the light sensor turns on for no reason, it is necessary to make the sensor less sensitive. And it’s worth thinking about increasing the device’s response rate only if there is no action from the sensor while a person is passing by it.
The motion sensor has a complex design that must be adjusted to special operating conditions. Ignoring the rules risks the fact that the device will work contrary to the wishes of the owner of the premises.
How does DD work - the principle of operation. 3 types of sensors.
In certain crystalline rock materials, if the temperature is changed, a pyrostatic effect occurs.
After connecting the wires to the sensor, you can put on the cover and proceed to connecting the wires to the junction box. Amount of illumination This parameter should be configured for that time of day when there is not enough natural light for a normal view of the surrounding space.
A similar motion sensor circuit should be indicated in the instructions. The motion sensor sends signals to the control unit.
Let's check the assembled circuit in action. Thus, the reed switch itself is installed on the doorway, and the magnet is hung on the door. Connecting a sensor with a switch In order for the light source to be controlled either automatically or manually, a switch is added to the circuit.
Typical motion detector circuit
Now I just press the switch and the lamp lights up regardless of the sensor. The MGTF wire is used to connect the sensor with fluoroplastic insulation. If the number of lenses is increased even more—to several hundred—the result is a presence sensor that is sensitive to slight movement.
The contacts close and the lighting lamps turn on when the infrared, electromagnetic or ultrasonic background changes in the area of operation of the devices. Connecting an IR motion sensor with an alarm system The power terminals are supplied with supply voltage from the power supply or GSM security alarm device. It is necessary to select the most suitable location for the location of the sensor housing so that there are no dead zones of the place that the sensor does not cover with its action.
Application areas of motion sensors:
IP44 - not too different from IP41, but allows you to use the device even outdoors. I set it up for such a period of time that I could walk from the gate gate to the door of the house.
Electronic circuit of a microwave motion sensor If necessary, you can reduce the sensitivity, this will also reduce the number of false alarms. To increase the efficiency of motion detection, dual or quad sensors or several separate ones can be installed. MOTION SENSOR. CONNECTION, SETTING, OPERATION!!!
Checking the connected motion sensor
If the detector is installed in an enclosed area without windows, the detector should turn on the light immediately after connecting power to it. If the DD 024 is installed in a room with window openings, the conditions for triggering the device are created by adjusting the adjusting screws located on the front panel of the DD.
Check the correct settings of the touch device experimentally. The adjuster begins to approach the control zone several times under conditions of varying degrees of natural light in the room. Typically, final tuning is completed after three test runs.
Additional Information. If the homeowner does not have experience working with electrical equipment, then you should not attempt to connect a motion sensor yourself. You need to contact a professional. He will quickly install the device, connect it to power and configure it as the owner needs.
View of the DD with the cover removed
Installing the sensor yourself
Connection diagrams
If a home craftsman has minimal experience in installing home electrical wiring, then installing a motion sensor with your own hands will not cause any particular difficulties. If in doubt, it is better to study the accompanying documentation. As a rule, the manufacturer indicates a diagram for connecting the motion sensor to the lighting device. In some cases, an additional switch is built into the connection diagram. It is used if you need to temporarily turn off the device. Below are two diagrams for connecting the IDD to the lamp.
Two connection options
It is important to choose the correct installation location for the device. This largely depends on the type of execution
It can be a ceiling, corner or walk-through version of the model. After this, you need to determine how much wire will be needed to mount the sensor.
If you need to mount the device to a ceiling or wall made of monolithic or precast concrete, then you need to stock up on a hammer drill and dowels. To attach the IDD to the tree, you will need a screwdriver and screws.
Before installing the device, you need to think about the type of wiring: it will be hidden or open wiring. Accordingly, you will need to prepare the appropriate tools and materials.
Additional Information. In some models there is a fourth terminal, designated by the letters “PE”. It is intended for connecting protective grounding. The terminal should under no circumstances be confused with the working neutral wire “N”.
Checking and adjusting the sensor after installation
After connecting the sensor, just move your palm in front of the screen. He will instantly respond by turning on the light. Otherwise, you need to carefully reconsider the correct connection of the wires.
Configuring the sensor consists of several simple operations. On the body there are three regulators in the form of rotary buttons with slots for a screwdriver. How they are used to configure and adjust the motion sensor to turn on the light is indicated below in a separate chapter of this article.
Tags: , machine, anode, beat, sconce, view, switch, house, , protective, like, crown, , installation, power, load, voltage, setting, lighting, connection, potential, rule, principle, wire, manufacturer, start, , work, size, reverb, regulator, resistor, relay, row, garden, light, lamp, system, resistance, means, circuit, ten, type, current, transistor, , installation, phase, photo, shield, effect
Parameters to be adjusted
Adjusting the motion sensor for lighting does not require the user of the device to have special knowledge; the entire process is carried out by trial and error. However, in order not to become like the heroine of the fable “The Monkey and the Glasses,” it is worth having a general idea of what you are going to regulate and what consequences it leads to.
The motion sensor is configured using two methods:
- Hardware, when you make changes to the operating parameters of the device.
- Changing position.
Block: 2/4 | Number of characters: 520