04/27/201606/26/2016 master
Many people today use various technological devices in their homes and apartments that make home life easier to one degree or another. Especially often, such innovations are used in lighting systems in the entrance or in home areas. Today, one of the devices that are often connected to the lighting system are motion and volume sensors.
With the help of such devices, you can significantly increase the comfort of any room, gaining a lot of advantages. We will talk about what a volume sensor is and how to work with it in an apartment in this article.
Purpose and application
Initially, motion sensors were used to protect the territory inside and outside the building. Later the scope of application extended to the private sector. Modern technologies make it possible to control lighting using various similar devices.
Security systems
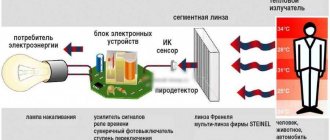
The devices used to protect the territory, when triggered, can turn on lighting, video cameras and alarms. IR detectors are often installed indoors, which are configured to monitor open space. However, for narrow corridors it is better to choose an ultrasound or radio wave device.
Externally, sensors that respond to thermal radiation and a combined type are used. To protect the perimeter, it is more important to choose active ones.
When it comes to car security systems, compactness is important. Ultrasonic and radio wave equipment have this parameter.
Lighting control
To turn on the light, as a rule, passive sensors that respond to thermal radiation are used. The main parameter for selection is the range. It is 12 m.
The viewing angle may vary. Triggering only occurs when a person is in the controlled area. If a light sensor is built-in, the lighting does not turn on during daylight hours. This allows you to save on wasted electricity.
In smart home systems
The various technical devices that the house is equipped with are controlled via a remote control or mobile phone. For this purpose, various types of sensors are installed.
Devices that respond to movement are functionally designed to turn on lights and protect the territory. Any changes in the security system are recorded by video cameras that are automatically sent to the traffic zone. The owner and the security guard simultaneously receive a signal about this.
Lighting can be configured in two options:
- shutdown occurs after a configurable period of time;
- the light is on for the entire period that a person is in the sensor’s coverage area.
Device type
In addition to the types that imply different principles of operation, there is also a difference in the acceptance of the information that they record in the room. This also applies to those volume sensors that are used for car alarms.
Active
In terms of its design, such a sensor is a little more complex, since it has a generator and a receiving device in its structure, which somewhat increases the chances of operation. This is due to the fact that forced - active - scanning is used, which also requires additional power sources. The signal that is reflected and transmitted back to the sensor also has different parameters than during passive scanning.
Passive
This is an easy-to-implement technology that is aimed at analyzing data exclusively from the external environment. The positions or direction of movement are fixed - nothing more. In addition, there is no need to use additional power sources.
Important Features
The choice of device is based not only on the principle of operation, operating conditions and installation methods. An important parameter is the range of the device.
Viewing angle
The indicator is measured in degrees. Varies between 60-360 units in the horizontal plane and 15-20 units in the vertical plane. Ceiling sensors have the maximum value, wall sensors have the minimum value.
Street sensors are designed for maximum coverage of the protected area. Therefore, the viewing angle is over 180 degrees.
Range
The units of measurement are meters. Range is considered in three planes:
- perpendicular to 40 m in diameter (movement along a tangent circle);
- frontally up to 20 m (towards the device);
- presence (under the sensor).
Installation method and location
Installation work depends on the design features of the sensors. There are devices for indoor and outdoor use. The latter have a body protected from the effects of natural phenomena. A wider range of permissible operating temperatures is also provided.
The following areas are excluded for installation of sensors:
- near air conditioners and humidifiers;
- near natural or forced ventilation;
- near heating appliances.
To avoid false alarms, it is recommended to install devices on supporting structures, where the presence of direct sunlight is minimal. The latter can illuminate sensitive detectors. Based on the installation method, the following models are distinguished:
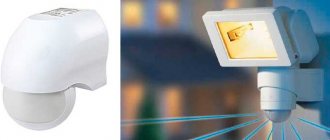
- Cabinets for outdoor use.
- On the ceiling, the device covers the entire perimeter around the circumference (with a diameter of 10-20 m). Installed for lighting, security or turning on any mechanisms at a height of 2.5-3 meters from the floor.
- Sensors on the wall have a limited effect relative to the area covered.
Built-in models are partially recessed into the base. That is, only the receiving surface and the decorative frame remain visible. The entire mechanism is located in a niche in the wall.
Additional features
Modern devices are designed to have advanced features. That is, they not only triggered movement and signaled it, but also additionally performed other tasks.
Light sensor
The radius of action is often 180 degrees, but there are models with full circle coverage. During movement, the circuit closes and the light turns on.
Animal protection
Ultrasonic and radio wave sensors automatically repel animals because they perceive them and cause discomfort. The waves also have a negative effect on humans, but imperceptibly.
IR devices can be configured so that they are not triggered by animal movement. This feature is also available in some models of combined sensors.
There are devices in which the settings are carried out in accordance with the weight of objects. So, if the permissible value is adjusted to exceed the animal data, then there will be no reaction.
Light off delay
There are detectors that have a built-in light switch-off timer (timer). Then the operation will occur within the time required by the consumer.
Autonomy
A stand-alone motion sensor is powered by batteries or rechargeable batteries. Can be equipped with a GSM module to work with a mobile phone. Compatibility with CCTV cameras is allowed.
How to connect for lighting: on the stairs, in the apartment, on the street
There are five different connection schemes for lighting control. Let's look at the features of each option and common mistakes.
Circuits without a switch
To begin with, let's highlight circuit solutions that do not involve the use of a switch.
Two-wire connection
This is the simplest option, which involves the use of several elements - a 220 V circuit breaker, a sensor, a junction box and a lighting source). The principle of assembling the circuit is the same as when installing a lamp.
First, power is supplied to the indicator, and through it is directed to the lamp. It is better to assemble the chain in an individual circuit, rather than in a general lighting chain.
A simplified diagram is shown below.
Using this method, you can connect motion sensors to turn on the lights on the stairs, in an apartment or other object.
The action algorithm looks like this:
- Place a cable with three cores and a 1.5 square wire into the junction box and label the wires (indicate the phase, ground and neutral wires).
- Stretch two wires to the installation site of the control product, which gives the command to turn on the lighting.
- Place the device at a height of 120-200 cm from the floor. When installing, make sure that it does not interfere with the opening of doors or other mechanisms. It is not recommended to install near heating elements.
- Also place the cable that goes to the light source in the box.
- Connect all the wires using special terminal blocks - phase, neutral and ground.
- Connect the wires to the sensor. Place the phase on the terminal with L, and the second wire (from the lamp) on the load symbol.
- Finish the installation by installing the box and setting it up. Set the automatic mode, operating time interval and sensitivity level.
Main causes of breakdown or malfunction
A common cause of device failure is incorrect connection. If the sensor is constantly on and is triggered without taking into account the settings, then a malfunction of the device has occurred.
To repair and identify the causes, it is recommended to contact specialists. Moreover, it is better if they are representatives of the manufacturer. You can only check the settings and adjust them yourself.
The location of the sensor may also be incorrect. If there are factors nearby that influence the results, then false positives or lack of response will be ensured. For example, a volumetric IR sensor works more efficiently in a perpendicular plane than in a horizontal one; accordingly, the second option will reduce the possibility of operation.
Designation on the diagram
In the diagram, the motion sensor is graphically indicated as a square with a triangular cutout. The latter plane is directed towards the covered territory.
The connection is made according to the circuit closing and opening circuit. If temporary and permanent lighting is intended, then a switch is installed in parallel. If it is disabled, then the lighting operates from the sensor.
There are two-wire and three-wire devices. The first ones, as a rule, are installed in a standard socket box. The connection follows the same principle as a switch with one key. The second ones are a little more difficult to connect, but the technology is the same. Only the zero phase connection is additionally provided.
How to connect to Arduino
Of no less interest is connecting a motion sensor to Arduino to organize a smart home.
To solve the problem you need to prepare:
- Arduino board;
- PIR motion control device;
- solderless breadboard;
- 220 Ohm resistance and LED;
- wires of the male-male and male-male types.
The name of the contact connections may differ from one manufacturer to another, so before performing work it is necessary to study the features of the module.
One pin is connected to GND, the next to VCC (5 V), and the remaining one to OUT (transmits a digital signal from the PIR sensor).
PIR sensors are almost identical in design. They have the necessary sensitivity at a distance of up to six meters, and visibility is 110*70 degrees. The output appears 0 or 1 depending on whether the fact of movement is detected.
Recommendations for placement
The plastic body of the device is easily damaged by impact. Therefore, you should avoid places where damage is possible. Outdoors it is worth installing a canopy to protect the device from the sun and precipitation.
Tilt angle
Most sensors, especially those that respond to thermal radiation, should be installed at angles of 90 degrees relative to the possible movement of the object. Any obstacles will negatively affect the full overview of the permissible territory.
Sensitivity
If the sensitivity is set incorrectly, the device will respond to all objects. In order to limit the reaction only to people, you need to set the mode to “medium”. The manufacturer provides information about this in the instructions.


