Get the basics right
What kind of backlights are there?
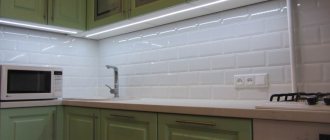
To organize additional lighting, spots, spotlights and LED strips are most often used.
The first two options are good as decorative lighting, but they are not suitable for a work area. The most convenient and practical for these purposes are LED strips, which provide uniform and powerful light, are easy to install and are relatively inexpensive. We recommend using them, and this is the option that will be discussed in our instructions.
How to choose LED strip
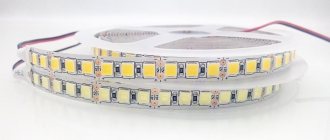
LED strips are sold in coils of 5 m, they can be cut into pieces in multiples of a certain size, which ranges from 25 to 100 mm. This is done in specially designated places with simple scissors, and the fragments are connected to each other if necessary.
These products have several key parameters that should be considered when purchasing:
- Supply voltage. Available in 12 and 24 VDC. If possible, you should prefer the latter option. Such tapes are safer and consume less current, which will allow you to use a less powerful power supply.
- Power. It is measured in watts per meter. The higher you go, the more light there will be. To illuminate the work area in the kitchen, strips with a power of 10 W/m or more are best suited.
- Colorful temperature. It is measured in kelvins. Essentially, this is the color of the glow from warm yellow (2,500 K) to cool bluish (7,500 K and above). For high-quality lighting of the workplace, you need at least a neutral white (4,500–5,000 K), and better yet, a cooler one (about 6,000 K).
- CRI coefficient, or color rendering index. It shows how natural the shades of colors of illuminated objects will be. It can range from 65 to 98 - the more, the better (100 for the sun). A tape with a CRI below 80 will tire your eyes, so it’s better not to take one.
What to attach the backlight to
During operation, LEDs become very hot, so they require a heatsink, which is an aluminum profile. The tape is glued to it from the inside, and it also serves as a protective casing and is covered on top with a light flux diffuser. The profile usually indicates the amount of heat that it is capable of removing - it is important that this parameter corresponds to the power of the tape, and even better, has a reserve.
Frame: 5watt/YouTube
Profiles can be overhead (straight), corner and mortise. The latter are completely hidden in the kitchen cabinets, they are not visible and they do not interfere in any way. If you did not provide lighting at the repair stage, then your choice is a straight or angular profile. It is better to go with the first one, since the second one will make cleaning difficult and can blind those sitting at the table with light.
Which mounting method to choose
The tape itself must be attached with an adhesive layer on the back side to the profile for effective heat dissipation. But the aluminum part can be fixed to cabinets in different ways: using complete brackets, with screws through drilled holes, or with double-sided tape.
The last option is the simplest and fastest, but also the most unreliable. It is best to use complete latches that are screwed to the cabinet with screws - it is not difficult and it is always easy to remove the profile if necessary.
If for aesthetic or other reasons the option with clips is not suitable for you, then you can drill holes in the part and screw the guides directly to the cabinets. The main thing is not to forget to slightly drill the hole with a large drill so that the screw head is hidden in it, otherwise the tape will not fit tightly to the profile and the protruding LEDs will quickly burn out. It is also worth considering that in this version the LEDs are glued on top of the fasteners and removing the profile in case of emergency will be problematic.
How to position the backlight
With straight kitchens, everything is simple - the tape in the profile stretches along the wall. But if you have a corner one, then you can’t do without rotating the backlight.
You can't just turn the tape at a right angle, but there are several other options. The easiest one is to fold it twice, as shown in the video above. This method is suitable for inexpensive thin products without a protective shell.
Shot: Zhenya Sidorov / YouTube
If you have a less pliable tape, you can use a special corner connector. It connects the pieces of the product by snapping onto the contact pads of both fragments. Due to their size, the corners leave unlit areas and may not fit into the profile.
And, of course, you can always simply connect two strips by soldering them with short pieces of wire: plus to plus, minus to minus.
What else will you need to connect?
power unit
To operate the LED strip, you need a power supply unit (PSU) with the appropriate voltage. They come in closed and open cases. The first is necessary for installation in places where there is moisture, and the second - for dry ones. The power supply connects to an outlet and supplies 12 or 24 VDC.
Its power should be with a margin of 20–25%. To calculate, you need to measure the length of the tape, multiply it by its power in watts and add another 20–25% on top. For example, for a piece of product with a power of 11.5 W/m and a length of 3.2 m, you will need a power supply of 44 W or 50 W, whichever is closest to this value:
3,2 × 11,5 = 36,8; 36,8 × 0,2 = 7,36; 36,8 + 7,36 = 44, 16
Sometimes the power supply is indicated by current, not power. In this case, you should divide the total power of the tape by the voltage to find out the current it consumes and compare it with that on the power supply. In the example above, it will be 3.68 A at a voltage of 12 V. Thus, you need a 4 A power supply:
44,16 / 12 = 3,68
Switch
To control the backlight you need a switch, and there are plenty to choose from here too. If you are planning lighting at the renovation stage, then you can install a regular keyboard version next to the socket block above the tabletop.
It is easier to integrate a compact corded switch, similar to those used in wall sconces, into a finished kitchen. Better yet, install a part with an IR sensor that will be triggered by a wave of your hand.
An important point: any switch should be placed in front of the power supply, and not after. This way the transformer will not work constantly and will last longer.
Principles and requirements
A kitchen is a room in which there are at least two zones with different purposes - a work area for cooking and a dining area. Different purposes also lead to different requirements for kitchen lighting: the work area should have bright lighting, allowing you to see everything clearly, and the dining area should have softer lighting.
It is better to make lighting in the kitchen zoned
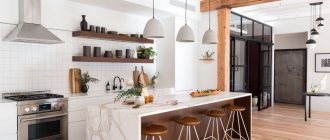
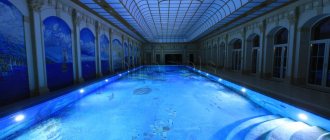
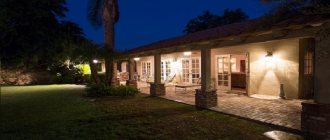
But zoned kitchen lighting does not exclude the presence of a chandelier. Its functional significance is small, since the light spot is obtained in the center of the room, which remains mostly empty. But from the point of view of leveling out uneven illumination, this method is very good. As an option, you can use several spotlights, as in the photo above, or install built-in ceiling lights if the ceiling is suspended or suspended from plasterboard.
You need to think about kitchen lighting at the renovation stage, when the electrical panel is being assembled, the wiring is being installed, and the installation locations of sockets and switches are marked. Later, after the repair is completed, this is very problematic - you have to lay the wiring on top or in cable channels.
Illumination standards
When you are just planning lighting in the kitchen, the question arises of how many lamps are needed and what power. It's simple: there are lighting standards for each room for the kitchen - 150 Lux per square meter of area. Calculating illumination in Watts is no longer relevant, since a 7 W LED lamp can produce light like a 50 W incandescent lamp or 650 lm.
For example, let’s calculate how much light is required for a kitchen with an area of 12 m2. To do this, we multiply its area by the norm: 12 m2 * 150 Lx = 1800 Lx. And since 1 Lux is equal to 1 Lumen, it is necessary to install light bulbs that in total give at least 1800 Lm.
With zoned lighting, the amount of light required is calculated separately for each zone
If you decide to do zoned lighting, that is, the work surface will be illuminated separately, there will be a light source above the table, it makes sense to count everything separately. To do this, the kitchen plan must be divided into zones, the area must be calculated, and based on these figures, the number of lamps and lamps for them must be selected. Just keep in mind that two 50 W lamps in total will not give as much light as one 100 W lamp, but about 1/3 less.
Lamp type, color and light
Another important point. When selecting lighting, it is best to choose lamps of the same type: halogen, LED, daylight. As a last resort, you can combine two types, but it is better not to use all three. They provide different lighting and it is almost impossible to get a sane result. We are not talking about incandescent lamps, since they are used very rarely: they require too much electricity, producing a small amount of light.
When choosing lamps, it is necessary to take into account their color temperature
In addition to the type of lamps, you need to choose lamps that produce light of the same color, which is also called the color temperature of the lamps. They can produce light with blue, yellow, and white tints. Basically, it’s up to you to choose, but the best option is natural or neutral. It is better for the eyes and for color perception.
Prepare everything you need
- LED Strip Light;
- profile with diffuser and plugs;
- power unit;
- cable with plug;
- switch;
- mounting bracket (if necessary);
- stranded copper cable 0.75–1.5 mm²;
- network cable with 220 V plug;
- corner connectors (if necessary);
- degreaser;
- double-sided tape (if necessary);
- masking tape;
- insulating tape;
- soldering iron and solder (if needed);
- screwdriver;
- drill;
- scissors;
- knife;
- metal hacksaw, angle grinder or miter saw;
- roulette.
Decorative lighting for the kitchen
LED lighting serves as decorative lighting. Due to its flexibility, LED strip bends in any direction. Used to decorate functional areas of the kitchen. Place an LED strip in a work apron, or decorate cabinets, focusing on the details. Using RGB tape, you can highlight the hob in red, the refrigerator area in blue, and the dining table in green; this will create a cosmic atmosphere in the room.
Decorative lighting for the bottom of cabinets in a modern kitchen
Additional lighting based on LED strips can, in principle, be installed anywhere
Prepare the tape
Shot: Do-It-Yourself Magazine / YouTube
Using a tape measure, measure the length of the kitchen cabinets above the work surface and use scissors to cut the required amount of tape along the special marks. They are marked with a dotted line or scissors icon and bisect two copper pads.
Shot: Magazine “How to do it yourself” / YouTube
If you use the entire tape, you can connect to the standard wires. For cut fragments, solder copper stranded wires with a cross-section of at least 0.75 mm², and preferably 1.5 mm².
Illustration: Artyom Kozoriz / Lifehacker
When the length of the illumination zone is more than 5 m, never connect the strips in series, one to the other! In such cases, use separate cables from the power supply or one from the power supply, and branch the power from it to each tape.
Secrets of illuminating the work triangle
By doing electric lighting yourself, you can save money and also create a new design style to suit your taste.
- Electrical appliances should be placed not on the surface of the headset, but in the work apron itself, using LED strips.
- It is better to illuminate cabinets with glass shelves from below with an additional light source, which will add lighting to the work area.
- The old set will be transformed with the help of overhead lamps, which can be placed anywhere due to the existing mounts.
- Placing LED strips around the entire perimeter due to unusual color shades will create an incredible design in the room.
An interesting solution for illuminating the work area is a strip with flat lamps that can be moved along the guide
Make a test assembly and fitting
To avoid mistakes after installation and not have to redo the entire structure later, it is better to first assemble all the components together and make sure they are working.
Illustration: Artyom Kozoriz / Lifehacker
If you chose a contactless switch, connect everything according to the diagram above. Connect the cables from the LED strip to the power supply: red to the +V terminal, black to COM. Next, connect the L and N terminals on the power supply to the OUT output terminals on the IR switch (it doesn’t matter in what order). Then connect a cable with a plug to the input terminals IN of the part and plug it into the socket. All you have to do is connect the sensor, hold your hand next to it and make sure that the backlight works.
Illustration: Artyom Kozoriz / Lifehacker
If you use a regular switch (keyboard or with a cord), then everything is even simpler. In this case, one of the wires from the plug should be connected directly to the power supply, and the second should be cut, stripped of the ends and connected to the switch terminals.
At the same stage, think about the location of the wires, find a place for the power supply, and also figure out in which places you need to drill cabinets in order to pass the wires through the holes.
Advantages of LED lighting
LED lighting has a number of obvious advantages:
- Resistance to mechanical external damage;
- Durability – kitchen lighting strip can last 14 years or more even when working more than 15 hours a day;
- A variety of colors - kitchen lighting under cabinets can be made in white, red and orange, green and blue, purple and yellow. You can also choose LEDs that operate in the infrared and ultraviolet spectrum;
- Excellent lighting brightness, and the device does not require time to warm up;
- Affordability (due to distribution and popularization);
- Possibility to use tape with different radiation angles;
- Safety;
- Environmental friendliness;
- Undemanding to room temperature.
Saw off the profile
Frame: Evgeny Lenkov / YouTube
Measure and cut the required amount of profile. Do not forget to take into account the size of the plugs - if this is not done, the part will stick out behind the cabinet. A hacksaw, angle grinder or miter saw is suitable for cutting.
It is more convenient to cut immediately with the diffuser installed. And to prevent the latter from fidgeting and chipping, wrap two or three turns of masking tape around the cut site.
General lighting in the kitchen
Now let's see how you can create general lighting in the kitchen. The traditional option is a chandelier. But it does not fit into every modern interior; nevertheless, it has its place.
Traditional general lighting - a chandelier in the middle of the ceiling
Often kitchens are not square, but rectangular in shape. In this case, you can find a chandelier that is elongated. For a long and narrow room, this is the best option that will provide optimal light distribution.
Install a long lamp in a narrow kitchen
If the ceilings are low, you won’t be able to hang a chandelier—it will get in the way. The solution is to find a lamp that is almost flat. It can be square or round - whichever suits the chosen kitchen design style best.
Recessed square lamp
If you are going to make a suspended or suspended ceiling, you can “scatter” spotlights over the surface or create some kind of pattern from them (read about ways to place spotlights and more here). You can also make lighting around the perimeter of the “central” zone. Such lighting in the kitchen visually helps to raise the ceiling and make the room a little more spacious.
The lighting can be made in a plasterboard ceiling or with a suspended ceiling
All these methods can be combined, so the number of options is very large. But it is important not to forget that there is also lighting for two other zones and to look for lighting fixtures for this area as well, because they must match in style.
Attach the profile in place
Shot: DIY apartment renovation / YouTube
Attach the profile to the cabinet. If you use the supplied clips, fasten them with screws, stepping back from the edges of the guide by 10–15 cm, and snap the part into them.
Shot: Magazine “How to do it yourself” / YouTube
When attaching the profile directly to furniture, make holes in its base every meter or only along the edges, if the length is short: first with a 4 mm drill for screws, and then lightly drill them with an 8 mm tool to form a chamfer where the screw head will hide. After this, screw the profile to the cabinet.
Frame: Ruslan Viktorovich / YouTube
If you don't want to mess around, use good quality double-sided tape. Be sure to degrease the surfaces of the cabinets and profiles, apply tape and install the metal part in place, pressing well.
Additional lighting: design ideas
Spots are a group of movable light sources attached to the ceiling using a metal strip. The placement of designer lamps in the kitchen will help illuminate any corner of the kitchen. The only negative is the bulkiness of the design, suitable for high ceilings.
Slots are very convenient, as they can be directed to the desired area. The appearance of such a suspension may vary, as can the height of placement.
Built-in spotlights are located in cut-out holes and are an inexpensive source of lighting. They illuminate the tabletop well, but installation is technically difficult at home. It is better to order this option along with the furniture as a set.
Light beams, which are relatively inexpensive, illuminate the work area well, but have a simple design that stands out roughly from the general background of the kitchen. LEDs have a number of advantages - they are energy efficient, unnoticeable, have a long service life, and illuminate the desired areas as additional lighting.
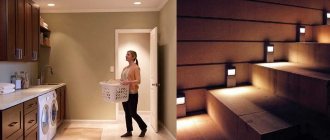
Even drawers can be illuminated with LEDs
Place the switch
Shot: Magazine “How to do it yourself” / YouTube
If you planned a stationary switch at the renovation stage, then it should already be installed. In the case of a cord switch, build it into the bottom of the cabinet by pre-drilling a hole. Or use a mounting plate: attach it to the kitchen eaves or other convenient place, and then insert the switch into the plate.
Shot: Westline furniture fittings / YouTube
When using a contactless switch, hide it in one of the cabinets, and place the IR sensor in a suitable place by drilling a hole of the required diameter in the bottom or wall of the box.
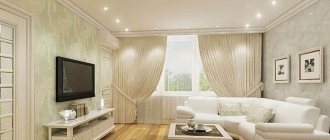
Dining area lighting
The light near the dining table can be made in only two variations: a story sconce, one or several lamps on a long cord from the ceiling.
It is important to maintain the style
You can use the sconce if the table is near the wall. When choosing the location of a wall lamp, we are guided by two considerations: the degree of illumination and convenience. The lamp should not interfere, for which it is placed at a height of 60-80 cm above the tabletop. In order for it to illuminate the entire table, it is advisable to find a model that allows you to move the lamp away from the wall.
An example of the location of sconces above the dining table in the kitchen
To ensure that the lighting in the kitchen is not only bright, but also beautiful, all chandeliers and sconces are selected in the same style, which should also be in harmony with the overall design style.
Choosing a lamp for the kitchen
Most often for the kitchen area they choose:
1. Built-in spotlights;
2. Surface-mounted lighting fixtures;
3. LED models;
4. Bus lamps;
5. Hanging chandeliers.
What are the best ceiling lighting options?
An interesting type of ceiling lighting is the installation of electrical appliances along the entire perimeter of the ceiling. Fluorescent and neon lamps will create an unusual effect on a glossy stretch ceiling. Lighting with duralight is necessary where light weight of the structure is needed. The LED strip will last longer if you use its length greater than 16 m.
The correct choice of kitchen lamps takes into account the area of the room, the color shades of the interior and the style.
It should be noted that when starting to install electrical appliances, you need to contact specialists and designers who can create a safe and cozy atmosphere in your home.
Profile for LED strip for kitchen
When considering what types of LED strips there are, it is worth mentioning aluminum profiles. LED strips can be glued to any surface using an adhesive backing, but this is not a very attractive or safe option for the kitchen. Therefore, products are often ordered immediately with profiles. These elements perform both an aesthetic and protective function. They are used for the following reasons:
- facilitate installation;
- protect from high humidity, mechanical damage and other factors;
- smooth out the dots from the diodes and form a more even strip of light;
- help to beautifully decorate the lighting.
The LED profile is produced in a standard length of 2 meters. They come in overhead U-shaped, corner and built-in. The latter option is rarely used, since no one is usually going to dismantle the kitchen to install lighting. It is chosen only if such lighting is planned at the design stage.
The plastic screen of the profile can be matte or transparent. Usually matte is chosen, as it smoothes out the dots from the tape diodes. Plugs are placed at the end of the structure.