Recently, underfloor heating has become an increasingly popular way of heating a country house. This heating system can be used as the main and only source of heat, or can be used to create additional comfort .
A warm floor in a private house distributes heat evenly throughout the room, unlike a radiator heating system. The floor itself and the lower layers of air are heated, which, gradually rising upward, increase the temperature of the room as a whole.
The variety of systems allows you to choose the only one that is optimally suited for a particular private home and the needs of its owner. One of the advantages of this method of heating a room is the combination of increased comfort and attractive appearance . All components of the system are hidden from view, while effectively doing their job . This not only pleases the eye, but also makes the house reliable: the heating elements are located under the covering. Thus, the premises are completely safe, which is especially important if there are children in the house.
Variety of heating systems
The heating system is responsible for creating a warm, favorable microclimate in the house. In a private home, this could be radiators or heated floors. The disadvantage of the battery is its small surface area of the device. Due to the increase in temperature, the speed of air movement increases. In addition, dust often accumulates in batteries.
But a warm floor has a large heat transfer area, which allows you to heat large volumes of air faster. The most common type of heated floor is considered to be a water floor, which is powered by a gas boiler : it heats the water, it goes through pipes and becomes a source of heat for the floor.
The entire variety of types of heated floors is divided according to the following criteria:
- according to the operating principle: infrared or convective;
- by type of boiler: it can operate on solid or diesel fuel, gas or electricity;
- by coolant: they are air, water, electricity.
Choosing the required heating system is a complex and responsible matter that should be entrusted to professionals. They can take into account all the advantages and disadvantages of heating types and the conditions of a particular home. The heating system is selected at the design stage . After all, one of the factors influencing the choice is the material from which the building is constructed. This is also important to consider.
Laying the heat insulator
Extruded polystyrene foam and cross-linked polyethylene foam, only these two materials can be used for thermal insulation in a water heated floor system.
Before laying the heat insulation sheets, a damper tape 10-12 mm thick is glued around the perimeter of the room. It serves not only to compensate for the thermal expansion of the screed, but also to prevent heat from escaping into the walls. In height, it should protrude beyond the boundaries of the top layer of the screed.
The heat insulation sheets are laid out staggered and always on top of the waterproofing layer. For waterproofing, it is best to use polyethylene film with a thickness of 0.2 mm.
If you decide to make the thermal insulation thickness 10 cm, then it will be better if you lay two layers of slabs 5 cm thick. Be sure to have a spacing between the layers.
There is an option to use special slabs designed for organizing water-heated floors as a heat insulator. Their difference is in the bosses on one of the surfaces. A pipe is laid between these bosses. But their cost is unreasonably high. In addition, not all pipes will be supported in such slabs. For example, polypropylene and polyethylene pipes are too elastic and will require additional fixation.
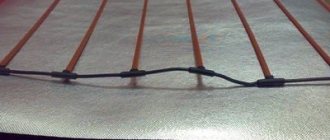
The pipes are not attached to the heat insulator. The fastener must pass through the foam layer and be fixed in the screed. This is a very labor-intensive process considering the amount of work involved.
Mounting tapes are a more acceptable solution, but it is very difficult to lay a pipe on them in a spiral (snail).
The best option would be to fix the pipes on the mesh. In this case, the mesh will serve specifically for fastening pipes, and not for reinforcing the screed.
There are special meshes made of biaxially oriented polypropylene, or you can use a simple masonry mesh.
See also: Electric underfloor heating
Installation of underfloor heating with liquid coolant
If you live in a country house permanently, you should take advantage of the centralized gas supply and choose water as a coolant. If a country house is used as a summer cottage, for the weekend, it is worth taking a closer look at antifreeze. It will allow you not to flush the water every time you come to the dacha.
Warm water floors in a private house are a closed circuit . It is laid out from pipes and mounted under the floor covering. Coolant water circulates through pipes that are built into the screed. The boiler heats the water, from which it passes into the main collector and enters the distribution unit. From here it is evenly distributed throughout the pipes, transferring heat to the screeds. Having lost temperature, it goes back to the boiler for the next cycle.
A heating system with liquid coolant can be open or closed circuit . The difference between them is the design of the expansion tank.
In an open circuit, the tank communicates with the environment; when heated, liquid can be added to it to compensate for its deficiency.
The closed-type design has special features, in particular the presence of a membrane tank.
The water system is installed in one of three ways:
- on the ground;
- on the base, usually a concrete slab;
- on a wooden floor.
It is quite rare to lay it on a wooden floor. Most often, it is removed, a screed is poured, and then the system is laid. A simpler option is when all elements of the system are laid on the subfloor (base) and filled with self-leveling mixtures. True, this reduces the useful volume of the floor due to an increase in its thickness. This option will not be convenient for rooms with low ceilings.
A warm wooden floor in a private house is usually installed on the ground . A warm floor on the ground is laid as follows: remove the top layer, form a cushion of up to 10 cm from sand and crushed stone, and lay a material with waterproofing properties on top. As a rule, this is roofing felt, a special membrane. A rough screed is laid over all this, and pipes and insulation are placed on it.
The easiest way is with a concrete base. It is leveled, the cracks are sealed, and the base for laying the heated floor is ready.
The system consists of the following components:
- pipes, which are usually made of polypropylene or metal-plastic;
- fasteners;
- thermal insulation materials;
- manifold and fittings with which they are connected.
A double-circuit boiler is used for heating. It also provides hot water to the home.
A water-heated floor does not heat more than 55°; usually the coolant temperature is 35-45° maximum. At the same time, the temperature of the floor surface is 26-31°: 26° in places where people are constantly present, and 31° in rooms where the stay is temporary.
The circulation pump is mounted outside the boiler or built into it. It allows you to withstand one of the requirements for a water floor: the temperature difference between the supply water and the return water should be no more than 10°.
There are a large number of options for connecting a water heated floor to a heating system. Let's look at four schemes for water heated floors in a private house.
- Direct connection diagram.
- Circuit with three-code valve.
- Scheme with a pumping and mixing unit.
- Scheme with a thermostatic kit for one loop.
In this table we will see a small comparative analysis of the advantages and disadvantages of these schemes. This will help you choose the best scheme for a particular home.
Features of installation of water heated floors
Before pouring a heated floor in a private house, it is necessary to lay high-quality waterproofing and provide protection against leaks. When installing a heated floor, you need to cover the screed with a thick layer; this is the only way to hide the pipes well . The system consists of several layers and is a three-dimensional structure.
This is what the structure of a water-heated floor in a country house looks like.
Laying heated floors is carried out in several ways:
- snake;
- double snake;
- corner snake;
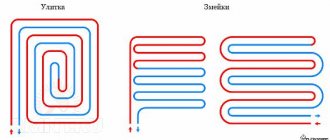
- snail or spiral.
You should not do the installation of a water heated floor in a private house yourself; the risk of making a mistake is too great. It is better to leave this matter to specialists with experience working with similar systems.
Wiring diagrams
It was already mentioned above that the layout of heated floors can be different. Depending on the design and compliance with the installation rules, the distribution of thermal energy in the room will occur. There are three main pipe layout schemes, but what they all have in common is that pipes must be installed from the walls towards the central part.
Table. Water floor installation diagrams.
| Snail | In this case, the pipes are laid in a spiral from the wall to the center, and then return to the starting point. Moreover, the structure gradually narrows towards the center of the room. When calculating the circuit and laying it out, you must remember to leave free space between the pipes so that you can “lead” them back to the power source. It is noted that such a scheme will allow achieving the most uniform heating of the floors, and thanks to it, hydraulic resistance can be reduced. The number of pipes is also used less than in other cases. The main disadvantage is difficult installation. |
| Snake | In this case, the pipes are laid along the walls with loops in one direction and then in the opposite direction. When looking at such a diagram, you can notice the waviness of the final pattern. It’s easy to lay pipes this way, but due to the frequent steps of pipe laying, it’s unlikely to achieve uniform heating of the floors without temperature surges. |
| Combined type | In this case, both pipe laying schemes are combined. This option is used if the walls in the room are cold enough. The pipes are laid so that in some places they lie in the form of loops, and in others at right angles. |
Pros and cons of using water floors
Water heated floor technology in a private home has the following advantages:
- economical consumption of electricity: installing a water heated floor in a private house can significantly reduce heating costs;
- uniform heating of all rooms;
- eliminating the risk of burns;
- the possibility of using such a heating system as the only one in the entire house;
- no electromagnetic field is created;
- the air in the rooms is not dried;
- the ability to regulate the microclimate if each room has its own heating circuit;
- its maintenance is inexpensive;
- any technology can be used to cover the floor: heating the surface will not damage it and will not lead to the release of toxic substances;
- creates a comfortable stay for all residents. Warm floors are especially pleasant for young children, who spend most of their time sitting on its surface.
With water heating it is much easier to remodel.
To be fair, the disadvantages of water heated floors should also be outlined:
- installation is quite complex and is a lengthy process. For example, a concrete screed takes at least a month to dry;
- sometimes leaks occur; to eliminate them, complete dismantling of the coating is necessary;
- there is a risk of a decrease in pressure in the heating system;
- you need to install mixers to regulate the temperature;
- it is impossible to install it on the landings of a country house;
- the price of water heated floors in a private house is much higher than that of an electric system.
Conditions for installing a water floor
It is recommended to include the installation of an additional heating circuit in the project even before the start of construction - this makes calculations easier.
In a finished new house or building where the radiator system has been in operation for a long time, installing a water floor is also possible, but under certain conditions.
The benefits of water heating have long been appreciated by residents of Europe and Russia: it effectively heats rooms, saves expensive energy, creates the most comfortable environment in bedrooms, bathrooms and children's rooms
If the desire to insulate the floor arose after the construction of the house, you should determine whether the building is suitable for this. One of the main conditions is pre-made thermal insulation of the house, since heat losses above 100 W/m² will make the installation of the floor useless.
Pay attention to the height of the ceilings: the installation “pie” with pipes takes about 15 cm, or even more, from the total height of the room. After implementation of the system, the dimensions of doorways must be maintained, with a height of 210 cm or more.
Special requirements apply to the foundation. It should be strong, smooth, clean. An unstable base will lead to unevenness, and these will lead to deformation of pipes with coolant
If the house is new, then before starting installation it is necessary to completely complete construction - erect walls and ceilings, install windows, and plaster.
Types of pipes used
To install heated floors, pipes made of metal-plastic or plastic are used. Polypropylene is also considered an excellent choice: it is sealed, resistant to deformation, and has high thermal conductivity.
When choosing pipes, their technical characteristics are important. You should pay attention whether they are suitable for heating systems or only suitable for plumbing. The markings on the product will help you navigate these subtleties. The following indicators must be indicated on pipes for heating systems:
- linear expansion: up to 0.025 mm/m;
- thermal conductivity: from 0.43 W/m°C.
To calculate the number of pipes required for a particular heating system, you need to know the diameter of the pipe and the laying pitch. It is better to select pipes with a specialist who will pay attention to both quality and technical nuances.
Selection of pipes for floor heating
Contrary to popular belief, the choice of pipes for installing a heat exchanger in the floor is not so wide. There are two options: cross-linked polyethylene and copper. The most obvious advantages of special materials are durability, resistance to deformation, and a low coefficient of linear expansion. But the main advantage is the oxygen barrier, which ultimately prevents the formation of sediment on the inner surface of the pipes.
The purpose of using copper is the high thermal conductivity of the tubes and resistance to corrosion. An obvious disadvantage is the complexity of installation and the high risk of failure if there are solid particles (sand) in the coolant. Despite the fact that all you need for soldering is an inexpensive gas lamp and flux, bending the coil correctly is a difficult task. This is despite the fact that there can be several dozen turns of the copper tube and one mistake, resulting in a break, leads to the failure of the entire segment or the need for additional soldering.
Polymer (polyethylene) tubes have a higher coefficient of thermal expansion; in addition, they lose their strength properties when heated above operating temperatures, however, in heated floors, in principle, the coolant does not heat up above 40 °C. Ease of installation is an obvious plus. It bends easily and is laid in a spiral or coil. The pipe is supplied in coils of 200 m, allowing you to lay warm floors without a single connection throughout the entire volume of the future screed. Most branded polyethylene tubes require the use of special tools for crimping and welding.
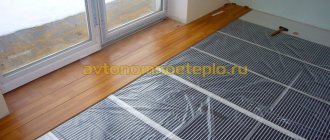
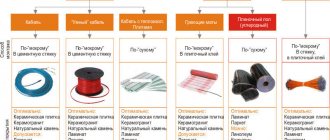
Electric heated floor installation
There are several types of heated floor installation in a private home:
- cable;
- heating mats;
- infrared film floors.
In cable heated floors, heating is carried out using a cable in a screed . For this, a single-core cable is used, which is less expensive, but more difficult to install, or a two-core cable. The latter is easier to install, since the connection is only needed on one side, while the single-core one is connected on both sides. Cable flooring is well suited for any room: the cable can be easily laid in various shapes, it is only important to determine the laying step.
Heating mats are heating wires attached to a coarse mesh . This type of electric heated floor is more convenient, since the installation step has already been calculated and the layout and fastenings have been planned. In addition, the cables in such a system are thinner, so they can be laid in tile adhesive rather than in screed. This simplifies installation and does not make the floor too high.
The installation of the mats itself is simple: the roll is rolled out onto the floor surface, then the power is connected.
Infrared film floors create a microclimate in the room by exposing furniture and interior components to infrared radiation . Next, these objects heat the air, so it does not dry out. This flooring consists of a thin film containing conductive carbon strips. Instead, there may be a continuous layer of carbon. The advantage of the system is its instant heating, but the system cools down just as quickly after switching off.
Selection and calculation of materials
After drawing up the project, it is necessary to calculate the required material. To do the calculation yourself, you can use an online calculator. If you are not sure that you yourself can correctly calculate the required material for a heated floor, then you should turn to professionals.
To carry out these calculations, standard indicators are taken that are not affected by the installation method and conditions - the area and characteristics of the room, the power of the boiler and pump, the diameter of the pipes. Also, it is necessary to calculate the heat transfer coefficient; it is influenced by the material from which the walls are made, the degree of insulation and the size of the windows. If the heat transfer rate is 100 W/m2, then such a warm floor is intended for use in private homes, only as an additional source of heating.
Pipes
The length of the pipes is calculated according to the prepared diagram drawing. A prerequisite is a solid water circuit, therefore, if the room area is large, the pipeline should be divided into several parts, each no more than 100 meters.
The standard formula by which you can calculate the size of a pipeline is the area of the room in square meters. divided by the laying step in meters, and the length of the curls and the distance to the collector are added.
For a do-it-yourself water structure in a private house, it is recommended to use a pipe product with a diameter of 16 and 17 mm. Experts do not recommend using a contour with a diameter of 20 mm (although it is acceptable), because this increases the thickness of the screed. And the larger it is, the lower the efficiency of the system. The optimal thickness of pipe walls is 2 mm.
Average pipe consumption per 1 m2:
- 10 meters at 10 cm increments;
- 6.75 m - at 15 cm.
The main material from which water floor pipes are made:
- Cross-linked polyethylene - PE-X and PERT. The advantages of the PE-X type are the presence of shape memory due to the high cross-linking density. That is, a stretched and deformed contour under the influence of a hot coolant returns to its original shape. It is worth saying that the PE-X circuit with axial fittings is not dangerous to fill with a screed, but the PERT equipped with push-in fittings must be open at the joints. Therefore, it is recommended to lay the PERT type in the screed only as a single piece, and install the fittings only in the places of fixation to the manifold.
- Metal-plastic - pipes made from this material are often used in water floor structures, as they are inexpensive and easy to install (they bend easily).
- Copper is an expensive product and requires protection from the effects of alkali in the concrete solution. Therefore, it is rarely used when installing a water heating floor in a private house with your own hands.
Professionals do not recommend installing composite pipes with an aluminum layer in your home, as there is a risk that the metallized layer may peel off.
It is better to buy a product with a polyvinylethylene layer inside if more reliable insulation is required.
Insulation
The purpose of thermal insulation is to separate the heating elements from the base so that warm air flows upward and does not go into the ground. The presence of thermal insulation material is a prerequisite for installing a heated floor. Without it, the floor will not work effectively, and the meaning of its construction is generally lost.
The most common insulation materials include:
- Extruded polystyrene foam - has increased mechanical strength and low thermal conductivity. In addition, the product is moisture resistant, so it is suitable for installation in the kitchen, bathroom or swimming pool. EPS is easy to install, as it is equipped with special grooves on the sides. The sheet sizes are 600 by 1250 and 500 by 1000, and the thickness ranges from 20 to 100 mm.
- Profile mats with grooves for fixing pipes are expensive, but with their help, laying the circuit is greatly simplified. The thickness of the mats is only 1 - 3 mm.
Deciding on the thickness of insulation for a warm water floor in a private home is not difficult. You need to start from the installation conditions:
- on the ground - a layer of 10 cm is required;
- above the basement - 5;
- if there is a warm room below - 3 cm.
In addition, you need to purchase fasteners that will fix the slabs to the floor (disc dowels).
Components for manifold
In order for the structure to function, it will be necessary to equip a collector-mixing unit. With its help, the heated coolant is directed into the heated floor circuits and the temperature regime is adjusted.
The collector units are not sold as a set, so you will have to select the components for it yourself. If you are not sure that you can properly equip the manifold cabinet yourself, then it is better to seek help from specialists.
The collector unit includes:
- manifolds with valves;
- connecting fittings;
- automatic air vents;
- brackets for mounting on the wall;
- drain taps;
- metal cabinet;
- mixing unit and pump;
- thermometer.
Since, most often, warm water floors are filled with concrete screed and are planned for long-term operation, the material must be chosen responsibly. That is, do not buy cheap and low-quality products; all material - pipes, insulation and components must be of high quality and with a long service life.
Pros and cons of electric heated floors
Electric heated floors have many advantages:
- reliability and absence of leaks;
- silent operation;
- aesthetic appearance;
- duration of use of the system;
- the entire area is heated evenly;
- the system is easy to operate.
- ease of installation;
- low cost;
- do not raise the floor too high.
The disadvantages of electric heated floors are as follows:
- high energy consumption;
- weak electromagnetic radiation occurs;
- To effectively heat all rooms, electric floors are used in parallel with classic radiators.
Electric heated floors are sometimes turned on only in some rooms, for example, in which the floor is covered with tiles. In this way they increase the comfort of individual rooms.
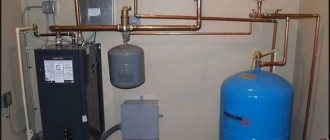
Boiler installation
For a “warm floor” system, a boiler is selected depending on the coolant. If the house has gas, then it is advisable to choose a gas boiler. It is installed indoors. Coolant costs will be minimal. Equipment with outlets for hot water supply and for a floor water main is required.
If a solid or liquid fuel stove is installed in the house, then a separate boiler room is installed for heating equipment. The disadvantage is that you have to constantly monitor fuel consumption.
The water in the heat exchanger heats up to a high temperature; you will need to additionally install radiators and towel dryers; you can take separate circuits to a bathhouse or garage. These measures are necessary to maintain a certain pressure and temperature of water in the floor line.
Features of installing heated floors in a wooden house
How to make a warm floor in a wooden private house? It is necessary to take into account the characteristics of wood and remember that in general the temperature in a wooden house should not be higher than 30°. Otherwise, the wood will dry out, crack and lose its properties.
To reduce installation costs, you should equip a warm house of any kind during construction. You can use a major overhaul.
The subfloor is insulated. For installation and connection to the heating system, we recommend inviting specialists to avoid mistakes and risks.
If an electric heated floor is installed, the cable must be in an outer metal braid. It will protect the cable from external damage, including from rodents. When connected, the electrical network must have the appropriate parameters. It is necessary to install devices to protect the system from short circuits.
If a water heated floor is installed, it is important to carefully level the base. Heating pipes are laid out in special boxes, which are made of plasterboard, wood or material that absorbs moisture. Then they are covered with boards and a heated floor covering, usually laminate, is laid on top.
Laying pipes in a private house
In order for a water heated floor to work efficiently and be sufficiently reliable, the pipes must be laid at a certain distance from each other. Typically, the step value varies from 15 to 35 cm and is determined depending on the required heat transfer - for more efficient heating, the step must be reduced. There is no point in saving on pipes - too large a step will lead to uneven heating of the floor areas, which will lead to a noticeable decrease in comfort.
The total length of pipes for one room is calculated using the following formula:
- D = S / M * k, where
- D – total length of pipes,
- S – room area,
- M – laying step,
- k – safety factor, varies from 1.1 to 1.4.
Usually for 1 sq.m. The room area requires about 1.5-3.5 m of pipes.
An important point is the layout of the pipeline, which can be performed according to one of the following schemes:
- "Snake" . A good option for small spaces. Since the area is small, the temperature in the pipes remains virtually unchanged throughout the entire circuit.
- "Snail" and "double snake" . These layout options are suitable for medium-sized rooms. Thanks to the close location of the supply and return circuits, the floor will warm up evenly.
- A circuit that includes several circuits . For complete and efficient heating of large rooms, it is most advisable to equip several separate circuits that will provide good heat transfer and be quite reliable.
Heated floor design
When designing a heated floor system, it is important to consider the following parameters:
- height of the room. The water heated floor system raises the floor level by 100-120 mm;
- door locations. Due to the raised floor, it is necessary to either maintain the standard doorway height of 2200 m, or consider increasing it. The third way is to make a door to order based on the dimensions obtained;
- window orientation. In some cases, it will be necessary to increase the power of the system: if the windows are oriented north-northwest, on the windy side, and are larger than standard;
- how much beams and floor slabs can withstand the load. You can choose a water-based heated floor on the 2nd floor of a private house to lighten the weight of the structure.
For country houses, water floors are often chosen, which better meet the requirements of a private home.
Preparing the base
Irregularities on the base are corrected with a screed if they exceed the permissible limits. A screed is made from cement-sand mortar (4-5 cm thick), or self-leveling mixtures are poured, which can be made 0.5-1 cm thick.
In wet rooms a waterproofing membrane is installed. The same protection is assumed if there is also a bathroom, swimming pool, or toilet below, where there may be damp vapors.
The width of the damper tape should not be less than 50 mm, and it should protrude 20 mm above the structure of the entire heated floor.
Insulation of underfloor heating systems
How to make a heated floor in a private house so that the installation is correct and the result pleases with comfort? Using insulation, experts recommend. A heated floor system, both water and electric, transfers part of the heat to the material of the floors themselves. Such heat loss will result in additional costs. Thermal insulation, acting as a heat shield, will help prevent energy loss and save money.
The thermal insulation layer also ensures uniform heating of the room. High-quality thermal insulation must meet the following requirements:
- ensure the formation of upward heat flow;
- reduce or eliminate heat loss down to the ceiling;
- be a stable and durable material that does not collapse over time;
- have a low thermal conductivity coefficient;
- be resistant to the load from pipes filled with water and screeds on top of them;
- restore its original shape after reducing pressure during operation.
When choosing insulation, it is important to correctly determine its thickness. If it is less than necessary, heat will be lost in the downward direction. And the required thickness will allow the insulation to pay for itself within 3 years of using the heated floor if the energy source is natural gas.
When purchasing insulation, focus on the following parameters:
- advice from specialists and sellers;
- reviews on the Internet;
- material cost;
- manufacturer and its reputation.
Types of insulation for heated floors:
- Styrofoam. It is light in weight, has high vapor permeability, but is not very dense, is subject to deformation under load, ages too quickly over time, and also emits toxic gas. It is recommended to install polystyrene foam to increase strength between joists;
- expanded polystyrene. With high strength, able to withstand large mechanical loads. However, there is practically zero vapor permeability;
- cork insulation. It has a high level of compressive strength due to its special structure. The material is quite expensive, so it is usually used in rooms with an insulated base. In this case, the material consumption will be significantly lower, which will not hit the budget as much. However, the material is hygroscopic, so additional hydro- and vapor protection will be required;
- mineral wool. Produced in mats or hard slabs. Since the thermal insulation properties of mineral wool are reduced when it is crushed under weight during installation, it is recommended to combine it with decking structures that are assembled from wooden logs. The disadvantages of this material are low moisture resistance and the presence of penofol in the composition, which is harmful to human health.
The floor surface for laying thermal insulation should be as level as possible.
TVP Installation Guide
Before laying the heated floor structure, you should carry out preparatory work: purchase components, mark the installation location of the cabinet, drill holes in the walls for communications. Then you can proceed to the first stage.
Subfloor installation
If you plan to install a heated floor directly on the ground, it is recommended to choose one of two options:
- make a “rough” screed from cement pouring;
- instead of screed, pour, compact and level a layer of sand.
A layer of sand will be required in any case, since it also serves as the basis for the screed. A layer of waterproofing is placed on it, the most basic option is a thick polyethylene film.
Compaction and leveling of the sand layer is very important. Small depressions up to 5 cm deep are allowed, but for pipe installation it is better if it is perfectly smooth
When making calculations, it should be remembered that heat loss when installing the system on the ground is higher, therefore, the temperature of the coolant in the pipes should be higher than usual.
Laying the heat-insulating layer
The insulation is laid on a clean, level floor. Before starting work, a strip is cut on the walls - the level of the clean floor; small depressions, if they were formed during the construction work, are filled with clean, dry sand.
Installation instructions:
- Spread the waterproofing - lay sheets of film with a density of 150-200 microns with an overlap of at least 10 cm and wrap them on the walls.
- Lay the slabs of extruded polystyrene foam with the markings facing up, joining the grooves together. It's better to start from the far corner.
- If necessary, cut out fragments with a construction knife.
- Secure the slabs with disc dowels at the corners, along the middle of the joints and in the center of the slabs.
- Seal the seams with construction tape.
If laying a second layer is required, then it is better to change the direction of the upper slabs, that is, lay them perpendicular to the lower ones.
When laying, avoid large gaps and cracks. If they do form, the voids can be blown out with foam or covered with scraps of polystyrene foam
To move on the slabs during installation, it is recommended to use thin boards or pieces of plywood - the structure of the slabs, despite their density, can be deformed.
Marking and placement of pipes
Markings are applied to the surface of the slabs using a marker or paint cord. If profile mats are used instead of EPS, markings will not be required.
There is a risk of bending and twisting of the pipe when unwinding, so it is better to use a special device for unwinding the coil. It will take longer to unwind manually
Before starting pipe installation, it is also recommended to install collectors and prepare places for connections.
Installation instructions:
- Unwind 15-20 m from the pipe, put a heat-insulating sleeve and a fitting on the end for connection.
- Connect to the collector.
- Carefully lay the pipe according to the markings.
- Secure the outline with harpoon staples.
- Bring the pipe to the manifold and connect the other end.
The length of each loop must be recorded, and not just remembered, but written down near the fitting on the wall.
A damper tape or some substitute is placed along the edges - for example, pieces of foam plastic 1.5-2 cm thick. They hold up well on liquid nails
Transit pipes passing through walls or transition zones are insulated as much as possible with sleeves. Instead of expensive imported products, you can use ordinary insulation - foamed polyethylene.
Installation of reinforcing mesh
Properly laid fittings should be located above the pipes, not under them or between them. An acceptable option is a metal mesh with a 10*10 cm cell made of 3 mm wire.
It is also incorrect to fix the contours to a metal mesh; in this case, it will serve as a stand, not reinforcement. Proper installation - when the mesh is above the pipes
Nowadays, many people use plastic mesh instead of wire mesh. This option is also suitable, since the polymer creates the necessary rigidity.
System testing
Until hydraulic tests have been carried out to check the tightness of the system, the screed cannot be poured. Usually the circuits are checked one by one.
First, a main line and a pump are connected to the pipe, and water is supplied. For drainage, use a hose connected to the drain pipe of the manifold.
A pressure test pump is the best tool for testing the system. It can be rented. You can also hire a specialist for testing, who usually has the necessary tools
During inspection, staples may fly off as the pipe tends to straighten under pressure. The harpoons that fly off are attached 5 cm from their original place; after pouring the screed, they will no longer fly off.
Laying cement screed
The pipes are left under a pressure of 5 bar and the screed is laid. Usually the traditional beacon method is used. You can use a metal profile for drywall as beacons.
A regular screed solution is not suitable; plasticizers and fiber must be added to the cement, since the load will be not only mechanical, but also temperature
Laying is done in parts, starting from the far corner. Immediately after pouring, each fragment must be leveled, dips and sagging must be eliminated.
After 2 days, the surface is cleaned, the damper tape is cut, the screed is sprayed with water and covered with film (the last two steps are repeated for 10 days).
How to choose a heated floor for your home
Do you need underfloor heating in all rooms or in some specific rooms? In what cases can you do without it, and when is it simply necessary?
If the flooring is tiles or porcelain stoneware, a warm floor will be simply irreplaceable. The kitchen, toilet, and bathroom need heating more than other rooms. After all, sometimes all the heating in the bathroom is a heated towel rail and hot water pipes. Warm floors will also be an excellent solution for children's rooms: children spend a lot of time playing on the floor.
Where to start choosing the type of heated floor? From determining for what purposes it is needed and in what rooms it will be installed. At the same time, keep in mind that it will not be installed everywhere in the room: in places where furniture and household appliances are located, there is no need for heating. Accordingly, this affects the amount of cable or film required.
Film flooring does not require a cement screed, but fits perfectly under carpet or parquet. The main thing is that the surface for the film floor is perfectly level. In order for the room to be heated effectively, more than 70% of the total area should be allocated to underfloor heating.
Each specific case has its own pros and cons for different types of flooring. There are 12 comparison parameters that will help determine the optimal type of heated floor for your home:
- How difficult is the installation?
- durability;
- reliability;
- suitability for repair of individual elements of the heating system;
- inertia;
- efficiency;
- Is it legal to use?
- does it make noise during operation?
- price;
- compatibility: with finishing coatings, rooms with high humidity, furniture.
You can see a comparison of these parameters in the table below.
Possible problems in building an autonomous house
Many articles have been written about the warm water field on our portal and many topics have been created where users share their experience of installing it. However, novice developers still have many questions about what kind of system this is and what pros and cons it has. In order not to repeat ourselves, we recommend reading the article “Warm floors - tips and recommendations for choosing”, where experts talk in detail about the basic operating principles and advantages of this surface heating system.
We will try to look at a warm water floor from the other side and consider it as an element that increases the autonomy of a country house. First, let’s understand the concept of “autonomous home” in relation to our country.
Practice shows that an autonomous house abroad and here are two big differences, both in the approach to its design and construction, and to further operation. Most often, a novice developer imagines an autonomous cottage as completely independent from all external power grids. Simply put, the house is equipped with engineering devices that generate enough electricity to power all the equipment in the cottage. This could be a boiler, pumps, household appliances, etc.
The “life” of a modern home completely depends on an uninterrupted power supply.
If, in extreme cases, water can be obtained from a well, the house can be heated with coal or wood, then, relatively speaking, if you unplug a modern cottage “from the socket,” the entire “engineering” will stop. We do not consider special cases of construction of completely energy-independent houses, which are heated by a stove, and the heating system is built on the gravitational principle of operation, i.e. does not require circulation pumps.
The main pitfall for developers who decide to go “autonomous” is that solar panels, solar collectors and wind turbines, due to their high cost, cannot be used in the cold regions of Russia as the only sources of energy.
Often, having calculated the cost of building such a system, for example, based on photocells, in which expensive batteries become the “weak point” - they need to be changed after a few years, taking into account the lack of sunny days, the user understands that the costs will never be recouped.
The larger the area of the house, the more expensive it is to switch it to a completely autonomous energy supply.
When it comes to foreign experience, many people think: “here they have it..., why is it like this with us?” But, for example, in Germany, wind generators have long become commonplace, and a private owner can sell the excess electricity generated on a “solar farm” to power grids. “Green” energy “there” is subsidized, and the state in every possible way stimulates its development, increasing the production of alternatives every year. The milder climate also plays an important role.
In our realities, the developer is forced, first of all, to rely on himself. And, although the number of autonomy enthusiasts is growing, and systems are becoming more accessible every year, in most cases, developers are only interested in a partially independent energy supply to the cottage. Those. the opportunity to comfortably wait out an emergency power outage or an accident in the boiler room - in winter and not freeze. an autonomous house and an economical house that consumes less energy in the event of force majeure comes first
Based on this, a modern country house should be thermally inertial - i.e. its design must be designed in such a way that the structure stores energy during normal operation. For this purpose, walls, floors, and ceilings are built from materials that have a large mass, as well as good heat capacity and heat transfer.
A good example of such a wall material is ordinary solid brick. Of course, this is not always possible to do (for example, in frame houses). In this case, a warm water floor becomes one of the elements of a system that increases the degree of autonomy of a country house.
Installation on a wooden floor
Wood does not conduct heat as efficiently as concrete, but installation on it is also feasible. For this purpose, distribution plates made of aluminum are used. The pipes are laid in wooden grooves made by attaching pre-prepared boards.
For installation of linoleum, carpet and other materials that require a flat surface, a leveling layer of chipboard, plywood or gypsum fiber board is laid over the pipes. If parquet or laminate is used as the finishing coating, the design of the heated floor can be slightly simplified, without the use of a leveling layer.
When choosing plywood and chipboard, make sure that they have sanitary, hygienic and thermomechanical characteristics that allow them to be used together with heated floors.
Floor installation methods
There are several ways to create a warm water floor.
- The most popular and reliable of them is concrete screed. Unlike electric types, 16 mm pipes cannot be hidden in tile adhesive, and it will not work. Therefore, the screed is poured at least 3 cm above the pipes.
- The second method is to lay pipes in cut-out polystyrene foam grooves. The grooves are made by hand, pipes are laid inside, then the screed is poured.
- The next option is often used in houses with wooden floors, although it requires a lot of labor - laying it in wooden grooves. To do this, boards are placed on the floor, which create a gutter of the desired shape for installation.
Technical characteristics overview
The water heated floor system consists of a circuit and a control unit. The first are located under the floor covering, the second is often built into niches with open access. This type of heating is used as the main or additional heat source.
The most effective option is considered to be a warm water floor under tiles or laminate. Carpets have low conductivity, so they act as a barrier between the system and the air.
Benefits and recommendations
Warm floors, unlike heating radiators, warm air masses over the entire area of the room up to 1.7 m in height. The readings will be higher in the area of the heat source, and not under the ceiling. This indicates greater productivity of systems built into the ceiling than other heaters.
Room heating efficiency of different heating systems Source floorheatmoshiriba.blogspot.com
If we compare the installation of electric and water heated floors, the second one will cost significantly more. But to obtain the same result, it will take more electricity than natural gas or solid fuel. Therefore, a water floor is about 5 times more profitable and is more often used as the main source of heat.
To maintain air temperature in the range of 20-25 0C, radiators heat up to at least 60 0C. The water in the underfloor heating system is brought to 35-45 0C. This also suggests that this type of heating system can be considered one of the most cost-effective. Savings will be up to 40%.
In favor of water heated floors, it is worth noting the fact that the system has minimal effect on the relative humidity of the air, that is, the air does not dry out. There is no active dust circulation. There is also no electromagnetic field, which negatively affects a person’s well-being.
Since the heated floor has a hidden installation system, you need to pay serious attention to the choice of pipes for it. Pipes must have high wear resistance, ductility, durability and low weight. All these characteristics, for example, are met by pipes from the manufacturer Lammin.
Disadvantages and consequences
Violations during the installation of water heated floors lead to leaks and repair work. Therefore, installing a water heated floor takes a lot of time. This fact is often considered a disadvantage, but there is no rush here.
To detect a leak, you will have to open the screed Source www.auckland.plumbing
If you plan to lay a heated floor in a screed, then the floor becomes noticeably heavier (up to 15% of the original weight). It is important to make prudent calculations. Not every foundation or load-bearing structure can handle such a load.
How to make a warm floor in an apartment? In a multi-storey building with a central water supply, the installation of the system must be accompanied by coordination with the service authorities. The connection is made to the water supply. There is an increase in hydraulic resistance, which is designed for vertical rather than horizontal systems. As a result, heating problems will arise in the neighboring apartments above, and the central system as a whole may fail. Therefore, it is not always possible to obtain permission to install heated floors.
The control unit includes several elements. They are expensive to install, configure and maintain. But overall, the costs are paid off by the results.
Heated floor control unit Source i.pinimg.com
Materials such as linoleum, carpet, and carpet are not recommended as finishing floor coverings. The list also includes laminate. But there are brands that are allowed for installation. The packaging must have the appropriate sign: water heated floor. It is important not to confuse it with electric, as the parameters there are slightly different.
Premises requirements
The installation of a water heated floor takes up space from 8 to 20 cm in height. Therefore, doorways must be higher than 2.1 m and ceilings at least 2.7 m.
It is important that the supporting structures and foundation cope with the load generated by building materials and coolant. Differences on the base are allowed within 5 mm to prevent the formation of air and an increase in hydraulic pressure.
Effective heating of a room with a water system is only possible with heat losses of up to 100 W/sq. m. This means that windows must be inserted, the walls must be plastered, and measures must be taken to insulate the structures.