Several years ago, a new type of heating called electric-water heated floor appeared on our market.
We all know well about electric and water heated floors separately. Each of them has its own advantages and disadvantages.
What kind of miracle is this – electric water heated floor? Is it really capable of combining all the advantages of two types of heating?
Let's look at exactly those parameters that are most often described in advertising brochures as obvious advantages, due to which you, in fact, should make your clear choice in favor of the new product.
Peculiarities
What exactly is an electric water heated floor? Essentially, it is a cross-linked polyethylene pipe with a heating cable inside.
Tube diameter 20mm, thickness 2.5mm. The tube itself is filled with non-freezing liquid. To prevent thermal expansion, an expansion joint is also placed in the pipe.
The entire structure is reliably sealed on both sides and has a given length (7m-14m-21m-28m-35m-42m-56m-70m-84m).
The price of this entire system is significantly more expensive than conventional heated floors. And here a logical question arises: what are we overpaying for and is it worth it?
Step-by-step instructions for installing ETP
Preparing the base
Marking
ETP flooring must be laid on a clean, dry base. It is necessary to cut a groove in the wall for the temperature regulator and wires. Carefully sweep away any accumulated debris.
Photo of the groove in the wall connecting the floor to the thermostat
Drilling a hole for the thermostat
The groove should be 20x20 mm
After this, you need to put a layer of thermal insulation on the base, for example, penofol or expanded polystyrene. If there is a heated room on the floor below, then it will be enough to lay a layer of penofol 5 mm thick. If there is an unheated room or ground under the heated floor, then it is necessary to use polystyrene foam with a thickness of 20 mm to 50 mm, depending on the severity of winters in your area. Thermal insulation is fixed using any adhesive material.
Laying penofol
Laying heating elements
Calculation of cable laying pitch
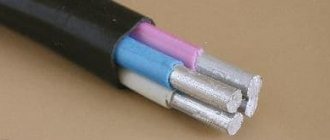
Selecting wire cross-section
Before installation, mark the floor. It is important to highlight those areas that should not warm up. It is important to remember that a distance of 0.5 m must be maintained from walls and large furniture, and a distance of at least 0.3 m from heating appliances, stoves and fireplaces.
If you are installing a heated floor based on a heating wire, then first you need to install the mounting tape. It will fix the turns of the wire and prevent them from moving. Lay the tape over the thermal insulation and secure with dowels.
Attaching the mounting tape
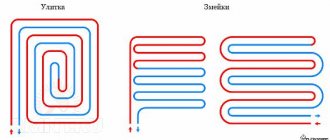
Carefully unwind the heating wire and lay it on top of the thermal insulation and mounting tape, strictly observing the parallelism of the turns and the spaces between them. Secure each turn using fixing tendrils on the mounting tape. The turns of the wire should not overlap under any circumstances. After installation, measure the insulation resistance; it should not differ from the standard by more than 10%.
How to secure a cable in a mounting tape
Fastening the cable in the mounting tape
If you are installing heating mats, then simply carefully place them over the entire floor area that needs to be heated. Connect them to each other according to the diagram given in the technical data sheet. Then also check the insulation resistance.
The distance between the turns of the heating cable is 50-60 cm
Distance of at least 8 cm
Distance 10 cm
Distance from the wall at least 5 cm
If you are using infrared film, carefully unwind it along the base, then connect the sheets of film together in parallel. Route the wires to the location where the thermostat is installed.
Installing a Temperature Sensor
If you are installing an ETP based on a heating wire or mat, then the temperature sensor should be located in a corrugated tube. Make a small depression in the thermal insulation layer and place a tube with a diameter of 20 mm in it. Plug one end of the tube tightly with insulation, and bring the other end above the floor level in the same place where the wires will come out.
Place the temperature sensor at the end of the tube and make sure it can be easily pulled back out. This is important for the possibility of replacing the sensor after the floor has been screeded.
If you are installing an infrared ETP, then the sensor can simply be placed in the recess in the center of the film strip. Since the screed in this case is not flooded, you can replace it at any time.
ETP connection
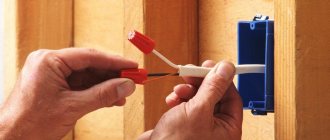
Connect the heating wire and temperature sensor to the thermostat according to the diagram provided by the manufacturer. Then connect the entire system to a residual current circuit breaker with a leakage current setting of no more than 30 mA. Under no circumstances should you apply tension to the heated floor until the screed has completely hardened. Checking the integrity of the insulation and correct connection can only be done by measuring the resistance of the heated floor and comparing it with the control values.
If you are installing an ETP system in a bathroom or bathhouse, be sure to connect the heating wire braid to the building’s grounding loop. The use of grounding and a circuit breaker with leakage current control provides absolute protection against electric shock.
Installation of a thermostat
If you are using an infrared ETP, you can check it by turning it on, the floor should be warm to the touch.
Filling a heated floor with screed
If you use an infrared ETP, then filling is not required, you can immediately begin installing the finishing coating.
Screed thickness from 3 to 5 cm
If you use a heating wire or mat, then filling the screed is strictly necessary. It is necessary to fill with a self-leveling cement screed to a thickness of 30-50 mm. After the screed has hardened, you can begin installing the finishing coating, for example, tiles, laminate or linoleum. The first switching on of the heated floor can be carried out only after the screed has completely dried. Most manufacturers set a complete drying time of 28 days. This ensures that there are no voids around the wire, which will eventually cause the wire to burn out.
Video - Installation of heating mats
Video - Warm floor under tiles
Video - Installation of Electrolux heated floor, cable
Retains heat longer
Since there is a coolant inside the pipe, the entire system supposedly retains heat better than a conventional heating cable under a screed.
Specifically, two hours longer. For simple heated floors this time is 2 hours, for electro-fluid floors – 4 hours.
That is, so that you understand, the surface area of the floor does not change in any way, nor does the material and thickness of the screed.
The cable in the pipe gives off heat to the screed; a regular heating cable without a pipe also gives off heat to the screed.
In both cases, the floor warms up exactly the same. And only by adding liquid to the tube, in some magical way the indicators should change several times.
Roughly speaking, you gave the liquid 1 kW of heat and what should it do with it? Transfer to the floor or save, or maybe save 1 kW and transfer 1 kW?
What a miracle system with an efficiency of 200%!
When a room with its heat loss conditionally needs 1 kW/h of thermal energy to maintain 25C, then it makes absolutely no difference where you get this kW (gas, electricity, solid fuel) and how you transfer it - by convection or infrared radiation, underfloor heating, water or electric, fireplace, radiators or heat gun!
If you take a d-20mm pipe (2.5mm thick) and calculate the total volume of coolant inside it, for a standard length of an electro-fluid system of 56 meters, you get approximately 10 liters.
As an experiment, place a bucket of water heated to 40 degrees in the room and let it cool to 20 degrees.
Even one domestic cat with its stable body temperature of 38-39C will bring much more warmth into your home