Today, several methods are used to create electrical wiring. It can pass through special shafts in the thickness of the wall. To do this, you have to trench the walls, which significantly complicates the repair work. Many property owners install electrical cables in an open way. In this case, the wires run along the surface of the base.
One option for installing open wiring is to lay the cable in the baseboard. This method allows you not to disturb the harmonious appearance of the interior. At the same time, it is possible to connect not only electrical, but also other types of communications (Internet, television) to all consumers.
Electrical wiring installation, what do you need to know?
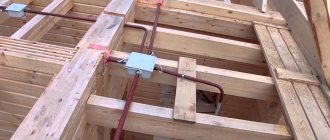
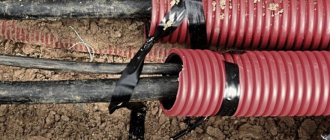
If the walls are wooden, then the wires must be inserted into metal pipes
. When inserting an electrical cable into an apartment, you need to know that the holes for laying are made in the voids of concrete slabs (if the floor is concrete). If you have wooden floors, then the wire should pass through a metal pipe (15-35 cm wide).
After the power supply wire is brought into the living space, you need to independently design the location of the power points (sockets and switches) and, based on this, lay the cable.
In addition, it is necessary to mark in advance on the wall the places where the distribution boxes and nodes where the wires will be connected will be located.
Every owner should know that when laying a wire between the connection and output points, you should always leave the ends of the conductor at least 30-40 cm for convenient connection of devices and installation of sockets and switches.
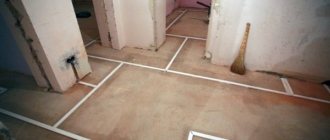
Cable laying in the walls should be done only in a vertical or horizontal direction; there should not be any oblique lines in the electrical supply diagram of the room.
Old wiring can be detected with a locator
Before installing wiring under the plaster, you need to make sure that there is no old connected cable under the finish.
To do this, you can invite the appropriate specialists with an electric locator or simply turn off the old power supply.
When organizing wiring in a brick or concrete wall, remember the following rules:
- the wire is mounted below the ceiling by 25-35 cm;
- the distance from the floor to the wiring should not be less than 15-20 cm;
- power points and connections must be at least 10 cm away from corners;
- It is not recommended to mount spliced wires in the wall; all wiring must be solid.
In junction boxes, wires can be joined using several methods. The “old-fashioned” (old) methods include joining conductors by twisting or soldering. A new joining method is the use of special terminal connectors that create tight and reliable contact.
Flaws
There are also certain disadvantages of laying cables in the baseboard. These include low heat dissipation from internal structural elements. If the wire is located in channels in the thickness of the wall, this figure will be much higher. This feature significantly reduces the scope of application of such structures. The plinth cannot be used for wires whose rated load exceeds 3.5 kW.
It is almost impossible to lay several three-core wires with a cross-section of each element of 2.5 mm² inside the cable channel. It will be much easier to lay such wires in the groove.
When choosing the installation of electrical communications when using a plinth, you cannot connect sockets in series. Each of them must have a separate line. Otherwise, the system may overheat. This is a fire hazard. If the requirements of building codes and regulations are not observed, such installation can lead to a short circuit. This threatens the life and health of people and their property.
Electrical wiring under plaster and its installation
To lay electrical wiring under the plaster, special channels are cut into the finishing - grooves. These channels can be created either on a plastered surface or on a bare concrete wall, which will subsequently be coated.
Approximate wiring diagram
The channels must connect the sockets to each other
The grooves connect “sockets” for switches and sockets, which are created by drilling holes of the appropriate diameter.
It is recommended to pre-attach distribution boxes to the wall with gypsum glue or mortar before plastering. It should stick out from the plaster cover by 5-10 mm.
Before cutting the wires, initially measure the distances between the distribution boxes or the power point and the box, to which 10-20 cm are added.
The wires in the corresponding channel will be secured using an alabaster solution, which is applied pointwise with intensity depending on the length of the conductor being laid.
The solution should not stick out from the surface of the wall, so it is recommended to carefully remove its excess.
After installing the wires and junction boxes, you can carry out work on applying a plaster layer, but leaving, if possible, space for sockets and switches.
Installation of wiring according to rules and regulations
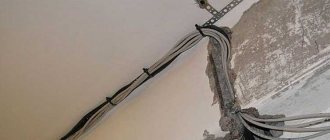
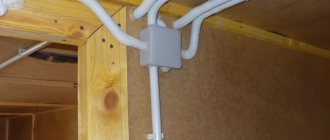
It is recommended to lay wires in corrugated pipes
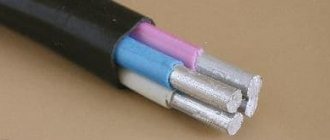
The ideal option for installing a power supply system in an apartment is to install the cable before finishing the finishing work. Most often, for these purposes, professional electricians use conductors of the VVG and VVGNG brands of various sections (depending on consumers).
If the surface of the walls on which the electrical lines will be attached is smooth, then there is no need to cut grooves.
The wiring is laid in special corrugated pipes, which are attached to the wall using clips. In this case, the thickness of the plaster layer should completely cover all electrical wiring elements.
Work with electrical wiring must be carried out strictly according to regulations
If the wall in the room is not level and there are significant differences, as a result of which the plaster will be applied to the surface in different layers, then drilling grooves in this case is necessary.
Any even hidden power supply wiring in the building must be carried out in accordance with the rules and regulations. These actions are regulated in specialized literature. Such sources include the “Rules for the Construction of Electrical Installations” (RUE) and the “Rules for the Safe Operation of Consumer Electrical Installations” (RBEEP).
Many of the requirements for laying an electrical cable in a residential area have been given above. Visual features of cable laying in a hidden manner can be seen in the diagram below.
Attention should be paid to the installation of switches and sockets. According to the PUE, switches can be mounted at a distance from the floor of at least 90 cm, and sockets - at least 30 cm. For rooms with high humidity, special waterproof elements with protection class IP65 are installed.
Wiring markings
Markup example
The wiring is marked on the surface after accurately determining the installation locations of switches, sockets and junction boxes.
To make work easier, many electricians use a laser level to mark out points, after which they draw lines on the wall where the hidden wiring will run using colored tapping thread.
Using these devices, markings are made in both horizontal and vertical directions. If you do not have a laser level, then you can use a regular drip tool, but the marking process will take more time.
Grooves and conductor fastenings
After marking, if necessary, you can begin the process of creating grooves (if the wall is curved or a plaster layer has been applied). To create these channels, there is a special device - a wall chaser. This is a fairly expensive device that makes no sense to purchase for one-time use.
Vertical stripes are made using a grinder
For these purposes, you can use a grinding machine - a “grinder”, with which 2 vertical or horizontal furrows are made, and the intermediate concrete gap between them is knocked out using a hammer drill. The width of the groove depends on the number of conductors laid in it; the greater the number, the wider the channel.
The wiring in the channels is secured using special clamps installed at points using dowels. The distance between the clamps should not be more than 30 cm. After laying the wiring, all channels are sealed with putty or alabaster mixture. For more information on how to attach cables, watch this video:
Before closing the grooves with the embedded cable with a special compound, this opening must be properly primed for better adhesion of the putty to the wall material. If this process is not completed, then the decorative coating of the room in the place where the electrical cable is laid may be destroyed.
To summarize the written article, it should be said that laying hidden electrical wiring is not an easy task, requiring the study of certain installation rules and strict adherence to the order of work.
If you adhere to the above recommendations and carry out all work in accordance with the standards, each owner will be able to independently install power supply lines, while saving a significant amount of money.
Installation technology
Before starting work, it is necessary to carefully think through everything and carry out preparatory work. The first step is to decide where the wiring will go. When planning, you should calculate the total cable length.
The next stage is the purchase of all necessary materials for electrical installation. Please note that if you plan to install additional sockets, you will need to purchase a special box for installing electrical products in the baseboard, as shown in the photo below. Or you can use a cable channel to lift the wiring up and install an overhead socket.
We offer to buy quarry sand in Moscow with delivery from 30 minutes. Your own transshipment base!
Then you can begin installation. To do this you need:
- Remove old unusable baseboard.
- Remove the protective panel of the box. Only the installation bar should remain, with which further work will be carried out.
- Start installing the fastener from the inner corner. Place the corner adapter on the end side of the plank. And in the place where the wiring is planned, attach a strip.
- Using an awl, you need to make punctures for fastening. The marks on the wall should be small.
- Then the plinth is removed, and using a puncher, holes with a diameter of 6 mm are made into which dowels are inserted.
- The installation strip is returned to its place and screwed with self-tapping screws.
- Using special adapters, the plinth is attached to the frame.
- Once the strip has been installed, you can begin installing the wiring. To do this, all wires are placed in special cable channels or on shelves. If necessary, the wires are additionally secured with mechanical fasteners.
- Holes are made where the socket boxes should be. To avoid damage to the insulation, its edges should be cleaned with a file. The next stage is the installation of sockets and their fixation.
- After installing the wiring, reinstall the faceplate.
The video clearly demonstrates how to do wiring in a baseboard with your own hands:
Specifications
Quite often situations arise when it is impossible to lay cables and wires using conventional methods. The main reason is most often the repairs made and the reluctance to destroy the finishing elements. However, the line is still needed and then the best way out is a plastic plinth with a cable channel located inside.
This design allows you to mount the socket in the most convenient places, provided that special socket boxes for the baseboard are installed. All wires pass inside the baseboard, are brought out and connected to the outlet. The entire structure is attached to the wall using dowel nails or screws.
The main structural element is a plastic housing made of PVC. There is an adapter at the bottom of the product. The surface of the electrical box is covered with a laminated film that imitates different colors and textures of natural materials. The plastic has greater rigidity compared to the baseboard, which ensures reliable fixation of the socket box during installation.
All such boxes are available in two versions:
- When installed on the floor, the product fits tightly to the baseboard and floor
- The wall structure is fixed to the wall and to the baseboard, but does not come into contact with the floor.
The universal design of the mounting box allows you to place any type of sockets, both electrical and telephone, antenna, network and others. The socket box must structurally completely coincide with the baseboards, so it is recommended to purchase all the necessary elements and parts from one manufacturer.
Installation of skirting boards with cable duct
- This installation method is permitted in accordance with Chapter 2.1 of the PUE, clause 2.1.4.
- You can lay the electrical cable without damaging the wall cladding or finishing.
- The protected panel on the frame can be easily removed without the use of additional tools. Thanks to this, you can easily and quickly replace damaged wires or inspect the wiring.
- There is a large selection of these products available on the construction market. Thanks to this, you can choose a plinth to suit every taste and desire. Wires can be located on one shelf or on several.
Installation rules
Installing a socket box on a baseboard is not at all difficult; even a novice home craftsman can easily cope with this task.
Before starting work, you need to prepare the tool. The main actions are performed with a hammer drill and a screwdriver, and a sharp knife and saw are used for cutting. Pliers are almost always required, and for marking you will need a tape measure. For fastenings, it is best to use self-tapping screws, since glue or sealant does not provide a tight enough fastening. The wire connections are protected with electrical tape.
The work begins with laying the baseboard. First you need to remove the protective panel and attach the mounting strips with dowels to pre-designated points. Installation of corner elements and longitudinal adapters is carried out in accordance with the laid wires.
The installation locations of sockets are marked in advance. After this, the molding is cut, the resulting opening should have a gap of 4-5 mm on both sides. If a floor socket box is installed, then the gap between the slats is 60-70 mm. If necessary, a special incision is made at this point. In case of wall mounting of the box, the plinth is cut at the top. The cut areas are sanded with a file so as not to damage the insulation.
The wire that will be connected is pulled out from the central cable channel, after which it must be cut and stripped. Then a protective strip is installed on the baseboard. A plastic PVC box must be attached to the wall and marks for future fastenings must be made through the holes. Next, sockets are drilled along these marks, into which plastic dowels without sides are inserted and hammered, which makes the fit tighter. The final fixation of the box to the wall is carried out with self-tapping screws, and the wire is carefully routed through the hole.
All that remains is to install the outlet itself. First, use a screwdriver to unscrew the terminals to which the stripped wires are connected. After this, you need to tighten the screws evenly, avoiding squeezing and damage. First, the cable should be tightened a little to avoid bending inside the box. Once installation is complete, voltage is applied to the outlet to test functionality. The decorative panel is fixed if the socket is in good condition.
Features of acquiring a PKK
Installation of skirting boards is carried out at the final stage of renovation of the premises, when work on finishing the walls, ceilings and laying floor coverings is completed. Before installing floor edging and ceiling fillets, it is necessary to select products that meet the operational requirements for the cable line and the decorative criteria for the artistic framing of the home. PCCs are purchased taking into account the following factors:
- The overall dimensions of the molding must ensure the laying of cables in the quantity required to accommodate electrical wiring and low-current lines. It is recommended to purchase products that have spare parts;
- The color of the molding should be selected in accordance with the color of the floor covering. It is recommended to install baseboards in darker shades to create a distinctive contour.
Note! When calculating the length of plinth panels required for purchase, the width of the doorways is subtracted from the measured perimeter of the room, however, it is necessary to have a reserve of 2-5% in excess of the calculated molding in case of eliminating possible installation defects that arise during the installation of the PKK
Pros and cons of socket boxes on baseboards
Installing baseboard socket boxes has undoubted advantages:
- There is no need to install grooves in the walls, and there is a minimum amount of dust during work. The installation procedure does not require any building mixtures. Wiring inside the baseboards is carried out upon completion of finishing work.
- Minimal risk of contact with old wiring during installation. Engineering communications also do not interfere, since they are not laid directly near the floors.
- If necessary, installing an additional outlet takes very little time. It can be installed almost anywhere, at a selected point on the perimeter of the room. Again, no mortars are required.
- Wires for electrical equipment and household appliances, connected to sockets on the baseboards, do not spoil the appearance of the room, since they are almost invisible due to their low height.
However, despite many advantages, owners may encounter certain problems caused by baseboard wiring.
Among them are the following:
- Conductors become more vulnerable to mechanical stress, since a thin layer of plastic provides weak protection compared to plaster walls.
- Wiring hidden in cable ducts overheats much more often, since heat dissipation is very weak due to tightly fitted structures. This drawback is easily eliminated with the help of correct calculations and selection of wire cross-section, as a result of which the load on the outlet is noticeably reduced.
- Sometimes there is a threat of apartment flooding. In this regard, leaky wire connections are exposed to moisture and pose a real threat to the health and life of residents.
- Baseboard sockets are located in places where small children can easily access them. This problem can be solved by installing special plugs or installing sockets equipped with protective covers.
Preliminary measures before installation
Before you begin installing electrical wiring inside the baseboards, you will have to carry out a number of preparatory measures. They should not be neglected, because through them it will be possible to ensure the fastest and most correct installation, while also taking into account decorative aspects.
First you need to decide on the color and size of the skirting boards. Our article will help you with this. Here everything will depend on the wishes of the apartment owner, as well as on the interior of the rooms and their dimensions. So, in a room with high ceilings you should not install narrow skirting boards. In dark rooms, radically light or dark finishing strips are not used unless they are combined with other interior elements.
Even before you begin installing the baseboards and laying the wires, you should decide where the various electrical devices will be located. This will allow you to choose the correct location of sockets and lay the cables as secretly as possible
It is best to immediately draw up a diagram of where and how the wires will be laid. It is important to calculate the amount of plinth - it will depend on the perimeter of the room. Don’t forget to take into account the amount of possible waste that is generated during cutting of the material.
This is about 5-10%. At the design stage, the size of the cable channel is also calculated. Here the choice will depend on how many wires will be laid in it.
The procedure for performing work when installing skirting boards
At the preparatory stage, it is important not to forget to calculate and purchase components in the required quantity. They will not only facilitate the installation process, but also make the entire structure beautiful and neat.
In this case, the components must match the color and size of the baseboard itself.
Accessories for plastic skirting boards
Tips and tricks for the home handyman
Socket boxes equipped with grounding are more convenient for installation and are suitable for most sockets. They have a large internal space where wires and cables can be freely located. Other designs of socket boxes require sockets with special grounding terminals.
Boxes mounted on walls are considered more practical. The fact is that around socket boxes installed adjacent to the floor, a lot of dust and dirt gradually collects. During cleaning, moisture may get inside and cause a short circuit.
Particular attention should be paid to electrical and fire safety during work. All actions are performed only when the voltage is turned off. Wires and cables must be intact and undamaged, and exposed areas and connections must be insulated.
It often happens that additional sockets are required in an apartment, and they cannot be installed without damaging the repair. A socket in the baseboard will come to the rescue - a convenient device for which you do not need to drill the walls. Having this type of sockets in the house, you can connect any device where it is really needed.
Features of installing baseboard sockets
Laying the wire in the cable channel
There are a number of rules that should be followed when installing power points on a wall border:
- The plinth is fixed to a flat wall in increments of 0.5 m. If the panel has bends, the fastening spacing is reduced to eliminate the appearance of gaps between the curb and the wall.
- It is better to work with a hammer drill and install dowel-nails directly through the baseboard attached to the panel. This saves time.
- It is better to fill the cable channel with wires by 40%, but no more. Otherwise, overheating of the electrical wiring will occur.
- It is advisable to lay the cable freely, without tension. Sometimes, if the channel cross-section allows, even a small reserve is made.
- If the master installs ordinary overhead sockets close to the baseboard, a grinder is used to make a cutout right up to the box with the wires. This will make it easier to route the cable to the power point. And connecting the outlet to the curb will be neat.
Methods for installing sockets
With the help of a floor plinth there will be no problems with sockets - they can be made right at the junction of the floor and wall. Installation is possible on the surface of the plinth or on the wall next to it. There are a number of installation features that you should know in advance.
Installation of baseboard sockets
This method of mounting sockets on dismountable plastic baseboards is practiced. You should buy a socket box - a plastic cover. The walls of the lining can be cut independently according to the shape of the sections, to the shape of the socket box.
There are the following types of socket boxes:
- relating to gender;
- reaching to the middle of the baseboard;
- products for thin and thick skirting boards.
It is advisable to purchase a socket box, a plinth with a cable channel and a socket of the same brand - this way you can be sure of the correctness and accuracy of the installation. Installation features are given below:
- Remove the strip from the electrical skirting board. It runs down the middle, representing a narrow lid. It is removed from the corner with a thin screwdriver.
- Make a cut - cut the strip so that a hole appears for the socket box.
- Install the cover into the hole, secure with dowels (sold in one set). They should be inserted into the holes in the casing; they are easily installed with a thin-tipped screwdriver.
- Remove the wiring and attach it to the outlet.
- Place the cover in the cable channel and snap it into place. Connect the necessary wires on the reverse side and check the operation of the circuit.
It is often necessary to build several wires into an electrical baseboard; they should be placed without bends or pinches for long service life.
Wall mounting
If the baseboard is not modern, but ordinary wooden, installation of sockets becomes more complicated. You will have to attach the device to the wall. There is no possibility of creating a hole for installing a box under the socket on the baseboard, so you will have to purchase a surface-mounted electrical socket. This will help avoid damage to the repair.
Removing the wiring from under the baseboard is done like this. You need to cut a recess in the top bar from the inside and place the wiring. Then the wires should be connected to an electrical outlet so that the cable is invisible. Wiring is carried out only before installing the baseboard! The number of cables is no more than two regular or one high voltage.
Cable channel on top of the baseboard
Any hardware store sells cable ducts made of plastic, which can be selected depending on the thickness of the cables. They are placed on the walls near the baseboard and extend to the new electrical outlet. In this case, you will not have to cut the baseboard, installation will be easier. You can open the box at any time if necessary to repair wires. There is one minus - the wall is not very attractive, which can ruin the interior.
Sequence of installation work
- If there is an old wooden baseboard, carefully dismantle it so as not to damage the smooth surface of the walls and floors.
- Remove any remaining nails or screws from the walls and flooring, and sand the walls if necessary until the base of the floor is level. A typical mistake of novice installers, this point is very important; on an uneven surface there may be large gaps between the baseboard and the wall.
- Disassemble the plinth panel box, take the frame of the installation strip, the first stages of installation and cable routing are carried out on it.
- Installation starts from the outer corner along the entire perimeter of the room, so attach the corresponding corner connecting element to the end of the plank. Place the structure in the corner between the wall and the floor so that the channels where the cable is laid are on the outside, facing you.
- Use a marker to make marks on the wall through the mounting holes in the plank. In some models, the plastic strip does not have these holes; drill them yourself.
Option for installing a socket above the baseboard
- Depending on the design features, the cable strips are stacked in one cable channel or on separate shelves. If compact installation is necessary, you can use a plastic bundle that tightly ties the wires into a single bundle.
- When laying out the wiring, especially when you tie it together with a bundle, do not forget to make bends in the planned places. Leave loops for cutting wires and connections in universal boxes that are built into the baseboard structure. This is one of the typical errors that has serious consequences; the wiring will have to be disassembled and re-installed. It is not advisable to build up or make unnecessary connections in the new wiring.
Universal box with socket
After installation is complete, the decorative panels can be secured in place, creating a perfectly smooth baseboard, under which all communications are hidden.
Materials for hidden wiring
You should clarify what materials will be needed for installing hidden wiring. These include multiboxes, external and internal electrical sockets, and plastic boxes.
Multiboxes
The multibox (plastic cover) will help you install any type of single electrical sockets. There are different overlays depending on the thickness of the baseboard and the cutout for the socket. Each device comes with detailed instructions for use. The advantages of multiboxes are obvious - they make it easy and convenient to run wires without cutting into the plaster, and getting them out for repairs is very simple. This method is ideal if you need to replace old wiring with a new one, but it is not possible to do a full repair.
Multiboxes are used for:
- installation of hidden wiring in a house, apartment, cottage;
- installation of sockets in offices, shops, schools, call centers.
Such devices are universal; inside them you can place television and other cables in the house. There is a large selection of multiboxes; the most popular manufacturers are Rosmat, Marshall, Decorah.
Plastic cable ducts
Instead of multiboxes, many use cable channels with external sockets. It looks like a plastic box with a lid with a latch on it. There are various modifications of cable channels; you can choose the right one in height and width. There are no restrictions on the number of wires - you can install any number.
External and internal sockets
There are two types of electrical outlets sold in stores. Internal ones are purchased for multiboxes, external ones - for wooden or plastic skirting boards (with or without cable duct). Sockets are available with grounding, without grounding, for normal mains voltage, Internet, telephone, TV. For comfortable use of equipment, it is important to buy a suitable electrical outlet, materials for it and construct their installation, especially since it is simple.
Installation technology
Before starting work, it is necessary to carefully think through everything and carry out preparatory work. The first step is to decide where the wiring will go. When planning, you should calculate the total cable length.
The next stage is the purchase of all the necessary materials for the work. Please note that if you plan to install additional sockets, you will need to purchase a special box for installing electrical products in the baseboard, as shown in the photo below. Or you can use a cable channel to lift the wiring up and install an overhead socket.
Then you can begin installation. To do this you need:
- Remove old unusable baseboard.
- Remove the protective panel of the box. Only the installation bar should remain, with which further work will be carried out.
- Start installing the fastener from the inner corner. Place the corner adapter on the end side of the plank. And in the place where the wiring is planned, attach a strip.
- Using an awl, you need to make punctures for fastening. The marks on the wall should be small.
- Then the plinth is removed, and using a puncher, holes with a diameter of 6 mm are made into which dowels are inserted.
- The installation strip is returned to its place and screwed with self-tapping screws.
- Using special adapters, the plinth is attached to the frame.
- Once the strip has been installed, you can begin installing the wiring. To do this, all wires are placed in special cable channels or on shelves. If necessary, the wires are additionally secured with mechanical fasteners.
- Holes are made where the socket boxes should be. To avoid damage to the insulation, its edges should be cleaned with a file. The next stage is the installation of sockets and their fixation.
- Once the electrical wiring is in place, you need to put the protection panel in place.
The video clearly demonstrates how to do wiring in a baseboard with your own hands:
How and why you should use ceiling plinth
This type of ceiling plinth differs from the decorative one by the presence of a channel inside into which the wires are laid. In addition to aesthetics and camouflage, it also performs an insulating function, reliably protecting the contents from moisture, temperature changes and mechanical damage. The most popular are PVC samples. They come in various shapes, sizes and colors and are suitable for painting with acrylic paints. In addition, the polymer material has a high degree of fire safety and can be used in any premises. Wooden skirting boards are used less frequently due to their higher price. As a rule, such models are made to order.
Wooden plinth is beautiful, but it is more difficult to fix it under the ceiling
Installing a ceiling plinth with cable duct yourself is not difficult. It consists of a mounting strip and a decorative cover. To attach the first part, markings are applied to the wall and holes are drilled for standard screws. Then the bar itself is screwed on. The wires are placed in its recess and covered with a decorative plug. The built-in fastening system simply snaps and locks it into place. Any time you need access to wiring, the cover can be easily peeled back.
There are three types of skirting boards of this type
- Simple: PVC skirting board, made with one cable channel.
- Wide: PVC skirting board, made with two cable channels.
- Stackable: PVC plinth, on which, if necessary, you can install several more cable channels.
Skirting boards with cable ducts have become very widespread due to their undoubted advantages, which include:
- The relative cheapness of these products compared to analogues made from other materials.
- The installation of such skirting boards with cable duct is so simple that the person performing it does not require special training.
- The presence of specially made channels for laying cables and wires, as well as the ability to use technological voids in the baseboard for these purposes.
- Possibility to match the color of the baseboard with the floor and wall coverings.
- Ease of work on adding new cables and wires to the channel.
- There is no need for special care - painting, washing.
- Resistance to moisture, dryness, sunlight, temperature changes.
The sequence of work for installation, installation and operation of skirting boards for this purpose is the same, so let’s look at these works using the example of a simple skirting board.
Installation of plinth with cable duct does not require diagonal cuts
As a rule, such skirting boards have a shaped profile similar to that given to skirting boards made from other materials, but solid. Before purchasing such a plinth with cable duct, you must carefully examine the room in which they will be installed. During the examination, it is necessary to establish the following details.
- The perimeter of the room - in order to know how many meters of plinth to buy. It should be noted that such skirting boards are produced in only one standard length - 2.5 meters. Therefore, depending on the length of the wall, you will have to cut or extend them. When building up, joints are formed that will need to be decorated and the ends of the spliced parts connected to each other. This will require joining elements. You need to know their number. Depending on the number of meters you purchase, the seller may offer an additional 5 - 10% of the total length of the ordered skirting boards. Agree. This stock will serve as a guarantee that what you buy will last. The cost will increase slightly. But the confidence is worth it.
- Number of corners in the room. Most rooms are rectangular. But in any of them there are at least two niches: a doorway and a niche for central heating radiators. This means that to the four internal angles, two more internal and four external angles should be added if the wall where the doorway is installed is thick enough. If such a wall is thin and there is no need to insert skirting boards into this opening, then you can get by with special plugs.
- In office premises where there are several workstations, cable outlets will need to be made to each of them. This wiring will look more neat if you use special couplings through which the necessary cables and wires will be brought out. The number of such couplings can be determined during the perimeter marking process.
The next stage of work is preparing the floor and wall surfaces for the installation of PVC skirting boards. Despite the fact that the structure of the material from which the plinth is made is quite flexible, these surfaces should be leveled as much as possible. If this is not possible, make a mark in its center for installing a dowel, so that you can subsequently press the plinth to the wall in this place.
Step-by-step photo instructions for installing a plinth with a cable channel. The load-bearing element of such a PVC plinth is the channel. It is made so that its bottom fits tightly to the wall. This allows you to attach the baseboard to it. Depending on the size of the plinth, at a distance equal to half the width of the part adjacent to the wall, draw a line along the entire perimeter, where every 50 - 60 cm make marks for drilling holes for dowels.
Installation of skirting boards should begin from the inside corner along the longest part of the wall. After all the holes in the wall have been drilled in the bottom of the cable channel, holes for dowels are pierced in the appropriate places. They press the plinth with the cable channel against the wall, but not tightly, they are attached. This is necessary so that by bending the upper or lower edge of the plinth, you can tuck the cables under the edge. Then, according to a pre-made decision, cables and wires are laid in the technological voids above and below.
Types of overlays for skirting boards and their application
When making a decision, you should consider the purpose of a particular cable. Typically, three types of cables are installed:
- Antenna cable for TV.
- Telephone cable.
- Twisted pair for the Internet.
Features of placing wiring behind a suspended ceiling
Many people choose suspended structures because there is no need for additional ceiling finishing. They can easily hide not only construction irregularities, but also various types of communications: wires, cables, hood pipes, etc. However, experts do not advise leaving the wiring unattended. Under a suspended ceiling, it continues to be affected by various factors: temperature, humidity, etc. In addition, there is always a threat of it burning out or flooding from above. And stretch fabric or drywall, for example, form a solid surface. If necessary, it will not be possible to get to the wires without damaging it. Therefore, you should immediately take care of the safety and security of the wires.
To lay wiring under a suspended ceiling, it is recommended to use the following insulators.
- Flexible metallized or plastic corrugated sleeve.
- Steel pipe.
- Plastic electrical pipe.
- Plastic boxes or cable channels.
The metal pipe has a fairly large diameter and allows several wires to be laid in it at the same time
The presented materials are not afraid of moisture, temperature changes, do not burn and are not subject to corrosion. In wooden houses, it is recommended to use steel pipes for laying cables; in rooms with metal floors (garages) - hoses made of electrical plastic. There are no special restrictions for concrete structures, so preference can be given to any method.
Before installation, you need to mark the intended wiring and cut the selected material into the required pieces. The fragments are assembled and connected to each other, the resulting structure is fixed to the ceiling. For metal and plastic pipes, as well as hoses, special mounting clips are used, which are screwed to the concrete surface.
Flexible corrugated sleeves can be laid flat or bent at the desired angle
Installing a plastic box is similar to a ceiling plinth. Its mounting plate is attached to the ceiling with self-tapping screws, and the lid has latches. Everything ends with pulling the wiring and insulating its exposed areas. Metal structures may require grounding.
Whether your wiring is hidden or exposed is not so important. The main thing is that it is laid in compliance with all norms and requirements by competent specialists. And such a useful device as a ceiling plinth with a cable duct will make it easy to hide it, preserving the impeccable beauty of the interior.
>Video: wiring on the ceiling
Wiring in the baseboard: disadvantages, how to conduct it under the baseboard
In most cases, when performing repair work, ordinary people are faced with the problem of replacing wiring.
Electrical cables are laid in two ways: open or closed.
The first involves gating the walls, after which all the grooves must be covered with cement-sand mortar or a special plaster mixture.
- Design Features
- Negative sides
The second is wiring in baseboards or installation of baseboards with cable ducts fixed to the surface of the walls. Of course, both methods have their positive and negative qualities, but speaking of the disadvantages, we should remember that open wiring has no less of them than hidden wiring.
Design Features
Open electrical wiring is the installation of attachments on the surface of walls or ceilings.
There are several types of skirting boards that are used as a device that allows you to hide not one, but several cables.
However, most models can only accommodate one electrical wire, which makes the job much more difficult.
The open method of laying wires is:
Placing cables inside special plastic channels. Such a thin box allows you to hide the wire running along the walls or ceiling. In order not to spoil the design created in the room, they use not only ordinary U-shaped boxes, but also designer models that can decorate the room
However, both of them stand out quite strongly on the surface of the finishing coating and attract the attention of others. Corrugated plastic pipes provide high-quality reinforcement of insulation, but do not look aesthetically pleasing and cannot be used during renovation of residential premises. Plastic skirting boards are created with the expectation that in models equipped with several compartments for cables, it will be possible to place wires leading to sockets, household appliances and lighting lamps. True, most of the models sold by modern manufacturers are designed for laying only one wire. Using a plinth with one cable channel for laying several wires for different purposes is strictly prohibited
Using a plinth with one cable channel to lay several wires for different purposes is strictly prohibited.
During operation, electrical wires become hot and close contact between several wires can cause a fire.
Inside the plastic baseboard there is no possibility of quick and high-quality cooling of all wiring components, and the baseboard itself quickly heats up and melts easily.
Certain existing deficiencies in the wiring in the baseboard will not allow such installation on an unglazed balcony or in a bathroom. This applies to all rooms characterized by high humidity.
When choosing a plastic baseboard for wiring, the average person is faced with another problem.
Existing models are not always able to accommodate the required number of cables and guarantee complete safety of residents.
Plastic skirting boards are easily destroyed under the influence of negative factors, such as:
- ultra-violet rays;
- mechanical damage;
- chemicals included in detergents and cleaning products.
Installing plastic skirting boards is a process that does not require large material costs and the involvement of qualified specialists, but the slightest error during installation will lead to breakage of the skirting board itself.
The features of some designs do not make it possible to place the required number of wires inside the baseboard.
The consumer will have to purchase a more expensive multi-core cable and accurately calculate the upcoming load. Another drawback of wiring in the baseboard is the accumulation of dust and small debris, which is quite difficult to remove during cleaning.
In the space between the floor covering and the baseboard itself, formed under the influence of changes in temperature and humidity levels in the room, quite a large amount of debris accumulates, which leads to breakdown due to the increasing heating of the cable. For more information on laying cables under the baseboard, watch this video:
The latches used to secure the cable channel protective strip cannot be called strong and durable. The need to verify the integrity of the cable or the suspicion of an existing fault forces the consumer to open this channel with the help of a tool, which leads to cracking of the baseboard and a decrease in the level of security of the wires located in it.
How to choose
Neat ceiling plinth with cable duct allows easy access to wires
Instructions for choosing a plastic ceiling plinth with a cable channel suggest:
- Select the color of the product to match the floor, walls or ceiling, slightly changing the shades, or give preference to a contrasting option.
Molding to match the color of the walls
The main condition is the taste of the owner and ensuring comfort in the room.
- The size of the plinth is influenced by the volume of the room, the height of the ceilings, and the number of utilities that need to be hidden.
In addition to wires, lighting equipment is also installed in the baseboards.
Tip: When purchasing a product, you should opt for the option with large sizes so that there is enough space for all the cables.
- When choosing a material, you need to pay attention to the quality of the mounting strip; it should be flexible and not break due to slight misalignment. The latches are checked, which should securely and tightly close the recess located on the front side.
Tip: When choosing MDF molding, you need to pay attention to the melamine coating so that it is of good quality.
Preliminary measures before installation
To do this, you need to compare the characteristics of the cable channels in the baseboard with the cables being laid. The width, height, and cross-section of the channels in mm2 are provided in the documentation for them. Let's look at a separate example:
Comparison of two versions of three-channel skirting boards of the MEX series
| MEX series plinth | Total channel cross-section in mm2 | Useful section. mm2 | Useful cross-section by channels mm2 | Capacity of wires of different sections per channel in pieces. | |||||||||||||
| 1.5 mm2 | 2.5 mm2 | 4 mm2 | 6 mm2 | ||||||||||||||
| 1 | 2 | 3 | 1 | 2 | 3 | 1 | 2 | 3 | 1 | 2 | 3 | 1 | 2 | 3 | |||
| 60x16/3 | 702 | 502 | 163 | 176 | 163 | 20 | 22 | 22 | 14 | 15 | 14 | 11 | 12 | 11 | 8 | 9 | 8 |
| 75x20/3 | 1113 | 800 | 232 | 331 | 232 | 29 | 42 | 29 | 20 | 28 | 20 | 16 | 23 | 16 | 12 | 17 | 12 |
In the cable lines of floor skirting boards, you can lay not only power supply wires; the following fits perfectly there:
- Coaxial cable for TV or Internet signal input;
- Telephone pair, from city PBX;
- Cables for local computer networks and wires for other purposes.
When choosing the design of skirting boards, consider all factors.
There are three main methods for diverting sockets from baseboard wiring:
Having counted the quantity and purchased all the necessary elements, you can begin installation work.
Methods for installing skirting boards
The ceiling plinth is attached in two ways:
- Foam or polystyrene ceiling molding can be installed after gluing the walls with tiles or wallpaper, gluing them with a special sealant or using “Dragon” or “Moment Installation” adhesives.
Installation of ceiling plinth
- The walls and ceiling are carefully leveled and then primed. The fillets are attached to them using putty or sealant. After this, wallpaper is pasted or another decorative coating is applied. This option is preferable.
Cutting fillets
Cutting process
To complete the work you will need to purchase:
- Miter box.
- A sharp knife or hacksaw for metal.
- Small spatula.
- Bucket for mixing putty.
- Adhesive mixture.
Cutting skirting boards in a device
You can buy a miter box in a store, or you can build it yourself, so that the product helps you make cuts precisely at angles of 45° and 90°.
Cutting skirting boards
The plinth in the tool is positioned at an angle, as it will be glued to the wall.
Tip: Fillets with cable ducts should be cut with a hacksaw, without force, so that chips do not appear at the cut points.
Cutting wide baseboards without a miter box is unthinkable
To better imagine the process, you should watch the video first.
Selection of sockets and switches
The next important step is the selection of sockets and switches. When installing external wiring in a wooden house, the products must have a metal mounting plate.
At the first stage, it is this plate that is to be installed, after which you need to move on to installing the external panel. If desired, you can use plastic plates. However, it is very important that the plastic is fire resistant.
Experts also recommend installing three-wire sockets with a ground wire. As a rule, they will be required to connect many models of modern equipment. When connecting street lighting, grounding will also be required.
Requirements for electrical wiring in a wooden house
Houses made of natural wood are considered comfortable to live in. They are in great demand, but remember, wood is flammable. Therefore, when carrying out electrical installation work, it is necessary to comply with all requirements and standards to avoid fire in the building.
The main requirements for installing electrical wiring are:
- Correct choice of cables. They must be powerful enough to handle heavy loads.
- The presence of a protective sheath on the wire. It must be fireproof and resistant to mechanical damage.
- Installation of an RCD that cuts off the power supply when the wiring is overloaded.
- It is necessary to have a separate branch with an increased power reserve for such devices, such as a microwave oven, an automatic machine.
- Cables can only be laid through building structures in special openings.
The gaps formed between the pipe, cable and wiring must be sealed with a seal made of non-combustible materials, for example, a mixture of cement and sand with clay.
Cable selection
In order for electrical appliances to operate without overloading the network, the cable of each line must be of the appropriate cross-section. And if there are several consumers on the same line (for example, to the kitchen) (and there will be), then it is necessary to calculate their total power and leave a margin of “strength” for the cable, that is, select the required cross-section (wire thickness). The power of all household appliances is always indicated by the manufacturer. For example: an incandescent lamp is 40W, and a hob is 6000W, etc.
| Wire cross-section (sq.mm) | Current (A) | Power, W) | Machine denomination |
| 1,5 | 15 | 3300 | 16 |
| 2,5 | 21 | 4600 | 20 |
| 4 | 27 | 5900 | 25 |
| 6 | 34 | 7400 | 32 |
Each device (consumer) has its own declared maximum power, measured in Watts.
Simplified power formula
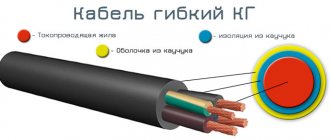
The cable must be three-core (phase, neutral, ground). Zero is always blue, ground is yellow or yellow-green, phase is any other color. If you change the wiring, do not skimp on the material - always take a cable with a third core (with grounding), because all modern devices have an additional protective terminal, and automatic protection works only using grounding.
To replace electrical wiring, it is best to use a VVG-ng cable. You can, of course, use NYM or PVS, but the advantages of the VVG cable over others are obvious. Firstly, VVG does not need to be crimped with sleeves (soft ones need to be crimped). And secondly, it is smaller and flat, which allows you to make smaller grooves, and it is possible to insert the cable into a thin slot (3mm for a three-core cable with a cross-section of 1.5mm)
Wiring diagram. The need to compile
Before installing electrical wiring, you should draw up a diagram of the room, where you should note the location of switches, sockets, lighting fixtures, and their number.
The drawing identifies the installation points of electrical appliances, wiring routes, and locations of junction boxes. The electrical circuit of the room also includes the power of each energy consumer and the total power of the devices. This is necessary to determine the load level on the circuit breakers.
In addition to the diagram, you should draw up a wiring plan. The cable is routed in a straight line to avoid kinks. The wiring is placed at a distance of 15cm from the floor or ceiling. The wires converge in junction boxes made of metal. Distributing the cable correctly, distributing the load between consumers, providing protection against short circuits is the task of a person who decides to independently cope with the installation of electrical wiring in a wooden house.
Skirting mounting options
After all the preparatory activities have been completed, you can begin installing the plinth. The material of the walls will determine how the fastening will be carried out.
Fastening with hidden brackets
When choosing fastening with brackets, you do not need to nail the baseboard to the wall. The distance between fasteners should be calculated based on the curvature of the walls. For smooth surfaces it is about 50 cm. If there are uneven surfaces, the distance is reduced to 20-25 cm.
Fastening with hidden brackets
To mark, each bracket is pressed tightly against the wall in one line and the places where they are fixed are marked. Holes are made according to the marks obtained. Dowels are hammered into each of them, then clips are applied, which are secured with screws.
The baseboard is attached to the installed brackets. To do this, apply it to the clips and lightly press them into place. To install the next plank, its edge is inserted into the connecting fittings, previously put on the edge of the previous one, and then the product is also snapped onto the clip.
Dowel mounting
If the walls in the room are made of plasterboard, then the installation of the baseboard is carried out using dowels with self-tapping screws. You can use a dowel, which is popularly called a “butterfly.” A hole is made in the wall at the installation site. The dowel parts are pressed against it, and the element is installed in the hole.
There is another way to install the baseboard using dowels. It involves drilling holes in the profile itself, and in relation to these holes, drilling the wall. In this case, you need to use dowels with caps.
Installation with liquid nails
The simplest way to fasten skirting boards is with “liquid nails”. It is suitable for working with wood and plastic. Installation of skirting boards begins from the corner of the room. The adhesive composition is applied in separate drops at a distance of 3-5 cm from each other. Then the plinth is pressed tightly against the wall with the side treated with glue. After 5-8 minutes, final fixation is performed. With this technology, “liquid nails” set better. Upon completion of installation, a coupling is attached to the free end of the profile.
When installing with liquid nails, you need to consider some points:
- glued plinth cannot be reused;
- the wall for gluing the baseboard must be flat;
- it is necessary to be able to dose the glue used for fastening.
To avoid the appearance of glue drips on the floor and walls, the work must be carried out very carefully.
Nuances and installation technology
You can correctly handle the installation of floor plinths yourself, having first studied the features of this process
It doesn’t matter at all what material the decorative element is made of, the specifics of its installation are the same
Plastic skirting board
Plastic skirting boards are mounted to the wall using fasteners. With their help you can achieve a beautiful appearance of the room. Installation of PVC skirting boards begins with cutting them into elements of the required length.
It is recommended to start work from the inner corners or from the doorway. The elements that do not require cutting are installed first. Joining parts are used only if solid pieces are not enough.
The step-by-step installation of plastic skirting boards is as follows:
- A corner is put on the bar and applied to the wall. If necessary, the required length is cut.
- Using a drill with a drill bit with a diameter of 4 mm, shallow holes are made in increments of 30-40 cm.
- The holes made are enlarged with a larger 6 mm drill, the size of which corresponds to the plastic anchors.
- After installing the plastic anchors, the plinth is secured with screws.
All planks are mounted in a similar way. After installing the plastic plinth on the floor, the installation site is cleared of construction dust.
Wooden plinth
The installation method of wooden skirting boards is no different from the installation of plastic products. The only problem may be joining the panels in the corners of the room and adding a profile. Intermediate joining of skirting boards is performed at an angle of 45 degrees. At the joints, the thickness of the elements should be the same, and the wood should not have burrs.
An easy way to secure a wooden baseboard is to attach it to glue or liquid nails. You can also use special sticks with a round cross-section. They must be made from the same wood as the baseboard itself. With their help, the attachment points will be invisible.
Fire safety
Most electrical cables are made of plastic, which raises questions about fire safety. If you don’t take into account the very cheap options on the market, all the rest are made of plastic, which does not support or propagate combustion. More serious material is used. From a fire safety point of view, such an electrical baseboard is an acceptable option.
Electrical safety is guaranteed subject to cable operating conditions
Well, to be sure of fire safety, also take cables with a spare cross-section and in non-flammable sheaths. And it is cables, not wires, when it comes to wiring. There is a difference and not only in price.
Step 1, purchasing material
First of all, you need to calculate the required amount of material, direct connecting fasteners, plugs, as well as internal and external corner joints.
For installation you will also need so-called dowel-nails. They are purchased at the rate of one for every 250 perimeter of the room, plus 10% of the total quantity, for unforeseen situations (for example, dowel breakage).
Carrying out electrical wiring tests
After completing the installation of electrical wiring and all necessary electrical devices, it is necessary to check the entire system using a tester. In this way, you can determine the presence or absence of a short circuit. The line can be connected to the panel if the device does not generate errors. At the same time, all household appliances and lighting must be turned off.
Power is supplied to the line one by one, after which the lighting fixtures can be turned on. If any failures occur, the circuit breakers will be switched off. If this does not happen, then the system is working properly and does not require additional intervention.
Using an indicator or multimeter, you need to check the phases of all sockets. Additionally, you can invite specialists who will check everything using special equipment. In particular, they will carry out a visual inspection, check grounding, circuit sections, insulation, and protection. You will have to pay for such diagnostics, but after this you can be sure that the wiring will not catch fire.
You can also stress test the electrical network by creating a high load. If failures occur, they must be eliminated.
Materials for baguettes with grooves
Polyurethane option
After the ceiling cable rack has been installed, you need to hide the wires from the TV. For these purposes, it is best to use a ceiling plinth with a cable channel. Different materials are used for its manufacture.
Their features are presented in the table:
| Advantages | Flaws |
| Another type of polyurethane fillet | |
|
|
| Styrofoam | |
|
|
| Expanded polystyrene | |
| Advice: When choosing a plinth for a polystyrene ceiling, preference should be given to denser options made not by stamping, but by extrusion. |
| Wood-look plastic | |
|
|
| Tree | |
|
|
Design features
The most popular are plastic moldings.
Their features:
The presence of a mounting strip, which is the main element of any plinth.
Plastic molding
In the center of this element there is a recess or cable channel for laying communications.
- The upper and lower parts of the product ensure its secure fit to the ceiling and wall panels. They are made elastic, preventing moisture and dust from entering the baseboard.
- The cable channel is made as a recess, or is divided into compartments, which is more convenient; in this case, the wires can be evenly separated from electrical appliances.
- A special panel protects the channel, and it is fixed in the recess with side latches.
A plinth made of wood and other materials is constructed differently:
- The wiring channel is a regular recess in the outer strip that covers it from above.
- Communications are laid along the wall panels and then fixed in mounting clips.
- Some skirting boards have a specific shape that allows wires to be laid on top.