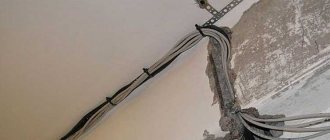
PROS AND CONS RELEVANCE OF THE METHOD ORDER OF WORK MAIN STEPS OF INSTALLATION Until recently, installation of electrical wiring in a house or apartment was carried out almost exclusively along the walls. This method is extremely expensive and labor-intensive, as it requires a groove or a thick layer of plaster to hide the cables.
After the widespread use of suspended and suspended ceilings, the wiring was almost immediately transferred to the technical space between the ceiling and the ceiling.
However, this option also requires significant amounts of wall gating, especially if sockets and switches are located below.
The third method is to locate the wiring under the floor. In this article we will talk about the features of laying electrical wiring under a wooden floor and in a concrete screed.
Let's consider the advantages and technical limitations of each method, as well as the basic rules for performing the work.
Advantages and disadvantages
The main advantages of this method of laying electrical cables include:
- Increased level of safety compared to installing wiring in the wall. Any accidental damage to the line associated with driving in nails, dowels and other fasteners, which is accompanied by the use of a drill, jackhammer or grinder, is excluded.
- The total amount of cable required to organize the network is reduced. A lot more wires are required to run in the wall.
- You don't have to be a qualified specialist to handle the task yourself. Difficulties can arise only when placing the cable inside a corrugated or metal pipe.
- The junction boxes are located near the wall or at the bottom, which eliminates the possibility of cable breakage.
- There is no need to chisel the walls, apply a thick layer of plaster or perform other finishing work.
Installing wires on the floor allows you to get rid of wall slitting.
Floor wiring scares people for the following reasons:
- Serious difficulties when performing repair work or when it is necessary to replace the electrical cable. Sooner or later the chain may break. It is almost impossible to find the emergency area on your own, so you will have to dismantle the system and lay a new wire. However, the problem can be avoided if you follow the rules and recommendations for installing floor wiring. For example, you should make sure that the cable placed in the pipe moves freely through it. Before pulling out the cable, tie a strong rope or wire to the far end so that you can then easily pull the new wire into the pipe.
- The cost of the work increases due to the need to purchase corrugation, which is not needed when installing in walls, when the cable is hidden inside the groove or under a thick layer of plaster.
With floor installation, replacement becomes more complicated and the cost of work increases
. There are only two disadvantages, but the first is easily eliminated if you follow the installation technology flawlessly.
Closed wiring
Wiring diagram under the floor screed.
Hidden electrical wiring is most often used in residential premises. An exception here may be structures that are made of wood. There are two types of such wiring: in a groove and in a screed. In a groove, the wiring is mounted into the walls, using a hammer drill to make special channels, which are called grooves. It is necessary to lay cables in them, which are secured using special loops or dowel clamps.
If there are weak walls, the wires should be fixed in the grooves using plaster or alabaster. Next comes plastering and general finishing.
The wiring in the screed is the electrical wiring in the flooring. It is laid on the base, after which the floor is filled with cement screed. In order to ensure safety, the wire is protected with a metal corrugation.
The advantages of a closed type screed, in addition to those listed above, include a good appearance of the room, because the wires on the walls are not visible. In addition, greater security is a plus. The disadvantage is the complexity of installation, lack of access to some parts of the system, damage to the finish during the process of replacing and adding various electrical wiring elements.
Cables should be laid exclusively in electrical installation corrugated polyvinyl chloride pipes. Thanks to the stiffening ribs, the corrugation is able to withstand quite large loads. It is preferable to use pipes with a probe, because in this case installation can be significantly simplified.
Scheme of laying wiring on the screed.
In addition to corrugated plastic pipes, there are also metal pipes, or metal hoses. Today they are most often used in non-residential buildings or buildings made of wood. The advantages of corrugation will be high electrical safety, in addition - reliable protection against various mechanical damage. The disadvantages include an increase in cost and an increase in the amount of time that will need to be spent on work.
If the wires do not pass through a corrugated flexible conduit, but through a smooth rigid pipe, this option is called closed pipe wiring. It is used in floors, ceilings, walls, plasterboard structures, under false floors, in suspended ceilings. The advantages of this method are reliability, additional electrical protection, and protection from various mechanical damage. Disadvantages include the lack of flexibility, as well as the need to use additional elements for installation.
Requirements and standards of the PUE
Laying cables in the floor is officially permitted by the 7th edition of the PUE and refers to hidden wiring. In Chapter 2.1 of these rules it is noted that when forming cable routes, they can be used
- round pipes, boxes of various types with a rectangular cross-section, as well as flexible metal or other fireproof hoses;
- it is possible to lay it directly in the structure of the building structure in a groove formed for this purpose, followed by coating with putty or plaster;
- It is permissible to lay wires into the structure of the structure under a layer of concrete directly at the factory during its manufacture.
To connect wires, you can use crimping, screw clamps of various types, and soldering. In places where the splice is formed, an installation supply of cable should be provided, sufficient to make at least one additional connection. According to the requirements of paragraph 2.1.23, the connection points must be accessible, allowing repair or maintenance to be carried out. Further, paragraph 2.1.24 puts forward the requirement that there are no mechanical impacts on the connection areas.
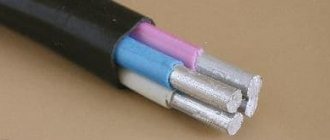
Installation can be carried out using either a flexible multi-wire cable or a rigid single-wire cable. The conductors themselves can be either copper or aluminum. The minimum cross-section depends on the material, connection method and design. When connecting with screw terminals, the minimum cross-section of copper wire is 1 mm², increasing to 2 mm² when switching to aluminum. Copper conductors can also be connected by soldering with a minimum cross-section of 0.5 mm² for a single-wire conductor and 0.35 mm² for a multi-wire conductor. The exact cross-sectional value is determined by calculating the consumer’s power at the project execution stage.
It is separately indicated that when installed in a channel, regardless of its design, it must be possible to replace the electrical wiring if such a need arises.
Floor screeding in an apartment - nuances and stages
In many apartments in new buildings or Khrushchev-era buildings, the subfloors can hardly be called level and, if they are not leveled, many difficulties will arise in the further operation of the room and its design. To do this, install a screed based on cement, expanded clay, reinforced mesh and other components.
How to properly screed a floor
- The space is cleared of debris and dust, and the level of the floor covering is measured.
- Beacons are set up and metal guides are laid.
- Expanded clay is poured out and leveled.
- A layer of cement at least 5 cm thick is poured on top.
- The screed is left to dry - this takes more than a day.
The floor can be decorated all at once or in separate rooms. The choice depends on the characteristics of the space and the tasks at hand.
Electrical and plumbing installations and floor screeding are carried out according to a few simple rules. Compliance with them will save the owner from problems during further turnkey finishing of the apartment. It is advisable to entrust all these operations to professionals who have the necessary equipment. For example, employees. We have been involved in similar work many times and know all its intricacies.
Read more about other stages of apartment renovation
- Stage 1: Dismantling work
- Stage 2: Construction and leveling of walls
- Stage 3: Installation and wiring of air conditioners
- Stage 4: Plumbing, electrical and floor screeding
- Stage 5: Arrangement of plasterboard ceiling, self-leveling floor, laying tiles, puttying walls
- Stage 6: Installation of stretch ceiling
- Stage 7: Installation of interior doors
- Stage 8: Finishing the apartment during renovation
Some features
Returning to the first disadvantage of floor wiring, we emphasize that the specifics of installing electrical wiring of any type are clearly stated in the document PUE (“Electrical Installation Rules”). The main point is the availability of the entire system for inspection and repair work.
The points where wires connect/split must be free from mechanical tension from the material covering the floor. For this reason, various pipes made of corrugated, metal or polyethylene are used. The surface of this product takes the load of the coating. Remember that there must be enough free space inside for the wire to move.
One of the main elements of the electrical network in the house are distribution boxes. But placing them under the flooring is unrealistic, so the products are mounted in the wall. It is important to choose the correct height above the floor to avoid short circuits when the apartment is partially flooded and to prevent free access for children.
Since the corrugated pipe used for wiring must be smooth, in most cases it can be replaced with a regular polyethylene pipe with the appropriate diameter. However, the final decision is entirely up to you. Metal, corrugated and plastic products differ in technical characteristics and cost per linear meter.
Is it possible to do the work yourself?
The option of arranging electrical wiring on the floor is not the simplest, but it is the most convenient for self-installation. You can do this kind of work with your own hands, but you don’t always use the method of laying it on the floor, since the wires are often pulled far from the panel.
In order to decide whether to use this method and how to implement it, it is necessary to consider each stage of the work in more detail.
Having determined the advantages for yourself, it is easy to make a choice in favor of the method.
In what cases should you resort to installing electrical wiring in the floor?
Laying cables in the floor is not always the right solution. Sometimes it is worth resorting to the usual chiselling of walls, laying wiring and subsequent putty. But there are several options in which you should lean toward installing wires in the floor.
- When installing completely new wiring in a room without repair. This situation awaits the owner who recently purchased a home. And most often, a complete lack of repair can only be observed in new buildings. And then laying the cable in the floor will be the ideal solution. There is no need to violate the integrity of the walls, and the work will take much less time than when installing hidden wiring.
- When laying cables and wires in wooden houses, where the use of plastic cable ducts is not relevant. Then it is necessary to lay the cables in the floor, discreetly leading branches to sockets and switches. Distribution boxes are also installed in the floor.
Where to use floor wiring
Wiring in a wooden floor is necessary in two cases. The first case is when you bought yourself a new apartment. Quite often, in new premises, developers run wiring along the floor.
In order not to gouge the walls, you just need to bring out the cable for sockets and switches. You can simply pour a screed onto the cable that is located in the floor. This method is considered good, since you will not need to ditch the walls.
The second situation is considered more relevant. When you carry out electrical wiring in a wooden house, then you should choose to do retro wiring or place the wire in cable channels. Both methods are considered bad. Electrical wiring in the floor of a wooden house will simultaneously solve this problem. Thanks to this method, wiring can be placed in almost any room.
How to properly lay cables in the floor
You should remember the basic rule: when installing a cable in a concrete floor, ordinary corrugation is used, and when installing in a wooden floor, metal is used. Laying wiring without any protection is prohibited by all regulatory documents.
What you should know when starting to install electrical wiring on the floor:
- All connections must be made only in junction boxes. The presence of twists in the floor, without additional protection, is unacceptable. Also, other types of connections cannot be left open: using sleeves or terminal blocks, bolted connections, etc.
- It is very convenient to place the junction box on the floor surface. This allows you to quickly identify and eliminate the problem without compromising the integrity of the floor covering.
- The corrugation should not be filled more than half with cable. This should be taken into account and a corrugation of the appropriate diameter should be selected. Only then, to replace the wire, can it be completely removed from the floor.
- You should not install too long lines - 20 m is enough. If the use of longer conductors is required, then special transit boxes must be used.
- There should not be more than two bends on one cable, the angles of which are 90 degrees or higher. This will have a detrimental effect on the further operation of the electrical network and, if necessary, the conductor will be impossible to get.
- When laying a cable in a wooden floor, you should not attach it to the joists; in this case, special holes are made in them, through which the corrugation is then passed. The presence of such holes will not affect the stability of the floor covering in any way. For additional safety, all wooden floor elements must be treated with a special composition that prevents combustion.
- When starting to pour a concrete floor, you must remember that the thickness of the cement screed above the wiring should be approximately 30 cm. For better stability (but not for electrical safety purposes), reinforced mesh is also placed in the screed.
- The corrugation with conductors should not intersect; all cables should run parallel to each other. When crossing them, it will be necessary to raise the floor level, which implies additional consumption of building material.
Basic installation rules
Now it's time to learn how to wire the floor yourself. Wiring in the floor must be carried out in accordance with the following recommendations:
- When laying the cable, it must be protected with corrugation. It is possible to install wiring without a corrugated pipe, but it will be difficult for you to replace the cable.
- Wiring in the floor should not be twisted. All connections must be made only in junction boxes. Before starting installation, you need to draw a diagram of where the distribution boxes will be located.
- The corrugated pipe should not be filled more than 40%.
- The length of one route should not exceed 20 meters. To solve this problem you need to use transit boxes.
- When laying wiring in the floor, do not lay it on joists. It is better to first create special holes through which your cable will pass.
- You cannot create more than two cable turns.
- When laying wiring in the floor, you need to pre-treat the wood with special means.
- The thickness of the screed over the corrugated pipe should not be less than 3 centimeters.
- You cannot overlap routes on top of each other.
You can also do wiring in the garage in the floor. When laying the wiring, you must take into account all the rules and recommendations that we have indicated. Before you start pouring the screed, you need to check the quality of your wiring. You can check its operation using a multimeter. If you have done everything correctly, then you can begin installing lamps and sockets.
Read: wiring in drywall.
Tags: , automatic, beat, sconce, upper, view, harm, house, , ground, replacement, star, cable, how, design, circuit, , magnet, installation, power, voltage, transfer, connection, principle, wire, project, laying, start-up, , work, size, revise, repair, row, light, lamp, network, connection, wire connection, term, diagram, ten, type, current, transformer, , installation, photo, shield, electrical panel, effect
Places where it is beneficial to use the method
Electrical wiring on the floor is convenient in houses that have not yet undergone any renovation. Such buildings include newly erected new buildings, where, as a rule, only pre-finishing has been done. You will not have to violate the integrity of the walls; the cable can be laid in a place convenient for you in the floor, and the necessary wiring can be made from it to switches and sockets.
Installation under the floor will also be a profitable solution for a wooden house. In this case, wiring disadvantages associated with difficult access will disappear. For a wooden house, this solution is quite relevant, since running cable ducts along the walls will significantly affect the interior of the rooms, and retro-style wiring will cost much more than modern wiring.
By placing the cable under the floor, you will not only hide all the wires and make the wiring convenient, but if necessary, you can easily pull it out from under the boards and make repairs.
Methods for laying electrical wiring in an apartment
In apartment buildings, cable lines can be laid along the floor in a cement-sand screed, along the ceiling and in the walls.
I don’t consider it in walls, in existing voids or on top of grooves. This method can only be used in the case of local wiring replacement; this method has become obsolete. If you are going to do a complete replacement of the electrics, then it is better to lay it along the ceiling.
Laying electrical wiring in an apartment along the ceiling
From the moment stretch, suspended and other ceiling structures appeared in modern decoration, this method is the best.
Let me explain what its advantage is over other methods:
- This wiring can be used in an apartment where the screed has already been poured. When replacing old electrical wiring.
- With this wiring it is much easier to install the sockets and switches themselves. All switching has already been done in junction boxes and only one wire goes down into the socket box.
- It is almost impossible to damage such electrical equipment. When the electrical wiring is done correctly: the junction boxes are assembled on modern terminals, and the outgoing radial lines from the switchboard are protected by correctly selected circuit breakers. You only have access to sockets and switches, the supply cables to which go strictly vertically downwards.
If the cable line of one of the sockets is damaged, the rest will continue to work (if, of course, the cause of the short circuit is eliminated). If something needs to be modernized or repaired, all costs will be only the cost of the stretch ceiling fabric and the work of installing it. No need to open the screed, etc.
The disadvantage of laying in this way is, of course, more wire consumption, slightly more grooves and, of course, more labor costs.
Laying electrical wiring in an apartment along the floor
If you are the happy owner of an apartment in a new building and do not want to lay electrical wiring along the ceiling, then laying cable lines in a screed is also a good way.
With this method of wiring, it is best to abandon junction boxes altogether and make all switching in the socket boxes. I’ll tell you how later.
When installing electrical wiring on the floor, it is advisable to use corrugation and run the wires through it. During the installation process, you or your workers will repeatedly walk along the cable lines and the corrugation will help protect the cable from damage. In addition, after pouring the screed, they will be isolated from direct contact with the screed.
The cable lines are attached to the base of the floor using punched tape only to ensure that they do not float up during the screed pouring process.
Among other things, you can combine these two methods and lay electrical wiring along both the floor and the ceiling. In this case, the rosette lines are stretched across the floor, and the light lines are laid on top. It turns out to be a good symbiosis and cable savings.
Advantages of corrugation
The corrugation, which is used when installing in a screed, must be rigid or heavy, as it is also called.
It has almost the same appearance as a light PVC corrugated tube. However, the price for these products differs several times! As an alternative, many use orange or black HDPE corrugation. Three types of corrugated tubes and their characteristics PVC, HDPE, PP:
PVCHPNDPP
PP
However, do not forget that corrugated HDPE is flammable! Although the majority here are reassured by the moment of its installation on a concrete slab, and even a screed poured on top.
When using cheap PVC, during work, you will step on it more than once and push it with your own weight. At the same time, do not forget about careless handling of the stepladder and falling of heavy objects. All this can easily damage the cable insulation.
Anyone who dares to lay a cable in a screed without protection, that is, without corrugation, may face serious problems in the future. Unfortunately, the screed sometimes cracks, and along with them the wire will break.
By the way, regarding the myths about the replacement of wiring laid in corrugation, you can read in detail in the article “Installing cables in corrugation - errors and misconceptions.”
The only full-fledged replacement option can only be when laying a wide plastic cable channel or pipes into the wall.
This is often done on the wall where the TV will be hung. And then, in this case, completely different cables are used.
When installing on the floor, it is advisable to place the entire cable at a distance from the edge of the wall (approximately 30cm). There is no need to make connections close to it.
When installing baseboards, bar counters or other furniture, the cable can easily be pierced and damaged.
As for junction boxes, the best option would be to install all connections in the socket boxes. That is, where switches and sockets are installed, recessed socket boxes are used and all switching is performed inside them. If you need to audit contacts or reconnect something, there will be no problems with this.
The mechanism of the switch or socket itself is removed, the wires are pulled out from there and all the work is carried out. Then everything is put together in reverse order.
In this case, you do not need to dismantle and then re-stretch the suspended ceiling, as is the case with wiring along the top.
Work technology
When installing a coating on a concrete or slab base, its height should not exceed 5 cm, provided it is reinforced with a metal mesh, in which the thickness of the rods is at least 1.5 mm and the cell size is 4 cm. Instead of such a mesh, the use of fiberglass is allowed.
Marking
The level of the top of the screed and insulation is displayed on the walls as follows:
- The first risk is carried out anywhere;
- Measure the distance from the horizon line to the floor or ceiling;
- The thickness of the floor structure is subtracted from the smallest measurement;
- All other marks are marked according to level;
- The smallest measurement indicates that in this place the ceiling or floor is raised up;
- The resulting size is laid off from the horizon line and a line is drawn to the level of the “finished floor”.
Preparing the base
The work includes cleaning the surface of the slab from debris and sealing cracks with a solution of tile adhesive. Also, all protruding mounting loops are bent or cut off.
Laying insulation
If the ceiling is uneven, the surface is leveled with a small layer of sand, but so that the insulation boards do not wobble. The same effect is achieved by laying crumbs of this material under the insulation. Pin beacons are placed on top. Laying starts from the far wall towards the door. Expanded polystyrene insulation at the joints is immediately covered with tape.
Installation of vapor barrier
A “trough” is made over the thermal insulation: a continuous layer of polyethylene is laid with an outlet on the wall above the screed. For more accurate holes from the installation of beacons, first lay down a film, and then install them.
Installation of beacons
Pin beacons are installed regardless of the presence of a vapor barrier layer under the insulation. When installing them, the vapor barrier is damaged, which is why the best option as insulation would be dense polystyrene foam, which has low vapor permeability. In this case, the joints are glued with tape.
Laying the screed
The work is carried out with a semi-dry sand-cement mortar, starting from the entrance. The mixture is thrown onto the insulation at half the height relative to the beacons. After trampling, a reinforcing mesh is laid, which is also pressed into the solution with your feet. The pieces of mesh are laid overlapping into three cells; there is no need to tie them together. Afterwards, you can add screed to the beacons or put a drywall profile on them and level them using the rule.
Work on laying the screed is carried out by applying the solution between the beacons, compacting it and leveling it with the rule. If there is no plasticizer in the mixture, it is more convenient to do this with a trowel; the rule is to control the level. After leveling is completed, the surface is grouted with plaster floats. If necessary, it is moistened with water.
If the solution is too liquid, this is considered a defect, since it cannot be rubbed in, and cracks may form in this place. When grouting, the beacons are pulled out, and the remaining holes are filled up. If there is a vapor barrier, the hole from the beacon is filled with silicone.
Professionals do not use pin beacons; they install these auxiliary means along with a screed. But the technology requires good skills, since, unlike a pin beacon, the tag cannot be quickly raised or lowered by simply unscrewing the bolt.
Carrying out the work is much easier with the use of ready-made non-shrink solutions. They are well leveled by rule, and there is no need to grout them with floats. When the solution dries and you can walk on it, the Beacons are unscrewed, the broken vapor barrier is sealed with silicone, and the surface is rubbed with the solution.
If the screed is made using materials containing fiber fiber, the use of steel reinforcement is not necessary. Fiber fiber itself exhibits the properties of reinforcement, preventing cracking. You can prepare such a solution yourself by adding about 500 g of material to the solution.
Coating care
After completing the work, the surface is covered with a film so that moisture is used to set the solution. Over the next three days, its condition is monitored by moisturizing dry areas with a spray bottle. But excess water will also be unnecessary, as it will erode the top layer of the screed. During drying, there should be no drafts or temperature fluctuations in the room.
After 3 days you can walk on the surface while performing other necessary work. But it is not recommended to put excessive stress on her, since her condition during this period is not completely strengthened. After 28 days, a check is carried out using the “clearance” rule. If the required parameters are not met, grind and lay a layer of self-leveling mixture.
Safe installation
Before installing the cable, make sure it is intact. Special distribution boxes are used for each individual section. Avoid any twists that reduce the reliability of the system as a whole. The boxes described above are placed on the walls at a safe height to prevent moisture from entering during flooding or interference from children. In some cases, the selected height may be minimal.
The installation box can be installed directly in the floor. In this case, it should be protected by a durable removable lid that can be easily removed so that, if necessary, the master can access the contents. Don’t forget about the possibility of creating a floor wiring diagram, which will make it easier to find the right node or wire in the future.
Junction box in the floor
Another important condition for increasing the safety level of electrical wiring is the correct filling of the corrugation. Do not try to cram a lot of wires inside such a tube. It is advisable to leave about 60% of the total tube space empty. The maximum length of one line (from the distribution panel to the socket or switch) should not exceed 20 m. When placing at right angles, make sure that there are no more than two cables. However, the recommendation is similar for situations with sharper angles. Try to avoid any sharp bends.
In wooden houses, placing wires along joists is unacceptable. Installation is carried out using pre-drilled technical holes. When using wooden parts, they must be treated with a high-quality composition that prevents combustion. Avoid branching the route directly from the panel, this will significantly complicate repair work if the electrical wiring is damaged.
Laying wires in the technological holes of the log.
Advantages of hidden wiring
By giving preference to installing hidden electrical wiring in a room, electricians strive to ensure its aesthetic appeal. In addition, this type of gasket has many advantages:
- Fire safety. Electrical networks are hidden by thick building material, which makes it difficult for air to enter. Therefore, the combustion process will develop more slowly.
- Electrical safety. The likelihood of touching live parts is minimal.
- Durability. The wires are reliably protected from mechanical damage, heat, and dampness.
Installation of electrical wiring in a hidden apartment is carried out using metal pipes, corrugated plastic or metal, and special boxes. Lines are laid along the wall, under plaster, plasterboard, wall panels, and hidden behind a suspended ceiling.
To complete the picture, a few words should be said about some of the shortcomings. The first of them is the impossibility of attaching an additional element without opening the finish. Therefore, it is recommended to think carefully in advance about where and how many connection points you will need. The second is the difficulty of repairing and replacing areas when damaged. The diagram preserved after installation will help you quickly find the electrical cable. It will also protect against electric shock during any repair work. The main disadvantage, which is mentioned by everyone who had to independently arrange hidden electrical wiring in an apartment: the process is labor-intensive, dusty, and noisy.
Step-by-step instructions for performing hidden electrical wiring
Installation of wire in a screed
Well, at the last stage, let's look at the installation itself. It is not so complicated and can be done with your own hands, but we should pay attention to some nuances.
We make walls for embedded boxes
- First of all, we are building walls to install embedded parts for sockets, switches and wiring to them. After all, these devices cannot be placed close to the floor. In this case, the groove should be of such a depth that the wire fits in the corrugation, and then the putty layer should be at least 1 cm.
Pulling wires in a corrugated
- The next step is to lay the corrugation. It is better to lay the corrugation with the wires already stretched, although this can be done later. When laying corrugations, we try to eliminate their intersection and get rid of sharp corners. This will make it easier for you to change the wire if necessary.
We try to avoid intersection of corrugated hoses
- After this, we connect all electrical points. It is mandatory to check their functionality with voltage applied. Ideally, even turn on all electrical points for a day, and then see if we have heating anywhere.
We fix the corrugation to the floor
- If we used plastic corrugation, then we fix it to the floor. This is necessary in case it starts to float while pouring the screed. This practically does not happen with metal corrugation, but it is better to secure it in the same way as in the video.
- Well, at the very last stage we directly fill the floor. In this case, it is better to remove the voltage from all wires in this room. The screed must provide at least a 3 cm layer above the corrugation. The functionality of the network should be checked only after the concrete has completely dried, which is 15–30 days.
Combined electrical option
However, there is no need to take all of the above as an axiom and install electrics in your apartment only on the ceiling, or only on the floor.
A very common option is a combined solution to this issue. Some of the wires run on top, and some on the bottom.
Sometimes equally, sometimes not. The reason for this may be the very large volume and ramification of the entire wiring architecture.
If you have at least two or three dozen modular protection devices in your electrical panel, and at the same time you also have a low-current panel, then when installing all this equipment on the floor, you would get a huge trail of wires.
The wider it is, the higher the likelihood of overlaps and intersections of corrugations with each other. Such intersections are not good. And in some cases they can even lead to an increase in the thickness of the screed.
Therefore, the ideal solution here would be a combined option. A small amount of corrugations (primarily low-current) can be run along the ceiling.
And lay the power wires in a screed.
Also, in the future, it will be possible to run additional lines along the ceiling that you did not initially plan, for example, for the air conditioning system.
Electrical wiring on the floor
There are three fundamental PROs when choosing this option.
you value every millimeter of room height
Electrical wiring on the ceiling is invariably associated with certain losses in this regard. For any corrugation, in order to hide it securely, be it tension fabric or drywall, a few centimeters are needed.
How many of these centimeters will be eaten depends largely on the type of lamp.
Usually it comes out 3-5cm, but sometimes it’s as much as 10cm.
if you plan to fill the screed under any conditions
The usual thickness for screeds in new houses is from 4 to 6 cm.
Under this layer you can easily hide all the wiring and corrugated sleeves. In this case, you gain in total centimeters to the ceiling.
Well, the third PRO:
total cost of work
According to modern standards, all sockets and switches are located closer to the floor and not to the ceiling.
This means that when all your electrical wiring runs along the floor, the length of the groove to the socket box will not exceed 90 cm.
And if you laid the wiring to these electrical installation products along the top, then, on the contrary, you would need to make grooves from the ceiling to the socket boxes. And this is already several times greater distance.
Accordingly, you would need more cable footage. Plus, consider the additional costs of the work itself.
Laying cables in a concrete floor: installation rules and features
Laying wiring on a concrete floor has its pros and cons, but today it is the most relevant.
The advantages of such installation include a high level of electrical safety - even in the event of a breakdown, the dangerous potential will not reach the resident, even those located near the breakdown site. A layer of concrete will hide the entire electrical network, and a reinforced belt will give the structure additional strength. With proper installation and subsequent operation, wires in concrete will function properly for several decades.
Now we should move on to the disadvantages. The main disadvantage of installing cables in the floor is the impossibility of creating connection points. After all, if a twist or terminal block burns out in concrete, then it is almost impossible to find the location of the damage. Therefore, it is necessary to lay solid lines directly from the panel or connection points located above the floor level.
According to technical standards, the concrete layer above the electrical wiring must be at least 30 cm. If the room is large, creating such a screed will require a large amount of building material, which leads to additional costs.
To replace the electrical wiring located in the floor screed, as well as when troubleshooting or laying a new line, it is necessary to dismantle the concrete surface. And after all the work, re-fill the floor. In order for concrete to gain the required hardness, a certain time must pass, so eliminating errors in cable laying in a concrete floor may take more than one day.
To cut concrete pavement, diamond blades are used, the cost of which is now quite high. You may also need a hammer drill, the use of which will lead to a large amount of construction waste.
Pros and cons of this installation
You should not lay a cable in the floor without knowing all the intricacies of this process. And you should start with the advantages of hidden electrical wiring:
- High degree of electrical safety. The floor covering (floorboard, laminate, linoleum) will become the dielectric that will prevent the spread of potential in the event of a cable breakdown. This means that a person will not be shocked by electric current even if he stands in the place under which the cable passes.
- Less spending. High-quality wiring will require less cable, which will provide significant savings.
- Ease of operation. The most difficult stage will be pouring the concrete floor. When installing electrical wiring, you need to insert the cable into the corrugation and simply lay it on the floor. Many electricians do not even attach the corrugation to the concrete base.
But in addition to its advantages, any work also has its disadvantages. The disadvantages of installing cable wiring under the floor include:
- The complexity of identifying and eliminating the malfunction. If the cable breaks down, you will have to lay a new line or dismantle the floor surface.
- Additional expenses for pouring a new floor if dismantling is required. Also included in the category of additional investments is the consumption of corrugation, without which the cable cannot be laid in the floor.
On a wooden floor
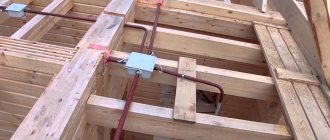
Laying in the structure of wooden floors is complicated by the fact that it is carried out in a fire hazardous environment. Taking into account this feature, cable products whose shells do not propagate fire should be used for installation. The best according to this criterion are cables whose letter part of the brand is supplemented with the symbols “ng” - non-flammable.
The best results are obtained by using metal pipes, which also protect against mechanical damage. A blind metal tray is also acceptable.
The formation of a cable channel system is performed in the following sequence:
- First, pipe laying routes are formed. To pass through the logs, technological holes are made in them, which can be replaced with cuts
- Metal pipes of individual channels are installed according to the design, followed by fastening to the transverse beams. The main means of fastening pipes is perforated tape; self-tapping screws are used for fixation.
- If there is a large gap in the places where the beams pass through, it is sealed with polyurethane foam.
- Individual sections of pipes are connected to each other through junction boxes. An example of such a connection is shown in Figure 8.
- Regardless of the type of metal pipe, they must be grounded to form channels.
- Power cables are pulled into the formed tubular channels.
When cable ducts pass through wooden structures, the use of protective sleeves and short sections of pipes is not mandatory.
When using a system for underground laying of electrical cables, taking into account the high fire hazard of wooden structures, it is necessary to additionally treat them with fire retardant compounds.
An example of installing a junction box with grounding of pipes and foaming of mounting cuts in joists.
Laying cables in the floor has a number of advantages, but due to certain technological difficulties in implementation, it is advisable to use it in the process of new construction of city apartments. For wooden houses, this limitation shifts to the level of major repairs.
In the process of forming the wiring, it is advisable to provide a system of mounting boxes, and the pipes between the individual boxes should have a minimum number of turns. The process of forming electrical wiring using a gasket in the floor is not highly technologically complex; with the use of modern building materials, it can be performed without outside help with initial qualifications and without the use of special tools.
Floating screed in the floor on the ceiling
A floating floor with a concrete screed is installed on the reinforced concrete floor between floors. The floor is called floating because the screed does not have a rigid connection with the structure of the house.
The floating screed is separated from the walls and ceiling by a layer of elastic mineral wool. This floor design provides sound insulation between rooms of the house, and also allows the screed to move with changes in temperature and humidity.
If the floor is dry, with a humidity of no more than 3%, and the lower room is heated, then soundproofing slabs can be laid directly on the floor concrete. Otherwise, a vapor-waterproofing film is laid between the ceiling and the sound insulation slabs.
How to choose a material for sound insulation -
Read: Floating floor - soundproofing of interfloor ceilings.
A layer of sound insulation made of mineral wool slabs is covered on top with a construction polyethylene film. The film strips are placed on the walls to a height of about 20 cm. The film strips are laid overlapping. The overlap is 20 cm.
The film prevents the penetration of cement laitance from the freshly laid mortar into the sound insulation layer and into the edge strip.
A reinforcing mesh of steel wire with a diameter of 3 - 4 mm is laid on the film. with cells measuring 100 x 100 mm. or 150 x 150 mm.
The floor screed can accommodate heating pipes to radiators, as well as pipes with electrical wiring. The pipes are laid on top of the reinforcing mesh and secured to it with plastic clamps.
It is recommended to put covers made of corrugated plastic pipes on heating pipes and wires. In the covers, heating pipes will be able to move freely when the temperature changes. In addition, corrugated pipes protect communications laid in the screed from mechanical damage when pouring the cement mixture.
To level the cement mortar in the screed, beacons made of pipes or other profiles are placed on the reinforcing mesh. Beacon pipes are laid in increments of about 1.5 m and leveled in a horizontal plane using a level. The position of the beacons determines the thickness of the screed. The recommended screed thickness for residential premises is no more than 6 cm.
A cement mixture is placed in the space between adjacent beacons. Moving the rule or edged board along the beacons, distribute the mixture and level the surface.
Eight to ten hours after installation, the surface of the screed is smoothed (rubbed). Grouting can be omitted if ceramic or stone tiles will be laid on the screed.
After the cement mixture has hardened, the parts of the edge strip and construction film protruding from the screed are cut off.
Watch the video, which shows in detail how to mark the level and thickness of the screed in the premises.
Subtleties of laying cables in a floor screed
Let's consider certain nuances associated with laying an electrical cable under a concrete screed.
Marking and diagram
Before starting work, you should make a marking to indicate where under the floor the corrugation with the electrical cable will be located. Consider those elements that will be placed on the wall or floor; they also need to be noted.
For convenience, create a diagram on paper where the location of the wires will be marked. This will come in handy if you need to drill into the floor: you can avoid getting caught in a wire.
The diagram should show the dimensions of the wires, as well as the distance at which they are removed from the walls. If possible, mark the depth of the wiring under the floor.
It is much more convenient to groove walls or install socket boxes using markings. You will be able to carry out the work more accurately, check how evenly all the structural elements will be located without starting work, and evaluate whether their location is convenient.
Laying electrical wiring in the floor
When installing the electrical cable, you should pay attention to its fixation. Fastening is carried out using plastic clamps, which avoids any shifts during installation of the screed. If you ignore this point, it is more likely that the wiring will simply move out of place, making the previously created diagram irrelevant. You may not even know about it, and in the worst case, you will realize it when you accidentally drill into the cable. To increase the strength of the screed and protect the corrugated pipe, experts recommend using reinforcement or mesh made of polymers.
You should not save money and purchase low-quality cable channels. Make sure to choose durable products that will improve the reliability of your home's electrical wiring. Electrical installation components must be routed from the distribution panel. Ideally, each wire should have a separate channel, since a large number of branches will complicate the potential replacement of the damaged section. This may lead to the need to open up the floor.
When you pass the cable through the channels, the created passages should be covered with plaster. It can be replaced with cement mixture or plaster. Next, a floor screed with a thickness of at least 30 mm is performed. The load on the box should be minimal to avoid deformation and destruction of the surface with subsequent damage to the wiring.
In addition to saving on materials, electrical wiring in the floor provides freedom when arranging furniture in the room. Think in advance about the location of sockets depending on where the household appliances will be located. Try to create the required number of plugs to eliminate the need for tees and extensions. It is always better to connect each device to a separate point.
Floor socket device
As you can see, installing electrical wiring in the floor is much simpler than installing wires in the walls. However, there are some nuances and the need for impeccable implementation of the rules and recommendations prescribed in the PUE. If you doubt the quality of the work performed, contact professional specialists. A qualified electrician will install reliable wiring, drawing up its diagram in advance and calculating the amount of materials and equipment (making an estimate).
Problems and diagrams for installing wiring under the floor
Problems with installing wiring under the floor
Laying electrical wiring under the floor also has its disadvantages. And in order to minimize them as much as possible, it is very important to properly plan the wiring and accurately determine the number of electrical points. After all, making changes in the future will be almost impossible.
Underfloor wiring
So:
- The main problem that you may encounter with this type of wiring is the difficulty of implementing clause 2.1.23 of the Electrical Installation Code. It requires that all connections and branches of wires be accessible for maintenance and repair.
- This greatly complicates the installation of wiring under the screed layer. After all, in any group network we cannot do without distribution boxes. But we cannot arrange them under the floor.
- There are several ways out of this situation. The simplest seems to be the arrangement of distribution boxes in the wall directly above the floor. But this method is not aesthetically very attractive; there is a possibility that children or pets could get into the box, and if the room is flooded, it generally becomes very dangerous. Therefore, this method is used extremely rarely.
- Much more often, home electrical wiring is installed using socket boxes as junction boxes. Indeed, by connecting each electrical point in series, it is possible to do without distribution boxes. But here lies one huge problem. If the wire feeding a certain electrical point breaks, all subsequent points also become inoperable.
- And of course, it is possible to install a distribution box in a standard location under the ceiling. But this eliminates all the advantages of laying wiring under the floor and leads us to the so-called classic version of hidden wiring.
- From practice I can say that some people ignore clause 2.1.23 of the PUE and install distribution boxes under a layer of screed. But this leads to problems in the future, and these problems can be associated not only with the wiring, but also with the screed due to the insufficient rigidity of the stationary boxes. Therefore, I cannot recommend this installation method to you.
The photo shows an option with a distribution box above the floor
- The only exception is wiring for a private house with wooden floors. Where it is possible to create unique removable beams in the floor for servicing distribution boxes. This method causes certain difficulties in implementation and has its own nuances, but as one of the options it is quite acceptable.
Underfloor wiring diagrams
Based on the foregoing, let's look at the most common wiring installation scheme when laying it under the floor. In most cases, the method used is to use embedded socket boxes as distribution boxes.
And in order to minimize the disadvantages of this method, it is very important to apply the correct wiring diagram for each individual room.
- First of all, it is very important for us to separate the power supply circuits of various electrical points as much as possible. Thanks to this, if there is damage in one of the areas, not the entire room network will lose functionality, but only a small area.
- Therefore, based on the geometry of the room and the layout of sockets and switches, the room should be divided into 2-3 sections. Each site should have 2-3 electrical points. Usually these are 1-2 sockets and a switch (see How to connect a switch from an outlet with your own hands).
Connection diagram for a separate area
- Our instructions also advise you to immediately decide on the central outlet to which the main group wire will be connected. Usually, either the most loaded electrical point or the one most conveniently located in the center of the room is chosen as such.
- If you choose the most loaded electrical point, usually a double or triple socket, then it is very important that it is located as close to the center of the room as possible. Otherwise, due to the long length of wires extending from it, the price increases slightly.
- If you choose an outlet that is located in the center of the room, but is not the most loaded, then it is much more difficult to implement the connection itself. After all, in addition to the supply group wire, 2-3 more wires must be connected to it to power individual sections of your electrical network. It is quite difficult to accommodate such a number of wires for the embedded box of a single socket.
- If there are not many electrical points in your room, for example, two or three sockets and a switch, then dividing the power into separate sections may not be necessary. But here it all depends on your preferences and wishes for the reliability of the electrical network.
What to do if it floods
The most common question that arises for any apartment owner who has agreed to install wires on the floor: “What will happen to the electrics if you are flooded for some reason?”
Nothing catastrophic. All wiring is carried out not only in a corrugated cable, but also with a cable having several layers of insulation.
The most important thing is to check during the pouring of the screed that there are no joints or insulation burrs underneath it. The cable must only be solid. Then you won’t have any problems with the wiring, even if it’s ankle-deep in flooding.
Features of surface preparation
When preparing the surface for screeding, it is necessary to remove existing skirting boards, old flooring and joists (if they were used). As a result, a wooden or concrete floor should remain without any extraneous construction debris.
Next, the cleaned base is repaired in case of deep cracks or ragged potholes and primed. Defects are sealed with concrete mortar after preliminary priming of repair areas. There is no point in leaving flaws unfixed. If you screed the floor over such weak points, they will then continue to collapse. As a result, inevitable damage to the new top layer will occur.
Preparing the floor before screeding
If there is an old screed on the floor, it should be carefully checked for integrity and reliability. In most cases, it is recommended to completely remove such concrete. But if it is still strong and does not peel off from the base, then pouring a new leveling layer on it is quite acceptable.