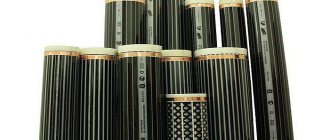
What is a heated carbon mat floor?
Carbon heated floors should be considered as an additional source of heat and as an independent heating system.
Panel heating of this type is available in different modifications, which allows consumers to choose the most optimal type. The system is highly adaptable and cost-effective. An innovative option for heating a home is powered by an infrared energy source. Most often, graphite-silver rods connected in parallel to each other are used for this. For this purpose, wires with an increased degree of protection against overheating are used in production.
The insulating material is a substance based on polyester and polyethylene. The main component of the product is the heating element, which consists of carbon and polymers. The cable used for these purposes is made of copper. Its cross-section is 2.5 mm. It is insulated with a shell up to 3 mm thick.
Everyone who has used carbon heated floors claims that the modern market cannot offer a more profitable option for panel heating. In a house where this type of heating is installed, natural air humidity is always maintained. An intelligent heating system with modern thermostats and temperature sensors helps with this.
All currently existing variations of carbon-based panel heating are complemented by a detailed description of the installation and operating instructions. The buyer only needs to choose the most optimal option, show a little effort in order to surround himself with warmth and comfort for a long time.
Types of carbon heating systems
All heating systems based on carbon heaters are lightweight, durable, easy to install, and corrosion resistant. There are rod and solid (film) carbon floors. Flexible heating elements of rod systems are connected into mats with heat-resistant stranded copper wire 2.5 mm thick in a thick 3 mm sheath.
Carbon mats are self-regulating systems, which means they can be laid under furniture without the risk of overheating. They are great for installation in a screed or in a 2-3 cm layer of tile adhesive. The protective shell of the rod is polyester and polyethylene.
Carbon mats with a self-regulating effect can be laid under furniture. Overheating excluded
Continuous infrared film heats the room due to a single carbon layer. This flooring can be cut and laid under furniture. The strips are securely connected by soldering. Film systems can differ significantly. Regular film is two- or three-layer. The carbon-graphite mixture is applied using a printer onto a polypropylene base.
The continuous system consists of 3 working layers, protected on both sides by 5 security layers. Such 13-layer floors reliably protect against any possible harmful influences and overheating. This type of film uses pure carbon rather than a carbon-graphite mixture.
The 13-layer infrared film uses pure carbon, it is extremely reliable and safe
Scope of application of infrared film
First of all, it is worth mentioning that with the help of infrared film, not only floors are insulated, but also other elements of buildings - walls, ceilings, etc. This makes a certain sense, because heat can escape not only through the floor, but also through other surfaces.
In addition to residential premises, infrared floor heating can be used in a variety of areas:
- Greenhouses and greenhouses;
- Outbuildings intended for animals;
- Technical buildings (workshops, garages, etc.);
- Baths and saunas.
In the latter case, installing an infrared heated floor will also be good because such radiation is used to treat various diseases, and its effect in combination with hot air will be extremely useful.
In addition, infrared film can be used as heating in open areas that need to be kept clean - and these are various sports fields, runways and car parks.
Description of carbon fiber underfloor heating
The basis of a carbon heated floor is a cable with carbon fiber winding
The basis of the electrical system is the heating cable. When turned on, the electric current heats the wire, it transfers heat to the floor surface, and the latter releases it to the air in the room. This option has 2 disadvantages. The cable resistance practically does not change with increasing temperature, so it is impossible to regulate the degree of heating along the length of the cable. More importantly, heat transfer occurs in 2 stages, which increases electricity consumption.
The first problem is partially solved by laying the cable in loops at regular intervals. This is not entirely convenient, since only modules of a certain size are received. During installation they have to be joined to each other. The standard modification does not solve the second problem.
The design of a carbon heated floor is devoid of these disadvantages:
- The basis of the floor heater is carbon rods. Carbon is an amorphous carbon, it has high electrical resistance - when an electric current passes, it becomes very hot and emits thermal radiation in the range of 5–20 microns. Infrared radiation transfers heat to objects and objects, and not to the air - such a system heats the floor, furniture and people in the room, and the air is heated secondarily. To increase the efficiency of the heater, elements made of graphite and silver are included.
- Carbon rods are assembled into blocks and interconnected by multi-core copper cables in polymer insulation. The area of such a structure is practically unlimited.
- The role of temperature regulators is played by polymer inserts. When the air temperature reaches a threshold value - from +18 to +22 C, the material increases in volume, which leads to an increase in electrical resistance. In this case, the current strength drops and the heating temperature of the rod decreases.
Carbon heaters generate thermal radiation. The air heats up slightly and retains natural humidity.
Specifications
- Operating voltage – 220 – 230 V;
- System power per 1 m² – 220 W;
- Surface heating temperature 45 - 50°C;
- Thickness no more than 0.5 mm.
Heating element device
A film heated floor consists of two layers of polymer film, between which strips of carbon material are included. The polymer material provides waterproofness, mechanical strength and safety in case of local overheating. Strips 1.5 cm wide are connected in parallel to copper-silver busbars, which conduct electric current. With this connection scheme, the strips heat up independently of each other, and if a problem occurs in one of the strips, all other strips of the system continue to work. In the event of a failure in one segment, to eliminate the malfunction, you will have to open the floor only in this area, and there is no need to dismantle the floor covering in the entire room. When reconstructing a floor or part of it, infrared film can be dismantled, moved and installed in a new location.
Diagram of an infrared heated floor
The principle of operation of such a system
Heat rays warm up objects in the room, passing freely through the floor covering and almost without heating the air, which fundamentally distinguishes them from the usual electric heated floors. People's bodies, furniture, and objects heat up evenly. Heating efficiency does not depend on the presence or absence of drafts or the level of humidity in the room. 90% of the radiation is in the far infrared range, which has a positive effect on the health of people living in houses with this type of heating.
Approximately half of the heat loss of the human body occurs in the infrared bioresonance range (wavelength 9-10 microns). In this same range, heat is absorbed most efficiently. Therefore, under the condition of infrared heating, for a person to feel comfortable, a temperature is 4-5 C lower than with other types of heating. Thanks to this and high efficiency, heating costs are reduced by 15-20%. The air in rooms with carbon floors does not overheat, remains fresh and not overdried.
The heating rods of the carbon fiber floor are connected to each other by a copper cable in thick insulation
Carbon floors not only allow you to maintain a comfortable temperature in the premises, but also have a healing effect on the human body. Radiant heating and increased amounts of negative ions act like solar heat. The effect of radiation is similar to the operation of aeroin generators used in medicine.
Biogenetic far-infrared rays played a huge role in the development of life on the planet; they are called life rays. Using them in heating systems has additional advantages:
- reducing stress levels;
- suppression of cancer cell growth;
- acceleration of waste removal;
- purification and deodorization of polluted air;
- stimulation of plant growth;
- destruction of the hepatitis virus;
- positive effect on patients with psoriasis and diabetes.
Living infrared radiation is perceived by the body as its own heat and has a mild healing effect - blood microcirculation improves, redox processes are stimulated, making a person less prone to fatigue and feeling better.
Carbon infrared heated floors have a beneficial effect on the human body
Main types of graphite heated floors
Rod heated floor is mounted in a concrete screed
There are 2 main types of heaters: film and rod. These also include bimetallic and amorphous floors. However, these 2 options do not include carbon elements. Although their principle of operation is the same: radiation of infrared heat.
We recommend: 10 best steel heating radiators - 2020 rating and tips for choosing
Rod mats
Rod heated floor is a wire mat, 83 cm wide, the number of rods in 1 linear meter is 10. The structure is spread on a prepared base of any area. The sections are joined to each other using connecting kits.
Rod mats are laid under any, even the most capricious material: tiles, laminate, wooden flooring, parquet. Prerequisite: the heater is placed in a layer of concrete screed or tile adhesive. The subfloor is thermally insulated.
The advantage of the product is the possibility of self-regulation. The carbon fiber rod floor is not afraid of pressure, since its design prevents overheating of the wire. If an area is temporarily covered with furniture, heat transfer from it decreases. At the same time, the rods reduce energy consumption and cool down. In areas where the surface cools faster, the elements heat up more.
The level of electricity consumption is determined by the heating temperature - from 110 to 180 W per linear meter.
Film mats
Film heated floor coated with carbon material with graphite impurities
The design of the product is significantly different. The basis of the heating element is still carbon or a mixture of carbon and graphite. The composition is sprayed onto a base made of heat-resistant polypropylene, forming conductive paths. The base is covered on both sides with a two- or three-layer film and sealed. The material can withstand heating up to 120 C and is not afraid of water or moisture. The width of the strip is 50–100 cm. They are connected to each other by copper busbars.
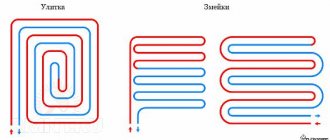
There are several methods of applying carbon:
- Continuous film - carbon fiber is applied to the entire area of the base. The heating speed of the heater is as high as possible, energy consumption is lower. If any areas are damaged, the performance of the system does not change.
- Perforated - stripes and circles are formed in the continuous coating, where there are no heating elements. The modification is designed for installation in screed or under tiles.
- Perforation in the form of a honeycomb is a variation of the previous one.
- Striped - a classic version in which stripes of different widths are formed on the substrate. The power of IR film depends on their size.
Installation of IR film is extremely simple and convenient. It is very thin - 0.23–0.47 mm, it is laid without a screed. The film can be cut into pieces of any size and heat the smallest areas and even staircase steps. If any section fails, the rest of the floor continues to operate as before, and the damaged fragment can be replaced at any minute.
However, the film version has many limitations. It cannot be laid under porcelain stoneware or tiles, since “wet work” and IR film are incompatible. The exception is the perforated modification. But its use is, rather, a forced decision. Flooring made from materials that conduct heat poorly, such as carpet, linoleum on a felt base, is not suitable. In this case, the heat is absorbed by the coating.
Film heated floors can be dismantled, transported to another location and reinstalled in another room.
Why is this heated floor better than others?
Carbon fiber floors can be used to heat indoor and outdoor areas. Their advantages:
Self-regulation
These are “smart” systems that control temperature and, accordingly, energy consumption without installing complex, expensive equipment. The higher the temperature, the more the distance between the particles of the heating elements increases, and the heating is automatically reduced due to increased resistance. Thus, energy consumption is reduced. When the temperature drops, the reverse process occurs.
In areas of the floor with increased load, for example, in places where furniture is installed, the system will heat up significantly less. Rearranging furniture and heavy objects is not a problem; no additional heating protection measures are required.
Reliability and safety
Since the infrared carbon floor cannot overheat due to its thermoregulation features, there is no risk of damage or deformation of the floor covering. The heating system is extremely reliable and does not fail.
Infrared radiation from a heated floor has no negative side effects; it is used in chambers for premature babies for gentle heating of babies and a healing effect. The scope of application of infrared systems is constantly expanding. They are used in spas and infrared saunas.
Economical
The power of the carbon floor is 116 watts per linear meter. When the layer of tile adhesive or screed in which the systems are installed warms up, power consumption decreases. Typically it is 87 watts per linear meter.
To ensure maximum control over energy consumption, thermostats are installed. This allows you to save up to 30% on energy costs. Today, carbon floors are the most economical of all heating systems.
Carbon heating allows significant savings on energy costs. Systems are ultra-reliable and safe
Installing rod carbon heating
Mounting a rod carbon mat is quite simple. In order to lay it, you need simple tools and materials, and no special knowledge or skills are required. The system is laid in screed or glue. It is cut in multiples of 10 cm in length. The permissible band is from 20 to 25 meters.
Before installing the system, you must have the necessary components:
A thermal insulator substrate that allows the rod mat to operate more efficiently and, at the same time, reduces heat loss. In this case, it is advisable to use sheet foam material with Mylar film. It is possible to use armofol, isoka, planex, penofol and their analogues. Materials containing conductive foil cannot serve as a heat-insulating substrate.
Connection kit. You must have at least one set containing 4 thick-walled heat-shrinkable tubes and two sleeves.
End kit, which should contain two thick-walled heat-shrink tubes for each strip of mat.
Thermostat and floor temperature sensor. It is possible to purchase the sensor separately. A suitable brand is SF-7x30. The thermostat should have a maximum power of the planned load less than the maximum power of the thermostat by 15%.
A corrugated tube for laying a temperature sensor, which includes a probe and a plug.
Double insulated connecting wire.
In addition, you must have the following tools:
- Pliers used to remove insulation from wires;
- Nippers;
- Crimping pliers;
- Scissors;
- Knife;
- Screwdrivers;
- Technical hair dryer;
- Construction tape.
Before installing a carbon heated floor, you must ensure that the surface is even and clean. The total area for laying the carbon mat is determined, and a location for the thermostat is prepared in an accessible place. A groove is prepared in the floor in order to install the sensor in the corrugated pipe.
Laying carbon heated floors
The material is laid on the prepared floor surface. The mat is then secured to the floor with glue, stapler or tape. Strips of heat-reflecting material are connected to each other. The roll should be rolled out from the side where the mat will be connected to the thermostat.
In order to unfold the strip, it must be cut at the turning point and then rotated 180 degrees. The strips are secured with tape to heat-reflecting material and connected to each other. Carbon rods should not be allowed to intersect with each other.
Mounting wires are used to connect the mat strips. It is necessary to strip the wire located at the cut point of the mat from insulation. Then a sleeve in a heat-shrinkable tube is put on it and clamped using crimping pliers. After this, the insulation is removed from the connecting wire and a heat-shrinkable tube is put on.
The next stage of work is to connect the power wire of the carbon mat with the connecting wire. To do this, use a sleeve and crimping pliers. The sleeve is shrinked using a technical hair dryer. The heat-shrinkable tube is pushed onto the connection and shrinked with a hairdryer.
Therefore, on the same principle, all strips are connected. In the end kit, the ends of the wires are insulated using heat-shrinkable tubes, which are shrinked using a hair dryer and then crimped with pliers.
The first strip of the mat is connected to the thermostat. For this purpose, a connection kit with a wire is used. You must connect according to the instructions included in the kit.
In order for the heat-reflecting material to firmly adhere to the floor, a hole is made in it. Then the temperature sensor is inserted into the corrugated tube, using a probe.
A plug is installed on the tube, and then the tube is placed in the prepared groove along the rods. The thermostat is installed on the wall and the operation of the entire heating system is tested for 15 minutes, after which the connections are checked for reliability.
Having completed the installation of the carbon mat, it is laid either in a screed or tile adhesive is used for installation. The screed is poured over the underfloor heating rods. The tiles are laid on a warm floor using glue. The screed or adhesive layer together with the tiles must have a minimum thickness of 2 cm. Only special mixtures are used. Complete drying of tile adhesive or screed occurs within 28 days or more. The system turns on only after complete drying.
Carbon and carbon underfloor heating - what is the difference?
Carbon is the international name for all composite materials, the basis of which is a carbon nanostructure and various binding components. Thus, what is known to domestic consumers as carbon and carbon are one and the same substance. Those. film carbon floor and film carbon floor are the same system.
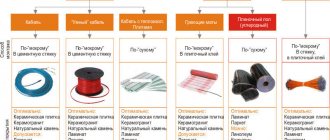
Manufacturers offer two types of carbon floor systems:
- film carbon heated floor (solid);
- rod carbon heated floor.
There are two more types of carbon floors on the market:
Bimetallic heated floor
Bimetallic heated floor Heating system based on bimetallic film. A distinctive characteristic of carbon film is a patented two-layer compound (the top layer is an alloy of copper and additives, and the bottom is an alloy of aluminum with additives). Heating plates emit waves in the infrared range. Such a warm floor should only be laid “dry”; it is prohibited to lay it in a screed or in tile adhesive.
Amorphous heated floor (ANT)
Amorphous heated floor (ANT)The Israeli company Advanced Heating Technologies (AHT) Ltd has developed a new technology - a heated floor based on an amorphous metal strip. The main feature is fire safety, because floors do not heat up above 35 °C (for example, cable floors can heat up to 60-70 °C). Made in the form of thin heating mats. The heating element is made of amorphous metal (ultra-thin tape, 30 microns thick). Warm floors on amorphous tape can be installed under all floor coverings (tiles, parquet, laminate, linoleum and carpet).
How to determine the film size?
Due to its design features, this type of heater is cut in increments of 25 cm. The maximum length of use of one tape should not exceed 7 meters.
Heating film width - 0.5 m. Voltage 220 V. Length
Power
Length
Power
Length
Power
| Film - 0.25 m | 27.5 W | Film - 2.75 m | 302.5 W | Film - 5.0 m | 550 W |
| Film - 0.5 m | 55 W | Film - 3.0 m | 330 W | Film - 5.25 m | 577.5 W |
| Film - 0.75 m | 82.5 W | Film - 3.25 m | 357.5 W | Film - 5.5 m | 605 W |
| Film - 1.0 m | 110 W | Film - 3.5 m | 385 W | Film - 5.75 m | 632.5 W |
| Film - 1.25 m | 137.5 W | Film - 3.75 m | 412.5 W | Film - 6.0 m | 660 W |
| Film - 1.5 m | 165 W | Film - 4.0 m | 440 W | Film - 6.25 m | 687.5 W |
| Film - 1.75 m | 192.5 W | Film - 4.25 m | 467.5 W | Film - 6.5 m | 715 W |
| Film - 2.0 m | 220 W | Film - 4.5 m | 495 W | Film - 6.75 m | 742.5 W |
| Film - 2.25 m | 247.5 W | Film - 4.75 m | 522.5 W | Film - 7.0 m | 770 W |
| Film - 2.5 m | 275 W |
We recommend: Grounding a gas boiler in a private house: standards, arrangement and testing methods
Manufacturers of IR underfloor heating
The construction market currently offers many models of infrared warm coatings from various manufacturers. At the same time, many of them are little known to a wide range of consumers, and therefore the reliability and effectiveness of such products are not guaranteed.
If you want to purchase high-quality products from well-known companies, then the lion's share of the market here is occupied by branded products from South Korean manufacturers, although there are also products produced in other countries, including Russia. Some of the more well-known brands can be briefly seen below.
Caleo is a manufacturer of infrared heated floors from South Korea. The products of this company have earned popularity due to their high quality and efficiency, but there is an important point that must be taken into account when choosing it: due to its very small thickness (0.42 millimeters), infrared film requires great care and precision when installing.
Marpe High Quality - innovative infrared coating from South Korean. It is characterized by high efficiency and economical energy consumption, and has a warranty period of 15 years.
Teplofol-nano – infrared film floors made in Germany and Russia. They are an innovative development: they are only 0.2-0.4 millimeters thick, and the heating element in them is aluminum. The warranty period is 7 years.
RexVa is another South Korean brand whose products are of high quality. The warm floors of this company are reliable and have an affordable price, which makes them popular in Russia and the CIS countries.
Slim Heat - film heated floors produced by a group of Russian companies. The warranty period is 7 years.
Heat Plus is another South Korean manufacturer whose products are very widely represented on the Russian market. Warm floors from this company are characterized by economical energy consumption, reliability and safety. The warranty period is 10 years.
Of course, infrared heated floors, for all their advantages, are far from the only option for efficient and convenient heating in the house. There are many other very practical heating systems: water heated floors, central heating, heating mats, cables, etc. They all have their own advantages and disadvantages, a comprehensive assessment of which determines the choice of the optimal option in each specific situation.
Main producers
The best-selling brand of heated floors is Unimat Boos.
The ranking of manufacturers in 2022 is headed by the following companies:
- Unimat Boos presents mats with a minimum distance between the rods. K-Techologies is a trademark of GTMat, RHE (Russia).
- GT is a South Korean company that produces high-power carbon fiber rod floors.
- Devi is a Danish company. Offers all types of film floors.
- CalorIQue LLC is an American brand known for its high safety requirements.
When choosing a floor heater from any company, you need to evaluate its characteristics. Power ratings and system design are more important than brand.
Installation of infrared floor
An important quality of a film heated floor is the fact that it does not require a new foundation. It will be enough to repair, clean and level the old coating. All necessary work can be divided into several stages, which will be discussed further.
Material and tools
Having decided to install a rod floor, you need to buy the selected model, which includes all the components for arranging the structure.
In addition, you need to purchase:
- substrate;
- heat shrink tubes;
- thermostat;
- sleeves;
- wire for connection having double insulation.
For tools, you should stock up on scissors, wire cutters, a knife, a screwdriver, and tape. You will also need a hair dryer to warm up the heat-shrinkable pipes.
Preparing the base
Before laying, it is necessary to properly prepare the concrete base. First, you need to vacuum it - in addition to directly cleaning, this will reveal various damage to the base that needs to be repaired. Particular care must be taken to deal with the cracks at the junction of floors and walls - it is through them that most of the thermal energy usually escapes.
Any cracks and crevices need to be widened and cleaned. To eliminate them, special repair mixtures or regular sealant are most often used. To fill large damage, you can use foam. In any case, after the mixture used has hardened, it is necessary to cut off its remains, after which you can move on.
Insulating material is laid and fixed on top of the cleaned base. As a rule, in the case of infrared heated floors, foamed polyethylene is used, the characteristics of which are best suited for such situations. The material is attached to the base, and the sheets themselves are connected to each other with special tape. This insulation will preserve the film, providing a level base.
Installation of heating elements
On the finished base, it is worth marking in advance all the areas on which the film will be placed. In addition, it is worth noting the parts of the floor intended for installing furniture, so as not to install heating in these places.
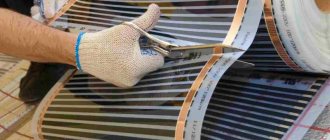
In accordance with the markings, you need to cut the film into suitable pieces. You need to cut it clearly along the lines, without deviating from them, and with caution - a film cut in the wrong area, at best, simply will not work.
The prepared infrared floor film is laid in the desired areas. Tape or hot melt adhesive is suitable for fixing the material. It is imperative to pay attention to the location of the copper strips - they must be located at the bottom.
Grooves are cut into the insulating layer for laying the cable, terminals and temperature sensor so that these elements do not stick out above the film. It is best to position the temperature sensor taking into account several indicators: firstly, the original wire should be enough, secondly, the distance to the wall should be at least 50 cm, thirdly, the device should be located in the center of one of the heating strips.
After installing the sensor, you need to connect its cable to the thermostat. Now you can attach and crimp the terminals to the contact bars. Next, the wires are connected to the terminals.
Having finished laying all the elements of the system, you need to insulate all connections using special overlays. The insulation will ensure the tightness of the contacts. The same must be done in the places where the film was cut - the exit points of the copper bars must be closed.
We recommend: Electric heat guns - operating principle, how to choose, best models, prices and reviews, where to buy
All wires are attached to the thermostat. To understand how to do this, it is better to look at the corresponding photo for clarity. After this, the thermostat with the junction box must be mounted on the wall. Next, the design needs to be checked for correct connection, and only after that can it be launched to test its functionality.
Connection
Connecting a device consists of several stages:
- Installing the thermostat at the planned location.
- Electrical diagram connection:
- stripping the cable at the cut points by 1 cm;
- installing the contact (it is included in the kit) on the stripped end of the cable; it should be clamped well with pliers;
- connection to the second contact - is made by passing the wire through a heat-shrinkable tube, and bringing and fixing it to the terminal; the insulation is first removed from the cable;
- heating the heat-shrinkable tube with a hairdryer;
Thus, the entire system is assembled.
- Placement of the temperature sensor - it is better to install it in a corrugated pipe. To do this, a recess is made in the insulation layer into which a corrugation with a sensor inside is placed. A cable is pulled from the device and connected to the thermostat.
The wires coming from the core floor are connected to the thermostat terminals. At this point, the connection of the rod-heated floor is completed, and you should check its operation. The system turns on for several hours; it is possible to leave the floor on for a day.
You can do the installation yourself
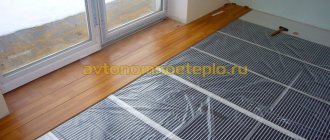
Laying an electric floor heating system under tiles
An important fact is the ability to independently install the product in your home. Installation of a carbon heated floor involves the following steps:
- First you need to level the surface that will serve as the basis for the floor. For this purpose, a special liquid screed is used, which has a self-leveling effect. If there is enough of it, it will independently fill all the holes and allow you to get a perfectly flat surface. But if there are bumps, they will have to be removed using a hammer drill or a hammer with a chisel.
- In order for an infrared carbon heated floor to work as efficiently as possible, it is necessary to prevent its heat exchange with the lower part of the floor. All the heat must go upstairs, otherwise half the power will be spent heating the ceiling of the neighbors below. Any foil material is suitable for insulation, which will allow you to direct thermal energy in the right direction. In this case, it is necessary to leave small windows in the thermal insulation material so that the future screed has better adhesion to the base.
- Next, the material is spread evenly over the entire surface and secured using special construction tape. You also need to correctly connect all the wires to each other and securely insulate them, install a floor temperature sensor and connect the thermostat. After completing the stage, the system must be tested in all available modes in order to correct possible shortcomings that were made during the laying of the floor.
- If everything works well, you can start pouring the screed. It must completely cover all elements of the heated floor. In this case, the layer of solution on top should be minimal so that heat passes through it better.
- After the screed has hardened, the finishing finishing material can be laid.
The work itself will not take much time and effort. The main thing is to do everything correctly, since correcting any errors will be associated with great difficulties due to the installation features. Reviews regarding heated floors with carbon elements are predominantly positive. Its use really significantly reduces the likelihood of colds.
But there are also disadvantages. Warm floors will be harmful for people suffering from varicose veins and other vascular diseases. If there is furniture made of artificial materials in the apartment, under the influence of heat it can begin to release substances harmful to health. Also, the use of electrical equipment will entail additional costs for utility bills. When making a decision, you need to clearly weigh all the pros and cons for yourself, so as not to regret it later.
What finishing coatings are suitable for infrared floors?
The top finishing layer for an infrared floor can be any covering: tiles, porcelain stoneware, parquet, linoleum, laminate, and so on. In this regard, it is worth noting that when choosing laminate or linoleum, you will no longer have to install a leveling screed. The work is carried out using the dry method. At the same time, most people consider it necessary to use such a system under tiles, which, in principle, for many seems to be a cold material, but has high thermal conductivity and, when paired with underfloor heating, creates an excellent insulating effect, which is highly valued in rooms such as kitchens, bathrooms and corridors, where Additional heat is always needed.
Any flooring can be used for infrared flooring
At the same time, it is necessary to take into account the fact that the top covering, arranged according to the heating system, is divided into hard and soft materials. For certain types of coatings, there is a separate system for installing heated floors with the selection of a specific model and, accordingly, technology option. For example, rod models of self-regulating samples are more suitable for the same tile. But soft materials (for example, you can take laminate or linoleum) require the installation of film IR floors with the obligatory laying of an intermediate layer of plywood sheets or fibreboards.
Floor installation work can be carried out using the dry method.
Installation Features
Rod infrared floors are a multi-layer structure, which can be installed in two ways.
Laying on screed
On a screed - this means pouring a subfloor from a concrete solution that expands during the heating process. A layer of heat and waterproofing, mats, and reinforcing mesh are placed on it, on top of which a thin screed is poured and the floor covering is installed.
For your information! Carbon fiber floors without screed can only be installed on a smooth surface.
On a wooden floor
The essence of installation on a wooden floor, the method is also called laying, is to construct a “pie” consisting of an insulating substrate with a foil layer, a wooden log, a reinforcing mesh to which the heating elements will be fixed, and a finishing coating.
For your information! Do not allow the IR floor to come into contact with metal or foil coating,
Safety precautions when installing infrared heated floors
During the installation process and when using film heated floors, certain safety rules must be observed:
- Before installing the system, it is necessary to clean the base from any contaminants, after which it is advisable to lay thin insulation on it;
- Film strips must be laid no closer than 10-20 cm from the wall, but no further than 40-50 cm;
- It is forbidden to lay infrared film overlapping - this can lead to dire consequences;
- The thermostat should be mounted from the floor at a distance exceeding 10-20 cm;
- The length of one canvas should not exceed 8 m;
- The longer the length of the blades used, the fewer contacts will be required;
- For safety reasons, individual strips of infrared flooring must be laid with a distance of at least 5 mm;
- The terminals themselves must be mounted so that one part of the contact is located on top of the film, above the conductive layer, and the second is inside the film, for which there is a special cavity in the latter;
- Having mounted the contact, it must be crimped using special tools for crimping contacts or ordinary pliers;
- Before installation, you should study the instructions - for some designs you can only use “your own” clamps, which are included in the kit;
- When cutting the film, the contact buses must be covered with bitumen insulation, which also comes complete with the rest of the structural elements;
- The thermostat can be connected in two ways: firstly, directly to the mains on a permanent basis, secondly, using a separate grounded cord;
- When connecting the thermostat and the film, it is necessary to lay the wires in such a way that they do not intersect each other;
- Under no circumstances should any other heating devices be placed above the film heated floor;
- It is highly undesirable to install the film at low temperatures or high humidity in the room;
- Bends of the film are unacceptable, otherwise its performance will be in great doubt;
- The film cannot be fixed using metal fasteners (nails or self-tapping screws).
Procedure for laying and installation
The installation work is quite simple. They are carried out in several stages.
Stage #1 - preparing the base
An infrared heating floor is quite demanding on the condition of the surface on which it is laid. It must be absolutely clean and even. The permissible height difference is no more than 3 mm. Professionals recommend using a level to check the horizontalness of the surface. If necessary, the surface is leveled, well dried and thoroughly cleaned of dust. For these purposes, it is better to use a vacuum cleaner. Only after this does the installation of the warm infrared floor begin.
The first to install is the waterproofing layer, which is necessary to protect the system from moisture. Thermal insulation is laid next. Some “craftsmen” believe that this is unnecessary. However, the insulating layer avoids heat loss from downward radiation, thereby increasing system efficiency and reducing energy consumption. There are different materials for thermal insulation. Professionals recommend laying technical cork if tiles are chosen for the finishing coating. Any special insulation can be installed under other floor coverings. The material is laid with the metallized side up, straightened and taped at the joints.
Scheme for laying infrared heated floors under linoleum or carpet
Stage #2 - drawing up a laying scheme
Immediately before starting installation, determine the location of the thermostat; 15 cm from the floor level is considered optimal. Then a film laying scheme is drawn up. It is necessary to take into account that the system is not mounted under stationary large furniture and household appliances. The first row is laid at a distance of no less than 10 and no more than 40 cm from the walls. One more nuance: if it is planned that the heating floor will be the only heating system, it should occupy at least 70% of the room area, but if it is additional heating, then 40%.
Stage #3 - installation and connection of the system
Polyester infrared film is laid out on the thermal insulation in accordance with the drawn up diagram. If necessary, it can be cut along the marked lines. The heating floor is laid with the copper sides of the contacts down towards the wall on which the thermostat is located. Terminal clamps are connected to the edge of the copper strip, then the wires are connected. Areas of film cuts and places where clamps and wires are connected must be insulated with special bitumen mastic. It should be taken into account that the longer length of the heating element panels implies a smaller number of contacts. However, the maximum length of the strip should not exceed eight meters. Some of the contact clamps are placed on the current-carrying surface, and the rest are located inside the film.
First, a thermal sensor is connected to the underside of the film, which must be well insulated. After finishing laying the material and connecting all the wires and contacts, the thermostat is installed. It is best to connect it permanently, although it can be installed as a standard electrical appliance using an outlet. Practice shows that it is better to run the main part of the wires connecting the film to the thermostat under the baseboard. Then the infrared heated floor is connected to the electrical network.
For safety reasons, the installation of infrared heated floors should be done at a distance of at least half a centimeter from one panel to another
Heating strips of infrared heated floors are connected in parallel
It is possible that you will have a different junction box, but the wiring principle is usually the same
You can watch the video for more details:
Stage #4 - testing after installation
Before proceeding with the installation of the floor covering, it is necessary to test the system. Normal operation is characterized by the absence of sparking and overheating in the areas where the contacts are connected; the film should warm up evenly. If the test is successful, the heating floor is covered with an additional layer of polyethylene film and installation of the finishing floor covering begins.
It’s safe to say that making your own infrared heated floor is quite possible. Even if you don’t have installation skills, you can first familiarize yourself with the installation instructions included with the system, find specialized sites on the Internet and study all the necessary information. A properly installed infrared heating floor will bring warmth and comfort to every home.
Limitations and Disadvantages
- IR film transfers heat to the floor covering. Constant and prolonged heating of laminate, linoleum or parquet leads to color fading. The coating may also deform and become unusable earlier than the manufacturer declared. Justification: This is a problem with all heated floors.
- The furniture gets hot. To avoid fires, it is recommended not to lay film under heavy interior items at all. Exit: there should be a gap of 10-15 cm between the floor and the furniture set: cabinets, sofas and bedside tables are placed on legs.
- IR heaters are initially spread locally on a free surface. Changing the surroundings and heating zones is a difficult process.
- The heating system depends on the electrical network. No electricity - no heat.
- It is dangerous to use in rooms with high humidity (bathrooms).
- If you close the temperature sensors, they transmit distorted data to the thermostat and problems begin in the system.
Infrared heated floors are widely used in apartments in country houses or cottages, in kindergartens and orphanages, shopping centers and industrial premises. They are equipped with outdoor sports grounds and used in agricultural facilities: incubators, nurseries, etc.
As a result, mobility, reliability, ease of installation and noticeable savings have made warm infrared floors one of the most popular even among radical skeptics.