Installation of overhead sockets
This is the easiest installation option; if you follow the instructions below, you will not have any problems with the installation. We will assume that the locations of electrical points have already been marked; in this case, the algorithm of actions will be as follows:
- We prepare the tools and necessary materials. We will need:
- drill or hammer drill (depending on the type of surface), as well as corresponding drill bits;
- fasteners, it is also selected depending on the wall material;
- metal plate according to the size of the socket (if installation is made on a wooden surface;
- a screwdriver and the socket itself.
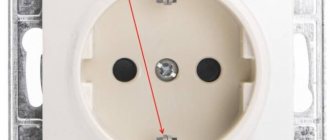
- We disassemble the structure into its component elements (unscrew the top panel, remove the mechanism from the bottom panel). An example of a disassembled outdoor socket
- We cut out the plug through which the wires will be fed (marked with a green circle in the figure above).
- We screw the bottom panel to the wall (if it is made of flammable material, we place a metal plate prepared in advance). If the wall is concrete or brick, you must first drill holes for dowels at the fastening points. The mounting holes on the housing are marked in Figure 7 with red circles. Before tightening the fasteners, the base should be level.
- We install the mechanism on the base.
- We make the connection (this process will be discussed in detail in a separate section, since it is performed the same for all types of devices).
- Screw on the outer panel.
As you can see, there is nothing complicated in this process. Now let's move on to the embedded installation.
Installation of sockets and switches with hidden wiring
For a long period of time, electrical points were made like this: a more or less round hole was punched in the wall, into which a metal box was inserted (or sometimes not inserted), then a socket or switch block was placed there, which was secured with spacers or cement mortar. After that, all the cracks were sealed with the same solution.
This method amazed the imagination with its service life, but, as a rule, it was not possible to change the socket without a jackhammer. Today, both the materials and the technology of electrical installation work have changed. The installation of electrical points begins simultaneously with the installation of the cable. While the wiring lines are being marked, the location of electrical points is also noted, because they serve as the end points of cable lines or junction stations when it comes to distribution boxes.
Socket installation example
Visual diagram of the installation of a separate socket
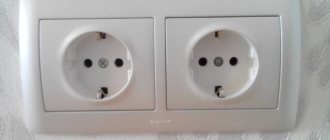
Installing a double socket
It is very important to know how to connect a double socket. There are two types of double hidden sockets:
- There are two sockets in one block. In this option, installing a double socket, there is only one socket and, accordingly, one core. Fastening to connect a double socket occurs in exactly the same way as for a single socket.
- Two connected sockets This option as a hidden double socket is very suitable for rooms. In this option, the installation of a double socket is carried out by installing two socket boxes into the wall. There are special double socket boxes for such tasks. The connection of a block of indoor sockets usually takes place in a series circuit. That is, the first one powers the next one. This option saves the amount of wire, because two sockets can be connected in series. The issue of connecting a triple socket is also resolved.
Use of high security sockets.
In the case of a completely sealed socket, when the top cover is unscrewed, you will see the internal ceramic part, on which there are contacts and clamps for wires.
This interior can be easily removed, making it easier to connect wires. The main thing to do is to place the case flat against the wall and use a pencil or marker to mark the mounting holes. Now we remove the body and drill two holes for the dowels according to the markings. Most often these are 6*40 mm dowels. Moreover, we immediately insert the plastic part of the dowel into the hole, and screw the metal part into the lid. When the lid is firmly attached to the wall, half the work is done. Next, we connect the wires to the terminals of the internal part and insert it into the already nailed housing. Screw on the lid.
Installation of switches
Let's consider the installation of the most common key switch. The switch consists of:
- Housings with working mechanism. The body material is made of non-flammable materials - metal and special plastic. The housing contains contacts for connecting the device to the network and a switching mechanism.
- Keys (keys) on – off. It is made of non-flammable decorative plastic, less often - specially treated wood.
- External decorative frame. The frame is usually made of the same material as the keys.
The switch is installed in the same way as a socket. The process depends on the type of installation. The open-mounted switch housing is screwed directly to the wall. The body of the concealed switch is mounted in a pre-installed socket box.
Any switch is, in fact, a device for closing or opening an electrical circuit. The switch is mounted in the phase wire and, in the on position, transmits electric current to the light source.
It is traditionally accepted that the position when the switch key is pressed from below is the “OFF” position, and when the key is pressed from above, this is the “ON” position. The switch is installed in accordance with this condition.
The simplest option is to install a single-key switch. In this case, only two wires go to the switch: the phase wire and the wire going to the lighting device.
Installation of a single-key switch
- The switch is disassembled into the key, front panel and housing with the operating mechanism.
- Clean contacts.
- Using a tester or an indicator screwdriver, determine the correct orientation of the housing using the ON – OFF position.
- If there are contact screws, loosen them.
- Install the wire contacts into the operating mechanism and fix them, depending on the design of the switch, with self-clamping terminals or bolts. Installing contacts using terminals
- Attach the housing to the wall or into a socket box.
- Secure the front panel.
- Set the key.
The connection diagram for a single-key switch looks like this:
Single-key switch connection diagram
Video
Installation of a single-key switch + diagram
Installation of surface-mounted switch
If you need to connect several light sources or simply regulate the number of light bulbs on one chandelier, then use a two-key or three-key switch. The difference is that not two, but three or four wires are connected to it: one of them is the phase, and the others transmit voltage to the device
In a multi-key switch, it is important to correctly determine which wire is the phase (incoming wire). This is done using an indicator or tester
In the switch itself, the contact socket for the phase wire is located, as a rule, on one side of the mechanism, and the contact sockets for outgoing wires are located on the other.
Installation of a two-key switch
- The switch is disassembled into keys, the front panel and the housing with the operating mechanism.
- Clean contacts.
- Using a tester or an indicator screwdriver, determine the correct orientation of the housing using the ON – OFF position.
- If there are contact screws, loosen them.
- Install the phase contact of the wires into the incoming hole of the operating mechanism and fix it, depending on the design of the switch, with self-clamping terminals or bolts.
- Install the contacts of the outgoing (transmitting) wires into the corresponding contact sockets of the working mechanism, fix them with bolts or clamps.
- Attach the housing to the wall or into a socket box.
- Secure the front panel.
- Install the keys.
The connection diagram for a two-key switch looks like this:
Connection diagram for two-button switch
Installing other types of switches is not much different from installing a key switch. The main task is to correctly determine where to connect the phase wire and securely secure the switch in place.
Video
Installation of a two-key switch + diagram
Terminal design features
The next important nuance is due to the changes that occur with contacts over time. As with most similar electrical fittings, the wire core in the overhead socket is clamped with a screw. When the core is made of aluminum, contact qualities are lost due to the plasticity of the material and compression. If this outlet most often contains a plug for a powerful electric heater, you will get what is shown in the image below.
Therefore, when installing an external outlet, you need to choose a place so that nothing interferes with periodically checking the condition of the connections in it. If only a spring is used in the socket to press the conductive core, it is not recommended to connect powerful electric heaters and electrical devices of similar power (1–3 kW) to it. It is also not recommended to use tees if the terminals are only spring-loaded and a screw is not used. When connecting several low-power consumers, the user, as a rule, does not think about what their total power is until the result shown above is obtained.
In city apartments or offices located in multi-storey buildings made of brick or concrete, overhead sockets are not the main components of the electrical network. But in wooden houses, which are usually built outside the city, they are used as the main devices for connecting certain electricity consumers to the power grid. Considering that electrical wiring is laid on wooden walls in an open way, monitoring the condition of the electrical network is much simpler.
But this significantly increases the risk of fire. After all, near the elements of the electrical network there is wood, which burns well without special treatment. For this reason, it is recommended to choose an installation location for sockets in plain sight, higher from the floor and closer to door and window openings. This is done in order to reduce the area of the wooden surface around them, especially towards the ceiling, since fire along the wall spreads upward from its source. And the place of this hearth, as a rule, is the outlet. To improve fire safety, it is recommended to use a socket box made of fireproof material.
Installation of a socket box
Installing the socket into the glass begins with cutting out the recess. The depth depends on the type of socket box. If the outlet is a pass-through outlet, that is, other cables pass through it, then the depth should not exceed 7-8 cm.
In the case where the socket box is the final one, the recess should be no more than 5 cm
It is important to take into account during installation that the wires must lie freely in the housing. After all, a tightly bent cable can cause damage.
As a result, the entire structure will have to be disassembled and rebuilt.
Socket boxes are divided into two types:
- For drywall
- For hard stone
In the first version, the design of the socket box consists of a plastic body and metal latches on the sides. When secured to the drywall, the clamp fits into the groove, tightly holding the socket body. For reliability, the structure is secured with two dowels.
The second option is provided for stone or brick walls. In this case, the body is made of polycarbonate with two lugs on the sides. The socket body is fixed into the recess, which was previously hollowed out with a hammer drill.
Security measures
When installing switches, it is important to consider their safe location. Electrical components must be located so that the door does not touch them when opening
Placing the elements on the wall on the side of the door handle makes lighting control convenient and safe.
Correct installation of elements will ensure safety
It is especially important to comply with the requirements for safe installation in rooms with high humidity. In the bathroom, electrical circuit parts are installed outside, not inside the room.
When carrying out any type of work on the electrical system, it is important to first turn off the voltage. After this, you need to make sure that there is no stray current, and for this you use a voltage indicator. The ends of the bare wire through which the current supply is turned off are additionally checked with a fingertip, but you should not clasp the element with two fingers.
How to remove a switch from a wall
Everyone has probably encountered the problem of dismantling and removing a light switch in an apartment. The process itself is quite easy to implement. The main thing is to know all the features.
Detailed list of actions:
- We take a flat and Phillips screwdriver;
- Turn off the electricity supply to the house;
This is the most important point. Before disassembling the light switch, the place of work must be de-energized. In an apartment or house, you must turn the circuit breaker switch to the “Off” position. (lever down) in the electrical panel.
Important! If you don’t find which machine is responsible for this switch, then turn everything off.
Caution comes first. It is also advisable to check that there is no voltage directly using an indicator screwdriver.
- Remove the device key;
Before dismantling the key, you should carefully consider the mechanism for its installation, because switches are available in various modifications. The easiest way is to grab the protruding parts from the side, and lightly press the center of the key with your thumb and pull it towards you. This procedure is easy to perform, but if you are unable to remove the key or keys of the device, you can use a flat screwdriver or knife, carefully prying them off so as not to scratch or damage the plastic product.
- Remove the switch frame;
It is attached in two ways: screw and clamp. In the first option, use a screwdriver to unscrew the screws. When dismantling a frame with a clamp fastening, it is necessary to bend the clamps one by one.
- Let's disassemble the switch itself;
Next, remove the internal mechanism from the socket box; to do this, unscrew the retaining side screws. There are models of devices whose mechanisms are secured in the mounting box with mounting tabs. In this case, you need to loosen this fastening using a screwdriver.
- Disconnect the wires;
After removing the switch, measure the voltage on the connected wires. Only when there is no voltage can they be disconnected.
Note! The dismantled switch should be carefully inspected, and if the electrical contacts are melted, then this device should no longer be used.
If the contacts become oxidized, they are cleaned.
- Disconnect the wires from the switch.
In the most common models, fastening occurs through bolted connections, which should be loosened slightly, and then the wires will easily pull out. We also recommend that you mark these wires with different colors to make subsequent installation easier.
Never take risks! Before touching the bare wire, make sure there is no voltage. Apply the tester to each contact and only if there is no signal, continue working.
For the version of the switch with a dimmer, the method for removing it is the same as for a conventional switch, only the rotary knob is removed instead of the keys.
Removing the indicator switch is slightly different from the process described above. Here you first need to turn off the indicator, i.e. cut off the power and remove the LED. Then the same steps are performed.
When choosing a new switch, take the dismantled one with you, this will make it easier to choose the right type based on its dimensions.
The principle of replacing sockets
Usually the sockets that are used most often fail.
There can be many reasons why you need to remake the outlet. This:
- malfunction of the connection point, for example, when the device body melts or the socket falls out of the wall;
- for the purpose of improving electrical equipment;
- when changing the design from a banal aesthetic point of view.
In any case, replacing the socket must be carried out in strict accordance with the rules of SNiP.
By replacing the socket yourself, you can not only solve the problem as quickly as possible, but also save on expenses
Regardless of the reason, it is important to consider a number of key factors when choosing a feeding device:
- Connection point parameters match. The operational characteristics of the installed outlet must exactly meet the requirements for a particular room. So, to “power” kitchens and bathrooms, you need to use devices that have an increased degree of housing protection. Read on to learn how to choose such an outlet.
- Electrical wiring method. When installing sockets, both open and closed installation methods are used. To implement each of these options, the radio market offers a wide range of built-in and surface-mounted sockets.
- Aesthetic qualities. A large selection of equipment, produced in a wide color palette, allows you to organically fit connection points into any stylistic interior design.
When choosing and installing an outlet, you should focus on the type of network. So in a three-wire network, a conventional design cannot do without a grounding contact.
But even if a two-wire network is installed in the house, electricians still recommend using sockets equipped with grounding terminals. The main argument for this decision is the fact that metal inserts will enhance the strength of not only the connection point, but also the plug itself, thereby extending the service life of the product.
Recommendations for location and use
Although this type of electrical fittings has its drawbacks, which are understandable from the above reasons, the ease of installation and use of overhead sockets prevails. They can be installed by most residents without much difficulty. But at the same time, you should pay attention to the correctness of the actions performed. First of all, it is recommended to think through the possible consequences associated with the installation of such outlets.
After all, they are located on a flat wall surface after the familiar interior has been created in the room. What will be visible is the removable decorative cover. It also performs a protective function. Therefore, it is recommended to choose a location for installation that will allow easy replacement of covers. For example, instead of a round shape, you can eventually put a rectangular one.
But only if the main part with the terminals on which the decorative part will be held allows this to be done. Any protrusion or object in the neighborhood, which did not interfere with the round shape in any way, will turn out to be an insurmountable obstacle for a rectangular lid. You will have to move the supporting structure to the side. There are wires connected to it, which will also need to be repositioned. In a word, problems out of the blue.
Tools and materials
The set of tools will depend on several factors
- Which device will be installed – surface-mounted or built-in.
- What type of wiring is used - internal or external.
- What is the material of the wall on which the product is installed.
What you will need for installation
- The sockets or switches themselves.
- Connecting electrical wires designed for the appropriate power consumption.
- Indicator or tester for checking the voltage in the network.
- Screwdrivers - flat, Phillips.
- Wire cutters or pliers for cutting wires to size.
- Knife or construction cutter for stripping insulation.
- A ruler, pencil or permanent marker for marking the wall before installation.
Additionally
- Dielectric protection plates for mounting external sockets.
- Overhead cable ducts to protect external electrical wiring.
- Cement or gypsum mortar for fixing the wire in the wall groove (for hidden wiring).
Installing an outdoor outlet
Installing an outdoor outlet
A device of this type is installed mainly in rooms with external wiring or those made of flammable materials (for example, wood). Of course, such devices significantly worsen the aesthetics of the room, but safety is still more important than aesthetics.
Installing an outdoor outlet
An important advantage of open sockets is that all elements will be visible, and the problem area, if necessary, is quite easy to detect. For example, if the contact is poor, the housing will melt or change color.
External socket
Now - directly to the installation process.
Step 1. The power supply is turned off.
Step 2. The case is disassembled - the fasteners are unscrewed and the top panel is removed.
Step 3. The base of the socket is screwed to the wall with screws.
Step 4. The contacts for the wires are loosened so that the latter can enter to a depth of 0.5-1 cm.
Step 5. The wires are stripped and bent in the form of a spring - this will eliminate sharp bends during installation. Then the ends of the wires are placed into the contacts, after which the mounting bolts are tightened.
How to connect wires to an open wiring outlet
Step 6. The panel is screwed on and the entire socket is assembled.
Socket design
Before you begin installing the outlet, you need to know what elements it consists of. Standard sockets consist of 3 parts:
- front panel;
- wiring;
- basics.
The faceplate protects and hides the inside of the outlet. Standard panels are white plastic housings that are made of fire-resistant plastic. Conductive contacts are contacts through which current flows. They come in different power and voltage. The base or block is the structure on which the contacts and the front panel are held. Modern sockets have additional grounding to ensure safe operation.
Preparation for dismantling work
Before installing a new outlet, you must decide on its type.
When buying sockets in specialized stores, pay attention to the presence of quality guarantees, certificates or evidence of their safety. The socket consists of several parts, and it is quite possible that you will not need to change all of them. It depends on what caused the outlet to be replaced
It depends on what caused the outlet to be replaced.
When choosing the appropriate option, focus on several important factors:
the location where you plan to install the outlet
Please note that there are a huge number of their varieties, so make your choice in accordance with the characteristics of the room. For example, the performance of outlets can be affected by the humidity or temperature in the room; . manufacturer's brand and reviews of such products
manufacturer's brand and reviews of such products
Analyze how popular the brand is and whether other consumers trust it. Choose sockets only from well-known manufacturers, otherwise you may stumble upon low-quality products;
purpose of the socket. Think in advance what electrical appliances and equipment you will connect to the selected outlet, and what power it should have;
appearance according to the interior of the room in which you plan to install it. Depending on the style of the room, select the required size, shape, texture and color of the outlet.
The choice of outlet also depends on how many electrical appliances you need to connect in this area of the room, how important it is to protect it, and whether there is a need to hide the wiring. Depending on these parameters, you can choose a socket for open or hidden wiring, single or double, with two or three phases, with grounding and many others. Advice: if you are going to change sockets in the children's room, choose options with curtains or other protective devices (plugs, covers, etc.)
This way you can protect children from unwanted contact with sources of electricity.
Advice: if you are going to change sockets in the children's room, choose options with curtains or other protective devices (plugs, covers, etc.). This way you can protect children from unwanted contact with sources of electricity.
Before you begin directly replacing the socket, you must prepare all the necessary tools. During the installation process, you will not be able to be distracted by searching for them, since at some stages of the work you need to hold the socket or ensure quick fastening of some parts.
To remove the old outlet and install a new one, you will need pliers, a screwdriver, a flashlight, electrical tape, a utility knife and a voltage gauge. Electrical tape may be needed for attaching some components or for working with wiring; a construction knife will be useful in the process of removing socket elements or, if necessary, cutting off some part of the wire (although you can use other tools for this). The flashlight will provide you with ease of operation.
Attention! Don't forget to turn off the electricity in your apartment before you start working on the outlets. If the switchboard is located on the landing, hang a note there asking not to turn on the electricity.
Installation and connection of an outdoor outlet with grounding
By the appearance of the outlet you can determine whether it is grounded or not. The presence of metal protruding contacts on both sides of the socket allows it to be connected to three-wire wiring with grounding.
Operating procedure:
- Strip the ends of the home electrical wiring wires where the outlet is installed.
- After unscrewing the fastening bolt, disassemble the socket.
- The socket terminal block contains three contacts. Connect the phase and neutral wires to the side contacts, polarity does not matter, and the ground wire (yellow-green) to the central contact.
- Having tightened the contacts tightly, attach the connected terminal block to the wall using self-tapping screws or dowels (on a concrete wall).
- Cut an opening in the housing at the marked location for the wire to pass through, using a knife or wire cutters. Install the socket housing onto the terminal block and tighten the bolt.
Outdoor socket with grounding
How to install a socket?
As for the outlet, it is necessary for any electrical appliance to work. Any socket sooner or later fails, like any equipment, so they need to be replaced.
Installing an outlet is generally easier than installing a switch, unless, of course, you are installing a regular outlet. First of all, remove the top cover from the outlet being installed; before doing this, of course, you need to completely turn off the home power supply.
The socket itself needs to be secured using two self-tapping screws, screw the wire and cover onto the socket and turn on the power, now you can connect any electrical appliance to it for testing. If it works properly, then you did everything right.
- Special sockets for the bathroom and kitchen are much more difficult to install; they always carry a large load; electric stoves, storage water heaters, and air heaters are connected to them.
- Such sockets have an additional terminal so that you can connect the ground, this is another zero. When installing such a socket, you need to be very careful about determining the phase wire; this is done with an active probe, similar to working with a switch.
- If you decide to install such a socket, then you need to start by removing the housing, then the socket is fixed into the socket box, after which you need to screw the phase and neutral wires to the outer terminals, and the ground wire is screwed to the middle one.
Now, you can assemble the socket and turn on the device for which it was installed; after a few minutes, unplug the device and touch it.
The plug and socket must be cold, this indicates that the connection is correct, but if they heat up, you have made some mistake, which means that the installation needs to be repeated. You can learn more about installing sockets and switches by visiting the construction forum on our website, where you can always find a lot of useful information.
As you can see, this is more difficult to do than it seems, but if you have certain skills and know how to use tools, you can do everything yourself quite easily. If you don’t have such skills, it’s better to call a professional specialist.
Socket Legrand Valena Life Netatmo 752296 ivory
Other products from this brand
Socket Legrand Valena Life 753526
Socket Legrand Valena Life 753119
Adapter Legrand Elium 050681
Detailed description
The Smart Home Starter Pack is the heart of Legrand's new home comfort system. It consists of a smart plug gateway and a main I'm home/I'm out switch:
The Smart Plug Gateway connects to your Wi-Fi network so you can control lights, appliances or roller shutters locally or remotely using your voice assistant or the Legrand Home Control app on your smartphone. The smart socket is connected in the same way as a standard one.
The main switch I'm at home/I'm away from home allows you to create scenarios for controlling lighting, roller shutters and smart sockets of your Legrand home comfort system.
You create your own scenarios for equipment operation during your absence and return home. The ultra-thin switch can be moved to another location at any time.
Equipment:
| Type: | Socket |
| Switch type: | Key |
| Installation method: | Hidden |
| Case material: | Heat-resistant electrical plastic |
| Depth: | 10.3 cm |
| Weight: | 281 g |
| Dimensions and weight (gross) | |
| Weight: | 281 g |
| Height: | 17.8 cm |
| Width: | 8.2 cm |
| Depth: | 10.3 cm |
| Additional Information | |
| Country of Origin: | France |
| Guarantee period: | 24 months |
Instructions
Instructions
Manual
Articles
- Wiring and electrical equipment in the bathroom: what you need to know
- Electrical wiring in the bathroom: design and installation features
- Smart home Legrand
Rating (1)
- 5 (1)
- 4 (0)
- 3 (0)
- 2 (0)
- 1 (0)
Already bought this product? Tell me what you think about him.
“Your opinion is important to us!”
Interesting and useful thing
My husband and I bought this set of socket, switch and gateway because of the child. My son often forgot to turn off electrical appliances or lights when he left home on his own. Now this problem has been solved thanks to a smart switch. You can control it with a button or from an application through Alice; it’s easier for my son from a phone. In addition, I can control what is happening at home through the application and know when the child came/left. A special convenience is that we had regular Valena Life sockets installed throughout the apartment, but the design of the smart sockets is no different and fits one to one. So the replacement turned out to be visually indistinguishable from the sockets that were there before. And the installation is very simple, just took out (my husband did it) the old outlet and put a new smart one in its place. Very cool!
0 or You found this review helpful. ✓ You do not find this review helpful.
“Your opinion is important to us!”
Thank you for your feedback!
Thanks for your feedback! After passing moderation it will be published on the website. Please note that only product reviews are published here. We always welcome feedback regarding services, any questions and suggestions at
Unfortunately, your review was not saved. Please try again later
Even more products from Legrand
The information on the price and availability of goods presented on this website is valid as of the current date. All prices are indicated in rubles, including VAT. All product specifications and images are provided by the manufacturers. The manufacturer reserves the right to change the characteristics/appearance of the product without prior notice, and therefore, on the date of purchase of the product, they may differ from those presented on this website. Changes and text errors are possible. Please check the availability of the required characteristics and equipment at the time of purchasing the product.
Subscribe to our newsletter!
- information about all promotions and special offers
- tips and ideas for arranging your home or cottage
- current news and trends
Download our mobile application
The OBI mobile application is a construction hypermarket in your smartphone! Now you have access to more than 50,000 home and garden products, and you can choose and compare products without leaving your home. Just install it on your smartphone and enjoy all the benefits thanks to our convenient services.
Here you can easily find ideas and tips for renovation, gardening or decor, share your experience with others and find like-minded people.
Degree of protection
There are external sockets for open wiring with varying degrees of protection of the housing from moisture and other substances.
Devices with IP 21 protection do not have a housing that is sealed on all sides. The back side is open and during installation it leans against the plane of the wall.
Basically, outdoor sockets with open wiring with a completely closed housing with protection class from IP 44 to IP 68 are intended for wet and other hazardous areas.
Such devices have, as already mentioned, a molded plastic housing, a cover for insulating live parts and rubber inserts for better sealing. All this should protect people from electric shock and fire - inside and outside the building.
Design varieties
The conditions in which sockets are used vary. For this reason, the design of external sockets is made most appropriate for specific conditions. Therefore, it is possible to systematize these electrical fittings products according to the following criteria:
- Main terminal material. Either ceramics or plastic are used. For connecting powerful electrical appliances, a ceramic base is preferable. It is generally not exposed to elevated temperatures. But its drawback is fragility. Therefore, when installing ceramic products, it is necessary to avoid efforts that could cause cracking of the ceramics.
- Number of pairs of terminals for connecting plugs. The minimum, as is obvious, is a single-plug socket. But blocks with more than four connections are rarely used; single, double and triple external sockets are more popular.
Open way
It is used in several cases: for design and stylistic reasons, to avoid contamination of the room with construction debris and dust, and when connecting additional energy consumers. Wiring in this case is also carried out in an open way. The installation process is much simpler than with hidden installation. In this case, there is no need to drill holes in the wall and install installation boxes.
We disassemble the socket or switch. We attach the lower part to the wall using screws or dowels. We connect the wires to the socket/switch block and secure it to the bottom. We cover the entire structure with a plastic cover on top and fasten it with screws.
If the electrical wiring is enclosed in a cable channel, then installing a socket/switch is even easier. We use special inserts (supports) on the surface of the cable channels. The housing of many models of sockets/switches is equipped with special holes with inserts for connecting cable channels.
Recommendations for work
There are other tips that you should follow when connecting sockets.
- Before starting installation, it is necessary to check the compliance of the sockets and panel, cables with current strength and voltage.
- Installation of a triple module in a brick house is allowed in a plastic box. To avoid fire, only metal can be used in a wooden one.
- When working, tools with plastic or rubber insulation are used. Rubber protective gloves are required.
- The module is installed near the door so that the switch is closer to the doorway than the sockets.
Installing an outlet: what to be prepared for?
For each device, a separate socket is installed with an autonomous connection to the meter and a residual current device is installed. You cannot limit yourself to just wedging a new point into an old overloaded system.
IMPORTANT! According to electrical safety rules, you need to install a separate socket for the washing machine (necessarily with grounding), for the electric stove, and even a separate point for the refrigerator. In the case of autonomous connection of each socket for household appliances with high power consumption, it will be easy to determine the cause of a breakdown or failure in the network, as well as protect equipment from damage due to the failure of a certain section of the network
In the case of autonomous connection of each socket for household appliances with high power consumption, it will be easy to determine the cause of a breakdown or failure in the network, as well as protect equipment from damage due to the failure of a certain section of the network.
The device, powered by its own unit, will not overvoltage the entire electrical wiring of the apartment, which will allow you to simultaneously use several powerful devices (washing machine and electric stove). Otherwise, the heavy network load will cause traffic jams.
If the apartment is old, seriously think about not just installing a couple of new sockets, but immediately changing all the wiring.
IMPORTANT! When making major home renovations, changing the wiring is no less important than leveling the floor or replacing windows. One cannot cope here without the help of a specialist.
You need to know how to calculate the power of the wire, how to correctly connect the wiring to the electric meter, which sockets and for which devices to choose, and how the installation diagram of sockets in the apartment should be drawn up
One cannot cope here alone, without the help of a specialist. You need to know how to calculate the power of the wire, how to correctly connect the wiring to the electric meter, which sockets and for which devices to choose, and how the installation diagram of sockets in the apartment should be drawn up.
General step-by-step installation of sockets
Step 1 — Mark a hole for installing a mounting box for a switch or socket Step 2 — Cut holes for the mounting box using a hammer drill and a crown hole saw Step 3 — Lead the wires into the holes Step 4 — Boxes for installing a socket or switch Step 5 — Insert the wire into the mounting boxes Step 6 - We fix the wires using alabaster in the concrete wall Step 7 - Ready-made mounted socket boxes Step 8 - Before connecting, we strip the wire strands Diagram 1 - Connecting the wires for the socket
Scheme 2 - Installation of a socket in a mounting box
Replacement and installation process
The first step is to turn off the power supply to the outlet by turning off the fuse, which is usually located in the entrance panel. After this, the decorative trim is dismantled (in the case of an external variation, the entire body), for which the screws holding it are unscrewed.
Next step: disconnecting the power wires. This is done in different ways depending on the type of socket mounting:
- External - unscrew the fasteners and dismantle;
- Internal - loosen the screws of the spacer connection or fastening to the socket box and pull out the product.
Installation of the internal socket is carried out identically in the reverse order, ensuring a reliable connection. After installation, you need to check the final result for tight fit and presence of gaps.
Dismantling procedure
Before work, be sure to turn off the power in the house or apartment.
Additionally, it is recommended to turn off electrical equipment and circuit breakers. After this, you need to check the presence of voltage in the electrical network of the apartment or house.
Lighting wires
It is not necessary to dismantle the old wiring as the first step. First, you can install new wires. They can be pulled through the cavity of the slabs. To do this, find a junction box, which may be near the door or in the corner of the room.
Open it, unroll all the twists and determine which wires go to the lighting sources. If they run along the ceiling, new wiring can be attached to them.
If the wires are in the kitchen, the separation may go into the hallway or bathroom, depending on the location of the rooms.
Removing the electrical panel
Before starting work, you need to prepare a kit for dismantling electrical wiring terminals and check whether the electricity in the apartment has been turned off. After this, you can proceed directly to action:
- after a power outage in the bathroom or kitchen, the voltage on the panel is checked separately. To do this, you can take an indicator screwdriver. If you attach it to the upper terminals, then regardless of the location of the machines, it should light up on phase, but not on zero. The indicator on the lower terminals should not light up when the machines are turned off;
- you need to unscrew the clamps on the lower terminals, and then remove the wire strands from them. Similar work needs to be done on plugs, that is, protection devices;
- after that, remove the fasteners that held the electrical panel and the panel itself;
- Carefully inspect the insulation of the wires behind the shield and, if necessary, restore it.
Sockets and switches
Removal of sockets and switches is carried out in the following sequence:
- remove the device;
- remove the installation box;
- Cover the resulting hole with construction mixture. You can use plaster or gypsum;
- After a day you can glue the wallpaper.
If such electrical installation work is carried out on a plasterboard wall, then a piece of similar material needs to be cut out, slightly larger than the hole itself. It needs to be glued to the wall and additionally screwed with self-tapping screws.
Chandeliers and lamps
The process of dismantling chandeliers and lamps is as follows:
- de-energize the device - turn off the circuit breakers and RCDs;
- remove the chandelier from the mounting strip or hook. Before doing this, you need to check again with an indicator screwdriver to see if there is voltage. Disconnect the wires from the chandelier;
- After removing the lamp, the wires must be insulated to avoid electric shock.
Disassembling the electricity meter
Before dismantling the electricity meter, you must obtain permits. Equipment disassembly is done in the following sequence:
- de-energize the meter by turning off the switch. Check for voltage;
- disconnect the wires from the clamps, first remembering their location. For convenience, you can mark them with a marker;
- pull the counter down and then forward to remove it from the bar.