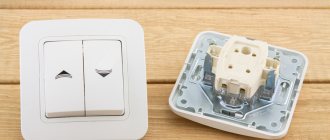
A household switch, starting with a single-key switch, is a simple item that can be found in any apartment or house. This useful invention works quite simply. Although during the time of technical progress its design and appearance has undergone numerous changes. However, in essence, the operating principle is the same. With the exception, perhaps, of sound, and the method of extinguishing the arc in the chambers. Nowadays there is a very large selection of these devices, according to the method of application for every taste. It remains to tell a little about how the light switch works.
Single-key switch device
The main parts that make up a household single-key switch:
- base with fastening elements;
- movable panel;
- contact group with moving and fixed contacts;
- decorative elements.
The operating principle of a standard switch is to close and open an electrical circuit when acted upon. But this action depends on the difference in devices, the features of their design, and functionality.
The basic principle of operation of a standard switch is to close and open an electrical circuit
How to properly design corners on a ceiling plinth
Execution options
The circuit breaker design options differ in degree of protection IPxx. Two digits xx indicate the level of protection against solid objects and particles and against water. Depending on it, the area of application of the device is determined. For example, switches with IP 21 are only suitable for indoor use, while switches with IP44/54 are suitable for outdoor use.
Switches with an increased degree of protection can be used outdoors
There are also switches for surface mounting and built-in type. Surface mounted for use with exposed wiring. They are mounted on a lining. The second type is mounted in a recess on the wall into which the socket box is built. This installation comes with hidden wiring and is therefore more flexible. There is less chance of damaging something, but, on the other hand, there is more installation work.
How to correctly report data for electricity: how to transmit, when and in what way
Surface-mounted switch
Among the switch options, there is also a difference in rated load. It is fixed in the current or power that the device is capable of switching. The value indicated on the housing or in the specification must not be exceeded.
| Switch type | Device type | Load capacity of contacts, A |
| MAKEL Mimoza 12003 | Double key | 10 |
| Simon S27 | Button | 10 |
| Jilion 9533140 | Two-key pass-through | 10 |
| Bylectrica Praleska | Three-key key | 6 |
| Schneider Electric GSL000171 GLOSSA | Cross | 10 |
Replacing electricity meters: at whose expense is the electricity meter changed and in what case
Kinds
Nowadays there are a huge number of different switches on the market, which differ in design and operating principle. Let's consider the main ones:
- Push-button;
- Rotary;
- Dimmers;
- Remote;
- Switches with cord;
- Switches with expanded functionality (infrared version, with motion sensor, acoustic, etc.).
Single-key and two-key (double) light switches are the most common in our time. The principle of their operation is based on the closure of the electrical circuit when the control button is switched. They are very easy to use and install. The design of this switch allows it to be installed in any part of the home or industrial premises; it is easiest to replace or upgrade. They are also often mounted to illuminate furniture or interior niches.
Photo - key switches
The rotary switch is the very first such device. Inside such a device there is a special rotary mechanism that closes the contacts when the position of the handle changes. Now you can find modern rotary light switches with a brightness control (dimmer). They are mainly produced in retro style for stylistic interior decoration.
A smooth dimmer switch or rheostat is based on the principle of changing the brightness of light; it can be contact or non-contact. A similar model is often installed in children's rooms or office spaces, but they are also used in cinemas and in production. It is a classic electronic resistor that connects to the power cable. It can be used to control any type of lamps.
Photo - dimmer
Remote switches are ideal for installation in large areas. Such a device is controlled by a remote control, for example, Livolo. A smart switch consists of a receiving point and a control circuit. The receiver can be installed anywhere in the apartment and even sometimes outside it; its contact wires are connected to the necessary lamp, the operation of which is controlled by switching the keys on the remote control. The main advantage of this operating principle is the ability to control several individual switches or even entire groups of residential lighting devices at once.
Photo - control panel
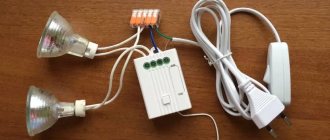
Almost all types of corded light switches are used for wall sconce lights. They are convenient to use in bedrooms and children's rooms, they have an affordable price and a wide range of designs. Their operating principle is similar to a classic keyboard, except for one detail: the contacts are closed by pressing a button, using a cord.
Types of light switches with extended functionality:
- With motion sensor;
- With timer;
- Creating the effect of presence;
- Wireless and touch;
- Acoustic.
Automatic switches with a built-in motion sensor are a rather complex device that consists of several parts. The first is a sensor that perceives infrared rays, the second is a lamp. The main feature of this model is the ability, when properly configured, to ensure that the light is turned on exclusively in the place where the person is currently located. Basically, this is a street or walk-through device (for the backyard, in entrances, corridors) that is manufactured in a vandal-proof design: protected by a grille. These touch sensors can respond to both human body heat and ultrasound.
Photo - motion sensor
At the same time, wireless touch-sensitive light switches with an immersive effect are the complete opposite of these devices. On the contrary, they are necessary to turn off the lights at the moment when some room is empty. This device is often used in shops or large offices.
A timer switch is a light dimmer that turns on only for a certain period of time. This operating system allows for savings in electrical energy. An adjustable timer is built directly into the lamp, although not all models have a setting function. Depending on the brand and type, adjustment can take from several minutes to several hours, and after the time has elapsed, the light will go out on its own.
Photo - timer
The sound switch differs from the infrared switch in that it reacts to air vibrations with sound waves; it turns off and turns on with a clap. If necessary, it can be made with adjustable light brightness or supplemented with other functions.
Acoustic sensor circuit
Separately, you need to consider models of switches such as wireless or touch . They can be installed in any part of the house, on furniture and other surfaces. To control them, a fairly simple scheme is used, in which a touch sensor is built into a shield or a special panel. It transmits radio signals or wifi pulses to receivers built into the lamps. This overhead device can be moved to any part of your home or office and control the lighting from one specific place or using a remote control.
Photo - sensor
also classified by design :
- Overhead;
- Built-in;
- Portable.
Each listed model has its own advantages and disadvantages. But if necessary, at any time you can disassemble the device and connect the desired sensor or sensor, thereby upgrading the switch. You can buy any switch in electrical stores, where you can also pick up parts to assemble the light control device yourself.
Video: motion sensor to turn on the light
How does an illuminated light switch work?
Nowadays, switches equipped with a backlight circuit are gaining popularity. How does a light switch work with such an addition, which serves not only for beauty, but also performs certain functions:
- allows you to locate the switch in the dark;
- is an indicator of the disconnected state of the switching device;
- determines the integrity of the lighting circuit (and, in the case of using incandescent lamps, indicates the serviceability of the light bulb).
The backlit switch serves not only for beauty, but also performs certain functions
Meter box: requirements for a metal case for outdoor installation of a meter
A lighting circuit is formed on the device. In order for this design to work, a very small current is enough - a few milliamps. LEDs or miniature neon lamps are suitable for use in such conditions.
Illuminated switch diagram
The diagrams show how the switch works. If you turn off the main switching device, then a current flows through the LED, limited by the resistor and the resistance of the lamp. If the switch is closed, then the backlight circuit is bypassed and the LED does not light. When the lamp is turned off, the glow circuit is broken and there will be no light.
How to fix bluetooth headphones for a phone, if one doesn’t work, the microphone or plug is broken, the contact has come loose and other cases
In ancient times, when there were no backlit switches and incandescent lamps were predominantly used, the backlight circuit did not affect the operation of the circuit. When energy-saving and LED lamps came into use, even extremely low current flowing through the resistor and LED, in some cases, causes unpleasant flickering of the lamps. This problem can be overcome by shunting the lamp with a resistor of several kiloOhms or a capacitor.
Why should the switch break the phase conductor?
After we have become familiar with the operating principle of a single-key switch, we can move on to explaining one of the most important aspects of its connection. The fact is that only the phase should always be connected to the switch contacts.
I'll explain why:
- Firstly. Only the phase is shocked;
- Secondly. Based on the point above, to safely replace lamps in a luminaire, the phase must be turned off. If the connection is made correctly, then for this action it will be enough just to move the switch key to the “off” position.
- Third. The likelihood of malfunction and premature failure of some types of lamps increases significantly. Namely, compact energy-saving and LED. When connecting them, the phase must be interrupted by a switch, since these lamps have in their design starting elements that recognize the phase, even without zero, as a signal to ignite the lamp. If there is no zero, the lamp will of course not glow properly, since there is not enough voltage, but it will definitely blink.
I have described only the main reasons why you should take the process of connecting a light switch seriously; in reality there are many more.
Terminals for connecting wires and markings
So, to connect conductors to the switching device, two main types of terminals are used:
Screw and spring types of terminals are used for mounting the switch
- screw - the conductor core is clamped by tightening the screws;
- clamping (spring) - just insert the conductor, the spring-loaded platform will press it itself.
More convenient, of course, are spring ones, from the point of view that they are easier to install. Screw ones, in comparison with the previous ones, are more reliable. However, if the wiring is carried out with a cable with aluminum conductors, you should remember the ductility of this metal. Screw terminals require periodic tightening, otherwise bad contacts and the corresponding consequences cannot be avoided. Spring ones do not need tightening, since they tighten the wire themselves.
Color and alphanumeric markings of electrical circuits
Looking at the switch from the front, it is difficult not to notice the symbols. Their designation indicates the place where the device is used.
Photo and description
On conventional key light switches, you can find the designation I and O, which means the on and off position.
Rocker switch with I and O designations
Also, conventional devices that work only to open or close an electrical circuit can be marked with a key symbol.
Key switch with key symbol designation
Another type of switch is a push-button switch that does not lock in one position. Therefore, such switches can be used as bell buttons, or as switches in a lighting system assembled on the basis of pulse relays. They have a special marking in the form of a bell.
Push button switch
There are pass-through switches marked with a bidirectional arrow.
Overhead pass-through switch with bidirectional arrows
There are pass-through type devices; symbols in the form of steps are applied to them. .
Pass-through switch with staircase symbol for indoor installation
All these markings may or may not be present on the switch panel at all. Here you will not find uniform standards, so each manufacturer is free to apply signs at their own discretion. And often you come across a product, even among global brands, that often lacks any markings.
Design features of built-in switches
The actual switch mechanism does not differ in models for hidden and open installation. In either case, it will be a two-position switch or a cam-type switch or a spring-loaded normally open contact. However, unlike overhead models, internal switches and sockets (this is the type you will most likely have to buy when renovating an apartment) do not have their own housing. This feature gives rise to a number of design differences between embedded mechanisms.
Thus, built-in mechanisms require the construction of technical recesses in the wall with the subsequent installation of special mounting boxes, which act as their body. The switch itself (or any other mechanism for internal mounting) is attached to a special support. A support is a shaped steel plate that is attached to the mounting box. It also fixes the mechanism and acts as a fastening for decorative elements. It is precisely because of this feature that the decorative potential of internal switches is much higher than in the case of overhead models, and this at approximately the same price.
The situation with the security of built-in switches is completely different. Thanks to their design features, overhead models have a greater degree of security. On the other hand, in the vast majority of cases where built-in electrical accessories are used, a high degree of security is not needed. And if additional protection is still necessary, then in addition to the internal switch, you can buy special sealing pads for decorative frames and supports.
Design of various types of switches
According to their purpose - to turn on and off an electrical device, switches of any type meet the requirements. But they differ from each other in design.
Key
The design that is most often found. How does a keypad light switch work? In one position the contacts are closed and the light is on, in the other they are open and the light is off. The key switch is divided into: single-key, two-key and three-key.
Key switch
Over time, the design of the key switch has remained virtually unchanged, with the exception of the decor of the plastic surface. Behind it there is an active movable panel that controls the contact group. All this is assembled on a supporting structure.
Button
As the name suggests, this type of switch is based on a button. There are two options for this device:
Push button switch
- With fixation . Works like a keyboard. When pressed for the first time, the button is locked in the on position. In the second case, it is pressed to the off position. It is used for lamps, built into them.
- No fixation . When pressed, the contacts close, when released, they open. Can be used for electric bells and impulse relay circuits. Designed for vertical plane.
Cord or rope
You've probably seen such a lamp more than once. This rope-type switch (on-off from a cord) can be built into wall lamps, or it can be a separate device designed to illuminate the entire room or part of it. It is controlled by pulling the string.
Rope or cord switch
How does a corded light switch work? The mechanism of such a lamp is more complex than its operating principle. The algorithm is simple - each manipulation of the rope changes the state of the contacts to the opposite:
- Pull the cord the first time and the light will turn on;
- pull a second time to turn it off;
- The third time it will turn on again and so on.
It works according to the closing-opening mechanism of the contact group. Such a switch, with a certain degree of assumption, can be called a mechanical implementation of a pulse relay.
Turning
These days, this is quite a rare specimen. Rotary switches make and open contacts when the handle is turned. Nowadays they are rarely used because they are not very convenient to use, except for decoration.
Rotary switch
But there are also modern switches that can be classified into this category. They are combined with dimmers - these are brightness regulators. To turn off the light, you need to turn the handle towards the minimum brightness and turn it until it locks. To turn off the light, turn the knob in the opposite direction.
Acoustic
Switch with sound response. There is a microphone built inside that picks up sound and converts it into an electrical signal, which in turn is amplified, filtered, and compared with a set threshold.
Acoustic switch
An acoustic switch will be an indispensable thing in a house or apartment where a person with impaired motor functions or visual impairment lives. If the sound level is exceeded, a command is generated to turn on or turn off the load. However, there is a possibility of extraneous noise effects, which may cause unauthorized operation.
Sensory
This innovation among switches is characterized by the fact that to turn on the lighting, you just need to touch the panel without applying force to press. Most of all, such switches are suitable for the Smart Home system, because in addition to turning on the light, additional functions can be built into this switch. In ordinary houses, this switch serves for aesthetics and decoration of premises in the Hi-Tech style.
Sensor switch
Review of pass-through switch manufacturers: popular models
Before you buy a pass-through switch, you should get acquainted with the leading manufacturers who produce the highest quality products. In this case, it will be much easier to navigate the assortment offered by specialized stores. Some of the most popular brands include:
- Legrand;
- Schneider Electric;
- ABB;
- Viko;
- Lezard.
Products manufactured under the listed trademarks are distinguished by high build quality and long service life. With comparable technical characteristics, the price of pass-through switches can vary over a wide range. We offer you to get acquainted with the average prices so that you can make a choice much easier during the purchasing process.
Legrand: cost of the most popular models
When choosing a Legrand pass-through switch, you should clearly understand for what purpose the specific product is being purchased, and what connection diagram should be implemented. In the manufacturer's catalog you can find single- and multi-key models of different colors and sizes. We invite you to get acquainted with the average prices for Legrand pass-through switches:
| Photo | Model | Number of keys | Average cost, rubles |
| Legrand Celiane | 1 | 300 | |
| Legrand 774308 Valena | 2 | 380 | |
| Legrand Kaptika | 1 | 180 | |
| Legrand Etika | 2 | 200 | |
| Legrand Quteo | 2 | 120 |
Schneider Electric: cost of the most popular models
The well-known Schneider Electric brand produces high-quality products with a stylish modern design. Such devices can harmoniously fit into any interior. The availability of products in various colors will allow you to choose a model with a suitable design for any room. Check out the average prices for the most popular models:
| Photo | Model | Number of keys | Average cost, rubles |
| Schneider Electric Unica | 2 | 500 | |
| Schneider Electric Unica | 1 | 610 | |
| Schneider Electric Study | 1 | 230 | |
| Schneider Electric Sedna | 1 | 280 | |
| Schneider Electric Sedna | 2 | 500 | |
| Schneider Electric Glossa | 1 | 110 |
ABB: cost of the most popular models
High-quality materials are used to manufacture ABB switches. Such products are distinguished by high build quality and stylish design. Regardless of the chosen stylistic design of the room, you can always choose the most suitable option for a particular interior. In the manufacturer’s collection you can find a suitable option for a classic interior and one decorated in high-tech style. We offer you to get acquainted with the average prices for the most popular models:
| Photo | Model | Number of keys | Average cost, rubles |
| ABB Basic 55 | 1 | 310 | |
| ABB Zenit | 1 | 200 | |
| ABB STYLO | 1 | 570 | |
| ABB TACTO | 1 | 930 | |
| ABB TACTO | 2 | 1180 |
Viko: cost of the most popular models
Electrical products manufactured under the Viko trademark are presented in a fairly wide range. Thanks to this, you can choose the appropriate option for a room of any purpose and size. Among the models offered, you can find a suitable option in terms of cost and design. Average prices are presented in the table:
| Photo | Model | Number of keys | Average cost, rubles |
| Viko Carmen | 1 | 190 | |
| Viko Karre | 1 | 180 | |
| Viko Vera | 1 | 290 | |
| Viko Vera | 2 | 220 | |
| Viko Karre | 2 | 180 | |
| Viko Palmiye | 1 | 170 |
Lezard: cost of the most popular models
The manufacturer offers a wide range of products, among which you can always choose a switch with a suitable stylistic design and a suitable color. Thanks to this, you can purchase a pass-through switch that can harmoniously fit into the interior of an apartment decorated in a certain color scheme. The cost of the product depends on the color design. We suggest comparing the cost of products that have the same design, but different colors:
| Photo | Model | Number of keys | Average cost, rubles |
| Lezard Mira white | 1 | 200 | |
| Lezard Mira alder | 1 | 330 | |
| Lezard Nata cream | 1 | 180 | |
| Lezard Nata white | 1 | 150 | |
| Lezard Mira alder | 2 | 270 |
Difference between switches in circuits
Imagine that switches belonging to the same type and similar in appearance are distinguished by differences in function. In most cases, this difference is determined by the design of the contact group, but not always.
Key
This is the most famous household electrical circuit breaker/closer. In this common type, there is a relationship between the number of keys and the corresponding number of contact groups.
Contact groups of "key" type switches
The power side pins are usually combined.
Button
In this case, the difference between the switch is only in the direction of influence. Or in the position of fixation, its absence in some cases.
Contact group of a push-button device
The functionality of the contacts is the same, but they are arranged a little differently and are indicated by a different symbol in the diagram.
Passage
This switch works more like a switch. It is equipped with a changeover contact group. Let's look at how a walk-through light switch works? It works like this: in one position one pair of contacts is closed, in another - another. Available in single-key and two-key versions.
Pass-through switch contact diagram
At first glance, it is difficult to distinguish it from a regular key if there is no corresponding marking. But, if you look at the back, you will see the internal diagram printed on it. Available in single or double versions.
Cross
This switch has one key that controls two changeover groups of contacts connected in a special way. In this case, the device is combined with walk-throughs where it is possible to create a control load from three or more places.
Cross switch diagram
Switch selection
It is recommended to purchase the device in specialized electrical goods stores, where it is possible to find the most suitable model in terms of functionality and appearance. When purchasing, it is important to consider that the switch must meet the operating conditions.
We are talking about the power and current that will affect its constituent elements. Single-key devices can be different, the difference is determined by design features.
There are push-button and keyboard models, reversible and rotary, built-in and directly connected. Don't forget to check the build quality of products.
Circuit breakers: types
There are main types of circuit breakers:
- 2-pole : Designed for a single-phase line consisting of one live terminal and one neutral wire.
- 4-pole : designed for a three-phase line, consisting of 4 slots, where three phase wires and a neutral wire can be connected.
How does an automatic light switch work? Notably, it functions as a real-time protection system for main circuits used in industrial and other high-voltage commercial locations where there is a real risk of electrical shock that could result in an accident.
Types of switches for home use
Each manufacturer produces different models of switches, which differ both in shape and internal structure. However, several main types should be distinguished.
Table 1. Types of switches by switching principle
| View | Description |
| Mechanical | Devices that are easy to install. Instead of the usual button, some models have a lever or cord. |
| Sensory | The device works at the touch of your hand, and you do not need to press a key. |
| With remote control | This design is equipped with a special remote control, which comes included, or a sensor that responds to movements around. |
The most popular is the first option, which is installed everywhere. Moreover, such switches have become in demand since the very beginning of the appearance of the electrical circuit. The second option is less popular, especially in our country. The third option is a modern model, which is gradually displacing outdated switches from the market.
Installing a motion sensor in a structure is advisable both from the point of view of energy savings and home safety. For example, if you install a structure at the entrance, residents will notice if intruders break into the apartment.
Switch with additional lighting
Depending on their design features, there are devices with one or several buttons (on average, for standard electrical appliances, switches with two or three buttons are used). Each button is responsible for turning on and off a separate circuit.
So, if several lamps are installed in one room at once: the main chandelier, spotlights, sconces, then it would be advisable to install a design with three buttons.
In addition, no less popular are devices with two buttons, which are installed in all apartments without exception. Most often they are needed for a chandelier when there are many light bulbs.
Find a more detailed diagram of connecting a chandelier to a two-key switch in a special article.
Depending on the installation method, there are internal and external switches. The first option is installed in the apartment, because such structures look aesthetically pleasing. For safety during installation, a special box is installed, which is called a socket box.
Connection diagram
Built-in switches are used when there is electrical wiring hidden in the wall. Overhead devices are mounted in the presence of external conductors. In this case, the connection diagram has no fundamental differences.
Where is the switch installed?
Design and principle of operation of a pass-through switch
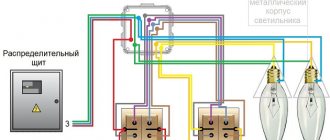
Pass-through switches are placed where the light is turned on and off from different ends of a living space or a flight of stairs. That is, you can turn on the light, say, in the hallway, and turn it off in some room. And at the same time, the lighting will be only in one place you need. Not only is this method convenient, it also saves energy.
Connecting a pass-through switch
In terms of its surroundings, the pass-through switch is no different from a regular one. The front panel is covered with an image of arrows (up/down). If a simple switch is characterized by one input and one output, then a pass-through device has one input and two outputs. How does a walk-through light switch work? This light switch does not work by breaking the current, but by redirecting it to any of the outputs.
What is an overcurrent circuit breaker and how to choose one
How to understand that there is a pass-through switch in front of you
Of course, an experienced electrician just needs to look at the product, and he already understands that this is a pass-through switch. For the rest there is a scheme. A high-quality manufacturer will always add, in addition to the product they produce, a drawn electrical diagram of a double triple or single design, which is located under the device body.
A single pass device can be identified visually. It is enough to inspect it and find terminals with copper contacts. There should be three of them. Next, take a multimeter and use it to call them together so as not to confuse them. The device should be put into beep mode and its input and output should be ringed. If the multimeter emits a signal when you touch a contact, there is a contact at that location.
Connection diagram for pass-through switch
In addition, the pass-through device has other differences from a conventional switch. There is three-wire switching here. Meanwhile, a simple switch has two-wire communication. And it is a switch that redirects voltage from one contact to another. One light source here is controlled by a pair of pass-through switches. Each has its own zero and phase. Changing the position of the switch key closes the circuit, which causes the light bulb to light up. If you turn off one of the two switches, the phase wire will open, and the contact of the paired switch will close. This means that the light goes out when the keys on both devices are in different positions, and if they are in the same position, it turns on.
Surface Mount Switch Installation Procedure
Such devices are used for open wiring and where for some reason it is impossible to make a hidden connection.
Let's look at the installation procedure using the example of a fully factory-assembled single-key switch. To connect it, you need to turn off the power supply to the apartment, and then perform the following operations sequentially.
Step 1: Disassemble the device
We take a slotted screwdriver, very carefully lift the device key and remove it. After this, just as carefully, trying not to damage it, remove the protective decorative cover. All we have to do is disconnect the working mechanism from the socket plate. Let's carry out this operation.
Step 2: Design the installation location
The manufacturer must make holes on the base plate for securing the device. They need to be marked on the wall. To do this, take the socket box, apply it to the surface and mark the line of the top edge with a pencil.
Using a level, we check that it is horizontal, otherwise we will not be able to install the switch evenly. After this, we again apply the plate to the wall and mark the attachment points.
Step 3: Install the socket plate
Further actions depend on the material from which the wall is made. If it is soft wood, fasten the base with galvanized screws. If the base is made of harder materials, you will have to drill holes in it.
We try to do all the work accurately so that we don’t have to make additional holes. We securely fasten the plate to the wall.
The last stage of mounting a surface-mounted switch is the installation of a protective decorative case and a key. After this, the device can be used
Step 4: Connect the wires
We determine the type of contact switching and cut and strip the wires in strict accordance with it. Be sure to remove all insulation so that it does not subsequently melt and cause problems with the operation of the device.
We check that the wires reach the terminals as accurately as possible; it is undesirable for excess wires to remain. In accordance with the markings and color of the wires, we connect them to the required contacts.
Step 5: Assembling the device
First we need to make sure that the wires are connected correctly, for which we test them with a multimeter screwdriver or other device. Having found out that everything is assembled correctly, we take the switch mechanism and install it in place.
Then we return the protective decorative cover and, last of all, snap the key into place. We check the operation of the device.
Wireless switch
In the field of switches, you can find more and more innovations designed to improve user comfort. Thus, remote switches have become widespread. A system that operates at a distance. Wall mounting of a wireless switch is possible.
At first glance, it may seem that a wireless switch is installed for fun, but in fact, for some people it is vitally necessary. For example, those who have limited mobility, as well as the elderly population.
The device is easy to operate. With its help, you can control the lighting throughout the house, turn lamps on and off, and also change their brightness. In addition, thanks to the special design, there is no need to damage the walls or make large holes for installation.
Gradually, the switches we are used to are fading into the background. They are not very convenient to use, they are difficult to install and connect, and they also have a short resource. Wireless analogues are not yet widely used, but they have better qualities.
Scope of application
Stylish appearance and installation within a few minutes are another advantage of wireless switches. Let's look at the cases in which they are most often used:
- When moving an old switch, when pieces of furniture interfere with its installation. The new device can be mounted anywhere in the room - on a wall, mirror, cabinet or other element of the room.
- To eliminate electrical errors. When installing wiring, mistakes are often made that affect the comfort of living in an apartment or house. In such cases, it is not necessary to make a strobe or plan expensive repairs - you can install a wireless switch (with or without a remote control).
- When the space is limited in size and there is nowhere else to put it. In order not to mount the switch in a cabinet, there are overhead analogues. They are easy to install, mounted anywhere, like a radio switch on any furniture set (coffee table, bedside table, etc.).
- In wooden houses. In such cozy and heat-saving houses, difficulties often arise with wiring. Hidden wiring cannot always be installed due to safety precautions, and open wiring is too vulnerable and accessible to rodents. Therefore, it is best to solve this issue with the help of wireless light switches, which simplify the process of installing hidden wiring and save money.
- To control lighting from multiple locations. Sometimes turning off the lights needs to be done from several parts of the room. Then, in order not to run wires to each switch, wireless devices are used. This solution comes with wireless switches with remote control.
Wireless switch
RCD in power supply circuits of drive frequency converters
When are wireless switches still used?
Here are some more cases where wireless switches are used:
- When installing additional switches. For example, after a repair that was not done by you, it suddenly turns out that there are not enough switches in certain places and additional installation is required. And this is where a wireless switch comes to the rescue.
- For controlling light over long distances. Let's say you need to regulate the switching on and off of a lamp in one room from another room, part of the apartment or even the street. Running an additional switch cable is expensive and unsafe, but new technology allows you to avoid such problems. The feature of radio switches is their large operating range - up to 350 m. It all depends on the device model. You can control it with a simple remote control, small in size in the form of a key fob.
- In order to preserve the design of the room. If installing a switch in a recess is not possible, you have to install overhead types of products that spoil the appearance of the room and do not look very solid. The solution to the problem is to install a wireless device that is thin and fits perfectly into the interior.
- As an alternative to conventional devices. To innovate and improve comfort. The best solution here, of course, is to install a wireless remote switch. The most important thing that has not yet been said about wireless switches is that they will cost more than regular ones - this is a fact. But they are easy to install and control lighting with their help.
Wireless switches in wooden houses
How to choose the “right” place for the switch
Choosing a place to install the switch is a personal matter for each owner. However, there is a set of industry requirements that regulate this issue. This is due to the fact that laying electrical wiring is quite an expensive undertaking and redoing it every time is expensive and too troublesome.
Experts recommend installing all switches in the house at the same height and the switching position should be common for all.
The devices are usually mounted at the height of door handles, which correlates well with the development of muscle memory. Thus, when entering a room, a person presses a key automatically, without even noticing it.
Another important point: the switch in the room must be positioned so that there is a distance of about 15-20 cm between it and the doorway. This way a person can grab the door handle with one hand and press the key with the other.
For living rooms, it is customary to install switches only indoors. For common areas, such as bathrooms, closets or corridors, switches located outside the room are most often used.
If there are small children in the house, you should not “lift” the switches up. The restless period when the baby will “play around” with the light will pass very quickly, and the inconvenience from the location of the switches will remain for a long time.
The design of the switch is extremely simple. Its main elements: mechanism on the mounting plate, keys and decorative protective panel
How a light switch works depending on placement
How to properly place a switch to be able to turn on and off the light in a room where there are several entrances? When there is one switch in a large area, this point is not always easy to access.
And the question immediately arises of how the light switch works at different ends of the apartment, corridor, staircase in the entrance, in the local area, and so on, in such a way as to control one part of the room while being in another. There are many options, some may seem completely fantastic, but technological progress does not stand still. Another thing is why bother with expensive, outrageous things if you can use a pass-through switch.
There is a simple diagram, maybe someone remembers it from school times, in physics textbooks. This task is based on the operating principle of a pass-through switch, which offers the ability to turn on and off a light bulb at any end of the corridor.
A simple diagram of “one light bulb and one switch”
Key K1 is closed, which means the light is on. If you open the contacts, the lamp will go out. To achieve the goal of switching on and off from different ends of the corridor, you need to switch to a different circuit.
Pair of pass-through switches
This problem is solved simply: you need not switches, but switches, plus an additional wire. The switch transmits voltage to one of two wires:
The switch transmits voltage to one of two wires
At this point, the phase is transferred from contact 1 to 2. When you press the switch, voltage from contact 1 will flow to 3. As a result, only, in any position of the switch, one of the wires will be energized: 2 or 3. This is the electrical circuit pass-through switch: simple switch.
Why you can’t leave a charger in a socket (charger): what the consequences are, reviews
There should be another pass-through light switch. You need to run two more wires to this switch.
Another pass-through light switch. You need to run two more wires to this switch.
By pressing switch No. 1 we open the circuit. What is noteworthy is that by pressing switch No. 2 the same thing will happen.
Switch No. 1 opens the circuit. It’s noteworthy that pressing switch No. 2 will do the same thing
This means that the light can be turned off from either end of the corridor. And you can turn it off in the same way - by clicking any of the switches. For example, first:
RCD in power supply circuits of drive frequency converters
Any switching of one of a pair of switches changes the state of the system: if the light was on, it will go out, and if it was turned off, it will light up
The single-key pass-through switch does not have On/Off positions. Any switching of one of the pair of switches changes the state of the system: if the light was on, it will go out, and if it was turned off, it will light up.
Safety precautions when working with electrical equipment: general information and basic measures
Installation and connection methods
The consumer first selects the device according to the installation method. If it is necessary to mount a hidden household electrical switch, then to do this you should drill a mounting hole in the wall. This installation is carried out when hidden installation of electrical networks is installed. If non-standard devices are used, then corresponding holes are made for them.
You may be interested in: The right and best choice of multimeter
Outdoor appliances are usually installed in areas with exposed electrical wiring. Such installation is carried out in wooden country houses, industrial enterprises, construction trailers and in rooms where it is impossible to hide the wires or they are installed according to a temporary scheme.
Typically, hidden devices are more suitable for design purposes, as they look more attractive. There are two types of wiring used:
- screw;
- screwless.
The first connection method is considered more common, when a wire of the appropriate size is inserted into the terminal and tightened with a screw. The only drawback is the weakening of the fastening due to vibration of the conductors under the influence of electric current. This is especially true for multi-core wires. Non-tightening spring terminals allow you to connect wires of almost different sizes and designs. Please note that this connection is not suitable for aluminum wires.
The advantage of this connection is that there is no need to constantly tighten the terminals. To connect aluminum wiring, a special lubricant is additionally used to treat the ends of the wires.
Installation of switches with one button
We will look at the basic connection diagrams for devices that have a similar structure (one button), but differ in the installation method. However, all these devices operate on the principle that a phase is started as a result of opening using a dynamic element. If you confuse the phase and zero contacts, there is a danger to life.
Switches with one button are often adjacent to sockets - this is convenient for bedside lamps
What equipment and materials will be needed during the work process?
In order to make the connection, you will need the following tools:
- stripping knife;
- screwdriver;
- indicator screwdriver;
- pliers;
- building level;
- electric drill;
- marker.
Indicator screwdriver
In addition, you will need the following materials:
- conductors of optimal length;
- wiring distribution box;
- clamps and electrical tape;
- corrugation;
- single-key switch.
The simplest single-key switch - only two terminal contacts, at the input and at the output
Installing an overhead device
In this scheme, the location of the conductors is not important: they can be located on the outside or inside the ceiling. In this case, a surface-mounted type of switch is installed in an apartment when it is not possible to make grooves in the wall or prepare channels. For example, the reason could be a recent renovation.
A primitive connection diagram that will be understandable even for a beginner. Here the L-phase wire is connected to the switch, and the other conductors to the lamp
We will consider an example with external wiring, where cables are laid on top of ceilings in a special corrugation.
At the installation site of the switch, the corrugation is fixed to the ceiling using clamps, and an insulated conductor peeks out of it
Under the switch there will be an additional electrical device - a socket, so it would be logical to place the cables of these two devices in the same protective tube.
The cable from the outlet will pass through the overhead switch, so as not to complicate the installation
Mounting a surface-mounted switch: step-by-step instructions
Step one: before starting the installation process, you need to turn off the power to the room. This is easy to do by lowering the switch on the switchboard, which is located on the landing or in the corridor. In order to make sure that there is no voltage, you need to place an indicator screwdriver against the contacts.
If the indicator light does not light up, then there is no voltage
Step two: now you need to disassemble the structure - you should take out the button. In this case, a device with a plastic case and moisture protection is used.
Under the main key, which is located on the case, there is another part - a plastic panel - this should also be removed
Step three: Now you need to remove the internal assembly, which is the main mechanism.
The internal unit is not fixed inside with latches or other elements, so it can be quickly dismantled
Step four: Now you should mark on the wall the place where the switch will be installed. In addition, it is necessary to leave markings for fasteners. To do this, you will have to attach the empty base of the device to the surface. Next, you need to level the housing on the wall, and then put marks where the holes for the fasteners will be located. After that, all that remains is to make indentations in the wall using an electric drill.
We make markings and drill the wall, and then fix the body to the wall with dowels
Step five: next, you need to remove the cover from the top of the body in order to pull the corrugated wiring into this hole.
There should be conductors inside the switch that we will work with
Step Six: Now you should move on to the wiring step. To do this, it is necessary to strip the ends of the wires from the insulating layer (using a knife) by 9 centimeters. After which it is necessary to connect the phase conductor (white) to the terminal marked “L”, and the neutral conductor (blue) to the terminal marked “1”. Next, you should carefully tighten the fasteners and place the mechanism in the body part.
A wire from the socket will pass through the bottom hole of the case, which we will bypass the main unit
Step seven: Now you need to assemble the switch, securing the button in place.
After installing the switch, you should check its functionality by connecting power to the distribution board. If the lamp works after pressing the button, it means that the installation was carried out in accordance with the rules
Video - Connecting a switch
How to replace an old switch: step-by-step instructions
Often, when renovating a residential building, it is necessary to install a new switch. Therefore, in order to understand the principle of these actions, we should consider them in more detail.
Step one: first you need to dismantle the old switch by unscrewing two bolts on the body.
This is what an outdated model of built-in switch looks like and needs to be replaced
Step two: Once the screws are removed, you will need to remove the top cover.
Inside there is an outdated version of the connections, where the ends of the conductors are held on bolts, on each side the base is supported by lugs
Step three: next we have to detect the phase conductor. To do this, you will need to take an indicator screwdriver and bring it to the contacts one by one. At this stage, care should be taken not to touch the conductors with your hands. To protect your hands, it is recommended to wear rubber gloves.
Use an indicator screwdriver to find the phase wire
Step four: after you can determine the phase and neutral wires, you will need to turn off the power at the distribution board. Next, you need to re-check the connections with an indicator screwdriver to make sure there is no voltage. Only after checking it is necessary to begin dismantling the internal device. Using a screwdriver, unscrew the holders that are located at the edges. It is necessary to carefully remove the holders and then wrap the conductors with electrical tape.
It is recommended to use electrical tape of the appropriate colors (white, blue) so as not to confuse the conductors
Step five: now you need to remove the device, straighten the conductors to free up space for installing another switch. Next, you should take a new switch and disassemble it. You will have to dismantle the button and the outer panel to get to the internal assembly, where there are two terminals and holders.
The screws located on each side adjust the degree of clamping, and the top screws are required for connecting conductors
Step six: Next, you need to use a knife or a special tool to remove the insulation from the conductors by about 10 millimeters. After which these wires are inserted into the holes and clamped with screws. It is recommended to tighten them with force so that it is impossible to pull them out. It is important to ensure that insulation does not get inside.
We insert the phase and neutral conductors into the holes in accordance with the markings
Step seven: After connecting the wiring, return the inside of the switch to the mounting cup.
In order to achieve a tight fit of the assembly, it is necessary to tighten the fasteners along the edges
Step eight: now all that remains is to attach the external panel and button.
Electricity should be connected to check the functionality of the switch. Moreover, it is recommended to do this even before the fastenings are fixed.