What is a light sensor and what is it for? This device has many names, for example, light sensor, light control switch, twilight switch, photosensor or photo relay. It is intended exclusively for saving electrical energy and is a small device with various microcircuits inside, connected to an electrical circuit.
Nowadays, there are a huge number of various devices of this type. For example, a motion sensor that closes a circuit when there is movement in its field of activity. An individual feature of the photo relay is the ability to change the power of artificial lighting depending on the level of natural light. Recently, these sensors have become increasingly popular and are widely used together with lamps for street lighting at night, with lighting fixtures in staircases, etc.
In this article we will talk about how to connect a photo relay, and a detailed diagram of connecting a photo relay for street lighting will be presented.
The principle of operation of the twilight switch and its connection diagram
This device has a simple structure. A special part called a photosensitive element is installed inside it. Usually this is a photodiode or photoresistor. Each of these elements is capable of increasing or decreasing the resistance inside the sensor, based on the level of natural light. This process causes the voltage inside the photo relay to increase or decrease, and the lighting device begins to produce artificial light or turns off.
In simple words, the light sensor works like a switch, but this happens automatically. The amount of luminous flux at which the photo relay (switch on sensor) is triggered is adjusted manually and does not require special knowledge.
Design features of light sensors
These devices have similar design features. As a rule, sensors are a small plastic box that is mounted on the wall or on the body of the lighting fixture itself.
Installing a photo relay takes little time and allows you to save a sufficient amount of electrical energy. The twilight sensor pays for itself in the shortest possible time.
Connecting a photo relay for street lighting in high-power conditions requires minor changes during the installation process. In this case, the device is connected via a magnetic starter.
If it is planned to install several light sensors, then they are connected in parallel.
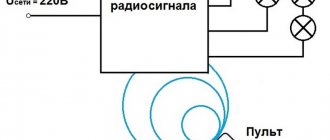
There are also devices that have a remote sensor. This design feature allows you to install the lighting device together with a photo relay in places out of reach of natural light.
Modern technologies do not stand still, and the lighting control scheme changes along with them. Light brightness adjustment, lighting time and other indicators can be adjusted and maintained automatically via a computer and the Internet.
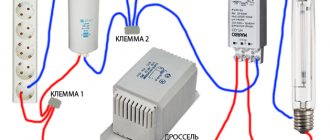
Photo sensor connection diagram
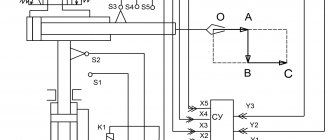
The figure shows a generalized standard diagram for connecting a light sensor. Manufacturers of these devices are constantly improving the design and making adjustments to circuits and operating modes. It all depends on the ratio of the cost of the photo relay to the quality of its manufacture.
Parameters to be configured
Other sensor parameters can be adjusted to suit specific local conditions. This will help optimize the operation of the lighting system and minimize false alarms.
- First choose the correct installation angle.
It is configured in such a way that the object is detected immediately upon entering the controlled area. Options for correct and incorrect setting of the control angle. - Secondly, the sensitivity of the sensor is adjusted (the adjustment element is designated SENS from the word sensitive). The essence of this adjustment is to tune out triggers when small objects are detected. In most cases, these are small animals; there is no point in turning on the lighting for them.
- Most sensors are equipped with a photo relay. Without it, the sensor will also work during daylight hours, or they will have to be turned off manually. The response threshold of the photo relay must be adjusted so that the detector does not waste electricity during the day, but turns on the lighting in time at night. The adjustment control is marked LUX or Day Light.
- Many models have the ability to configure a shutdown time delay. This is convenient when leaving the territory - the light will not go out immediately, allowing a person or car to leave not in complete darkness.
Not all detectors have a full set of settings. Some inexpensive models may not have a response time setting, while others may not have sensitivity to the size of objects.
An example of the location of the controls for an infrared motion detector
Principles of measuring light levels with a twilight sensor
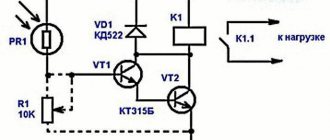
The installation diagram for a photo relay sensor for street lighting was described above. But how does the photo relay determine the moment when it is necessary to close or open the electrical circuit? These devices use sensitive elements made of various semiconductor metals, which are mounted at the location of the sensor where natural light falls. At the point of contact of these metals, a small electrical impulse occurs, which gives a further command to close the entire circuit. Let's consider the main types of these elements (the principle of their operation):
- photoresistor (resistance changes depending on the surrounding natural light flux due to the content of cadmium sulfide or selenide inside the element);
- photodiode (capable of generating an electrical charge using the photovoltaic effect);
- phototransistor (is an optoelectronic conductor that responds to natural illumination by irradiating part of its base);
- photothyristor (used in circuits with direct current, regulates voltage based on the natural beam of light incident on its matrix);
- phototriac (operates from alternating current, synchronizes the supplied current from several channels, for example, from 2 photothyristors, and transmits it to the main electrode, which controls the entire circuit).
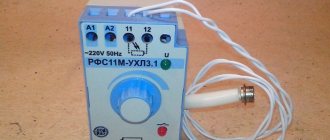
FR-601 (602)
When it comes to using standard single-phase photo relays for lighting, the most popular model is the FR-601 and FR-602 devices manufactured by IEK.
They are quite reliable, and even users uninitiated in electronics have no questions about how to connect an automatic backlight controller. These two modifications have minor differences: they both operate with current of the same voltage and frequency, have similar power consumption (0.5 W) and absolutely identical delivery kits.
The differences relate only to the maximum cross-section of the connected conductors: for the 601 model it is 1.5 square meters. mm., and for 602 - 2.5. Consequently, their rated load current is also different: 10 and 20 A, respectively. Both models have a built-in photocell; it can be adjusted from 0 to 50 lux in increments of 5 lux.
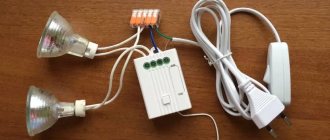
A visual step-by-step process of connecting a flashlight to a photo relay on a regular stand
The connection diagram for a light sensor for street lighting in a small area will be described below. To do this, we need a lamp, previously screwed into the socket, and the photo relay itself.
For greater clarity, we will install it on a stand. To do this, we attach a light sensor and a lamp in a socket next to each other, which will symbolize the lamp.
Next, you should connect the zero and input phases to the light sensor itself (as a rule, the connection points are marked on the body).
By inserting special rubberized plugs into these holes, you can connect the wires. These rubber plugs provide good protection from dust and other harmful external influences.
“Expert tip”: the connection points of the input wires should be directed downward when installing the sensor, which will increase protection from moisture and dust.
Before connecting, we clean the ends of the wires well (about 1 cm).
Next, connect the wires to the sensor in the following sequence:
- input phase;
- zero phase;
- protective phase (grounding).
The wires are connected to the lighting fixture itself in a similar way. We connect the input and zero phases to the socket, and the grounding phase is connected to the body of the device for lighting.
The last step will be to adjust the sensitivity of the regulator of our photosensor. This completes the installation process; all that remains is to replace the protective cover and tighten the bolts.
This is what the entire procedure for connecting a light sensor and lighting device to an electrical circuit looks like. It is not anything complicated, you just need to follow the correct order of connecting the wires. Otherwise, you can get negative consequences, including a short circuit or even a fire.
The procedure for connecting a photo relay for street lighting to diode light sources or spotlights is similar to that described above and is not particularly difficult.
Review of popular models of street lighting sensors
As for manufacturers, the products of the following brands are in demand:
- Elko-EP;
- Euroelectric;
- Hager;
- Theben;
- PromAutomation.
- Euroelectric 10A NEW. Plastic case, has a wall mount, suitable for connecting one line. Maximum current is 10A, operating current is up to 6A (1.3 kW). Among the settings - only the sensitivity regulator. One of the simplest models, but very reliable. The average price is 600 rubles.
- PromAutomation FRA 1-10. A universal relay, suitable not only for street lighting, but for turning on any electrical appliances. The maximum current is 10A, the cost is 400 rubles.
- Theben LUNA 122 top2. Twilight relay with DIN rail mounting. Professional model, a lot of settings (sensitivity, delayed response, connection of additional sensors, timer function, and so on). Can be used to control street lighting over large areas with connection to several separate lines. The average price is 17 thousand rubles.
- Eurolamp ST-303WSR. There is an adjustment of the response threshold, the maximum current is 25A. But it has low protection against moisture penetration, so it is installed only in dry places or in a protective housing. The average price is 350 rubles.
By the way, if you make a photo relay yourself, it will cost only 50 - 100 rubles - that’s how much all the necessary components cost in radio stores.
Technical characteristics of twilight switches
The main parameters for the operation of photo relays are specified in GOST standards and technical documentation of devices. These indicators were selected taking into account the realities of use in our country, however, there are analogues of these light sensors on the market. Before purchasing a device, you should definitely make sure that the device will work correctly when connected to our electrical circuit.
Main characteristics of light sensors:
- the value of the rated supply voltage;
- power indicators of electrical energy consumption and the level of thermal load on the lighting device;
- operating conditions in certain climatic zones (precipitation, dust, high or low ambient temperature, etc.);
- light sensitivity indicators;
- varieties and types of devices (switched, fluorescent and energy-saving).
Installation recommendations
When installing motion sensors, various nuances must be taken into account. Let's look at the main ones.
Sun protection
When direct sunlight enters through an open window or car reflector, false alarms may occur. Manufacturers protect themselves from this in several ways. The Fresnel lens is reinforced with a special material that provides protection from light. The pyrosensor can be located on the circuit board so that the top of the infrared sensor protects from excessive sunlight, drafts and dirt.
RF Interference Protection
High-performance radio transmitters and radio waves can cause confusion and false alarms when the motion sensor operates. An effective solution is to install a pyrosensor with a metal cover. Unfortunately, some manufacturers do not pay enough attention to this. Therefore, in some cases, interfering radio waves can cause users several unpleasant minutes.
Protective cover and masking
People don't often check their alarm system sensors and wiring. An attacker, taking advantage of this circumstance, can tear off or cover the sensor lens, making it inoperable. To protect the device, infrared devices with a higher level of protection and higher price range are covered with a protective cover. An infrared transmitter LED and a photodiode receiver are installed in the sensor. The emitted beams from the transmitter LED only reach the receiver diode if the sensor lens is covered and the signals are reflected from that surface. Then the operation of the photodiode leads to the appearance of a signal.
Protection against false positives
Below is a brief description of the installation and use conditions of the devices. They can significantly reduce the possible false alarms of motion detectors.
- Avoid places with drafts - natural, air-conditioned or from a fan. Doors and windows must also be closed during security mode.
- Do not point the detector at infrared objects such as radiators, air conditioners, fax machines, laser printers, or other devices that produce heat.
- Strong light effects may cause interference, so infrared rays should not be exposed to direct sunlight, reflected sunlight or car headlights. Avoid installation near radio transmitting equipment.
- Care should be taken to ensure that the surface on which the infrared port is installed is vibration-free and stable, especially for a dual diode system.
- Do not point the sensors at areas that may cause instability, such as reflective, glossy surfaces, or pool water.
- If you have pets, you will need to consider selecting specific motion sensors and a specific installation method. Choose only a pet-proof infrared detector.
House material, wall thickness and drafts
The more rigid and durable the house, the more stable the motion sensor will work, since it will not be able to detach from uneven wall surfaces. This reduces the possibility of false alarms. Air currents will also have less impact on the lenses, which are housed in a fairly durable housing. Air flow causes a false alarm primarily through the lens. Rapid temperature changes caused by drafts affect lenses with a high coefficient of thermal expansion. Due to the rapid change in the size of the areas of the lens, the rays also change. This leads to the sensor mistaking changes in ray fluxes for movement and triggering a false signal.
To learn how to properly configure the motion sensor, see the following video.
Disadvantages of Twilight Switches
Along with the undeniable advantages, photo relays also have a number of significant disadvantages, which are also worth mentioning in this article.
Unlike a motion sensor, light sensors are not able to illuminate a specific place at the right time. The light comes on on all lighting fixtures at once, and the lighting occurs in a not entirely rational way. Only one lamp can work or all at once.
These devices are very sensitive to external influences and weather conditions. They especially often react negatively to ordinary dust. Also, the device may not respond quite adequately when there is a sudden change in the weather, for example, when dark clouds come in, it may “think” that night has fallen and turn on the lights.
Photo relays with adjustable lighting levels are distinguished by their high price tag compared to their analogues.
A little about prices
The cost of a photo relay is actually not that high. Here is an example of price tags for the most popular models:
- FR-601 from 200 to 300 rub.
- FR-602from 300 to 400 rub.
- LXP-01 from 240 rub.
- LXP-02 from 350 rub.
- LXP-03 from 420 rub.
Prices for motion sensors:
- IEK from 400 rub.
- CAMELION from 350 rub.
- TDM from 400 rub.
- REV RITTER from 550 rub.
These are average prices in Russia; for different regions the cost may vary slightly. If you are interested in automating your home, then you can easily implement the idea and not go broke too much.