PUE clearly speak about the need to use grounding - this allows you to obtain the maximum degree of protection from electric shock and simply improve the quality of operation of sensitive electrical equipment. There are several ways to connect a grounded outlet, and which one to use depends on the initial presence or absence of a grounding wire in the network.
How does grounding protect an outlet?
fire due to short circuit
The most unpleasant thing that can happen to electrical wiring is a short circuit - contact between the neutral and phase conductors. At this moment, the current strength increases abruptly and if a person touches a part of the device that is not a dielectric, then the probability of receiving an electric shock of increased power is very high.
If there is grounding in the outlet, this means that the outer parts of the electrical appliance capable of conducting electric current are directly connected to the ground - in fact, a conductor of unlimited capacity. Since it is more convenient for electric current to run along the grounding wire (its resistance is an order of magnitude lower than that of human skin), in the event of a short circuit it will go exactly there. If the electrical wiring is done correctly - there are circuit breakers and RCDs in the circuit, then when voltage hits the body of the electrical appliance, the electricity will turn off in about 0.3-0.5 seconds. Even if there is a short circuit, the wires will probably burn out, but the person will remain unharmed.
As a result, it would be more correct to say that a grounded outlet protects not so much itself as the person who uses it. Moreover, this protection in most cases is needed for a split second, which is necessary for the automation to disconnect the damaged section of the wiring from the network.
Disadvantages of the ground loop
Despite the obvious advantages that a grounded socket has, its use still has certain disadvantages:
- Lack of monitoring of the insulation condition and automatic shutdown of power in the event of a violation of its integrity. This drawback fully applies to electrical networks that use sockets without grounding.
- The flow of differential current (leakage current) leads to gradual destruction of the insulation at the point of its damage. When using a socket without grounding, as a rule, there is no talk of any leakage current. High potential immediately appears on the body.
- Differential current can lead to heating of the connection points of grounding wires and, as a result, to an increase in their resistance and even the occurrence of fires.
- Relatively high price. The only quality in which sockets without grounding are in a more advantageous position. However, the difference in price is insignificant.
All these shortcomings clearly indicate that in addition to sockets with grounding contacts, the electrical wiring of modern apartments should use devices that provide additional safety for consumers. Such devices include RCDs and differential circuit breakers, which allow you to instantly disconnect a section of the electrical circuit in which the leakage current exceeds permissible values.
This is interesting: What wire to use for wiring: what cross-section, how many cores
If the wiring already has a ground wire
This may well happen if modern renovations have been made to an old house. Initially, there was no grounding in the corridor panel, and the electricians installing the wiring could install Euro sockets and lay grounding wires, but not connect them. If, in accordance with the plan for improving the electrical wiring, grounding is connected to the access panel, then the internal wiring made “for growth” becomes relevant.
grounding bus in the electrical panel
In this case, the installation task is simplified as much as possible and consists only of correctly connecting all the wires. The grounding wire in the entrance panel is connected to the PE bus and in apartment sockets it is connected to the corresponding contacts. To do this you need to do the following:
- Turn off the input circuit breaker or turn off the power to the outlet itself, if there is a separate switch for this.
- Take a socket with grounding contacts. If the old one already has them, then you just need to connect them.
- Remove the cover from the old socket, loosen the fasteners holding the inside of the socket in the socket and pull it out.
- If the old socket has a grounding contact, then screw it to the appropriate mount. If you need to install a new one, then the wires are removed from the old one and the required socket is installed in its place.
- After connecting the wires and turning on the input circuit breaker, you need to check whether the grounding is working correctly.
When the grounding wiring is connected correctly, when checking it, the RCD circuit breaker will trip if it is installed on the phase and neutral wires.
How to ground a double outlet
The procedure for connecting a double socket is exactly the same as for a regular socket, if it is a model for one socket. It has one grounding contact for both sockets, so the part that is inserted into the socket box is no different from the standard device.
laying a grounding wire when connecting several outlets
It’s another matter if a double socket is made up of two ordinary ones located next to each other. In this case, grounding should be considered as made for two separate points and the installation of the grounding wire is carried out somewhat differently than phase and neutral. The difference is that often the connected block of sockets is connected to each other by a cable, when the wires go to the next point from the contacts of the previous one.
If a wire burns out in any place, the next sockets in the circuit will not work. This is not a potential shock hazard like a ground wire that fails. To avoid this, before connecting a double socket made from ordinary ones, the grounding wire is laid in one piece to the last connection point, and twists are made opposite the previous ones, from which the grounding is already applied to the grounding contacts.
Installation (step by step instructions)
When choosing a one-piece socket design, where there are three sockets, an option with one socket box is considered. Accordingly, for a block with three separate mechanical devices, it will be necessary to provide three separate single socket boxes.
Drywall makes installation much easier than carrying out installation work on a brick or concrete base.
Sequence of installation steps:
- A round hole is made in part of the wall using a drill (perforator);
- Three holes are pressed out on the back of the socket box - these are for cables;
- Between the three holes for the cable, you need to make two more holes where the wires will go;
- To reliably fix the socket boxes on the walls, it is worth fixing using a thick alabaster aqueous solution, which is used to lubricate the hole immediately before installing the socket box in the wall hole;
- After completing the installation work, the solution is left for two or three hours until completely dry.
High-quality grounding ensures convenient operation, as well as the required safety.
- The wires are connected in parallel. Two of the additional cores are connected to each wire.
- They are sent to the second outlet and the third. Zero and phase are determined by the indicator.
- Then the power must be turned off. Having twisted the wires, they must be transferred in order to different sockets through the holes made.
- Connecting the triple model with separate sub-sockets, they are connected with clamps and pressed with separate terminals, twisted inside to install the main central part. Now all that remains is to install part of the decoration along with the lid.
If the installation is carried out where there is already a lighting group, then you need to think about the need to replace the machine with a new one. After installation, the outlet must be prepared for operation by connecting a low-power device.
If there is no ground wire in the outlet
It all depends on where exactly you need to connect the outlet with grounding - in a private house or an apartment building. In the second case, you still need to find out whether there is a grounding bus in the floor panel - the situation may well be the opposite of the previous one - when the wiring in the apartment is old, and the floor panel has already been converted to new standards and has a bus for connecting a PE conductor.
If there is no grounding bus in the floor panel, then you will not be able to ground the outlets yourself. More precisely, it can be done, but it will be a violation - interference with the approved layout of the house, etc. As a result, if there is no grounding, then all the residents of the house need to get together and write a collective statement so that the housing office employees carry out all the necessary work. There are no other options to do everything legally.
Also, the choice of connection method depends on whether you need to ground one outlet or ground all of them in the apartment. If one outlet can be grounded using external wiring, then if it is necessary to remodel all points in the apartment, large-scale work will have to be carried out to replace the electrical wiring, which is usually done only during major repairs. They consist of removing the old wiring from the wall and installing a new one in its place, which, among other things, will also have a grounding wire. In this case, it is not worth considering the option of simply adding a grounding conductor. The wiring itself is most likely old, plus, there is usually no precise wiring diagram inside the wall, so making new grounding grooves without damaging the old wires is quite problematic.
Security measures
During installation, be sure to operate with the power supply turned off. There is a warning sign near the shield with text like “Do not turn on! People are working!
When checking the grounding of the outlet using a screwdriver with an indicator or a test light, do not touch metal surfaces. Use electrically insulating rubber mats and do not work in wet clothes and shoes.
When you can’t, but really want to
There are quite a few ways to install a grounded outlet, bypassing the provisions of the PUE. All of them are, to a greater or lesser extent, a violation - to use them or not - this decision is made at your own peril and risk, but in any case you need to be aware of the possible consequences. The fact is that many of these methods are used happily ever after, but sooner or later something happens that is why they were banned. As a result, neglect of electrical safety rules endangers the life or health of not only the owner of such wiring, but also other people living with him in the same house.
Zeroing
This is one of the most common ways to ground an outlet if there is no separate PEN conductor. To make a grounding, you need to connect the working zero to the grounding contact - this is done by installing a jumper in the socket itself. The connection diagram for this method of “protection” is based on the fact that even in old wiring, the working neutral conductor is grounded in the distribution transformer. After short-circuiting the zero and grounding, if a phase appears on the device body, a short circuit will occur and the input circuit breaker will turn off the electricity.
Disadvantages of zeroing:
- When a phase “breaks through” the housing, the device, although not for long, is still energized and if at that moment a person touches it, he will receive an electric shock.
- If on the way to the socket the neutral wire in the wiring burns out (a fairly common fault in electrical wiring), then in most cases there will be a phase on the body of the devices. To do this, a single light bulb or power supply of any device that is not turned off is enough. In this case, the circuit breaker does not operate.
Read more about the dangers of zeroing in this video:
Connection to a lightning rod
If there is a lightning rod installed on the roof of the house, and the metal strip that connects it to the grounding passes close to the apartment window, then in this case you can connect to the grounding loop and conduct grounding to all sockets.
An excellent way to solve the problem, as a result of which the apartment will be connected to high-quality grounding. This method has only one drawback - grounding works well until the lightning rod is used for its intended purpose, or more precisely, until lightning strikes it. It is better not to know and not experience from personal experience what voltage will appear on the housings of devices connected to ground.
Grounding through heating pipes or water supply
Another common way to ground an outlet yourself is to strip a piece of water pipe and connect a grounding wire to it. On the one hand, it would seem a logical solution - the pipes in any case have contact with the ground. On the other hand, it is unknown to what extent this contact meets the grounding requirements, and if voltage appears on them, then there is a possibility that the current will not go into the ground, but will hit the person who is holding onto the pipe (washing his face or drawing water from the tap).
An additional disadvantage of this solution is the plastic water supply, which is often laid instead of rusted iron pipes. If the pipes on the fifth floor are metal, and on the third floor they are already plastic, then instead of grounding the pipes will simply be energized.
Installation features
When a person lives in a new apartment, house, the housing is built taking into account safety requirements, the electrical cables in it are three-core. Connecting the outlet will be easy. But if there is no third contact, you will have to ground the wire - you need to contact the management company and invite specialists. Residents of the upper floors will bear lower costs.
How to ground a power outlet: options
In an apartment where grounding is not provided, it can be done in two ways:
- Pull the bus from the home to the switchboard on the landing. This is done with copper wire.
- Establish grounding, replacing grounding with it. By zeroing we mean connecting the ground contact to the zero contact. This connection method can be dangerous.
If there is a distribution box in the apartment, you should connect the cable to it or to the panel, connect the phase and neutral to the device, and at the output route the wires to the places where the sockets are installed.
Location of phase and zero
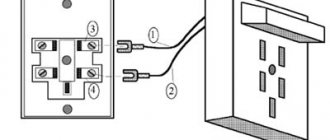
In order to correctly and safely carry out work on installing a grounded outlet, it is important to determine the location of the phase and zero. Before starting the search, you need to turn off the machines in order to de-energize the line or the entire apartment. Next, using a special screwdriver, phase is revealed (the light bulb or neon indicator is illuminated) and zero (there is no light). There will be a ground wire between them.
By dismantling the old device, you can identify the location of the phase and neutral by color. Coloring the wire will help you not to confuse their location:
- at zero - blue, blue-white;
- at the phase - black, red or brown;
- at grounding - yellow-green.
There is no clear prescription for where the phase and zero will be located - they can be swapped. It is important to correctly secure the ground wire to the top or central terminal, and attach the phase and neutral to the remaining two in any order to close the circuit.
It is prohibited to install a jumper to the grounding terminal from the neutral - this is life-threatening due to the risk of phase voltage reaching the socket block!
Connecting wires: specifics
In high-quality products, the wires are tightly clamped with special terminals and do not fall out, but sometimes you have to disassemble them and tighten the fasteners. There is a reliable way to reduce the work to a minimum.
It is necessary to bend the wires stripped of insulation into rings 0.5 cm in diameter and bring them under the top of the bolts. This way the contacts will heat up slightly, and the contact area between the protective contacts and conductive elements will become maximum.
Place for socket
Before grounding the outlet and installing it, you need to decide on the location of the device. It will depend on the devices intended for use. The device is often placed 30 cm from the baseboard, but individual needs also need to be taken into account.
If you have to damage the wallpaper to install a new socket, you should place it near the baseboard to run cables through it (such a position for the device will be inconvenient). For a medium-sized room, 3-4 nests are enough.
Sockets can be external or internal. The former protrude above the surface of the wall, the latter are “recessed” completely into the wall. This should be taken into account when choosing their location. The easiest way to install products is at the repair stage - this way you can avoid dirt, dust, and inconvenience.
Mounting the socket
Installation of a grounded socket with hidden wiring begins with the installation of a plastic socket box, which must be purchased separately. You also need to check the cross-section of the cable in the wall and the wires in the purchased product - they must be the same! The installation procedure for the device is as follows:
- De-energize the apartment by turning off the machine or unscrewing the plugs.
- Mark on the wall the place for the socket box (glass) with a pencil.
- Make a niche with the required dimensions using a hammer drill.
- Mix a small amount of gypsum (cement, alabaster).
- Fix the plastic cup in the niche with plaster and secure the wiring.
- After 20 minutes, tighten the fastening bolts on the glass.
Next, prepare the cables - they need to be divided into separate cores by 7–10 cm, and the ends must be stripped of insulation by 0.5 cm. Modern sockets are equipped with contacts with special clamps; they are easy to install. Each wire should be connected to the corresponding power wire (according to the diagram).
After connecting the socket with grounding, its working part should be screwed with self-tapping screws to the previously installed glass. Hide the wires in a glass. At the end of the work, screw the lid on. If the device is located next to the baseboard, it is better to immediately buy protective plugs - they will protect the outlet openings from water entering while washing the floor.
Open wiring socket
If you have to ground an open wiring outlet, you need to take its features into account. For overhead-type products, the internal strip has holes for fastening. To position the device evenly, you need to remove the cover, make marks for the dowels and carefully drill holes. Insert 2.5 cm dowels and 5 mm plugs into them.
Grounding in a private house
To fully imagine how to connect a grounded outlet, you need to consider the entire process from start to finish, using the example of a private house, if there was no grounding wire there initially:
- Installation of a grounding loop. It consists of metal pins driven into the ground, connected at the top points by metal strips welded to them. The length of the pins is 1.5-2 meters, and the length of the metal strips, depending on the type of contour: triangle, ribbon, square or round. To install the circuit, you need to dig a trench 0.5 meters deep.
- Ground connection to the distribution panel. It is made with the same metal strip as for connecting the pins.
- Replacing two-wire wiring with three-wire. If it did not exist before, then it is imperative to install an RCD that guarantees a power outage when voltage appears on the grounding conductor.
- Installation of sockets.
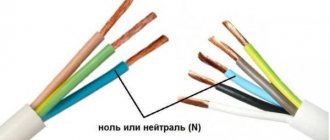
Design features
Every house has a grounding loop. Electricity enters an apartment or residential building through a three-wire cable. The cable consists of three wires: ground wire - yellow-green, neutral wire - black or blue, and phase wire - brown or white. In older houses, it is not possible to install a grounded outlet, since a two-core cable is used to supply electricity.
Grounded sockets have an additional contact, which is a metal plate.
The design is made in such a way that the contacts of the neutral and phase wires of the socket enter the socket only after the grounding terminals have touched. This design is made for safety reasons.
This is interesting: Differential circuit breaker
Which grounding method to choose
It is possible to correctly connect grounding to sockets in an apartment or house only if there is a grounding bus in the distribution panel. If it is not there, then you can’t do anything on your own - you need to seek connection from the appropriate authorities. All work must be carried out by services servicing the house, and their results are entered into the electrical wiring diagram.
In the private sector, you can make a separate grounding circuit, but it is better to solve this issue during the construction of the house, since in addition to installing the grounding bus itself, you will have to additionally redo the finished wiring.
Useful video on the topic
A lot of interesting information is in the video.
Leave a comment Cancel reply
Related Posts
How to quickly and easily connect a Viko switch An outdoor waterproof socket is an important attribute of your site
DIY triple socket installation. How to carry out the work.
How to select and connect a differential machine