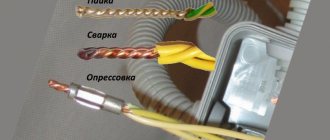
Those who independently repair home electrical wiring constantly have to deal with the concept of connecting wires. There are many ways to do this - from the ancient ancient method of twisting to modern terminal blocks. Regardless of what exactly you are doing now - a major overhaul of the household electrical network or connecting a new element (switch, lamp or socket), the connection should always be reliable. The safety of your home directly depends on this. Let's talk about what is stronger and more profitable - to use wire clamps or to twist them and solder them?
Twisting never goes out of fashion
The modern market presents such a variety of terminals for connecting electrical wires that it would seem that it is high time to forget about twisting. But this method stubbornly continues to be popular among electricians, despite the fact that factory connectors ensure safety and reliability. In addition, the terminals are much more convenient to use and look more aesthetically pleasing than twisted wires wrapped with electrical tape.
Twisting has another very significant drawback. If we consider this method objectively, it does not fit into any concept - detachable or permanent connection. Logically, it is clear that the ends of a detachable device can be repeatedly disconnected. But twisting cannot be called a full-fledged detachable connection, because each time after unwinding and re-twisting, the ends of the wires will deteriorate. Twisting also does not fit the concept of a permanent connection, because it does not have the necessary stability, strength and reliability.
How to make a good twist is described in this video:
But if you never get out of the habit of twisting wire strands, then at least use convenient and safe connecting caps instead of insulating tape.
Clamps for other purposes
In addition to the designs of clamps intended for connecting electrical conductors, there are a variety of similar accessories for other purposes.
Anchor clamps for fastening
Designs of clamps for fastening (suspension) of wires with a cross-section of 2 - 25 mm 2 in an amount of two to four wires. Structurally, the anchor accessory consists of a polymer body equipped with a self-adjusting clamping wedge.
A device whose design also assumes the role of a clamp. However, in this case we are no longer talking about connecting the conductors, but about the installation method - fixing it in a suspended state
Two configurations of anchor clamps are available:
- for self-supporting systems;
- under an isolated carrier neutral.
The mechanism has an easy-to-open bow, making it convenient and easy to install the clamp on brackets, hooks, and then attach electrical wires to the body of the clamp.
Wire clamps for test needs
Often the practice of electronics and electrical engineering involves the use of clamps for so-called “test” purposes. Traditionally, such accessories are “crocodiles” - jagged sliding (push) metal structures.
The toothed part of such a clamp remains open, while the pressure part is insulated with PVC material.
Another option for the design of clamping elements belonging to the class of equipment under test. So-called alligator clips are used to make a temporary contact, for example, to measure voltage
Such accessories are used for temporary attachment (engagement) to wires, for example, for the purpose of measuring current or network voltage.
This type of clamp can be divided into two categories - for low-voltage electronics and for high-voltage electrical networks. Both categories differ from each other in the limiting technical parameters for current.
PPE caps
The caps are also called connecting insulating clips (abbreviated as PPE).
Design
The outside of the cap body is made of plastic. This material has a number of positive aspects:
- under the influence of open fire does not support the combustion process;
- able to withstand operating voltages up to 600 V;
- has good insulating properties.
The plastic case, in addition to insulating the connection point, also protects it from mechanical damage.
Inside the cap is equipped with a compression spring made of steel and shaped like a cone. When a wire twist is inserted into the cap, the coils of this spring further compress it.
When using caps, it is very important to properly trim the ends for twisting. The insulating layer must be cut off so much so that the bare metal is not outside the cap, but completely falls under the compression spring.
Preparing wires for caps
Now in the electrical world it is already considered a mistake to expose a wire or cable from the insulating layer with a knife. Professional electricians use special devices - insulation strippers.
This device has calibrated holes for each standard core diameter (the holes have a cutting edge). The insulation stripper does not disturb the conductive surface layer, which maintains its strength.
No one can cancel the mechanic's knife either. The main thing is to position it when removing insulation towards the cutting direction at an angle, so as not to catch the metal core. Positioning the knife at a right angle while removing the insulating layer is not allowed, since there is a high probability that you will make a circular cut, as a result of which the core may then break.
When choosing PPE caps, special attention should be paid to the size of the crimp springs. The main contact is created in its smallest conical part. It is very important that it matches the wires being connected. If the wires are thin, the compression with a cone spring will not be tight, and thick twisted wires, on the contrary, will not fully enter the cap.
Core connection
Connecting wires using PPE caps is done in practice in two ways:
- No pre-twisting. Two wires of equal diameter must be inserted forcefully into the spring. Then vigorously rotate the cap in a clockwise direction. In this way, twisting is done to the length of the bare metal strands of the wires.
- If it is necessary to connect three or four wires, they must first be twisted using pliers, the twisted end must be bitten off, and then the cap must be put on, turning it clockwise with force.
Remember! In order for the PPE cap to fit tightly onto the surface of the twist, it must be rotated only clockwise, but not in the opposite direction.
Put the cap on with force so that the coils of the crimp spring move apart and reliably compress the connected wires.
Never use PPE caps to connect wires of different materials. This applies to a greater extent to copper and aluminum, between which the passage of electric current causes a galvanic process.
How to connect with caps is shown in this video:
Types of caps
Many electricians have a negative attitude towards PPE caps. But this attitude can be caused by two reasons. Either the caps were chosen incorrectly, or they were ineptly installed on the wires being connected.
In order to correctly select caps for wire sizes, manufacturers have introduced special color markings:
- SIZ-1 – connects two wires with a cross-section of 1.5 mm2 (gray);
- SIZ-2 – connects three wires with a cross-section of 1.5 mm2 (blue);
- SIZ-3 – connects two wires with a cross-section of 2.5 mm2 (orange);
- SIZ-4 – connects four wires with a cross-section of 2.5 mm2 (yellow);
- SIZ-5 – connects eight cores with a cross section of 2.5 mm2 (red).
However, there are no uniform international standards for such color marking. Therefore, it may differ for manufacturers from different countries. Be careful when purchasing, check with your sales consultant for the required sizes.
Terminals
Terminal blocks for connecting wires provide one undeniable advantage: they can connect cores of different metals. Both here and in other articles, we have repeatedly reminded that twisting aluminum and copper wires together is prohibited. The resulting galvanic couple will result in corrosion processes and destruction of the connection. And it doesn’t matter how much current flows at the connection. Late or early, the twist will still start to heat up. Terminals are the way out of this situation.
Terminal block
The simplest and cheapest solution is polyethylene terminal blocks. They are not very expensive and are sold in every electrical goods store.
The polyethylene frame is designed for several cells, inside each there is a brass tube (sleeve). The ends of the connected wires must be inserted into this sleeve and clamped with two screws. It is very convenient that as many cells are cut from the block as it is necessary to connect pairs of wires, for example, in one junction box.
But not everything is so smooth, there are also disadvantages. At room conditions, aluminum begins to flow under screw pressure. You will have to periodically inspect the terminal blocks and tighten the contacts where the aluminum conductors are fixed. If this is not done in a timely manner, the aluminum core in the terminal block will become loose, lose reliable contact, and, as a result, spark and heat up, which can result in a fire. Such problems do not arise with copper conductors, but it would not be superfluous to periodically inspect their contacts.
Terminal blocks are not intended for connecting stranded wires. If stranded wires are clamped into such connecting terminals, then when tightening the screw under pressure, the thin wires may partially break, which will lead to overheating.
In cases where it becomes necessary to clamp stranded wires into a terminal block, it is imperative to use auxiliary pin lugs. It is very important to choose the correct diameter so that the wire does not jump out later. The stranded wire must be inserted into the lug, crimped using pliers and secured in the terminal block.
As a result of all of the above, the terminal block is an ideal option for single-core copper wires. With aluminum and stranded ones you will have to comply with a number of additional measures and requirements.
How to use terminal blocks is shown in this video:
Terminals on plastic blocks
Another very convenient wire connector is a terminal on plastic blocks. This option differs from terminal blocks in that it has a smooth metal clamp. The clamping surface has a recess for the wire, so there is no pressure on the wire from the screw being tightened. Therefore, such terminals are suitable for connecting any wires.
Everything about these clamps is extremely simple. The ends of the wires are stripped and placed between the contact and pressure plates.
Such terminals are additionally equipped with a transparent plastic cover, which can be removed if necessary.
Self-clamping terminals
Wiring installation using such terminals is simple and quick.
The wire must be inserted into the hole to the very end. There it is automatically fixed using a pressure plate, which presses the wire to the tinned busbar. Thanks to the material from which the pressure plate is made, the clamping force does not weaken and is maintained all the time.
The internal tinned busbar is made in the form of a copper plate. Both copper and aluminum wires can be fixed in self-clamping terminals. These terminals are disposable.
And if you want clamps for connecting reusable wires, then use terminal blocks with levers. They lifted the lever and inserted the wire into the hole, then fixed it there by pressing it back. If necessary, the lever rises again and the wire protrudes.
Try to choose clamps from a manufacturer that has proven itself well. The clamps have especially positive characteristics and reviews.
The advantages and disadvantages are described in this video:
Connection of copper and aluminum wires
As a rule, directly connecting aluminum and copper wires is not recommended for a number of reasons:
- The connection gets very hot, which leads to negative consequences.
- As a result, the contact weakens. When heated, the softer wire expands and then contracts, leaving a microscopic space between them.
To avoid such negative aspects, experts advise:
- Connect the wires using terminal blocks.
- Using Wago clamps.
- Using bolted connections.
- Using branch clamps (outdoors).
The use of other types of connections is not recommended.
CONNECTION OF COPPER AND ALUMINUM WIRES. EVERYONE SHOULD KNOW THIS
Scotch-lock
Couplings of this type are for one-time use. Used for wires with low operating currents (telephone lines or wires for low-power LED lamps).
These clamping couplings make connections by means of a mortise contact. The wires don't even need to be stripped before connecting. They are inserted directly into the insulating layer into adhesive tape and crimped with pliers. The plate, which has cutting contacts, cuts into the insulating layer, due to which contact between the cores occurs.
In addition to the fact that stripping of cores is not required, adhesive locks have a number of other advantages:
- low cost;
- versatility;
- no special devices are needed, crimping is done with ordinary pliers;
- waterproof (there is a hydrophobic gel inside the coupling, which protects the contact connection from moisture and corrosion).
- If the Scotch-lock coupling needs to be replaced, it is simply cut out and a new one is installed in its place.
Sleeves
When powerful clamps for several wires are needed, sleeves are used. They are a tinned copper tube or a flat tip with a hole made for fastening.
All connected wires must be inserted into the sleeve and crimped using a special crimper device (crimping pliers). This wire clamp has a number of positive aspects:
- It is very convenient to use lugs with holes when there is a need to secure wire assemblies to housings with screws.
- Crimping at the connection does not increase the resistance.
As you can see, there are a lot of wire clamps, each with its own advantages and disadvantages. Choose based on which wires you need to connect and where the connection will be located. But do not forget that the most important thing in electricity is reliability and safety.
Connecting wires by crimping
An example of crimping conductors with a sleeve
To carry out such work, you will need a special sleeve. It is very important that the sleeve is made of the same metal as the conductor cores. Before placing the wire strands into the sleeve, they are cleaned to a shine, getting rid of the insulation. After this, a special tool is taken, with which the wires are clamped, ensuring reliable contact.
Both the tool and the sleeves are different, based on how many cores they can connect to each other at the same time. It is very important to choose the right tool and sleeves, otherwise the connection may not be reliable. It is for this reason that this method is also used in exceptional cases by professional electricians.
Crimping wires in the junction box. Crimping of wires in the junction box.