When carrying out electrical installation work, cable trays are necessary for laying the main power supply line with a heavy load over long distances.
They protect cables from external damage, preserve the aesthetics of the room, and hide cables that are not suitable for the interior of the room. The design of cable trays is not complicated and is made in the form of a trench made of various materials, with covers and perforations.
The inner surface of the trench is treated to avoid damage to the cable during installation. One or several cables can be laid in such trays.
Metal cable trays
Such trays are made of low-carbon or stainless steel, as well as galvanized iron. The most popular trays are made of galvanized steel, as it has the best performance properties and corrosion resistance compared to ferrous metal. Their cost is lower than stainless steel trays.
Galvanized Iron Cable Trays
In turn, galvanized trays are divided into:
- Ladder trays.
- Non-perforated trays with lid.
- Perforated trays.
- Wire trays.
Stairs
The ladder type of trays is used provided that supports are installed for open laying of electrical wiring operating under voltage up to 1 kV.
The trays are made from galvanized steel with a thickness of 1.2 mm. For ease of installation, crossbars and other additional elements are used.
Trays can be used to lay both power and low-power cables. The cables located in the trays have easy access for repairs and maintenance.
Non-perforated trays with lid
Such trays are designed for installation of power and low-power wires in the form of fire, security or information wires in any premises. The trays consist of a lid and a base.
During installation, the base is rigidly fixed to the surface, wires and cables are laid in trays, and the lid is closed on top. Such trays make it possible to create an electrical network, while maintaining all the advantages of an external network: mobility, ease of installation, low cost, change in shape, high safety, preserving the appearance of the room.
Perforated trays
Such trays are made of galvanized metal with a perforated base. It is also called a cable box or metal cable channel. The perforated tray can be mounted with or without a cover, which increases the protection of wiring and expands the scope of use of this design. The perforated version is optimal for cables with voltages up to 1000 volts.
The main design feature is side perforation in the form of holes along the entire length of the tray. This makes cable installation easier. The holes make it convenient to secure cables in the tray. Perforation prevents cable overheating.
Another feature is the stamped edges, which help to quickly join the overlap structure. There is a ground connection on the tray cover, which creates safety for humans.
There are three types of perforated trays based on the material used:
- Of stainless steel.
- Galvanized metal.
- Hot galvanized metal.
Wire trays
Wire cable trays are made from galvanized steel wire and are used for installing exposed cable lines in industrial facilities and residential buildings.
Power cables may be laid together with low-power wires. Wire tray models can be installed in closed and open spaces.
Advantages
- Low weight is combined with the necessary reliability and strength.
- Possibility of cable ventilation.
- Convenient access for cable monitoring.
Plastic cable trays
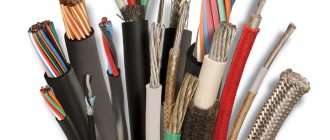
In residential premises and offices, cable trays made of PVC plastic are most often used. They can be used for laying cables up to 400 volts, as well as telecommunications wires indoors for open wiring.
Plastic cable channels consist of a plastic channel with a lid that closes with a latch. The tray gutter can be hollow or with removable dividers.
Plastic cable trays are divided into types, depending on the level of placement:
- Simple. They are used for wiring networks and protecting them from damage.
- Parapet. Their installation is carried out at the working level (at the desktop level). The inside of the tray can have separators to isolate wires of different functions. In this case, it is possible to mount the socket directly on the plastic tray.
- Skirting. Designed for installation of cables along the bottom of the room.
- Floor-standing. Serve to protect cables laid on the floor.
- Cornice. They are installed at the top under the ceiling.
Such plastic trays have some advantages and disadvantages.
Advantages
- They have a low cost.
- Light weight, which facilitates the line installation process.
- Simple and easy design adjustments.
- Aesthetics after installation.
- Convenient care and maintenance.
Flaws
- Significant wear and tear, unlike metal trays.
- They cannot withstand elevated temperatures and become deformed when the wires are heated, which leads to premature replacement.
- Plastic trays are used only for internal work; external installation is not recommended.
Dimensions
All cable trays are divided by size, and have a large classification for any size. The tray height is from 35 to 110 mm, the steel thickness is from 0.75 to 1.25 mm, the tray width is from 50 to 600 mm. The trays have a standard length of 3005 mm. Perforation is most often 9 x 22 mm.
Installation
When laying cables, it is necessary to place the largest number of cables and wires in the tray. Significant loads on cable trays can cause the structure to fall, so special attention must be paid to the method of fixing and laying conductors in the channel.
There are several ways to attach trays, let's look at the main ones.
Fixation on a vertical wall
A popular mounting method has become the use of cable shelves and brackets. The shelves can be fixed to the wall using profile posts. The advantage of the shelves is the possibility of laying different levels of channels of a separate installation, parallel to each other.
Dimensions
Trays are made in rectangular and trapezoidal shapes with a slope of internal walls. Their main dimensions:
- The standard length is 5970 mm; small concrete products of initial numbers have this standard size (at the discretion of the manufacturer, their length can be 2970 mm). Heavier, large-sized products starting with numbers L25 (weight more than 5 tons) are produced in sizes of 2970 mm for ease of transportation and installation;
- for all additional products with index d, the standard length is 720 mm;
- the width of the trays ranges from 420 mm to 4000 mm with the following gradation: 420 mm (L1); 570 mm (L2); 780 mm (L3 - L5); 1160 mm (L6 - L9); 1480 mm (L10 - L13); 1840 mm (L14 - L18); 2160 mm (L19 - L22); 2460 mm (L23 - L26); 2780 (L27 - L30); 3380 (L31 - L34); 4000 (L35 - L38);
- the height of the walls increases with increasing serial number and ranges from 360 mm for L1, L2 to 1700 mm for L38.
- wall thickness from 40 mm (L1) to 100 mm (L38);
- internal channel width - from 300 mm to 3600 mm;
- height of the tray from the inside from 300 mm to 1500 mm;
- bottom thickness - from 60 mm to 200 mm.
- the mass of the trays varies from 0.9 t for L1 with a concrete volume of 0.34 m3 to 9.38 t with a material volume of 3.75 m3 for L38.
- slabs of type KL and KLp are produced with a length of 2990 mm; for reinforced concrete products with an internal width of 300 and 450 mm, the length of the slabs is 740 mm.
- for additional prefabricated concrete products of 720 mm, the length of the overlapping slabs is 740 mm.
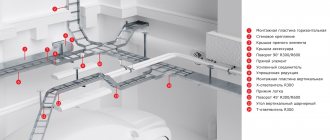
Installation diagram of reinforced concrete channels
What it is
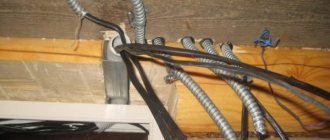
A cable ladder (cable ladder) is an open cable channel for laying a large number or, more precisely, a large mass of wires in one direction (vertical or horizontal).
A typical (but not the only) material is galvanized steel. The zinc coating is designed to protect the steel profile from corrosion. An alternative solution is polymer-coated steel. According to the production method, the profile is usually cold rolled; Spot welding is used to connect longitudinal and transverse elements.
How is the cable laid? It’s very simple: it is placed on the crossbars or attached to them in a vertical (or inclined) position; At the same time, longitudinal guides ensure rigidity of the structure.
Cable risers in the enterprise power supply system.
About fastening methods
Now let's talk about how trays are attached to different surfaces. Based on the installation method, three main directions can be distinguished: wall mounting, floor mounting, and ceiling mounting. In order to secure the trays, elements such as consoles, profiles and hangers are used. Trays can be attached to the wall surface using two methods:
- In the case of consoles, everything is extremely simple. The cantilever element is fixed to the wall surface, and cable trays are mounted directly on it. There are two types of consoles - welded and bent.
- If the console is wall-floor, then you cannot simply lay wires in a tray attached to the wall in this way. They will need to be secured with ties.
But most often, cable trays are mounted on the ceiling surface. In this case, there are more mounting methods, as well as advantages. For example, the cable route will be able to withstand heavy loads. So:
- Most often, cables are attached to the ceiling surface using two studs and a mounting profile. The permissible load is regulated by the thickness of the studs and the frequency of fastening. This installation method is considered the most labor-intensive.
- The second method of installing systems for laying cables on the ceiling involves the use of profile elements. Brackets are fixed to the ceiling surface. Profiles of the required length are fixed on them. Then the consoles are attached to the profile, and the cable trays are already attached to them. This method allows you to install trays along one route on several floors.
- The third installation method involves the use of wall-ceiling consoles. This method is the simplest.
Cable trays are rarely installed on the floor surface. However, you can secure this product to the floor using one of two methods:
- By installing a floor-type console.
- Using special supports that allow you to raise the tray to the desired height and perform multi-story laying along the same route.
Pros and cons
An additional advantage of installing wires in boxes is the quick replacement of cables with new ones in case of failure.
If there is a need to modernize cable networks, that is, replace wires laid in boxes, replace the sealing products themselves with similar types of other parameters, you do not have to face serious problems. It is enough to open the lid, lay a few additional threads or completely replace the wires, or the cable channels themselves with larger cross-sections or made of higher quality material.
You can lay several types of cables in one box at once. They can be power, represent telephone lines, cable television, or the Internet. Some types of boxes are produced with internal partitions. This can be considered another plus.
The disadvantage of boxes is their external installation. For many, this looks somewhat unaesthetic. Especially when you have to remove a large number of wires.
In some cases, this situation is solved by purchasing finishing materials that simultaneously serve as electrical boxes (plastic baseboards with removable strips). In other cases, boxes located on ceilings are masked with suspended panels.