The abundance of search queries like “warm floor cable” is easily explained. Any floor heating systems have already managed to fully prove their worth, efficiency, and ability to create truly comfortable indoor conditions. And if you choose between water and electric (cable) heated floors, then according to the criteria of ease of self-installation and the necessary initial material investments, the cable wins unconditionally.
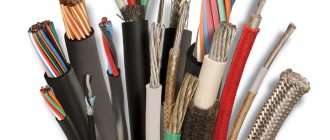
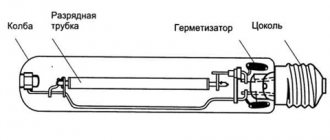
Warm floor cable
Indeed, even if you have basic knowledge and skills in electrical engineering and general construction issues, having mobilized your efforts, skills and attentiveness, such a system can be installed and launched independently. And in this article we will try to convince you of this.
Determination of thermal load
Before preparing materials for installing underfloor heating, you need to calculate how much heat to supply to a particular room.
This calculation is usually carried out according to the specific characteristic - the amount of heat released per unit volume or area of the room. The power of the heating system is calculated through the area in cases where the height of the ceilings of the home does not reach 3 m. The method gives the most accurate result in rooms with ceilings of 2.6-2.8 m. The calculation procedure is as follows:
- After measuring the dimensions of the room, calculate the area in square meters.
- Multiply the found quadrature by the value of the specific thermal characteristic (basic - 100 W/m²).
- Apply the regional correction factor to the resulting power.
Specific heat consumption indicators for different rooms
Rooms located in different parts of the house are cooled differently - corner rooms lose more heat than middle rooms. Hence the recommendation: take the value of the specific characteristic depending on the type of room:
- for rooms located inside the building or having one external wall with a window - the base value is 0.1 kW/m²;
- corner rooms (2 external fences and one light opening) – 0.12 kW/m²;
- the same corner rooms, but with two windows - 0.13 kW/m².
Apply the correction factor depending on your region of residence. For a cottage built in the southern regions, the coefficient value will be 0.7-0.8, in the northern regions - 1.5-2.0.
Calculation of heat consumption by volume of a dwelling is carried out in a similar way: the cubic capacity of the room is determined by measurements, multiplied by the specific characteristic. The basic value for interior spaces is 35 W/m3, corner rooms are 40 and 45 W/m3, respectively.
Which cable is better, two-core or single-core?
The difference between a single-core and a two-core cable is as follows:
- The need to install a thermostat. The self-regulating cable does not require installation of a temperature sensor and regulator. In this case, heating is carried out in separate areas.
- Presence of an electromagnetic field. Some types of single-core cables have high-quality Teflon coating. The protective layer effectively reduces radiation levels. Other types of single-core wire create an electromagnetic field of greater intensity, so they are recommended for use in walk-through rooms, hallways, balconies, baths, saunas, etc. With warm two-core floors, radiation is completely absent, which makes it completely safe for use in residential premises: bedrooms, children's rooms, etc.
Some manufacturers, in an effort to reduce the cost of self-regulating heated floors, change the internal structure, leaving only the heating matrix and minimal insulation. The correct method for choosing a self-regulating cable is associated with the need to determine whether the cable has external insulation and a copper shielding layer. The presence is indicated by the markings CT, CF, CR.
Selection of heating cable for heating
Materials for heating of this type should be selected individually, taking into account the characteristics of the pipeline. There are two main types of cables used.
Resistive - single- and double-core models are available. The conductor is covered with reliable insulation and has the same resistance in any area. The product has an affordable price, but requires the installation of a thermostat.
Self-regulating - this cable is based on a semiconductor matrix with sensors that can change the resistance in different areas. This allows heating of the pipe along its entire length, taking into account the ambient temperature. This eliminates the possibility of cable burnout. This product is more expensive, but much easier to use and does not require the installation of a thermostat. Unlike resistive cable, self-regulating cable can be cut into pieces of the required size.
Cables for heating pipelines from our catalog
Important!
When choosing a heating cable for a water pipe, you can safely buy domestic products if they suit your technical specifications. The products of large Russian manufacturers “Thermal Systems” are not inferior in quality to foreign analogues, but have a more affordable price.
Also, when selecting a heating element, it is necessary to take into account the following factors:
- length of the network - the longer the water supply, the higher the risk of overheating in any area;
- pipe location - if the pipeline is already laid underground or access to it is difficult for other reasons, this will affect the choice of cable and the process of its installation;
- the chosen method of laying the heating element - for laying the cable outside (along or in a spiral), you can select products in any sheath, and when installing inside the main line, you will need products with an inert braid;
- material and diameter of the heated water pipeline - cable heating is suitable for all types of pipes, but the maximum permissible power will differ;
- thickness and conductivity of thermal insulation - the lower the heat loss, the lower the cable power requirements.
Calculation example
Let's consider how to calculate the power of the engineering system that needs to be installed in the kitchen of an apartment located on the first floor of a five-story building.
Let’s say the kitchen area is 20 m2 (the width and length of the room are 4 and 5 m, respectively). An electric heated floor will act as the main heat source.
First of all, you need to make a furniture layout diagram on paper. According to the diagram, it is necessary to calculate how much space will be occupied by kitchen furniture and heavy equipment. A standard refrigerator occupies approximately 0.4 m2. As for kitchen furniture, which is usually 60 cm wide, to calculate its area you need to multiply the width by the length. We get: 0.6*5=3 m2.
You should also take into account the fact that the engineering system cannot be laid close to the walls. There should be a gap of at least 5 cm, but it is better to leave 7-8 cm free
It turns out that about 0.8 m2 will be used for indentations.
As a result of these simple mathematical calculations, we determined that the area over which the heating element can be laid is about 15 m2.
Now you can calculate this parameter. To do this, multiply the area, which is 15 m2, by 180 W. The main heat source should be 2700 W. Accordingly, you should purchase a cable with a power of at least 2.5 kW.
If the engineering system will act as an additional source, then it will be enough to purchase a cable with a power of 2 kW (15m2 * 140 W). By analogy, you can calculate the required power of the engineering system for each room.
Positive qualities of infrared heated floors
Modern infrared floor designs have a number of undoubted advantages. First of all, they are distinguished by simplicity and speed of installation. On average, no more than two hours are spent on installing floors. They do not require a screed device. These floors can easily be installed under carpet, linoleum or laminate. The thickness of the film is only 3 mm, therefore, it does not affect the height of the room at all and does not reduce its volume. The film coating material is highly reliable.
Compared to other types of underfloor heating, infrared design allows for significant energy savings. In addition, there are many positive physical properties. Infrared floors help ionize the air and eliminate various unpleasant odors. They have absolutely no effect on air humidity and do not dry it out.
This type of heated floors can be used as the main or additional source of heating for houses and apartments. In the first case, the film coverage is at least 60-70% of the total area of the room. With additional heating, any area is covered, on average this value is 30-50%. Infrared floors are installed in passage corridors throughout the entire area, provided there is no furniture. In rooms with furniture, the film is installed as needed, in free places.
Calculation of cable footage and laying pitch
To determine the length of the heating conductor, it is necessary to take into account some features:
- Manufacturers offer cables of fixed length with different powers (from 9 to 20 W per 1 linear meter);
- so that the heater can give off heat and not burn out in the floor, the circuit cannot be laid under stationary furniture and appliances without legs;
- for installation in the bathroom or on the balcony, the cable conductor is taken with a margin of 15-20%.
Resistive cable installation diagram in the bathroom
Having determined the need for thermal energy to heat a specific room, make a calculation of the electric heated floor according to the instructions:
- Select a cable from the catalog, focusing on the previously obtained thermal power and adding a margin of 15%. Record the total length of the conductor.
- Draw a scale plan of the room on paper.
- Place furniture and household appliances in the sketch that are close to the floor and interfere with normal heat exchange. Observe the actual dimensions of cabinets, washing machines and other equipment.
- Subtract the area occupied by furniture from the total square footage. The task is to place the heating conductor selected from the catalog on a free area.
- Divide the remaining area by the length of the cable heater - get the laying step in meters.
Layout rules in residential and auxiliary premises are different. For example, in the living room or bedroom, the first heating line is moved away from the furniture at a distance of 10 cm. In the bathroom or on the balcony, the cable is laid close to cabinets and plumbing so that your feet do not feel the temperature difference on the floor. Be sure to take this nuance into account when planning. The specialist will tell you more in the video:
Since heating mats are sold in strips of mesh (rolls), the laying step does not have to be counted. But keep in mind another point: the heat transfer of 1 m² of mat is limited, and the power cannot be increased. But to reduce it is no problem, just cut the mesh between the conductors and move the cables apart.
An example of calculating a warm electric floor in a bedroom of 18 m² with a heat consumption of 2.16 kW:
- Since cable heating is planned to be combined with a radiator system, the thermal power is divided in half - 2.16 / 2 = 1.08 kW per floor circuit.
- We select a two-core DEVIsafe 20T cable with a power density of 20 W/m. Taking into account the reserve, we take a ready-made conductor 60 m long with a heat transfer of 1.2 kW.
- Stationary furniture occupies 3 m² of bedroom area. 15 m² remains, then the laying step will be 15 / 60 = 0.25 m.
Possible cable layouts
Independent choice of heating cable: self-regulating and other options
The right choice depends on the specific tasks. Domestic pipelines - sewerage, drains and drinking water sources do not require impressive systems. A completely reasonable solution would be to purchase a wire with a power of 50–60 W/m. The parameter is given with a margin. Buying a heating cable for a water supply with large values means overpaying for the consumption of unnecessary electricity. The indicated numbers are stamped on the cable insulation; it is difficult to get confused and buy a product that does not correspond to the parameters.
Subtleties you need to know about
The typical diagram by which power is calculated gives an objective result only if the room is properly insulated. Thermal insulation means not only the laying of roll materials under heated floors, but also the installation of double-glazed windows on the windows.
Therefore, before installing the system, it is necessary to thermally insulate the room. This will prevent unwanted heat loss. Particular care should be taken to insulate rooms that are located on the ground or have a basement.
You need to choose thermal insulation based on the selected engineering system. Only foil thermal insulation can be installed under infrared floors. Otherwise, part of the heat will go to heating the rough foundation or the neighbor’s ceiling.
Another very important point that is worth paying attention to is the step of laying the heating element. If you have infrared floors or heating mats in front of you, then you can skip this point
They are a roll material, the basis of which is a special mesh or film. The heating element is attached to this base.
If you opted for cheaper cable systems, then the cable will have to be laid manually. In this case, the installation step will have to be determined independently. You don’t have to bother and do everything by eye. But in this case, the system may not work efficiently. And it will be quite difficult and expensive to redo everything.
Let's look at how to determine the laying pitch of a heating cable using the example described above. The power of an electric heated floor should be 2700 W. The cable length in this case should be about 130 meters. To calculate the installation pitch, you need to multiply the usable area of the room by 100, and divide the resulting number by the length of the heating cable. We get: 15*100/130=11.5 cm. This is the laying step.
To simplify installation work, you can purchase a special mesh onto which you can pre-attach the heating cable. If the cable is not fixed during installation, it will move. As a result, the laying step between turns will change. As a result, uneven heating of the base.
Calculating power for an engineering system is quite simple
It is important to correctly insulate the room, choose insulation for the base that is compatible with the engineering system and competently approach the issue of arranging heavy furniture under which the heating cable cannot be placed
https://youtube.com/watch?v=J8GJC6lEL-c
Resistive heating cable
Underfloor heating systems on this basis are used most often, since they are simple in design and have a lower price compared to other types of heaters. It is based on a single- or two-core conductor, enclosed in a protective shield and having a certain resistance. At its core, it is an elongated heating element, which, when connected to an electrical network, generates a certain amount of thermal energy. Resistive cables always have a fixed length, which must not be changed under any circumstances, as this radically changes the entire system setup. Any attempts to shorten a resistive cable reduce its resistance, the current increases and this most often leads to failure.
Resistive cables are simple, reliable and unpretentious
The main characteristics of resistive cables are:
- Cable design (single-core, two-core, zonal) and its purpose.
- supply voltage and power. Typically, manufacturers indicate two supply voltages of 220/230 volts and the corresponding power in Watts, for example, the deviflex™ DTIP?18 heating cable, 22 meters long, has a power of 360/395 Watts, respectively.
- A very important characteristic of heating cables is the linear power, that is, how many watts are emitted by one meter. In the cable example above, the linear power is 18 W/m at a supply voltage of 230 V. This indicator is indicated in the cable marking, but it can also be calculated. If the power of 395 W is divided by a length of 22 meters, then it turns out 395/22 = 17.95 W/m.
Resistive cables are produced in different lengths (7-220 m), different linear and total power, which can easily satisfy all needs. Naturally, the cable must be laid according to a special pattern to cover the entire area of the room, but this will be discussed in detail in subsequent sections.
Heating mats
For ease of installation, heating mats were invented, where a resistive heating cable is woven into a polymer mesh and already laid at the required pitch. The mesh usually has an adhesive base and can be glued to the floor surface, which only adds convenience during installation. This is especially good when laying tiles, when the mats are hidden directly in a layer of tile adhesive, or during repairs, if they only make a self-leveling thin screed, on which laminate or carpet can later be laid. Most heating mats are available in 45 cm widths and different lengths, which allows you to choose a specific model for any room. At the same time, do not forget that the mats are based on a resistive, usually two-core, cable, so cutting the mats along the conductors is strictly prohibited!
Heating mats are very convenient in calculations and installation
The main characteristics of heating mats are:
- The supply voltage, which is usually 220/230 V, and the power of the heating mat.
- Mat length and recommended installation area, usually from 0.5 m2 to 12 m2 with a length of 1 to 24 m.
- One of the main indicators is specific power, that is, how much heat a heating mat generates per 1 square meter. It is measured in W/m2 (Watts per square meter). For heated floors, mats with a specific power of 100-150 W/m2 are usually produced, very rarely 200 W/m2.
Installation methods
The heating cable must ultimately be covered on all sides with mortar/tile adhesive; this can be achieved in three ways:
Fill
. The most correct way in my opinion. It consists of pouring a 1-2 cm mini-screed over the mounted cable. The resulting screed will be suitable for any floor covering. To implement this option, when pouring the main screed, you should provide a couple of centimeters of height in places where there will be a warm floor. For work, mixtures are used that allow such thin layers to be poured. If the screed is initially poured at one level and raising the floor level is unacceptable, then this method is not suitable.
Glue layer
. When the tiles are laid, and in addition to everything else, it is permissible to raise the level of the subfloor by 1-2 cm (do not forget, the tiles themselves will add at least 1 cm), the tiles are placed on top of the cable on a thick layer of glue. This option should be considered last, because there will be a significant difference at the border of the warm zone.
Grilling
. The most difficult and tedious method, however, when raising the screed level is unacceptable, is the most correct. First you need to mark the lines where the heating cable will go. You also need to take into account the groove for the corrugation with a temperature sensor and the coupling with the cold connecting cable. After marking, you need to attach some kind of thread/rope to the lines to check the length of the grooves. You need to be sure that the entire cable will fit into the future groove, otherwise you need to change the markings.
After gating, the dust is carefully removed and the surface is primed. The wire is laid in a groove; the depth of the groove should allow 3-5 mm of caulking solution to be applied over the cable.
The temperature sensor in the corrugation is also mounted in the groove; the corrugation must be plugged at the end (wrap it with electrical tape). The end of the corrugation should be placed between the heating conductors, not far from the edge of the heating zone (but not on the edge). The optimal distance of the temperature sensor is 30-50 cm from the edge, deep into the warm area.
When the wire is laid, the grooves are sealed with tile adhesive or a self-leveling floor mixture. If you plan to lay linoleum, it would be a good idea to apply a finishing layer of 1-2 mm of self-leveling floor.
Floors should be checked or used no earlier than a month after completion of all wet processes with the floor (pouring, laying tiles). Switching on earlier will not damage the cable itself, but may cause the solution/adhesive to crack.
Conclusion
- Heating cable is recommended for use with heated floors. The most preferred method of application is a direct heating system or "thin floor".
- Among all the variety of heating cables, it is best in terms of price-quality ratio to use a two-core resistive cable.
- The selection of the required cable with the required power density, its length and laying pitch are obtained as a result of calculations.
- Changing the length of a resistive cable section (except for a zonal cable) is unacceptable.
Advantages and disadvantages of self-regulating heating systems
Advantages:
No overheating. Self-regulating thermal cables can be overlapped without any risk of overheating. Their intersection with each other does not cause any harm
This is of no small importance for control-closing mechanisms, for example, when you need to wrap a valve on a pipe. It also happens that the heating cable in anti-icing systems becomes covered with dirt, leaves and other debris.
In this case, an ordinary resistor will burn out while the samregs will work reliably;
Convenient cutting. Such cables can be cut from a common coil to the required length immediately on site “in the field”. This provides additional flexibility when plans do not match the “real life” situation on site. Such connections can be divided into pieces of the required length with a maximum length of up to 0.7 - 0.15 km (depending on the type of samreg). In contrast, resistive cables have a clearly defined length;
Self-regulation. During operation, there is no need to install complex multi-channel thermostats, because the cable sharply reduces power after reaching a certain threshold temperature. This mode is ideal for anti-icing systems, where it is often very difficult to maintain the desired temperature along the entire length of the section. Samreg itself finds the appropriate temperature for each zone;
Saving electricity. Due to the point release of heat where it is required and minimal heat release in places that do not require heating, a self-regulating cable is much more economical than a resistive cable. In anti-icing systems, a resistive cable is usually connected to one temperature sensor and generates heat where the sensor is located and heating is required, and in places where it is not needed.
Flaws:
Starting power. When installing, it must be borne in mind that the initial voltage can be maximum twice the operating rated voltage, and the supply network must cope with this. A similar situation arises with the selection of control equipment of suitable power;
- Limited heat dissipation. It is impossible to increase the temperature in the room using this connection in a short time. When the room heats up, the power of the cable drops, and it stops heating the surrounding room just as intensely;
- Relatively high cost. The price per 1 linear meter of self-regulating cable is 2-3 times higher than that of a constant power cable. This can immediately scare off a consumer who does not understand the issue. If you count the energy savings and other advantages, then such an increase in price is quite justified;
- Relatively short length of one section. Depending on the type of cable, the maximum length of a self-regulating cable cannot exceed 65-120 meters. Resistives have many times longer lengths. This imposes the task of installing additional power points;
- Limited service life. On average, such a cable lasts about 10-15 years. Next, its matrix begins to degrade and significantly reduce power down to 0.
About film heaters
Calculating the amount of infrared film is much simpler and comes down to selecting a heating material based on size and specific heat transfer:
- Calculate the room's need for thermal energy (section one of this publication).
- Sketch the layout of a room with stationary furniture. Calculate the size and square footage of the free area.
- Film heated floors are laid out at a distance of 15-20 cm from the walls. Draw these stripes on the sketch and subtract their dimensions from the free area.
- The last task is to place an infrared film of the required total power on the remaining area. Select rolls of the desired width and heat transfer from the manufacturer’s catalog.
Keep in mind that thermal film can only be cut across, guided by special lines (interval - 250 mm). Adjacent canvases can be laid end to end or with a calculated interval, but not overlapping. For the bedroom from our example, the amount of film is calculated as follows:
- The required heat transfer of the floor circuit is 1.08 kW. If you take a product with a heat output of 130 W/m², you will need 1080 / 130 = 8.3 m² of film heater. Taking into account the reserve - 9 m².
- The roll width is 0.5 m. To collect 9 squares, you need to take a film 18 m long.
- Since there is 15 m² of free space in the bedroom, this type of heater is quite suitable.
Installation
To install an IR film floor, you need to perform a series of sequential steps:
- First of all, it is necessary to develop a project and make all the necessary calculations.
- Get all the necessary materials and tools.
- Install the IR floor.
- Start the system and check operation.
- Carry out a clean finish.
Area calculation
The main distinguishing property of infrared film flooring is that it is not installed under furniture. Therefore, when calculating the amount of material that will be required and choosing the location for placing the film, you need to subtract the area where the film will not be laid.
When calculating the heated area, keep in mind that the IR film is laid at a distance of 100 mm or more to any vertical surface.
Once the size of the required area has been identified, the next step is to calculate the power.
| Film power | 150 W/m² | 220 W/m² |
| Main source of heating | At least 95% of the area | At least 70% of the area |
| Additional heating source | At least 60% of the area | At least 40% of the area |
| Flooring type | laminate, linoleum, carpet | parquet, carpet |
Energy consumption calculation
The amount of money spent on infrared floor heating is calculated based on the electricity tariff in your area.
Installing a thermostat can reduce the cost of infrared heated floors by approximately 35%.
Power calculation
If the area of the room that is planned to be heated with a film floor is very large, several sets of IR film will be needed to install such a system. In such a situation, you need to sum up their power.
Using several sets of IR film Ptot = P1+P2+…+Pi Using part of the set Ptot = 1.10*L
where, Ptotal is the total power of the film floor, W; P1…Pi is the power of a separate set of film, W; L is the length of the infrared film used during installation, m; 1.10 is the conversion factor for the power of the film floor.
Calculation of the number of thermostats
The main purpose of a thermostat for infrared heated floors is to regulate the degree of heating.
If you connect several sets of film flooring at once, then you need several thermostats at once, since the power consumed by the heated floor is summed up.
It is recommended to install the thermostat at a height of 15-20 cm, above the level of the final coating.
It is better to place the thermostat on a wall that is perpendicular to the direction of the stripes.
There are two connection methods:
- Zoning and connecting each zone to a separate thermostat.
- Connect a solid state relay or magnetic starter. You cannot make such a connection yourself; this requires the knowledge and skills of an electrician.
Types of thermostats for heating cables
For automatic operation of the heating cable, a special thermostat is required. The device reacts to the temperature of the pipe and turns on (turns off) the heating. The thermostat is installed under thermal insulation at the beginning or end of the electrical circuit. Thermostats are used to save energy. If you connect a heating cable without an additional device, it will always work without taking into account the ambient temperature. The equipment is used to work with a self-regulating cable with a significant chain length.
Temperature controllers have a wide range of applications - they control the heating of pipes, containers, technological structures in enterprises and can be used in rooms for underfloor heating.
What types of thermostats are there?
Based on the installation method, thermostats can be divided into several categories:
- invoices;
- built-in;
- working through an outlet.
The simplest devices are overhead ones. These are monoblock thermostats with a sensor that are installed directly on a pipe or container. Such devices are divided into groups according to the temperature ranges within which they operate. The clip-on type of sensor can be connected to a piping system and is great for roofs and tanks. More complex models are required for the home. Surface-mounted DIN rail regulators are modular devices with special clamps for standard mounting. They are installed on a mounting plate and feature advanced functionality. .
IMPORTANT! The thermostat allows you to save on electricity, ensuring its rational consumption. Built-in sensors are even more complex; they are often used to monitor heated floors. The devices are used together with heating sections. The sensor can be installed in a convenient place; in appearance it resembles a socket. Some types of such sensors are used to heat roofs, pipes and tanks.
Sensors operating through a socket are convenient because they are easy to connect. The product simply plugs into a power outlet and occupies it constantly. If you need to turn off the heating urgently, this is quite simple to do - you just need to remove the plug from the socket.
Devices are also divided into outdoor and indoor. Outdoor ones are protected from humidity.
Control of thermostats.
According to the control method, thermostats are:
- mechanical;
- programmable;
- network controlled;
- sensory.
Mechanical ones are the simplest; device settings are done manually. The advantages of such a device are that it is a separate independent device that is easy to set up. It is relatively inexpensive. Even a child can set up a mechanical thermostat. The device is safe, it is not even connected to the mains. The purpose of the device is to close and open the circuit.
Programmable thermostats are usually built-in. The advantage of such devices is the ability to configure several operating modes and select any of them. Once the mode is set, the system operates without interruption. Typically, such models are equipped with temperature sensors and monitors. Installation is carried out in a wall box.
Network-controlled thermostats belong to the category of Wi-Fi devices. This is IoT generation equipment. The system connects via your home network to a cloud server. Thanks to the cloud, secure connection and protection are ensured, as well as settings are saved. The user can change the module settings from a smartphone through the application.
Modern thermostats can be touch sensitive. Such devices are easier to control and have many fine-tuning settings. However, classic models with switches are not a thing of the past.
| Thermostats for heated floors | Thermostats for heating cable | Anti-icing systems control |
.
+7 +7
Warm floor cable or mat
The choice primarily depends on whether you will do the installation yourself or plan to invite specialists. Easier to install heating mats. To lay cable floors, work will be required to make a screed, connect to the power supply system, etc.
It will be necessary to take into account that the heat transfer of the mats is slightly lower than that of the cable; therefore, more electricity will be required.
If you plan to invite professional installers, it is recommended to use a self-regulating shielded heating cable for floor heating. The high cost will pay off due to the long service life and the absence of harmful effects of the electromagnetic field on humans.
What does the starting current depend on?
- Turn-on temperatures. The lower the ambient temperature at which the heating system turns on, the higher the starting current and the greater the starting power.
- Heating cable lengths. The longer the section, the greater the CT of the system. For a resistive cable, it is determined by the internal resistivity Ohm/m of the heating core and is calculated and controlled during the manufacture of the section at the factory. A self-regulating heating cable can be roughly represented as a set of parallel resistors (resistances) connected to one power source. The resistance will decrease as the line length increases, and the inrush current will accordingly increase.
Step-by-step installation plan
So, installation of a heating cable consists of several stages:
- Preparing the base. A cement-sand screed, the thickness of which is at least 3 cm, must be poured onto the subfloor. To lay the wire connecting the thermostat to the system, you will have to drill a channel whose diameter is 2 cm.
- Installation of heat-reflecting substrate.
- Laying the reinforcing mesh to which the cable will be attached. If this step is omitted, the wire will need to be secured to the mounting tape. We must not forget that the product does not fit under furniture.
- Laying the wire.
- Installation of heat sensor. It is placed in a special corrugated tube and placed in a pre-made groove.
- Pouring cement screed. It should have a small thickness, only 4 cm. After the thermal cable is hidden under the solution, it is necessary to check its performance: ohmic resistance and insulation resistance. Laying the flooring can be done only after the solution has dried thoroughly - no earlier than a month.
Step-by-step technology for cable heated floors
These are all the features of choosing and installing a heating cable for a heated floor. In any case, before work you need to consider all the nuances of installation. And finally, a video of the installation with detailed comments:
Types of heating cable
Currently, there are several types of thermal cables that differ in design, characteristics and scope of application. To heat pipes in private homes, two types are used:
- Resistive. These products consist of one or two steel cores, which are insulated with a special material. To protect against external damage, a shielding braid is applied to the insulating layer, which in addition serves as grounding for the wires.
- Self-regulating . Such cables consist of two metal cores, which are located in a separating self-regulating matrix. Superimposed on top of this semiconductor are an inner insulation layer and a shielding braid. To protect from the external environment and ultraviolet rays, the entire structure is placed in a polymer shell.
If we consider the design of the two products, we can see that the self-regulating wires are made more complexly, and accordingly their price will be higher than that of resistive wires. But in terms of heating quality and service life, self-regulating cables are superior to their counterparts.
Once the thermal wire has been selected based on these characteristics, it will be possible to begin calculating its length.
Rules for laying IR heated floors
You need to follow a few simple rules for installing infrared heated floors:
- The first line of film should be located at a distance of at least 100 mm to the wall and no further than 400 mm.
- The pitch of the film cutting line is 250 mm; the film cannot be cut in other places.
- The distance between adjacent film strips should be 10 mm or higher.
- The permissible length of the floor strip is 8 m.
Under laminate
When laying film heated floors under laminate, follow the rules:
- To prevent infrared film from overheating, it must be distributed in areas where there is no furniture.
- In order for the room to be heated with maximum efficiency, the film floor must cover at least 70% of the area.
Installation diagram of IR heated floors for various types of finishing floor coverings
Next you need to draw a plan for the location of the heating elements. On paper, reflect the locations of the furniture and heating film.
Laying is done on a surface that has been leveled beforehand.
The concrete screed should not have any differences. To prevent heat from escaping from the thermal film through the floor slabs into neighboring apartments, a thermal insulating substrate (polypropylene) must be laid on the floor, the thickness of which is 3-4 mm and covered with foil on one side.
Thermal insulation strips are secured with thermal insulation tape, and they also need to be carefully trimmed around the perimeter of the room.
The heating film can only be cut in the places marked on it. They are highlighted with a dotted line and a scissors symbol.
If you cut the film diagonally, you will simply ruin it.
The distance of the film from the wall should be 10 cm.
The heating film strips are laid on the substrate one next to the other with a gap of at least 5 mm, but not more than 1 cm.
You cannot bend the heating element at an angle of 90 degrees or more, as it will stop functioning.
Connection diagram for IR heated floor
In places where the thermal film is cut and the conductive busbars are cut, it is necessary to install bitumen insulation, which is included in the heated floor kit. The contact must be installed in the center of the end of the conductive busbar and pressed well with pliers. Using a sharp knife, it is necessary to strip the current-carrying wires by 5-8 mm and clamp them with pliers in the contact terminal, then the entire contact is insulated with bitumen insulation. The infrared heated floor is connected in parallel with copper stranded wires with a cross-section of at least 1.5 mm². It is also recommended to install a temperature sensor so that the automatic floor heating works correctly.
At a distance of 20-25 cm from the wall on which you will install the thermostat, use a hammer drill to perform a groove. Place the temperature sensor into the hole formed under the heating film.
In order for the sensor to show the correct temperature, it must be placed on a heat-insulating substrate.
After all the above manipulations, the thermostat is connected.
Upon completion of installation, check the functioning of the IR heated floor. All thermal films should heat up when turned on. Only after making sure can you lay the laminate on heating elements.
Under linoleum
Laying under linoleum is similar, but has its own characteristics:
- At the first stage, prepare the base, because... The floor can only be installed on a flat and stable surface.
- The mats can be cut into 25 cm pieces. The edge is insulated with a special tape. The gap to the heating system pipes should be 30 cm.
- The film must be laid with the copper bars facing up; overlapping joints is strictly prohibited. The remaining steps are carried out in accordance with the instructions. A prerequisite for high-quality heating is the connection of a thermostat.
- Then linoleum is laid. In small rooms, the coating is laid and left for a couple of days, after which the edges are pressed against the baseboards.
There are different ways to install linoleum
When carrying out work, take into account the fact whether it will be necessary to disassemble and move the system in the future, and also pay attention to the technical characteristics of heated floors
As you can see, infrared film heated floors are an excellent option for a heating system, and its installation is not that complicated. Therefore, everything can be done with your own hands.