Wireless lighting control is gaining popularity almost every day in everyday life, public institutions and enterprises. Moreover, the most in demand now is remote control via radio, WiFi and the Internet. Thanks to this approach, it is possible to control home and street lighting from another city or country.
Therefore, this article will analyze in detail the methods of light control discussed above, but systems with photocells, automatic machines and IR will not be considered, because they are inconvenient and outdated.
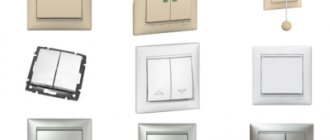
Types of switches
- Spinning. These switches are round scrolling buttons. The light turns on and off after a characteristic click. They also allow you not only to turn the light on and off, but also to simply reduce the lighting level.
- In the form of keys. They are the most popular, allowing you to switch different light sources using a different number of buttons.
- There are also switches with a motion sensor. They turn the light on and off automatically as a person moves around the room.
- Remote. Such switches are a system with a remote control.
And a huge number of different types of switches. The most convenient are remote switches. They can be switched from anywhere in the room, they do not require a wired connection and operate on batteries. An additional block is installed in place of the old switch.
RGB controller
For newer light sources, such as LED strips, special controllers have been developed that allow you to adjust not only the brightness of the lighting, but also select the range of the glow.
This is very useful for emotional “relaxation” or highlighting a certain mood of the composition. This type of remote control of the LED strip allows you to give the interior a unique twist each time, as can be seen in the photo below:
This type of lighting can be created by any handyman; all components can be purchased at your local radio or electrical store.
There are also interesting new items, so to speak toys, lighting control via WIFI and a special application for a smartphone. You can learn more about remote control of light via a Wifi remote control or a phone application by watching this video:
How to control light via phone
Ready-made devices for controlling lighting in a house or apartment are good, but they are not always adequately priced, or are not exactly what is needed, and have low functionality. Keeping up with the times, home craftsmen should pay attention to microcontrollers, which we will discuss below.
What is a wireless switch
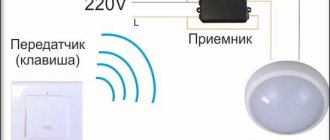
A Wi-Fi light switch is a device that is connected to the lighting source circuit. It consists of:
- transmitter (remote control or switch);
- relay for receiving a signal (actuator). It is installed directly in front of the electrical appliance.
What does a wireless switch look like?
Using the device solves two main problems:
- eliminating the installation of additional electrical wiring;
- the ability to control lighting devices from a distance.
For your information! The actuator opens and closes the electrical circuit. This occurs when a corresponding signal is received from the transmitter. It is supplied by the wireless light switch itself by converting an energy pulse into a radio signal. The actuator reads this signal.
Despite the apparent simplicity of the device, it is quite high-tech. A wireless walk-through switch provides comfort when using electrical appliances in living areas.
Specifications
As an example, let’s look at the characteristics of a standard device for turning the light on and off by clapping.
Device data:
- Power is supplied from a standard network with a voltage of 220 Volts.
- The maximum total power of consumers does not exceed 300 Watts.
- Sound control ranges from 30 to 150 decibels.
- Permissible temperature range: from 20 degrees below zero to 40 degrees above zero.
- Housing protection class - IP30.
A variety of lamps are used in the network:
- Incandescent and halogen light sources.
- Energy-saving or fluorescent light bulbs.
- LED devices.
The specified characteristics comply with the requirements of the law of the Russian Federation number 261. This act regulates the rules for the rational use of electrical energy.
Remote control of light from the remote control
Turning on the light using infrared radiation using a remote control is used very rarely. Such systems operate on the principle of transmitting signals via radio waves. To be able to control lighting using infrared radiation, a remote control unit is connected to the electrical circuit break, which is capable of turning the lamp on and off with its television remote control.
The main disadvantage of this method is the need to fairly accurately point the remote control at a special radio signal receiver. They can only operate within line of sight due to the weak signal level. In such cases, it is recommended to use repeaters.
Lighting control systems using a conventional remote control, in which a certain signal reaches a special controller, are very popular. It is able to regulate the switching on and off of light at a strictly defined frequency.
Lighting control using a radio signal is very popular for the following reasons:
- the ability to control lighting not only using a remote control, but also a personal computer or telephone;
- the maximum range of the product is no more than 110 meters;
- the possibility of using radio signal amplifiers and powerful repeaters.
A modern light control system via a radio channel using a remote control consists of the following elements:
- regular remote control;
- high-quality battery;
- a special remote controller that connects to the network and any load.
Place the controller on the wall or in a special glass lamp. It can be used to control simple incandescent lamps and other types of lighting devices. Additionally, it is possible to control the lighting of not only one lamp, but also an entire group.
The best manufacturers
At the moment, there are not many companies that produce Wi-Fi circuit breakers. However, there is still competition, and they have to maintain their position in the market and be responsible for quality.
Here are some of them:
- French company Legrand. It has been on the market for a long time, has proven itself well, and produces a large line of products under the Celian brand.
- Vitrum (Italy). They were the first to introduce Z-Wave technology into their circuit breakers, which made it possible to completely mechanize lighting control.
- Delumo. A Russian company that, in addition to wireless switches, produces dimmers and thermostats.
- Kopou (China). In addition to switches, it also produces various types of dimmers, including in the form of key fobs and other designer items.
- Livolo (China). In addition to wireless switches, the company produces all kinds of devices and other types of automation systems to simplify home and industrial life. Produces frames for switches.
- Xiaomi. Offers its own Aqara line. These are usually key switches with software and physical control.
The Belarusian company Noolite is also popular among many consumers on the Russian market and has not yet lost its position.
How to connect?
The cotton switch “Ekosvet-X-300-L” in question consists of a block in which the entire circuit is mounted, and two pairs of wires - white and black. The white ones need to be connected to a 220 V electrical network, the black wires are connected to the lighting load.
The lamp receives zero (directly) and phase (through an ordinary household switch) from the distribution box. These two wires are connected to the white wires. You can do this using the old-fashioned twisting method, but it is better to use special self-clamping terminals.
The black wires are connected to the lamp socket itself. That is, with the usual circuit, phase and zero from the supply network would go directly to the lamp socket, and so you also additionally inserted a cotton (or acoustic) light switch into this circuit.
The block itself must be secured to the body of the lighting fixture. The unit has a sensitivity regulator, with which you can set the desired level of cotton. It is most advisable to set the so-called medium level, so that it is not too light, otherwise the switch will start to operate at the slightest tap, and not too strong, so as not to knock off your palms.
The clapper switch is powered through a regular keypad mounted on the wall. If you need to remove a fancy sound device from the circuit, it will be enough to turn off the key switch.
All that remains is to experimentally test the results of your work. When operating correctly, Ecosvet-X-300-L will only respond to clapping of palms. Tap with a hammer, bring a running vacuum cleaner close to the lamp, beat it in a mug with a spoon, turn on a hammer drill, tease with a mobile phone signal. We don’t know what your experiments will show, but there have been cases when cotton switches were triggered by the sound of a working hammer drill or the ringing sound of a metal spoon hitting a mug. This is further confirmation that there are few ideal things in the world; any device, especially in electrical engineering, has, along with advantages, a number of disadvantages (even if completely insignificant).
How to set up a system for automatically turning on/off lights?
Thirdly, adjusting the light level depending on the scenario.
Fourthly, imitation of the presence of people in the house. Automation turns on and off different groups of lighting fixtures so that from the outside it seems as if there is someone in the house.
An intelligent lighting system includes a central control unit (if the system is centralized), a set of devices that send signals about any events to the control unit, and a set of controller devices that actuate actuators.
To organize the work, you will also need power supplies or (for example, for LED strips) drivers - electronic devices in which it is not the voltage that is converted and stabilized, but the current.
Ready-made projects most often use wireless data transmission technology. Such solutions are much simpler from an installation point of view. Let's say, the Insyte “smart home” consists of several blocks, each of which must be placed in the areas of the house that are subject to automation.
Inside the unit there may be an IP video camera, a microphone for voice control, an IR transceiver for controlling AV equipment and air conditioners, two outputs for controlling lighting, a dimmer for smoothly adjusting lighting, an output for controlling curtains, inputs for connecting external sensors, Wi -Fi-module for communication and control, built-in power supply.
In the Smart Visu Server (Jung) system, the compact device is mounted on a wall or on a DIN rail. The main components are connected using twisted pair cables.
Read more: Installation of a septic tank Tver construction diagrams and installation options
To configure and manage a smart home, the Smart Visu Server application for mobile devices is used.
Motion sensors, timers and photocells also belong to control systems. When I use such devices, I don’t have to worry about the safety of my home and unnecessary energy consumption. When movement in the room stops, the lights turn off.
The following device types exist:
- Infrared or IR elements;
- pulse;
- radio waves.
For external lighting, illumination of stairs and corridors, it is more advisable to use infrared elements. Their disadvantage is the small coverage area. The device and remote control should be located at a distance of no more than 10 meters.
To prevent low visibility from becoming a reason to refuse remote control, radio waves can be used. The disadvantage of such a system is its high cost.
A pulse relay can be mounted into a switch. This system is more suitable for large buildings.
Connection errors
The main problem during installation is always not taking into account the power of consumers. For most touch-sensitive light switches, the maximum throughput load is limited to 1 kW. In no case should it be exceeded. Most devices of this type do not contain safety elements that block excessive load. Hence their relative fire hazard when the maximum is exceeded.
Another relatively common mistake when installing 220V touch-sensitive light or energy switches is the incorrect connection of the contact groups. For example, it has been noticed more than once that they try to separate the zero of the power supply network with a control device, instead of a phase. Of course, this creates significant problems in its functioning; it becomes simply impossible.
The practical connection of a phase and a COM port for end devices does not make much sense. However, its purpose is different - to communicate with other switches or pass-through switches.
EXPERT OPINION
Why do reliable LEDs fail? Almost always the reason lies in installation errors. Thus, electricians often do not install cooling radiators (aluminum profile) for the tape and use a cable of insufficient cross-section for installation.
To correctly select the minimum cross-section cable for connecting from the power supply to the LED strip, you need to use one of the “formulas” that takes into account the planned length of the wire. “Formula” N91 (for copper cable up to 10 m long) 1A = 0.5 mm2 “Formula” No. 2 (for copper cable up to 30 m long) 1 A = 0.76 mm2
For example, for a tape with a current of 2 A (D8 W/24 V, 24 W/12 V), a cable with a cross section of 1 mm2 is selected if the length of the latter is up to 10 m, and with a cross section of 1.5 mm2 when the length does not exceed 30 m.
In addition, copper cable (manufactured in accordance with GOST) should be used for installation. But a copper-plated cable or one manufactured according to specifications can significantly reduce the brightness of LED equipment.
The tape must be mounted on aluminum surfaces. Since it heats up quite strongly during operation, the profile acts as a heat sink. If you install the tape on drywall or furniture, its service life will be sharply reduced.
Distinctive features of wireless devices
Modern wireless switches, manufactured under different brands, are similar in design and operating principle. The devices differ in the following parameters:
- type of control (push-button, touch, remote);
- the ability to control the intensity of the light flux in the room (whether present or not);
- number of devices to be managed (from 1 to 8 depending on the model and manufacturer).
In addition to the above items, there are significant differences in functionality. The majority of devices simply control the switching on/off of lights in rooms, and only advanced models are equipped with additional features such as:
- response delay - the device is activated or deactivated not immediately at the moment the button is pressed, but somewhat later, for example, while a person is walking towards the bed or to the exit from the room;
- multi-channel control - it is possible to configure several channels, allowing you to turn on several devices at once, even those located in different rooms of the same building;
- touch panel - there are no buttons that can lose sensitivity over time and fail. To activate the equipment, just touch the display;
- availability of Wi-Fi - the extension makes it possible to send a signal through available gadgets such as a smartphone, tablet or computer with Internet access.
The wider the functionality of the device, the higher its cost.
Wireless type switches look attractive, fit easily into the interior and give the decorative design of the room elegance and a stylish, modern look
The premium class includes “smart” wireless switches with a wide coverage radius (up to 350 meters), equipped with an internal energy generator, a touch control panel and the ability to multi-control the lighting system.
Such devices are usually installed in large houses, large apartments or country cottages that have an extensive lighting system.
Budget ones include simple battery-powered modules. Their coverage area is limited to 20-50 meters, which is quite enough for an average city apartment.
Varieties
These switches do not boast a wide variety of models, but there are plenty to choose from.
They differ according to 3 main criteria:
- Control type.
- Possibility of adjusting the degree of illumination.
- The number of lighting devices they control.
Based on the above, the following types of these devices are distinguished:
- Light delay function. For example, your child does not sleep without light. Installing this gadget allows you to turn off the lights at a certain time. That is, you know after what time your child falls asleep, the light will turn off automatically.
- Ability to configure multiple channels. This allows you to turn on several products at the same time.
- Touch switches. They work by touch.
- Wireless (Wi-Fi controlled) and radio controlled models.
How to choose a remote switch
When selecting a remote light switch, you need to pay attention to many different factors and parameters. Of course, first of all, do not forget that the interior design should be supported even in such small things as the light switch.
If you want to decide on the design of the switch in advance, before purchasing, evaluate the models by viewing photos of remote switches on the Internet.
The kit should always include instructions that will tell you how to connect the remote switch.
It is imperative that the price matches the quality of the model. To do this, it is better to choose well-known manufacturers of electrical equipment. If you are not well versed in this matter, be sure to consult at the point of sale.
And don’t skimp on quality; cheap models are unlikely to last you a long time, which is why it’s better to choose more expensive models. You can connect any of these switches with your own hands, since the current voltage is not high.
Just recently, remote switches were a novelty on the market, but now they are a modern and popular device that makes people's lives easier and more comfortable. If you have already decided to purchase such a switch, this article will tell you how to choose a remote switch.
Arduino controller
Today there is a wonderful system for independent development based on the inexpensive Atmega microcontroller, with adapted code and ready-made libraries, as well as a large community that will be happy to help. This project is called ARDUINO.
At the first stage, you will need a small investment and a lot of time searching and delving into the topic. In the future, having mastered the basics and understood the principle of programming, you will be able to create any conceived device based on ready-made modules. In the video below, the author explains the principle of constructing and programming the ARDUINO controller for control via an infrared port.
Arduino controller
Advice from our portal - before you start doing anything, you need to have an idea of the ultimate goal, otherwise the possibilities and principles of implementation can make your head spin and your efforts will dissipate without achieving what you want. Good luck with your future projects. We hope you liked our article about how to make remote lighting control with your own hands and what systems there are for implementing this project.
Types and types of switches
Switches are divided by type, type, each type has its own methods of application. And just in the table below, we see their division by degree of protection.
Currently, the international protection system (IP) is widely used. These letters are followed by two numbers and an optional letter.
The first number indicates that the product is protected from foreign objects entering it. These objects have any size, up to the size of dust particles. The second number usually indicates the degree of protection from moisture. It has a correlation dependence: the larger the numbers, the higher the degree. Switches differ in the method of switching - they can be with screw or screwless terminals. In the case of screw terminals, the wires are clamped between the plates using a screw. However, there is one drawback to this connection - over time, there is a high probability of the contact weakening, so you have to periodically tighten the screws. The screwless clamp makes installation work much easier and, due to the design of the mechanism, reliable contact of the wire with the conductive fittings is ensured.
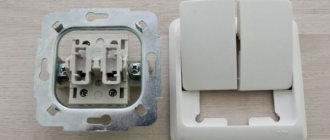
Key switches
The switches consist of contacts fixed inside the housing and a swinging mechanism pressed by a spring. Keyboard switches can be divided into two variations:
Switch types
- Using a ball that, when you press a key, begins to move along a swinging rocker arm. As it passes the axis, it rolls along the shoulder of the rocker arm, thereby moving the mechanism with contacts in the other opposite direction.
- Type of switch using a spring-loaded frame. Since it has the ability to swing on its axis, it thereby breaks or creates electrical contact.
Regardless of the type of device, turning the equipment on and off is done by pressing a key. Such switches, when used correctly, are characterized by a long service life of several decades. And their cost is low. You can find different types of designs on the market: there are lighter ones, and there are more complex ones - when two or more keys are attached to one base.
Corded switches
This option from the era of the last century is ideal for sconces, table lamps and other lamps. Because their main feature is the presence of a durable cord that comes out of the switch body. Actually turning this item on and off occurs precisely due to this cord. Fixed on the lever, it, in turn, interacts with the moving contact block. By releasing the lace, you straighten the spring fixed in the housing and the block returns to its original place. The unusualness of this type is manifested in the modification - control of two or more light bulbs. They respond to the amount of tension on the lace.
At the first pull, one of the lighting units turns on, at the second, the next one, and so on. Switching off occurs in the reverse order.
Manual circuits
All lighting control schemes can be divided into manual and automatic. Manual circuits, although they do not provide automation, do provide the necessary comfort. And in many cases, in terms of price and convenience, they have a clear advantage over fully automatic schemes.
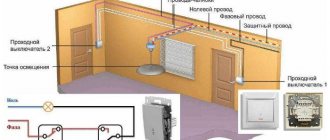
Through and cross switches
Pass-through and crossover switches have been used in practice for quite some time. But the scope of their application can be much wider. After all, installing such switching devices allows you to control lighting from two, three (see How to control lighting from three places) and more places.
So:
- A pass-through switch differs from a regular switch in that it has one input and two outputs. Let the input be contact number 1, and the output be contact numbers 2 and 3. In one position of the switch, contacts 1 and 2 are closed, and in the second position of the switch, contacts 1 and 3 are closed.
- The crossover switch has two input contacts 1 and 2, as well as two output contacts 3 and 4. In one position of the switch, contacts 1 - 3 and 2 - 4 are closed, and in the second position contacts 1 - 4 and 2 - 3 are closed.
- This feature allows the switches to control the lighting regardless of the position of other switches in the circuit. In this regard, such a scheme is often called a corridor.
- As you can see in the diagram, only pass-through switches can be used to control using two switches. For a larger number of control points, it is necessary to use cross-switches.
- In order to implement this circuit for two switches, the following switchings must be made. Connect the phase wire from the distribution box to the input of the first switch.
- After this, we connect pins 2 and 3 of both switches. And we connect our lamp to the input of the second switch. All that remains is to connect the neutral wire to the lamp directly from the junction box and our circuit is ready for use.
- To create such a circuit for three or more switches, cross switches should be installed between two pass-through switches. In this case, we connect wires from terminals 2 and 3 of the first pass-through switch to inputs 1 and 2 of the cross switch. And from terminals 3 and 4 of the cross-switch we connect to terminals 2 and 3 of the pass-through switch. The rest of the scheme remains unchanged.
Pulse relay circuits
But let's be honest, pass-through and cross-over switches are becoming obsolete. With the advent of pulse relays, such circuits seem overly complex and not reliable enough due to the large number of contacts.
It is easier to use pulse relays, which are more convenient for controlling lighting and whose circuits are much simpler.
Impulse relay
- The operating principle of a pulse relay is as follows. When power is applied to the coil, the power contacts change their state to the opposite and are fixed in this state. This allows a short-term voltage supply of 0.1 - 0.5 seconds to turn the lighting on and off.
- Since fixing the position of the switch in this case is not required, ordinary buttons are used to work with the pulse relay. Such as for a doorbell. A simple press of a button turns on the lighting. Pressing this or any other button in the chain again turns it off.
Note! When choosing a pulse relay, make sure that the coil operates from a 220V network. In addition, you should correctly select the rated current of the primary circuit, which for the lighting network should be at least 6A.
- In addition to being triggered by impulses, most relays have a function of only turning off and only turning on the lighting. For some circuits this can be a very useful feature.
- Due to such a rich functionality of the relay, it has as many as six contacts. Typically, control terminals are located at the top and power terminals at the bottom. But, unfortunately, there is no unified system here, and each manufacturer is excluded in the way he considers correct. The same goes for the designation of contacts. Therefore, in order not to be unfounded, we will take the principle of designating one of the most common manufacturers. An example is the relay - RIO-1.
- If you are planning to connect a pulse relay with your own hands, then first of all we collect the control signal. To do this, we connect the phase wire from the distribution box to each switch without fixing. We assemble the leads from the switches in series and connect them to the “Y” contact on the pulse relay.
- But for the relay to work, we need power on the coil. We supply this power by connecting it to terminal “11” of the phase wire from the distribution box, and to terminal “N” of the neutral wire.
- Now from terminal “14” we take the phase wire to our lamps. We lay the zero wire accordingly from the distribution box. Our entire scheme is fully operational.
- If you want to install a button that will only turn on the lighting whenever pressed, then we connect this button to contact “Y1” of the pulse relay. Accordingly, we connect a button that only works to turn off the light to the “Y2” contact of the relay.
Connecting lighting via starter
According to clause 6.2.10 of the PUE, it is prohibited to power more than 20 lamps or multi-lamp luminaires from one group circuit breaker. But sometimes it is necessary to turn on a larger number of lighting fixtures at once.
In this case, the lighting control circuit and circuit must provide for the installation of a starter or contactor.
So:
- The starter consists of a coil, a magnetic circuit and a system of power and secondary contacts associated with it. The magnetic core is divided into a fixed and moving part. When voltage is applied to the coil, the moving part of the magnetic circuit is pulled towards the stationary part. At the same time, they change their position and contacts. When the voltage on the coil disappears, the magnetic circuit disappears under the action of springs, and accordingly the contact part also disappears.
Note! Typically the starter has three power contacts. This allows you to connect one lighting group to each of them, which in turn allows you to simultaneously turn on up to 60 lamps.
- A push-button station is usually used to control the starter. It must have at least two buttons “on” and “off”. The “on” button has normally open contacts, and the “off” button has normally closed contacts.
- In order for the lighting to be controlled through a contactor or starter, as in the pulse relay circuit, we must assemble a separate power circuit and a separate control circuit. The power circuit is assembled quite simply. To do this, it is enough to connect the phase wires from the group circuit breakers to the input power contacts, and the phase wires going directly to the lamps to the starter terminals.
- But with the control circuit everything is a little more complicated. To do this, take a phase wire from one of the group circuit breakers and connect it to one of the contacts of the “off” button. From the second contact of the “off” button we connect a wire to the first contact of the “on” button. From the second contact of the “on” button we run a wire to the phase of the starter coil. We connect the second terminal of the starter coil to zero.
- It would seem that that's all. When you press the “on” button, voltage will appear on the coil and the starter will operate. But the fact is that as soon as we release the “on” button, the starter will disappear. Therefore, we need a so-called self-recovery scheme.
- The essence of this scheme comes down to the following. In addition to the power ones, the starter has secondary contacts that repeat the movement of the power ones. There are normally closed and normally open contacts.
- To implement the self-catching circuit, we take a phase from the starter coil. We connect it to the normally open contact of the starter. To the second terminal of this contact we connect the wire that goes to the “off” button. Here we connect it to the contact between the “on” and “off” buttons. Now the starter will work even after releasing the “on” button.
- This scheme works this way. Through the normally closed contact of the “off” button, voltage is supplied to the “on” button. When you press the “on” button, voltage is supplied to the coil and the starter is triggered. In this case, the secondary contacts of the starter close, thereby bypassing the “on” button. When you press the “off” button, the voltage is removed from the coil, the starter disappears, and the circuit returns to its original state.
Design and connection of the switch in the LED profile
The touch communicator consists of the following elements:
- shell (for built-in views, its role is played by a diffusing screen);
- sensitive element - spring, infrared sensor and receiver, motion sensor;
- switching circuit - signal to electrical converter.
LED strips and their breakers are designed for a voltage of 12–24 V, so they are connected to the network only through a power supply.
If the sensor is installed in a ready-made luminaire, the plug and diffuser are first removed. According to special markings, the tape is cut into 1–2 sections to make room for the switch.
You will need special connectors or low power soldering irons (25, 40 W) to connect the wires. Standard cable cross-section is 1.5 mm2. For illumination longer than 5 m, the calculation is performed individually.
First, the stripped and crimped wire strands connect the switch to the connector in front of the power supply, and then to the illuminator.
The markings will tell you how to easily connect the selected touch switch to the LED strip:
- VCC, GND - plus and minus that come from the power supply;
- LED+, LED- - go to diodes.
The adhesions are insulated with hot glue or heat shrink tubing. In the selected device, the working parts should occupy one side. If they are on different sides, the switch cannot be fixed in the profile. The location of the sensor is indicated by a blue LED. The tape together with the switch is fixed in an aluminum profile with double-sided tape, a protective panel is installed and secured with a plug.
LED LIGHTENING
The actuators of the system are lighting devices. In modern homes, as a rule, LED lighting sources are used, usually made in the form of lamps with an E27 or E14 base (minion) or LED strips and panels. LED lighting has a number of advantages over incandescent and energy-saving (fluorescent) lamps.
When designing LED lighting systems, a number of conditions must be met to ensure that the equipment works as long as possible.
Thus, LEDs are very sensitive to changes in current: they do not tolerate even the higher resistance created by the connecting wires that supply electricity from the power supply. For reliability, it is recommended to connect LED strips with a cable with a core cross-section of 6-10 mm2.
Although this requirement may seem excessive to many, such a cable allows you to power an electric stove or a fairly powerful water heater. In addition, the power supply should not be placed too far from the LED strip, the maximum distance is 28-30 m.
Manufacturers
The most famous models presented on the Russian market are “Ecosvet” and “Claps”. Let's look at their main characteristics.
Switch "Сlaps"
One of the newest developments is the “Claps” cotton switch model. In this device, the sound is processed using a microprocessor; it does not react to any extraneous noise, but is tuned to several claps in a row (this is the most important operating condition).
It is permissible to install several such switches in one room, each of them will react to a certain number of claps, and accordingly turn on the light, humidifier, fan, TV or stereo system. This switch model is suitable for any household appliances that have an electrical cord.
Perhaps to some, the clap switch may seem like a toy or a completely unnecessary device. Others, on the contrary, are passionate about the idea of creating their own “smart home” so that lights and electrical appliances turn on and start working on command or clap. Arrange your life the way you want, but at the same time make it as comfortable as possible.
Ecolight switch
The Ecosvet device is designed to work with 220 Volt light bulbs.
Main parameters of the device:
- load - 300 Watt;
- sound signal spread - from 30 to 150 decibels;
- housing protection level - IP30;
- permissible temperature range - from 20 degrees below zero to 40 degrees above zero;
- cost - from 350 rubles.
“Ekosvet” is fixed with self-tapping screws using the mounting legs. It is not recommended to install the device in noisy rooms. Despite the fact that “Ekosvet” is configured to clap, false alarms are possible.
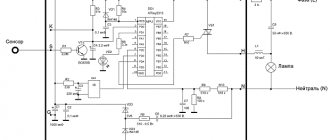
The figure above shows the device connection diagram. "Ecolight" is connected to a conventional switch to provide the ability to de-energize the circuit and stop its operation.
Types of proximity switches
The operating principles of the sensing element in non-contact models may differ depending on the operating conditions and the required speed. In this case, the device design always includes the following components:
- sensing element;
- element for signal processing;
- power key.
The following types of sensors are used: capacitive, inductive, optical, ultrasonic. The features of these devices will be discussed below.
Capacitive sensors
The operation of capacitive sensors is based on interaction with the human body: when a person is nearby, electrical capacitance is created, resulting in the activation of a time-setting multivibrator circuit. The closer a person is to the switch, the larger the volume of the capacitance and the lower the frequency created by the multivibrator. After the frequency overcomes the minimum threshold, the device turns on, but as soon as a person moves a certain distance, the sensor switches off.
The function of the sensitive element in the device is performed by a plate superimposed on a capacitor, which, in turn, is connected to a multivibrator. At the output, the multivibrator is connected to a frequency and voltage converter, as well as a comparator, which acts as a threshold element.
Inductive sensors
Contactless switches of this type respond not to the presence of a person, but to the movement of a magnet. Depending on the design of the magnetic product, the sensor is made with a metal or magnetized core. An inductive sensor creates electrical impulses of different directions depending on the approach or distance of an object. The signal is processed by a threshold element: after exceeding a certain voltage level on the sensor winding, a trigger is turned on, which opens the key.
Optical sensors
Optical devices include infrared LED and phototransistors. The LED operates regardless of interference caused by natural light. The device can reflect light (how a barcode reader works) or interrupt the flow (an object must be placed between the sensor and the light source).
Ultrasonic sensors
Ultrasonic devices use quartz sound emitters. A receiver tuned to a specific frequency responds to sound. Ultrasonic devices have another name - motion and volume sensors. Moreover, in a room where there are no moving objects, the return period and signal amplitude are constant. If a moving object appears in the room, the sound waves are distributed differently, which is reflected in a change in the signal received by the sensor.
Advantages of remote light control
The use of equipment for remote control of electrical appliances has the following advantages:
- reducing electricity consumption;
- the lighting control process becomes more comfortable;
- due to the effect of presence, the risk of breaking into the premises is reduced.
The main disadvantages of using motion sensors include the high possibility of false alarms, poor performance in heavy rain or snow, the device does not respond in cases where a person’s outer clothing does not transmit this type of radiation well, and the lighting turns off 20 seconds after the object stops moving.
The main advantages of motion sensors include monitoring energy consumption, reducing cost, safety for humans and ease of use.
Connecting an infrared motion sensor is quite simple. It is necessary to purchase a wire consisting of three insulated cores. With its help, the motion sensor is connected to the electrical network and to any lamp. The phase conductor of the network is connected to the phase output of the device. The neutral wires of the electrical network, motion sensor and lamp must be connected together. The phase wire of the electrical appliance is connected to the third core of the motion sensor. This is the entire sensor connection diagram.
When purchasing infrared motion sensors, you need to pay special attention to the following characteristics:
- Place of use. Motion sensors are produced with different degrees of protection from moisture. They can also be mounted or stand-up. For an apartment or cottage, a built-in motion sensor is most suitable, and the degree of protection from moisture and dust does not play an important role. When using the equipment in the entrance or on the street, it is worth buying a sensor with good protection from humidity and dust, which is mounted on a bracket.
- Range of infrared sensor. Such devices are capable of detecting changes in background temperature at a distance of up to 25 meters. When installed, a street sensor must have a large range of action, but in an apartment this characteristic can be neglected.
- Maximum load power. First of all, you need to determine in advance the maximum power of the connected lamp, and then buy a sensor for this parameter with a small margin.
Wireless light switches
It’s no surprise that today there are wireless light switches. Their main advantage is that you don’t have to hammer the walls every time you turn on the light, therefore, you won’t have greasy circles on the wallpaper.
It can also be installed in absolutely any place in your house or apartment, practically without spoiling the wall design. It covers large areas and is capable of monitoring the entire house.
The device itself is small in size; it can be placed in the lighting fixture itself. There are quite a few wireless switches; they are divided into only three characteristics: how many lamps they can control, the control method and the ability to adjust the lighting fixtures. Its main feature is easy installation, which does not require a professional.
Programmable lighting control scenes
In smart home installations, you can not only remotely control every lamp connected to the system, but also program so-called “lighting scenes” and even teach the system when it should turn them on. These scenes are nothing more than turning on a group of lamps (with a selected intensity and color), creating a certain mood in the room. In large or executive rooms, you can program several of these lighting “moods” - one for dinner, another for reading or watching TV. Scenes can be changed by pressing a remote control button or even a smartphone screen - these are often used as remote controls.
What does the market offer?
A wide range of wireless remote switches allows you to choose a product based on price, characteristics and appearance.
Below we consider just a few models that the market offers:
- Fenon TM-75 is a remote-controlled switch made of plastic and designed for a voltage of 220 V. The features of the device include the presence of two channels, a 30-meter range, the presence of a remote control and a delay switch function. A group of lighting fixtures can be connected to each channel and controlled. The Fenon TM-75 wireless switch can be used with chandeliers, spotlights, LED and track lights, as well as other devices operating on 220 Volts.
- Inted 220V is a wireless radio switch designed for wall mounting. It has one key and is installed in conjunction with the receiving unit. The operating voltage of the product is 220 Volts, and the range is 10-50 meters. The wireless light switch is attached using self-tapping screws or double-sided tape. The body is made of plastic.
- INTED-1-CH is a light switch with remote control. With this model you can control light sources remotely. The power of the lamps can be up to 900 W, and the operating voltage of the product is 220 V. Using a radio switch, you can control the equipment, turn on and off the lights or alarms. The product is based on a receiver and transmitter. The latter has the form of a key fob, which is small in size and transmits a signal over a distance of up to 100 m. The product body is not protected from moisture, so additional protection must be provided when installing outdoors.
- Wireless touch switch controlled via remote control. The product is mounted on the wall, has small dimensions and is made of tempered glass and PVC. The operating voltage is from 110 to 220V, and the rated power is up to 300 W. The package includes a switch, remote control and bolts for attaching the accessory. The average life cycle is 1000 clicks.
- Inted 220V 2 Receiver - Wireless Light Switch for Wall Mounting. Control is carried out using two keys. The body is made of plastic. The operating voltage is 220 V. The number of independent channels is 2.
- BAS-IP SH-74 is a wireless radio switch with two independent channels. Control is carried out using a mobile phone on the Android operating system. To work, you must install the BAS application. The SH-74 model is used to control incandescent lamps with a power of up to 500 W, as well as fluorescent light bulbs (power limit - 200 W).
- Feron TM72 is a wireless switch that controls lighting at a distance of up to 30 meters. The light sources are combined into a receiving unit, and switching on and off is done using the remote control. The TM72 model has two channels, each of which can be connected to a specific group of devices. The product has a large power reserve per channel (up to 1 kW), which allows you to connect different types of light sources. The big advantage of the model is the presence of a delay ranging from 10 to 60 seconds.
- Wireless 3-channel switch 220V Smartbuy is designed for connecting light sources into three channels with a power limit of up to 280 W. The rated supply voltage is 220 V. Control is carried out from the remote control, which has a range of 30 meters.
- Z-Wave CH-408 is a wall-type radio switch that allows you to program various scenarios for controlling lighting devices. If necessary, up to eight switches can be connected to it. Among the additional features, it is worth highlighting the management of Z-Wave devices (up to 80) and ease of configuration regardless of the main controller. The device is powered by two batteries, and when they are low, a corresponding signal is given. Firmware updates are performed via the Z-Wave network. The maximum distance to the controller should not exceed 75 meters. Protection class - IP-30.
- Feron TM-76 is a wireless light switch that is controlled remotely using a radio signal. The receiver connects to light sources, and the remote control controls the receiving unit at a distance of up to 30 meters. The Feron TM-76 model has three independent channels, each of which can be connected to its own group of lighting fixtures. In this case, control will be carried out separately, using the remote control. The maximum power reserve is up to 1 kW, which allows you to connect various types of lamps (including incandescent). The operating voltage is 220 V.
Receiver switch
The device is a touch or push-button light switch, additionally equipped with a radio signal receiver. Here we are talking about high-quality lighting control: mechanical on/off and control from the remote control do not depend on each other. Similar switches are found in some electronics manufacturers; in general, this is a rather rare solution implemented by any brand.
The range of such devices is small, let’s look at them briefly.
Simple devices include, for example, Wookee wk-317e
— load control up to 500 W, remote control range (according to the seller) 30 meters. The radio frequency of 433.92 MHz is standard for most radio light control devices. The switch is quite bulky and requires a non-standard installation box (socket box). The kit includes a control panel, which apparently cannot be replaced with another device. Unfortunately, there is no information on whether the switch requires a neutral conductor.
Receiver switches from Legrand Celiane series
have more advanced options - they can be controlled not only from the remote control.
The device has the function of a full-fledged radio relay and can work with various transmitters - remote controls in the form of a regular switch, motion sensors and Internet signal translators. Naturally, all these devices are supplied by the same manufacturer. Some receiver models support dimming. Among the disadvantages, it should be noted that this device is quite difficult to find, and also that the receiver switch requires a neutral wire
. The presence of a zero can become a serious obstacle when installing in an already equipped place for a regular switch (after all, a zero is not provided).
During the search process, I managed to find the best solution, in my opinion - a switch from Aliexpress Smart Switch
. The switch is mounted instead of the usual one, a neutral conductor is not required! The touch switch is produced in various colors and can have up to three independent control groups. A four-button compact remote control or other device (like Legrand) is purchased for the device. It is worth especially noting that the four buttons on the remote control can control many light groups and several switches; the switch itself is easily programmed to the desired key. There will be a short review about this model soon. The device does not switch on during power outages.
In addition to Legrand and the “unnamed” Chinese device, there are other manufacturers, for example Brenin
Mount Switch. This device can also be used as part of a smart home - with a remote control, various sensors and switches. However, I was unable to get competent technical advice on their supposedly official website. There are suspicions that they do not have a dealer in Russia, and that the site was created by some charlatans.
But on the noolite
“Nootekhnika” is quite possible to get advice from a competent specialist.
But, unfortunately, they do not have a ready-made solution in the form of a switch-receiver. However, there is an SB-1-100
- it is connected to the lighting circuit break (zero is not needed), like the devices described above, and is also connected to any push-button or conventional type switch. The block itself is mounted in the mounting box under the switch itself. The unit is compatible with all noolite smart home devices - remote controls, sensors and wireless switches. Capable of operating in two modes (selected during installation): relay, when the switch is only on. or off and dimmable, when the brightness of the lamps is smoothly adjusted.
All described devices consume a miniscule current from the circuit even when the lights are off. Therefore, when using energy-saving or LED lamps, chandeliers and lamps must be bypassed with a 0.1 - 0.2 µF capacitor. Otherwise, the lamps may glow dimly or flicker. Read more about glowing and blinking LED lamps
Typically, a bypass capacitor is supplied with the receiver switch.
Using the devices described above, a light control circuit based on the principle of pass-through switches is very simply implemented. The receiver switch is connected instead of a standard switch, and the remaining control points are implemented using remote switches (transmitters). The disadvantage of such a system is that additional control points (transmitters) require batteries. Well, an undeniable advantage is that there is no need to run wiring to the transmitters.
Types of switches
Wireless remote switch with remote control
There is a wide range of household switches on sale, controlled by remote control and telephone, designed for power consumption in the range of 0.5-3.5 kW.
- Delayed. Once turned on, the lamps remain lit until they are forced off. Another option is products that glow for 10-60 seconds after activation. These are usually installed in corridors and other passage places.
- With channel settings. These are the most complex and expensive devices, designed to operate in different modes. The products glow in one range or automatically switch the signal in accordance with the settings.
- Wireless. The best option for those who prefer to control lighting without leaving the couch. This option is convenient because in the dark you can turn on the lamps in the necessary rooms without moving from switch to switch in the dark.
- Sensory. Products are produced with displays through which they are configured and programmed.
Application area
The classic switches that we are all accustomed to are gradually becoming a thing of the past. They are inconvenient to use, difficult to connect and install, and have few resources.
Wireless analogs have the lead in this regard. This is both a stylish appearance and ease of installation.
They are perfect for you if:
- It is necessary to move the old switch, but the furniture is in the way. The new device can be mounted anywhere and on any surface. Whether it's a wall, a chest of drawers or a mirror.
- In case of an error by an electrician who performed the work poorly. There is no need to redo the wiring; it is easier to install a wireless switch.
- When the room is small, there is often no easy access to the switch. Sometimes it is located, for example, behind a closet. The wireless switch can be attached anywhere, installed without laying a cable, and does not require masking. And you can install the radio switch on a table, cabinet or chest of drawers.
- In houses made of wood, there is a very high risk of fire due to faulty wiring. And with the installation of a wireless switch, the process of working with hidden wiring becomes easier and more economical.
- It is possible to control the light from several different places. Manufacturers offer switches with remote control to control lighting from a distance.
- If you need to install one or more switches. For example, after repairs you are not satisfied with the location of the switch. A wireless switch with a remote control will help solve the problem.
- When it becomes necessary to turn off the lights from a distance. For example, you left the apartment, even already on the street, and remembered that you had not turned off the light in the house. We'll have to go back. And by installing a radio switch, you can easily do this even from the street, because its range reaches 350 meters. But it depends on the model you choose. This invention is controlled using a remote control. For convenience, it is made in the form of a small keychain.
- Aesthetics of the room. If you don't want to spoil your new wallpaper by drilling and picking, a wireless switch is a good alternative to conventional designs.