With the advent of the Internet, the lives of many families have changed.
Most of them are connected to the Internet, especially since you don’t need much for this; it’s enough to have a personal computer or the most common mobile phone. In turn, each family member can be connected to a separate line. Local distribution of the Internet resource is carried out wirelessly using a special Wi-Fi protocol. And yet, many prefer distribution by wire, as it is much more reliable, simpler and cheaper. In addition, the presence of additional electromagnetic waves negatively affects a person’s well-being. As a rule, they try to hide all wires in the walls so that they do not interfere. Internet cables are no exception. This is mainly carried out during the period of repair work. For this, there are special sockets called computer or information sockets. Basically, sockets with RJ-45 connectors are used. You can do all the installation processes yourself if you know how to do it, especially since there can be more than two wires and you need to know which contact to connect to which. The procedure is performed not by twisting or soldering, but by crimping, using a special tool for this.
Construction and components
To thoroughly understand how to properly install a new outlet at home, you need to study a little about its components. All sockets are sold already assembled. Therefore, when installing it, you will have to unscrew everything yourself.
The main components of the socket are the base, the conductive part, and the decorative front panel. The base is made of ceramic or high-quality plastic. All elements are attached to it - conductive parts and the front cover.
Ceramic bases are considered more reliable, but they require particularly careful installation, because if damaged, you will have to buy a new socket.
The decorative overlay is designed to hide all working elements. It serves as a reliable insulator of the working part from external influences. Some models provide the ability to simply replace this part of the outlet.
Getting to know the internal structure of the outlet will help you better understand the process of connecting it correctly.
The working part of the socket consists of spring contacts and terminals to which electrical wires are connected. One of the important contacts is the grounding one.
The conductive elements are made of brass or bronze. The latter are better, but are extremely rare. Therefore, you should choose options made from tinned brass - they are more reliable than conventional brass, are better soldered and last longer.
Designer sockets allow you to make the interior of your home unforgettable. Their unusual performance adds its own flavor
RJ-45 connector crimping
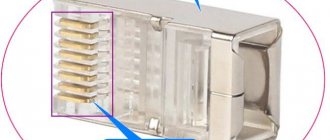
The Internet cable entering an apartment or house, most often called twisted pair, often ends in a small plastic connector. This plastic device is a connector, usually RJ45. In professional jargon they are also called “Jack”.
This is what an RJ-45 connector looks like
Its body is transparent, so wires of different colors are visible. The same devices are used on connecting wires that connect computers to each other or to a modem. Only the order of arrangement (or, as computer scientists say, pinout) of the wires can differ. The same connector is inserted into a computer socket. If you understand how the wires are distributed in the connector, there will be no problems connecting the Internet outlet.
Internet cable connection diagram by color
There are two connection schemes: T568A and T568B. The first option - “A” is practically not used in our country, and everywhere the wires are arranged according to the “B” scheme. It is necessary to remember it, since it is what is required in most cases.
Internet cable connection diagrams by color (use option B)
To finally clarify all the issues, let's talk about the number of wires in a twisted pair. This Internet cable comes in 2-pair and 4-pair versions. To transfer data at speeds up to 1 Gb/s, 2-pair cables are used, from 1 to 10 Gb/s - 4-pair. Today, apartments and private houses are mostly supplied with flows of up to 100 Mb/s. But with the current pace of development of Internet technology, it is quite possible that in just a couple of years the speeds will be measured in Megabits. It is for this reason that it is better to immediately expand a network of eight rather than 4 conductors. Then when changing speed you won't have to redo anything. The equipment will simply use more conductors. The difference in cable price is small, and sockets and connectors for the Internet still use eight-pin ones.
If the network is already wired in two pairs, use the same connectors, only after the first three conductors laid according to scheme B, skip two contacts and place the green conductor in place of the sixth (see photo).
Connection diagram for 4-wire internet cable by color
Crimping a twisted pair cable into a connector
There are special pliers for crimping wires in the connector. They cost about $6-10 depending on the manufacturer. They are more convenient to work with, although you can get by with a regular screwdriver and wire cutters.
Connector crimping pliers (one option)
First, the insulation is removed from the twisted pair. It is removed at a distance of 7-8 cm from the end of the cable. Underneath there are four pairs of conductors of different colors, twisted in twos. Sometimes there is also a thin shielding wire; we just bend it to the side - we don’t need it. We untwist the pairs, align the wires, spreading them in different directions. Then fold according to pattern “B”.
The procedure for sealing the RJ-45 connector in the connector
We clamp the wires in the required order between the thumb and forefinger. We lay out the wires evenly, tightly to each other. Having aligned everything, we take wire cutters and cut off the excess length of the wires laid out in order: 10-12 mm should remain. If you attach the connector as in the photo, the insulation of the twisted pair should begin above the latch.
Cut it so that the wires remain 10-12 mm
We insert a twisted pair with cut wires into the connector
Please note that you need to take it with the latch (protrusion on the lid) down.
We insert the wires into the connector
Each conductor must get into a special path. Insert the wires all the way - they should reach the edge of the connector. Holding the cable at the edge of the connector, insert it into the pliers. The handles of the pliers are brought together smoothly. If the body has become normal, no special effort is required. If you feel that it “doesn’t work”, double-check whether the RJ45 is installed correctly in the socket. If everything is fine, try again.
When pressed, the protrusions present in the pliers will move the conductors to the microknives, which will cut through the protective sheath and ensure contact.
How connector crimping pliers work
This connection is reliable and problems rarely arise with it. And if something happens, it’s easy to re-terminate the cable: cut it off and repeat the process with another “jack”.
You can read about connecting a chandelier here.
Video tutorial: crimping an RJ-45 connector with pliers and a screwdriver
The procedure is simple and easy to repeat. Perhaps it will be easier for you to do everything after the video. It shows how to work with pliers, as well as how to do without them, and do everything with a regular straight screwdriver.
Cable crimping
After you have crimped the power sockets, you need to check them. To check, we need to crimp at least 2 wires to check the connection on one side and the other. Two schemes are used for crimping:
- Direct - used most often.
- Cross – used less often to connect to a certain type of network equipment.
There is also the possibility of crimping for 4 wires, but I do not recommend using it. Firstly, there is a speed limit of 100 Mbit per second. Secondly, if something happens you will need to completely change the wires or re-crimp them. Thirdly, we need to check the connection across all pairs, not just two.
For a more detailed article on twisted pair crimping, see here.
At the very end, all that remains is to ring the connection with this special device. If it is not there, then you can check the integrity of the cable in another way. Connect one end to any switching device: switch, router, server or second computer. We insert the second end into a laptop or computer. On your laptop or computer, the light on the network card should light up.
Algorithm for laying Internet cables in walls
The most correct, but at the same time difficult to implement solution for laying an Internet cable in a home (office) environment is to install it inside the walls. The advantages of such wiring are obvious: the cable does not get tangled underfoot and does not affect the decorative design of the room. A significant disadvantage of in-wall installation is that in the future there may be problems with access to the cable for repair or maintenance. But with proper cable routing along grooves in a corrugated PVC pipe, you can not only minimize the risk of a malfunction, but also provide relatively easy access to the twisted pair without complex dismantling work.
Before you start laying the Internet cable, it is worth marking the places where it will be located. Remember that unshielded twisted pair cable is made of copper, which is very sensitive to electromagnetic interference. Try to keep the distance between computer and electrical wiring at least 50 cm.
- We outline the route. When planning a place for a groove for future wiring, keep in mind that the Internet cable has a certain limitation on the bending radius. Specific values can be found in the specifications of the selected cable.
It is better to lay the twisted pair in a protective corrugated hose, and make the groove taking into account its size
- Choosing a cable. The most significant quality characteristic of a twisted pair cable is reliability. Access to the cable after its installation will be significantly difficult, so it is advisable not to skimp on quality. To connect to the Internet, UTP of the fifth category and higher is most often used. You need to select a specific cable model based on its main technical characteristics:
- minimum permissible bending radius (the smaller it is, the easier it will be to install in the walls);
- maximum permissible tensile force (the higher this value, the easier it is to insert the cable into the corrugation, and in case of technical problems, subsequently remove it from the groove);
- warranty (for quality products the warranty period can be up to 25 years).
- We do installation. The cable is placed in a corrugated pipe of the required diameter (it must move freely inside it). Then the corrugation is secured in the groove with a plaster screed. Next, you can begin finishing work. As a result, an Internet socket will appear at the cable output. However, before that it is worth pinouting it.
At the exit from the wall, a standard socket box is installed, in which the housing and socket mechanism are fixed
We disassemble the LEZARD internet socket
Before we mount it, we need to disassemble it. This is done in order to connect it to the Internet cable, and then attach it to the wall. Here we go:
Unscrew the body. Unscrew it and all the plastic decorative protection will come off. We don't need it yet.
After this we need to remove the central part with the main contacts. It sits on the latches, just press on top and everything will come off.
The central part is in our hands, it is this that we will connect to the Internet cable. To do this we need to remove the top “small” cover.
We need to “plant” the already stripped cable into these contacts. However, another question arises - how to plant it? Where should any colors be? See the diagram below.
How to connect an external type socket
Before starting installation, be sure to wear protective gloves.
Important! During a call, the voltage in the telephone line increases by 100-120 Volts, so working with the outlet without gloves poses a serious threat to life and health. Now you need to use side cutters or a special tool for working with cables to expose the telephone line wire, stripping it of insulation by 4 cm. The wires must be straight, so they will need to be straightened
The veins must be even, so they will need to be straightened
Now you need to use side cutters or a special tool for working with cables to expose the telephone line wire, stripping it of insulation by 4 cm. The wires must be even, so they will need to be straightened.
Important! The insulation must be removed very carefully, trying not to make cuts on the copper conductors, otherwise they can easily break. When the wire is prepared for the upcoming work, you can begin connecting. To do this, you need to open the socket housing and familiarize yourself with its contents.
To do this, you need to open the socket housing and familiarize yourself with its contents.
When the wire is prepared for the upcoming work, you can begin connecting. To do this, you need to open the socket housing and familiarize yourself with its contents.
Inside the socket you can see the following:
To connect a telephone for home use, only two terminals and two wires are required. Therefore, at first glance, the contents of the box may seem strange, because there are as many as 4 terminals. But the remaining 2 are used to connect another telephone line.
In our case, we will need 2 terminals (they are circled in red in the figure), to which the telephone line will be connected. Next, you should connect the wire to the red (“minus”) and green (“plus”) wires, screwing the wires to metal screws.
In order to ensure correct connection, you need to check the polarity of the line using a multimeter or tester.
Advice! If you suddenly don’t have a tester at hand, you can use regular potatoes. To do this, you need to cut the potato in half and insert the ends of the cable into it: near the “plus” the color will change.
Not all telephones require strict polarity; in most cases it is not important.
After all operations are completed, the lid is returned back and latched. Then the box is attached to the wall using self-tapping screws or a double-sided adhesive pad.
After connecting, you must check if there is a connection.
How to repair or change the plug on a network cable
It also happens that you have to replace the plug on the cable and repair it. You can use a screwdriver. It’s worth saying right away that if the crimping is of poor quality, failures and loss of signal will occur regularly, and the connection will be broken. You can do the installation as follows:
- Remove the cable insulation and unscrew all the wires located inside it;
- Measure the distance along the entire body of the plug so that the wires reach the contacts, and the outer layer of insulation ends in the connector itself for greater reliability;
- Install the cable and fix all the wires along the contact channels;
- Tighten the lock and “sink” the plug contacts into the veins.
- Check the cable for functionality.
Pressing out the plug with a special tool
How to check if the Internet cable is working properly If the cable suddenly stops working, then you need to figure out the reasons for this malfunction. There are not many options here:
- The cable cores do not touch the contacts in the plug;
- The plug does not make good contact with the network card slot;
- An internal cable break has occurred.
The second reason does not need to be considered for a long time, since it is not related to a cable malfunction. The first and third cases are of much greater interest. The most important check is with a multimeter or tester, that is, ringing. You can also ring each individual transaction. This is done as follows. One probe of the device is installed on one part of the cable, and the other on the second. Voltage is applied to each wire in turn. The fault, if it was a break, will be found immediately. If everything is fine with the cable, then most likely the contacts in the plug itself have come loose. You can reassemble it or buy a new one and clamp it using any of the methods described above.
Advanced crimping pliers
It is now clear how to properly connect the Internet cable and how to fix it in the connector plug. This is quite simple to do, using not even special devices, but simple pliers or a screwdriver. It is better to repair problem wires using a multimeter.
Connecting an RJ-45 internet socket and crimping the connector
In many families, several devices are connected to the Internet: we can’t imagine life without the World Wide Web, so everyone needs their own line. They work mainly using a wireless protocol - Wi-Fi, but there is still a wire, since wired Internet is still more stable than wireless. During repairs, all wires are hidden in the walls and “Internet” wires are no exception. They, like electric ones, are plugged into sockets, only of a different standard: they are called computer or information. They can have different connectors, but the most common is RJ 45. You can do the installation and connection yourself, but since the connector looks unusual in appearance, there are more than two or three wires in it, and the connection is not ensured by soldering or twisting, you need to know , how to connect an Internet outlet and also the connector that should be inserted into it.
Installing an internet socket in a socket box
The last stage of installation of an Internet cable to a computer outlet is its installation in a place prepared for this purpose (socket box). In fact, there is nothing complicated here; it is enough to have a Phillips and slotted screwdriver and straight hands. The sequence should be as follows:
- We evenly lay and distribute the cable over the cup of the sub-socket so that the inside of the fittings is completely recessed and nothing interferes;
- We position the metal frame so that the attachment points on the frame and the cup coincide with each other;
- We fasten the frame with self-tapping screws;
- We cover the resulting structure with a decorative panel.
Actually, this is where we should finish describing the process of how to connect an Internet outlet. If you have any questions, feel free to ask them in the comments field. And to top it off, I suggest watching a video on a current topic so that the instructions you read are fully understood.
Installation and connection of a power outlet
The twisted pair wire is laid in a cable channel or covered with a plinth. The free end is led out through the socket box (when installing a mortise model) or is left uncovered (if an overhead version is mounted). Its length is left sufficient to carry out the necessary work.
7-8 cm is removed from the very edge and the outer shell is removed from this area. The conductor pairs unwind, separate and straighten. Further steps are given in the instructions.
- The socket body is disassembled, the front part is disconnected and set aside.
- On the reverse side there is a color scheme for the connection, presented in two options: A and B. For correct switching, it is necessary that the cross-connection of the socket corresponds to the connection diagram of the connector, so if its installation was carried out by another specialist, you need to clarify how the wiring was made. In Russia, scheme “B” is usually used.
- Crimp the wires in the socket terminals according to the selected option (the color of the wire matches the color of the contact). For example, as shown in the picture, from left to right: brown, white-brown, green, white-green, orange, white-orange, blue, white-blue.
- Secure the wire with a clamp and carry out a preliminary check of signal transmission through the connector. To do this, connect the connector from your tablet, laptop or mobile phone to the disassembled device and make sure there is a connection to the Internet.
- Trim excess wires. Assemble the socket by connecting both parts. Fix it on the wall or in it (depending on the type of design) just like a regular electrical point. Upon completion, you must again check the functionality of the already assembled device by connecting a laptop or other gadget.
Connecting RJ-45 with two twisted pair wires
Preparatory actions in this case are carried out exactly as in the previous version. The only difference can be considered the connection itself. Instead of eight conductors, the four present in the wire are switched. The contacts corresponding to the color of the wires and corresponding to the selected scheme “A” or “B” are used. After this, the product is crimped, assembled and installed, and signal transmission is checked.
It should be remembered that a wire with two twisted pairs is used to transfer data at speeds of up to 1 Gb/sec. As the speed of the Internet signal increases, the wire will have to be replaced and all connections made on it will also have to be replaced.
Crimping wires on socket contacts
As stated above. When connecting wires to the terminals of the device, it is necessary to crimp them. The quality of operation of the entire system will depend on this procedure. There is no need to think that you need to scrupulously remove the sheath from each wire and then connect it to a bolted connection, as happens in conventional electrical sockets.
The contacts of system connectors are designed in such a way that when the conductor is inserted tightly onto them, they cut the insulating coating and provide switching with the copper conductor. There is no need to strip thin wires.
Such a high-quality and reliable connection is achieved when the wire enters the contact terminal all the way. You can use a knife or thin screwdriver for this.
But you must act extremely carefully so as not to damage the wire.
Preparing to install a power outlet
In this article we will talk specifically about built-in sockets, since there are also external ones (for external wiring, when the cable is not laid in the wall). But the procedure and the wiring diagram for external sockets are approximately the same. First you need to buy the computer socket itself. You can take any one. If you want something of higher quality, beautiful and usually easy to install, don’t skimp (don’t buy the cheapest ones). I have a Makel socket. Inexpensive. Something around 130 UAH. (340 rubles). There are many more good options from Schneider, Legrand, VIDEX, VIKO, Werkel, Lezard. There are double sockets, with and without frames. Here's mine:
A twisted pair cable of category CAT5E, or the more advanced Cat.6, is laid to the socket. This is a four pair shielded cable. The socket must correspond to the cable category. The outlet has this information. I have a CAT5E cable and the socket is also CAT5E. The maximum cable length is 100 meters.
This means that on one side the cable is connected to a computer outlet, and on the other side it is usually crimped into an RJ-45 connector and connected to a router, modem, or switch.
In this article I will not write about how to crimp a network cable. We already have two instructions on this topic:
- How to crimp a twisted pair cable into RJ-45? DIY network cable
- How to crimp a network cable without a tool (screwdriver)
And this article may also be useful: how to extend the Internet cable (network cable).
All this network equipment can be purchased in specialized stores. Also, computer sockets, network cables, and connectors are usually sold in digital equipment stores.
The network cable must be laid in a regular socket box. In which, after connection, our socket will be installed and secured. If you have not yet laid a network cable, but are planning to do so, then leave a supply of cable. It seems like 1 meter is recommended. But it seems to me that this is too much. I think 50 centimeters will be more than enough.
One more thing: the way you connect the power outlet may vary depending on the manufacturer. It is the process of connecting a twisted pair cable and fixing it (clamping) in the socket module. To connect such sockets, no special tool is needed.
How to pinout an RJ-45 cable
When crimping a twisted pair cable, you must adhere to a certain pinout (color scheme). There are two generally accepted connection standards.
- "Type A" The wires are laid in the following order:
- white-orange;
- orange;
- white-green;
- blue;
- white-blue;
- green;
- white-brown;
- brown.
- "Type B". Here the order of the colors is slightly different:
- white-green;
- green;
- white-orange;
- blue;
- white-blue;
- orange
- white-brown;
- brown.
We carry out the work in the following order.
We leave a cable 10–15 cm long from the wall (outlet for the Internet outlet), and cut off the rest of it. The remaining cable should be enough, even if the pinout has to be redone. We clean all pairs of wires from the outer rubberized shell and from the inner foil (which acts as additional protection)
You can use the most ordinary knife as a tool (do not forget about caution and safety). We straighten all the colored pairs of twisted wires and carefully place each one in its own groove according to the color markings on the terminal block. Moreover, this must be done in such a way that the insulated part of the cable is fixed by the clamp of the socket terminal block. We press all the wires and secure them with bolts on the terminal block itself. We align all the clamping connectors with a screwdriver, and cut off the remaining cable. It is important that all wires remain at the same height relative to the base of the socket terminal block.
Connecting RJ-45 with two twisted pair wires
A two-pair RJ-45 cable uses data transfer rates of up to 1 Gb/s.
The two-pair cable is connected to one side of the socket contacts
The pinout of a two-pair cable is the same as for a four-pair cable. Only instead of eight multi-colored wires, only four are switched: white-blue, blue, white-orange and orange. Then the cable is crimped, the socket is assembled and installed, and its functionality is checked.
Video: RJ-45 pinout (two pairs)
How to crimp an RJ-45 cable onto the contacts of an Internet socket
When pinouting the cable to the terminals of the Internet socket, you should crimp them. The performance of the Internet connection will depend on this. Based on a similar process for conventional electrical outlets, one would assume that crimping an Internet outlet is a similarly labor-intensive process involving removing the protection from each individual wire and then connecting them with bolts. In reality, everything is much simpler and faster. The contacts of an Internet cable are designed in such a way that when a conductor is firmly connected to them, they cut the insulating coating, resulting in contact with the copper core. Because of this, stripping each wire is not necessary.
Usually, an extractor is used to crimp the contacts of the socket - a crossing knife. The work should be done carefully to avoid damage to the cable.
The cable is crimped into a computer socket using a cross-connecting knife.
Crimping a twisted pair cable into a connector
To crimp a twisted pair you will need:
- Two RJ-45 connectors.
- Special crimping scissors - crimper.
Let's consider a step-by-step algorithm for crimping a wire:
- One end of the twisted pair is stripped of external insulation using a crimper. To do this, insert it into the round hole of the scissors, about 1-5 cm, and remove the outer rubber layer of the wire. This action is similar to stripping insulation from electrical wiring.
- We unravel and align the wires according to the switching diagram. Align the wires in length. It is important that each wire is the same size. Then carefully insert the wires into the 8 micro-holes on the crimper and remove the insulation from them.
- We insert the bare wires according to the color scheme into the patch cord. At the same time, do not forget about the pinout of the connector. We check again that each core is in its proper contact. It is important that several wires do not go onto one pin!
- Carefully install the connector into the rectangular hole of the crimper and squeeze the handles of the scissors.
- We take out the crimped wire.
This is the correct way to crimp the cable. However, there are also homemade methods for installing the connector.
How to crimp a twisted pair cable without a crimper
Not every home has crimping scissors. It is, rather, a professional tool that does not find its way into everyday life. Most often, their crimper is at hand, so you have to work with what you have in the house.
So, for home installation of an RJ-45 connector we will need:
- Sharp knife.
- Small straight screwdriver.
The sequence of actions is exactly the same as when working with crimping scissors. Only removing all the insulation from the wires will be done with a knife, and clamping the wires with a screwdriver.
It is necessary to very carefully press each wire in the connector. To do this, it is best to fix the patch cord in a vice and hold the twisted pair with your free hand. The core is clamped with a copper pin tongue. It is secured with a small screwdriver.
Checking the connection
It is worth checking all patch cords for reliability. There are three main ways:
- Connecting the finished wire to the network to check its functionality. At the same time, the data transfer speed and network response are checked.
- Checking the wire for bending and rolling. In this case, the connector is slightly bent from the wire or rocked from side to side. A properly crimped twisted pair will prevent the patch cord from dangling, the connector will not bend too much, and all wire strands will remain in place.
- Check with a multimeter. One of the most reliable methods that can be used as a diagnostic method for the entire cable. Ringing each core of the same color from both ends of the twisted pair will allow you to determine whether the wire is broken, as well as the quality of signal transmission on it based on the resistance of the wire.
The listed methods allow you to fully evaluate the quality of switching.
Having dealt with twisted pair crimping, let's move on to the main topic of the article - connecting a socket to a twisted pair cable.
How to connect an internet outlet
Well guys, remember, I wrote about sockets behind the TV. there were three of them - an ordinary electric one, for an antenna, and the last one was the Internet, which is very popular nowadays. I already wrote about the first two, just follow the links, but about the last one, “tailored” for computers, I somehow kept putting it off. Today I want to correct this injustice and post complete instructions for connecting. I have a LEZARD socket, but it will be useful for everyone to look at it, because the principle is the same for everyone. As usual there will be photo and video instructions. So bookmark it...
First, let's look at the Internet outlet itself. This is a plastic type that fits into a regular socket box. but it connects to an Internet cable, that is, there are no electrical wires there.
On the outside of this socket there is a connector for an RJ45 connector, which is where we then insert the wire from the network card of a computer, laptop or TV (SMART TV). Hangs on the wall to hide wires (which are embedded in the wall) and make it more aesthetically pleasing. Everything is hidden, everything is beautiful - this is the main purpose. I think now it becomes clear why it is needed!
Types and types of Internet outlets
To understand what type of sockets we need to use in this or that case, we need to understand the general classification of sockets for the RJ-45 connector.
But first, RJ-45 is a unified standard for physically connecting computers and network switches using standard 8-core shielded wire, often called “twisted pair.”
Because by making a cross section of the cable, you can easily see 4 intertwined pairs of wires. This type of wire is used to build the vast majority of information transmission channels in local and public networks.
You may also be interested in information about the types of Internet cables and recommendations for selection.
Countless local and corporate networks, as well as the wired part of the Internet, have been built based on the RJ-45 interface. This is a generally accepted connector standard for transmitting data over a network.
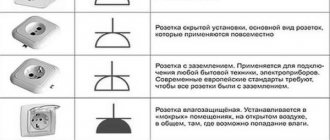
Experts suggest the following classification of sockets:
- By the number of connectors. There are single, double and terminal sockets with 4-8 connectors. In addition, there is also a separate type of combined sockets. Such modules may contain additional types of interfaces, including audio, USB, HDMI, and RJ-45 itself.
- By data transfer speed. There are many varieties and categories, the main ones being category 3 - data transfer speeds up to 100 Mbit/s, category 5e - up to 1000 Mbit/s and category 6 - up to 10 Gbit/s over a distance of up to 55 meters.
- According to the principle of fastening. By analogy with power electrical installation products, there are internal and overhead computer sockets. For an internal socket, the mechanism (contact group of terminals) is recessed into the wall, while for an external socket it is laid along the surface of the wall.
For a socket with hidden wiring laid in the wall, it is necessary to have a protective plastic “cup” in the wall where the terminal block is attached. An external socket is usually mounted using an overhead panel on the wall surface.
As for manufacturers: there are many of them, domestic and foreign. Recently, “Chinese” companies producing network equipment have begun to “even out” in terms of the quality of finished products relative to others.
The products are clearly distinguished by their high quality from such world brands as Digitus, Legrand, VIKO, etc.
It is worth mentioning separately about “keystones”.
The peculiarity of keystones is that with their help you can provide almost every computer with any set of interfaces. Recently, HDMI keystones have become widespread.
This is a modular architecture for placing individual “stones” - modular connectors for a variety of audio, video, telephone, optical, Mini-DIN and other interfaces, including RJ-45 on one standard panel of the socket block.
This is a fairly flexible and scalable system for providing interfaces to the end user.
Possible problems and how to fix them
Now let's look at the most common problems.
Incorrect wire connection
If you have connected the wires incorrectly, then either your Internet will work too slowly (about 10 times slower than it should) or will not work at all. Incorrect connection of wires can be corrected only by dismantling the socket:
- Remove the decorative and front panels, pull out the terminal block.
- Open the cover and carefully check that the wires are in their proper places. It is very easy to confuse the connection according to marking A with marking B and connect half of the cores according to one standard, and half according to another.
- Correct the connection if necessary.
The wires were cut before the latch closed
If, after thinking about it, you accidentally cut off the wires before you pressed them with the clamp, that’s okay. You need:
- Remove the wires from the socket.
- Strip the cable a couple of centimeters higher.
- Redistribute the cores as required.
- Close the cover/lock.
- Cut off excess pieces of wire.
You will only lose a couple of centimeters of cable - in most cases this is not a critical loss.
Too much cleared
If you strip the cable too far, the exposed strands may eventually become dangerous and break. You can improve the situation in two ways. The first one will require you to sacrifice the purified “surplus”:
- Pull the wires to the contacts so that the cable winding ends right at the entrance to the terminal block.
- Arrange the wires as needed.
- Close the lid and cut off any protruding wires. The ends will be long - exactly the same as how much extra cable stripping you did.
If you can’t say goodbye to precious centimeters of cable, then buy heat-shrinkable tubing. It is inexpensive and consists of a hollow tube made of thin plastic:
- Cut off as much tube as needed.
- Insert the cleaned wires into the tube.
- Heat the tube with a hair dryer (even a household hair dryer will do). Under the influence of heat, the tube will shrink and fit snugly against the wires.
Heat-shrink tubing is a useful household item; buy more at once.
Connecting an Internet outlet is not as difficult as it might seem. Fortunately, each outlet comes with instructions and clear markings.
Errors when connecting an Internet outlet
1
You can easily confuse the order of the wires on the connector and in the socket itself. Roughly speaking, turn them 180 degrees.
Here everything is checked by a more careful study of the inscriptions on the body of the socket and the color of the wires themselves. A tester with a signal generator and receiver is a good helper for identifying such errors.
If the wires are connected incorrectly, the lights on the tester will light up not in order from 1 to 8, but in random patterns. For example, first 1, then immediately 3, then 2, etc.
2
That is, immediately after placing them in their places in the slot. In this case, the core may accidentally fall out, and it will not be possible to insert it back after being cut. You will have to clean everything out again and go through the entire connection cycle again.
And if you left the supply of cable in the installation box small, then you will face a big headache.
3
As mentioned earlier, the result here is a deterioration in the speed and quality of the signal. Moreover, there is no need to first unravel the twisted pairs to the point where the insulation is cut, especially with a screwdriver. Simply embroider them by spreading the strands to the required length to fit them into the slots.
According to the standard, it is not allowed to unwind the twisted pair by more than 13mm, otherwise crosstalk errors will appear in frequency response tests. In practice, problems will begin when the network is loaded with traffic.
Sources - https://cable.ru, Kabel.RF
Assembling a socket for an Internet network
The installation process for computer sockets from different manufacturers differs only in details.
Preparatory work
- First of all, electrical wiring is laid to the point where the router will be connected.
- After this, a niche for the socket box is prepared. Any one will do, even from a regular outlet. To drill a hole, a hammer drill with a special attachment is used.
- Next, the finished niche is cleaned of dirt, and a socket box is installed in it on plaster.
Preparatory work begins with the installation of a socket box
Connection diagrams
After disconnecting the terminal block, you can begin connecting the wiring:
- The entire cable is pushed through the back of the removable terminal block, after which the twisted pair is carefully stripped with a knife and straightened for connection.
- Next, the cores are connected to the terminal block in accordance with the cross-connection diagram shown on the housing. The color of each wire must match the existing color scheme. For high-speed Internet (if supported by the provider), the wires are connected to terminals 1–2 and 3–6. Information about the connection diagram is available from your Internet service provider.
- After determining the circuit, we proceed to connecting the cores of the Internet wire, directing them into the appropriate grooves. There is no need to strip the ends of the wires, because a high-quality connection is guaranteed by the mechanism of the internal contact pad itself.
All well-known brands of Internet sockets are available in two varieties:
- Internal installation. The box for the internal socket is walled into the wall. After connecting the wire, the electrical part is returned to it and closed with a plastic box.
- Outdoor installation. The socket box is screwed onto the wall. First the electrical part with the contact plate, the next stage is connecting the wires and installing the decorative box. The number of connection points on the case may be different - one or two.
The connection type for these two types of sockets is the same.
Installing a wall outlet
The plastic part of the Internet outlet is screwed to the wall - with the computer connector down, and the cable inlet up. Further actions are performed in the following sequence:
- The insulation is carefully stripped to 5–7 cm from the twisted pair.
- The conductor is inserted into a plastic clamp and secured in such a way that the stripped part is just below the clamp.
- The wires are brought to the microknives in the contact plate and pulled through them until they click. This sound means that the insulation has been cut and the wire is in place.
- Excess parts of the wires are cut off. Put the lid on and you're done.
Appearance of a disassembled wall-mounted Internet socket and contact pad markings
If there is no click, the wire is put in place with the blunt side of a knife or a thin screwdriver.
Eight wires are inserted into the contact pad according to the diagram
Video: connecting an internet wall socket
Installing an indoor outlet
- Absolutely all Internet sockets are equipped with a terminal block, to which twisted pairs are connected. To do this, you need to disconnect the terminal block from the plastic part of the socket. There is a special white retainer for this - a locking ring. It is turned counterclockwise until the removable segment is disconnected. Nothing is removed from the stationary terminal block. The twisted pair is routed into a ring on the plate.
- Next, the cores are connected to the terminal block according to the diagram.
- The retaining ring is turned clockwise so that the clamp clamps the wires tightly.
- Then the terminal block is inserted into the main part and covered with the front panel.
- All that remains is to check whether the connection was made correctly. To do this, connect a modem or other device to the outlet. If everything is in order and the device is working, it means that the manipulations were carried out efficiently.
If you understand the connection principle, it will be easy to understand any model of computer outlet. By following the instructions, you can not only connect the Internet yourself, but also increase the length of the twisted pair, move the computer to another location, and much more.
Installation Guide
Work on installing the rj-45 socket is carried out in the following sequence:
The cable is being laid and the installation box is being installed. All these operations must be done in exactly the same way as when installing a regular electrical outlet.
Particular attention should be paid to ensuring that the network cable is reliably protected from mechanical damage. If a surface-mounted computer socket is installed, then staples or screws must be used. The cable is laid in special protective boxes. Connecting wires
The mentioned connection standards (T568B or T568A) do not pose any difficulty in their technical implementation and differ from each other only in the order of connecting the conductors. You can determine by what scheme they need to be connected simply by looking at how the contacts on the Ethernet plug are crimped on the side of the router that is used to access the Internet.
In order to make a connection, the twisted pair must be cleared of insulation by 2-3 cm, and the conductive wires by 0.5 cm. Each terminal has a color and digital marking that corresponds to a specific wire. Using this marking, you must insert each twisted pair wire into its corresponding socket.
- In some models, there is no need to pre-stripe the wires, since the required connection quality is ensured by the socket mechanism itself.
- The Rj45 with connected wires is fixed in the socket box, after which the front cover is installed.
If any problems arise when you subsequently connect your computer to the Internet through such an outlet, you should check that the wires are connected correctly to the contact terminals.
Connection nuances
There are grooves and stickers on the back cover of the Internet socket that indicate which circuit the device can be connected to. There are two connection schemes - A and B. Which type to use depends on how the equipment is connected to each other.
Today, almost all network structures independently recognize the connection scheme used and, if necessary, adapt to it. But the network outlet to which you need to connect the mechanism to access the Internet is best installed by connecting the wires of diagram B.
According to the diagram, you need to place twisted pair wires of a certain color into the grooves of the cover of the corresponding color.
Then return the lid to its original place. As soon as the cover has taken its place, you should close the white latch. To do this, it turns counterclockwise. It should be noted that incorrect installation of the cover is completely excluded, since the device has special elements that are mirrored on the connector (protrusion and groove). Therefore, it is impossible to install the elements incorrectly.
But the question arises: how is the Internet socket connected to the cable, since the insulation from the cores was not removed? This is considered the main difference between a network socket and other electrical installation structures. The pads with contacts in a computer socket are two sharpened plates. They are arranged so that the distance between them is equal to the cross-section of the double copper core.
Thus, the cover with all the inserted wires is placed in its original place, and these blades cut through the insulation of the twisted pair and come into contact with the cores that conduct current. This connection is reliable. It guarantees uninterrupted stable operation of electronic structures. In this case, the work will be carried out without unnecessary losses.
Then you should make sure that the installation of the cores is carried out correctly and cut off the excess ends of the twisted pair that stick out. The main thing is not to allow any cables to accidentally short-circuit with each other.
All that remains is to install the Internet socket in the socket box and secure the front panel. Once connected to the network, you can check the result. You can install and connect any network device yourself using this method. Even if the contact groups in them are different, the meaning will not change.
For example, there is a socket mechanism that is connected manually. That is, each twisted pair cord is squeezed into a specific terminal according to the number and color marking of the wire, as shown in the photo below. This is a little more complicated and longer than installing a Legrand series internet outlet. But the technology of how to install and connect the device remains unchanged: the cores fall into the hole between the pointed plates and touch the core, which carries the current.
Important! Before connecting the cable, you should call your Internet provider and find out what connection scheme is used in the apartment. Finally, we recommend watching a video that clearly demonstrates all the installation stages of not only the Legrand socket in question, but also products from other popular companies:
Finally, we recommend watching a video that clearly demonstrates all the installation stages of not only the Legrand socket in question, but also products from other popular companies:
Now you know how to install and connect an Internet outlet with your own hands. We hope that the provided diagrams, video and photo examples were useful to you in your own electrical installation!
You probably don't know:
- How to hide wires from a computer
- How to connect a TV socket
- How to strip insulation from a wire
Connection errors
If, when checking the connection, there is no connection, it is possible that errors were made during the installation or connection of the twisted pair. Such cases include:
- For self-installation, type “B” is used, and the connector and modem were purchased already assembled. If you do not check the type of connection, it may turn out that the socket is connected to one type, and the wire to another - type “A”. Because of this, the connection will not occur. You need to look at how the connector is crossed, and then do the pinouts of the twisted pair.
- While installing the twisted pair into the terminals, an attempt to strip it with a knife damaged the wire sheath. In order to ensure switching, it is necessary to insert the contacts into the grooves and make the correct crimp.
- The wire was left too long. To connect the Internet socket, you need to leave no more than 20 cm. If the wire is left at 30-40 cm, the socket will dangle and you will have to shorten it. And to do this, you will have to repeat the entire installation procedure again.
- During installation, everything was done correctly, but the socket still does not work. This means, most likely, that a non-working device with a manufacturing defect was purchased. There are many well-known manufacturers of Internet sockets on the market who guarantee the quality of their products. Therefore, it is better to purchase such sockets.
Connecting the socket to the cable
When connecting, the computer socket must be connected to the cable in such a way that inadvertent loss of the conductor from the clamping contact is completely prevented. To do this, you must correctly connect the device to the high-speed cable. The connection is made using a special plug. The plug should be of the required size; the thickness of the tool tip should not exceed the diameter of the wire.
The cable installation is carried out in the following sequence:
- Each twisted pair must be slightly unraveled.
- The wires are inserted into the mount according to the pinout.
- Using a plug, each wire is pressed into the clamp.
Some installers, in order to save money, use a slotted screwdriver of the appropriate size instead of a special plug. But this method is artisanal, sometimes leading to wire breakage or weakening of the clamp contacts. Although there is also a place to live.
When connecting the cable, there is no need to strip the wires. The knives that are built into the connector clamp reliably cut through the insulating shell.
Types of telephone sockets
When considering different types of such devices, one of the main classifications is their division according to the installation method:
- Devices for external installation.
- Devices with internal wiring.
A secondary classification, applicable to both types, is the division of these devices according to the number of available connectors:
- Single-connector models are designed to connect 1 device and are the most popular option for installation in private homes or residential apartments.
- Multi-connector models allow you to connect several different devices at once; they are most often found in offices and office premises.
Also, on the modern market there are sockets with different connectors.
RTShK-4
This parameter is determined by the type of standard used:
- RJ-11 is one of the most common options; it implies the presence of 2 conductors in the design. Such devices are most often found and are recommended for installation if there is a line-type telephone line to which the device is connected.
- RJ-12 is less common because it is rarely used for domestic purposes. The main purpose is to connect to office mini-PBXs or a number of types of network cards.
- RJ-14 has 4 conductors and the same number of contacts. It is a universal connector designed and suitable for most modern models of telephone equipment. To connect and ensure the operation of one line, contacts 2 and 3 are used; if for some reason several lines are required, then the connection occurs through contacts 1 and 4. Surface-mounted sockets must use a green and red conductor, which are usually located in the center of the fixture.
- RJ-25 includes 3 pairs of working contacts in its design. Devices of this type are extremely complex and unsuitable for installation on your own. To carry out this process, you will need to hire a qualified specialist who understands electrical and telephony issues.
- RJ-9 is a special type of connector, the main task of which is to connect the handset directly to the device.
- RTShK 4 is a technically outdated type of sockets that were common in the USSR in the past; the design includes 4 wide contacts and a key. Designed for a specific connection option in a permanent way; for its implementation, the presence of a branch-type box is required. The presence of several telephone sockets within one room contributes to the creation of a special electrical circuit; an additional capacitor is required to complete it.
Regardless of the type of telephone socket, you will need to install a special type of power cable inside this device. The different options have no design differences; all plugs have similar dimensions and connectors, but they may differ in the number of contacts available.
https://youtube.com/watch?v=KY6Fbl3kaKY
Computer socket and its types
To connect computer equipment and any other peripheral equipment, use a computer socket of the RJ-45 standard. It complies with uniform communication norms and standards designed to automate most tasks.
The device includes a plastic case, inside of which one to four connectors are placed.
To organize a home network, devices equipped with one or two connectors are most often used. In devices with two connectors, the first is intended for connection to the data cable going to the computer, and the second is for connecting to the punch panel.
The cable transmitting information, called “twisted pair,” is simply inserted into the dedicated module with a contact. Through another twisted pair, information goes to the network.
Externally, the RJ45 computer connector is similar to the telephone analogue of the RJ11. But the main difference between the devices is the number of contacts. Telephone models have 4 contacts, and information models have 8 contacts. For this reason, although an RJ45 computer socket can be used as a telephone socket, it will no longer be possible to connect computer equipment to the RJ11 socket.
The sequence of work for installing most types of computer sockets is typical. You need to perform a number of almost similar steps:
Let's disassemble the device. Structurally, a computer socket is not much different from standard electrical installation equipment; it includes a mounting plate, a mechanism and a front part.
We connect the twisted pair cable to the computer outlet according to the diagram indicated on the device case.
Before connecting, strip 0.5 cm of insulation from the wires.
Having installed the edge of the wire, stripped of insulation, in its intended place, we secure it with a spring device.
We cover the terminal with the connected twisted pair cable with a metal cover, which is used as additional protection for the connections.
Let's fix the body of the Internet socket to the wall using fasteners that match the wall material.
We fix the container with the Internet socket mechanism in the housing by tightening the screws into the complementary holes.
We fix the part of the front panel that hides the socket terminal and serves as a guide for the plug.
We check the functionality of the power outlet, test the quality of the connection and signal.
What will you need for crimping?
Multimeter - to check the quality of crimping.
Video lesson: crimping an RJ connector Thanks to the advent of the Internet, many problems can be solved quite quickly, especially after watching videos. Stripper is a special hand tool for stripping insulation from conductors.
Almost all modern local networks use an RJ connector for connections.
Color scheme for crimping RJ 8P8C utp twisted pair cable computer - hub during repair If, when checking the twisted pair cable, a break or short circuit is detected in the orange or green twisted pair, and the blue and brown ones are working, then you can do without replacing the cable. To crimp such a cable, special RJ connectors are used. Their peculiarity is that you can connect more than one computer to one socket.
How to properly connect the Internet cable to an outlet. Connection diagram for RJ 45
The protective insulation is removed from the cable by about a cm. Cables are divided into two types: shielded and unshielded and are designated as follows: Color schemes for crimping in an RJ plug There are several schematic solutions for crimping twisted pair cables, which will be discussed below using the example of an Internet cable, used to build LAN and DSL networks.
This connection method has become somewhat less widespread. You can also connect a ready-made patch cord to the equipment and check whether all packages are received. There is no need to strip thin wires.
Connecting Legrand Internet sockets with a cable (diagram)
In order to do this, you first need to unravel the wires and align them, and then lay them side by side in the correct sequence and press them together as tightly as possible. Cross crimping tool, used when connecting sockets, patch panels, etc.
Its length is left sufficient to carry out the necessary work. Moreover, such specialists will charge a considerable amount for this. This type of connection was demonstrated in Figure 12 V. How to connect two routers to the same network using a cable
We connect the RG-45 internet wall socket
When you open the lid, you will see a diagram for connecting the Internet outlet. At least, conscientious manufacturers and more expensive options definitely have it.
First, you need to vertically attach the case to the wall so that the network cable comes in from the top and the RG-45 connector is plugged in from the bottom. Although this condition is optional, if it is more convenient and beautiful for you to position the body horizontally, then do so.
We connect the RG 45 socket with the wire:
- Once you have installed the chassis, grab the edge of the twisted pair cable and cut off 4-6 cm of protective insulation. Be careful not to damage the wires.
- Twisted wires in pairs, untwist and align. Next, take one core at a time and insert it with force into the slot, adhering to the color scheme of the connection. If you can’t do this with your hands, then take a knife or screwdriver to help. Place one core into the slot and press it with a knife. The core should drop a few millimeters into the slot. In the photo below you see an example.
- After inserting all the wires into the slots, bite off the excess length of each wire.
- Done, close the lid.
Two options for connecting any RG45 internet socket
As you can see, connecting the external socket rj 45 turned out to be quite easy. This procedure can be performed by anyone, spending 10-15 minutes. If you don't succeed the first time, don't despair, try again.
Installation of the socket block
Internal sockets can be single or double. But if you need to place an internal socket with three or more sockets in one place, then you need to use an outlet block.
The socket block is a special single sockets that are combined into a single structure by a common frame.
A separate socket box is installed for each socket of the block.
The power cable is connected to only one socket in the block, and the rest are powered by jumpers. Connection diagram for the socket block
Below is a photo of the socket boxes in plasterboard for installing the socket block. In adjacent socket boxes, remove adjacent plugs for cable routing:
The photo below shows an example of a Sedna socket for a socket block:
And this is what the frame for a socket block with four sockets looks like:
As mentioned above, to connect the sockets in the block, jumpers from the cable cores are used:
Jumpers - phase, neutral and grounding for connecting sockets in the block.
Places for connecting cable cores in a socket:
An example of connecting sockets in a block. The power cable goes to the first socket, and the 2nd, 3rd and 4th are connected by jumpers:
All sockets are installed and connected:
Installation of the front panels of sockets and the frame is completed: