Design and principle of operation
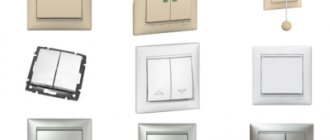
Wireless wall switch
The contactless type switch is equipped with two working units - a transmitter and a receiver.
Receiver Features
The receiver is a radio-controlled relay that picks up the signal and closes the galvanic circuit. The mechanism is installed next to the lighting fixture or within the coverage area of the transmitter. For control, you use a remote control, radio waves, or a smartphone or tablet application that works with Wi-Fi.
The receiver can be mounted in a suspended ceiling, chandelier, floor lamp, sconce, distribution box.
Specifics of transmitter operation
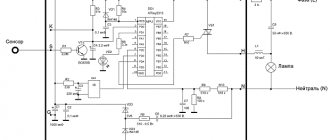
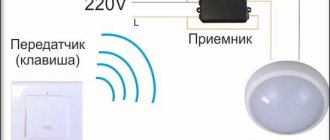
Operating principle of a wireless switch
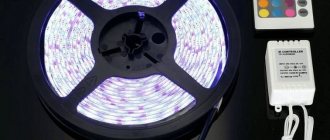
The device operates without being plugged into the mains and is compatible with LEDs and incandescent lamps. Budget models use a battery, while “advanced” ones use a generator that generates current when you press a button. The resulting energy pulse is transformed into a radio signal. The receiver picks it up. Battery-powered models require charging as they run down.
Commands to the module come from the control panel, from the phone via Wi-Fi or Bluetooth. The signal coverage area varies from 20 to 350 meters. If there is a dimmer, the user adjusts the level of illumination and brightness. Just press and hold the operating key.
You can control 8 gadgets through one remote control.
Main manufacturers of touch controllers for room illumination
When purchasing modern electronic switches, you need to check whether they work correctly with different lighting devices. If the switching unit copes with LEDs and fluorescent structures, then incandescent and halogen lamps will be freely controlled by it.
Suntruth Electrical from China produces devices that are designed to replace and install them in place of outdated contact switches. They are convenient for women in the kitchen in the form of additional lighting. Convenience lies in the fact that the unit is controlled by moving the finger of a hand that may be wet or dirty during the cooking process.
Photos of touch switches from most companies, such as Berker, Jung, Livolo, Steinel, show that they have abandoned the production of capacitive devices. The reorientation occurred to free-standing switches with infrared sensors operating on thermal radiation with a wavelength of up to 9 nm.
Switches of the Delta reflex model from Siemens are universal designs that can be mounted on a wall, ceiling and even outdoors. A highly sensitive pyroelectric element, divided into segments, perceives photons through an optical lens. As soon as a moving person enters the area of effect of the rays, a pyrodetector is triggered, which generates an electrical signal. It is amplified and the switch turns on the lamp.
Popular German electrical companies Steinel and Osram produce detectors to replace old systems and stand-alone products. The operating principle of the sensor has an original design based on scanning objects with radiation in the optical range. When an object enters the action zone, the light turns on and vice versa.
Using the example of a Livolo product, you can consider the marking of sensor devices of the VL C701R series. VL – company name. Latin letters with the first numbers C6 or C7 indicate the model. A two-digit number - 01, 02, 03, indicates the number of lighting groups. The radio-controlled model is listed under the letter R; dimmer – D; pass-through switch – S; timer - T.
You can buy a touch-sensitive light switch in specialized stores.
Wireless Device Specifications
A wireless light switch, regardless of the brand, has the following main characteristics:
- control using buttons, sensors or remote control;
- presence or absence of light intensity adjustment;
- number of devices in the system (from 1 to 8);
- range of action – from 10 m standard, 15-20 m in the presence of a concrete wall, 100-150 m in line-of-sight mode;
- autonomy - runs on batteries or from a mini-generator.
Budget modifications have all the listed functions. Advanced gadgets are equipped with several options:
- delayed start - they do not start working immediately, but at the moment of leaving the room;
- multi-channel – control of several switches within one building;
- presence of a touch panel - touch activation;
- signal reception via Wi-Fi – signals are sent from a smartphone, computer, tablet.
The more functions, the more expensive the switch.
Keep it simple: smart light bulbs and plugs
Replacing old light bulbs with new smart ones may seem like an easy task.
- Smart Bulb: With smart bulbs, you can control your lights remotely using your smartphone and even change the color of the lights if you want to enhance the ambiance for an evening barbecue or pool party.
- Smart Plug: If you choose a smart plug, you'll simply transform your existing lighting so you can turn it on and off from anywhere using your smartphone. Smart plugs have a Wi-Fi chip that allows them to communicate directly with your router and Wi-Fi network. Some smart plugs also allow you to track your energy consumption. You can also use IFTTT (If This, Then That) applets to allow your smart plug to receive instructions from other devices in your home.
The main benefit of this elemental approach to smart lighting is that it's all about connectivity and play with a very low barrier to entry. If you don't like the new setting, you won't have much to lose.
On the other hand, you need to make sure that the lamps you have in mind will fit into your existing lighting fixtures. As a rule of thumb, most smart light bulbs have an A-shaped lamp block and an E-shaped base. If you have more exotic accessories, such as candelabra, smart light bulbs may not be the right choice for you.
However, if you want to make a real impact with smart lighting, smart switches offer you a huge selection.
Types of wireless switches
Touch wireless switch
Wireless light switches are classified according to several parameters.
According to the control method, there are models:
- with control of the lighting system by mechanical buttons;
- with touch control: switching is carried out with fingers, the human body changes the electrostatic field of the capacitor, which triggers the switching circuit; touch models are designed for 100 thousand cycles;
- with a two-button remote control: after holding the button for 0.1-1 seconds, digital signals are sent to the switch, one button is for turning on and adjusting the brightness, the second is for turning off and reducing the light intensity;
- with Wi-Fi sensors: operating principle – the appearance of a pulse after a command from a remote device, the signal frequency is 2.4-5 GHz.
Classification is also made:
- By the number of channels in the system. The remote device can control from 1 to 8 groups of lamps, regardless of the number of bulbs. A multi-channel gadget allows you to adjust the lighting in an apartment or house, but remembers the address of “its” bitrate, i.e. remote control
- By the presence of a dimmer. There is no smooth adjustment in budget models. Smart switches with dimmers can turn off and activate light bulbs, adjust the intensity and brightness of the light output.
The contactless device receives a signal through furniture, walls, and interior items.
Varieties
Wireless switches are not very diverse, but there is still a certain selection.
They are classified according to three main characteristics:
- By type of control;
- If possible, regulate the level of illumination;
- By the number of lighting devices they control.
Taking into account the classification mentioned above, the following types of wireless switches can be distinguished:
- With a delay function to ensure the lamp stays on for a certain amount of time. This option allows, for example, to walk to the bed while the light is on, after which the room is plunged into darkness.
- With the ability to configure multiple channels. In this case, it is possible to turn on several products simultaneously.
- Sensory. To turn the lighting on/off, just touch the panel.
- Wireless (with the ability to control over a Wi-Fi network) or radio controlled.
Areas of use
If desired, you can install wireless switches with a remote control.
It is advisable to operate a contactless switch in several situations:
- Transferring an old device. If you have bulky furniture, the device can be installed on a wall, in a closet, or on a mirror.
- Elimination of installation errors. During the process of transferring the power line, wall chipping is eliminated. It is enough to connect the device with or without a remote control.
- Small room. Wireless devices are overhead, so there is no need to lay a cable. The device will fit on a coffee table, cabinet, chest of drawers, or bar counter.
- Ensuring the comfort of using electrical appliances. The contactless system takes up minimal space, is easy to operate and is technologically advanced.
- Accommodation in a wooden house. When installing hidden wiring, you must comply with safety requirements, and an open network is susceptible to mechanical damage. Connecting remote gadgets will be an economical and simple solution.
- Lighting control in several rooms. A small device with a remote control allows you to control light sources from 2-3 zones.
- The need for additional switching devices. Switches are installed after construction is completed without disturbing the finishing and communications.
- Turning lights on and off over a long distance. Laying the cable is expensive, and the radio switch, depending on the model, has a range of up to 350 m.
- Preservation of the design concept. If it is impossible to install switches in a niche or overhead, a wireless device will complement any interior style.
Wireless miniature light source switches are an alternative to traditional mechanisms due to ease of installation and control.
Switch with timer
These models operate differently than time-delay circuit breakers. In fact, they are a combination of a classic switch and a programmer (today, electronic). These smart home switches allow you to automatically turn on and off the light source at a specified time. This applies, for example, to illuminated building number signs or lamps in the general area of the building.
This type of switch can also be used to switch between day and night lighting, such as those used in shops or service points. Many devices of this type also have a built-in classic surface-mounted light switch. So, in addition to automatic control, you can also start the lighting manually.
Of course, they are rarely used in residential areas. However, they are quite useful for office or industrial premises.
Pros and cons
There is no need to chip the walls.
Devices that remotely control lighting have advantages and disadvantages. The advantages of their use include:
- ease of self-installation;
- no need for wall slitting or cable laying;
- convenient control of all lighting systems using a remote control or from a smartphone;
- large range of signal transmission and reception;
- no risk of electric shock;
- safety for children.
Among the disadvantages of wireless modules are their high cost compared to wired modifications, dependence on the stability of Wi-Fi, and the impossibility of using them with a low battery.
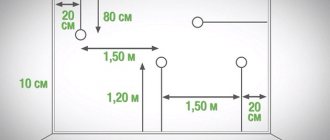
General connection diagram for the remote lighting control system
as follows
In the diagram, the colors of the conductors correspond to the color marking of the wires of the UNIEL receiver.
In our case, to implement remote control of the LED strip from the remote control, the connection diagram looks like this:
Let's start connecting the wires according to this diagram.
First of all, we connect all the necessary wires to the power supply of the LED strip.
From the remote control receiver, take the black outer wire marked “common line” and connect it to the “N” terminal - zero on the power supply, and connect the white wire marked “Group A” to the phase terminal “L”.
More information about the meaning of these markings is written in my article - “Designation L and N in electrical engineering”
Now let's move on to connecting the power cable. As you remember, we decided to connect to the cable that goes to the group of sockets. Turn off the voltage in the electrical panel and proceed with installation.
We remove the protective outer insulation from the cable just enough to make the connection convenient. For greater reliability, it was decided not to break the cable, but to remove the insulation and prepare the cores as follows:
Let me remind you that the power cable consists of three cores:
White - Phase
White-blue – Zero
Yellow-green – Grounding
If you are not sure about the color coding of the wires on the cable, you can independently identify phase, neutral and ground using the following instructions - here.
We connect the white wire - phase - to the red wire marked “off” of the remote lighting control receiver, and the white-blue wire - zero to the remaining black wire.
To ensure reliable connection, cable lugs were placed on this pair of wires. After which, the connections are pressed.
In addition, the connections were tightened with control screw terminals.
Then everything is securely insulated.
All that remains is to connect the yellow-green ground wire to the corresponding terminal of the LED strip power supply. We also do this without breaking.
Fortunately, the screw terminal on the power supply allows this.
Now you can check how the light control from the remote control works. If instead of the LED strip power supply we connected a lamp - a chandelier or sconce, they would already be fully operational. In the meantime, having turned on the electricity supply, we can only monitor the operation of the power supply using the green LED indicator.
You will find detailed instructions for installing LED lighting in a niche for curtains here. Now I will quite briefly describe the general procedure for connecting and installing the LED strip.
To connect the LED strip to the power supply, we lay a two-core cable to the installation location of the strip. We connect one of the cores to the “V+” terminal of the power supply, and the other to the “V-” terminal. In our case, a ShVVP 2x0.5 cable was used for connection, the blue wire of which is connected to the minus “V-”, and the brown wire to the plus “V+”. Then, in the same order, the LED strip is connected from the other end.
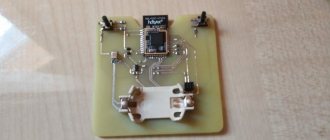
All equipment after connection looks something like this:
Now the installation is completely completed and you can check how the light control from the remote control works. Button “A” on the remote control is our backlight; pressing once, the lighting comes on, pressing again, it goes out.
The customer refused to install the holder for the remote control somewhere; he decided that it would be more convenient for him if the remote control just lay on the coffee table.
At this point, the connection is complete, now you can control the LED lighting of the curtain niche from the remote control, turning it on or off when required. At the same time, the operating modes of other lighting groups, as well as the rest of the apartment’s electrical network, have not changed in any way. And this is for only 859 rudders (the cost of a remote control light control kit).
Agree, a very good solution and this is far from the only possible way to use light control systems with remote control. If you wish, you can control all the lights in the apartment from the remote control, and in addition, you can close the curtains or blinds, turn on music or ventilation and much more, fortunately, there are a lot of models of remote control systems, with different capabilities and characteristics.
Contactless module selection options
Control can be done using a remote control, which for convenience is made in the form of a key fob.
Before purchasing a contactless limit switch, you must pay attention to the following characteristics:
- block type - the external one can be installed in place of the standard device, the internal one is mounted after removing the chandelier;
- layout - the kit includes a remote control, charging, and rarely a battery and holder;
- features of lighting lamps - the devices are compatible with LEDs, halogens and incandescent bulbs;
- operating frequency – ranges from 2.2 to 5 GHz, which determines the quality of signal reception and transmission;
- range of action – budget models operate at a distance of 10 m, luxury models – at a distance from 100 to 350 m;
- power – contactless equipment has a maximum load limit of 1000 W, but you need to select a power unit with a power 20% more than declared;
- number of clicks – the battery runs out after 10-20 touches, the sensor is designed for the number of touches up to 100 thousand;
- current rating – from 6 to 16 A;
- number of channels - modern devices receive signals from 1-8 sources.
Important characteristics are also the case material, the presence of a coding system, the permissible temperature range of use and the method of fastening.
Important characteristics for choosing a circuit breaker
When purchasing a device, it is recommended to pay attention to the following parameters:
- type of lamps in the lighting system;
- operating voltage indicator;
- material from which the body is made;
- number of channels;
- signal coverage area;
- operating frequency range;
- presence of encoding;
- signal transmission method;
- type of power supply;
- greatest load;
- current rating;
- permissible operating temperatures;
- dimensions;
- time required to replace the battery;
- method of fixing the device;
- device configuration;
- price.
Popular manufacturers
There are several modifications of contactless sockets and switches on the Russian market. It is advisable to consider products from popular brands.
Feron
Remote switch Feron TM75 23344
The following models are relevant in apartments and private houses:
- TM-75. Plastic switch with adjustable start delay for a 220 V network. Equipped with 20 channels. Included is a remote control.
- TM72. A remote control is used for control; devices are connected to 2 channels with a capacity of up to 1 kW for different light sources. Operation delay – 10-60 seconds.
Both devices have a coverage range of 30 m.
Inted
Several devices are produced:
- 220V. Single-key player with wall mounting (screws or double-sided tape) with a voltage of 20 V. Operating range - 50 m, amplified by a signal receiving unit. The case is plastic.
- 1-CH. Designed for lamps up to 900 W, controls light and alarm. It is made in the form of a key fob that transmits a signal over 100 m. It quickly fails in damp rooms.
The Inted 220V series also includes a model for two receivers with two channels.
BAS
A series of smart switches from BAS-IP
The inductive switch IP SH-74 has two independent channels. Controlled from a smartphone via a branded application. Compatible with incandescent bulbs up to 500 W and fluorescent lamps 200 W.
Smartbuy
Three-channel device with a power limit of 280 W and voltage of 220 V. Receives and transmits a signal from 30 m.
Z-Wave
8 devices are connected to the radio-controlled gadget. Power comes from two batteries. The maximum operating range is 75 m. The housing is moisture-resistant, with IP30 protection.
Nootechnics
Wireless switch NooLite
The Belarusian brand Nootekhnika nooLite has a line of products with programmable modes. They are activated using a multi-channel RGB controller. There is a dimmer to adjust the light.
The infrared model Sapphire-2503 is available with a dimmer, but is not suitable for energy-saving lamps. The lighting turns off some time after the user leaves the room. Load limit – from 40 to 400 W.
All devices are compact and easy to install.
How to choose a remote switch
When selecting a remote light switch, you need to pay attention to many different factors and parameters. Of course, first of all, do not forget that the interior design should be supported even in such small things as the light switch.
If you want to decide on the design of the switch in advance, before purchasing, evaluate the models by viewing photos of remote switches on the Internet.
The kit should always include instructions that will tell you how to connect the remote switch.
It is imperative that the price matches the quality of the model. To do this, it is better to choose well-known manufacturers of electrical equipment. If you are not well versed in this matter, be sure to consult at the point of sale.
And don’t skimp on quality; cheap models are unlikely to last you a long time, which is why it’s better to choose more expensive models. You can connect any of these switches with your own hands, since the current voltage is not high.
Just recently, remote switches were a novelty on the market, but now they are a modern and popular device that makes people's lives easier and more comfortable. If you have already decided to purchase such a switch, this article will tell you how to choose a remote switch.
Self-connection
Two-channel lighting control kit Zamel RZB-04
You can consider the features of connecting a contactless limit switch using the example of Zamel RZB-04. It is equipped with a two-channel receiver, a two-channel switch with 4 modes, and mounting brackets. The device has 5 operating modes:
- Inclusion. After the button is pressed in any position, the lamps light up or go out.
- Shutdown. Occurs when a key is pressed.
- Monostability. Operates in pressed button mode. After releasing it, the light will go out.
- Bistability. To turn on/off the light, successive pressings are used.
- Temporary mode. The pressed button starts the device for a short period.
Before using the device, please read the user manual.
Connection instructions
The best place to install the device is a passage room (corridor, hall), kitchen or bedroom.
The connection diagram depends on the number of channels. Single-channel ones are connected by breaking the phase cable connected to the luminaire and throwing the core onto the Lin and Lout terminals. Multichannels are installed like this:
- The power supply is turned off and the voltage is checked with an indicator screwdriver.
- The old switch mechanism is removed.
- Voltage is supplied, but only the phase is sent to the switch. It must be permanent, for which it is connected to one of the conductors with terminal blocks.
- The phase is thrown onto contact L without passing the wire through the devices.
- Zero is supplied to contact N using a wire from the distribution panel.
- It is better to connect to the OUT1 terminal with a phase wire directed to one or more light sources. The neutral is taken from the box or receiver.
- The phase that goes to the second group or one light source is supplied to the OUT2 contact. The neutral is taken from the shield or receiver.
- A pulse transmitter is attached to pin INT1, sending short signals. It will provide control from a remote control or a stationary switch.
- A pulse switch is connected to contact INT2 according to the diagram indicated in the previous paragraph.
At the final stage, the switch is connected and electricity is supplied.
Configuration and reprogramming technology
Programming the mode
First you need to select the operating mode of the system. By default, this is the standard functionality with the wireless switching up to turn on and down to turn off. To reprogram:
- Using a screwdriver, press the PROG button of device No. 2 and hold it until the red light comes on.
- Duplicate the action on the top of the radio switch button. Wait until the red light comes on.
- Press the lower part until the diode activates.
The remaining actions are performed according to a similar algorithm with the second key.
Switch Installation
The easiest way is to stick the switch to the wall with tape.
The package includes double-sided tape or dowels with self-tapping screws. When working with adhesive tape, the use of tools is eliminated and it is easier to adjust the position of the device. The tape is cut into 4 pieces, which are glued to the device.
After installation, a test lamp is installed and the system is checked. You need to move the button to the top and then to the bottom position. The start is indicated by a light indicator.
The installation location can be cabinet doors, a safe, or a gypsum plasterboard partition. The switch on the door can be installed at the level of a child's outstretched arm. The headboard, wall and floor will create additional comfort of use.
The portable light controller is easy to use due to its low weight and flat shape. The module is easily attached with double-sided tape. The presence of auxiliary functions, variability of range and number of channels will allow you to choose the appropriate model for an apartment, office or home.
Design and connection of the switch in the LED profile
The touch communicator consists of the following elements:
- shell (for built-in views, its role is played by a diffusing screen);
- sensitive element - spring, infrared sensor and receiver, motion sensor;
- switching circuit - signal to electrical converter.
LED strips and their breakers are designed for a voltage of 12–24 V, so they are connected to the network only through a power supply.
If the sensor is installed in a ready-made luminaire, the plug and diffuser are first removed. According to special markings, the tape is cut into 1–2 sections to make room for the switch.
You will need special connectors or low power soldering irons (25, 40 W) to connect the wires. Standard cable cross-section is 1.5 mm2. For illumination longer than 5 m, the calculation is performed individually.
First, the stripped and crimped wire strands connect the switch to the connector in front of the power supply, and then to the illuminator.
The markings will tell you how to easily connect the selected touch switch to the LED strip:
- VCC, GND - plus and minus that come from the power supply;
- LED+, LED- - go to diodes.
The adhesions are insulated with hot glue or heat shrink tubing. In the selected device, the working parts should occupy one side. If they are on different sides, the switch cannot be fixed in the profile. The location of the sensor is indicated by a blue LED. The tape together with the switch is fixed in an aluminum profile with double-sided tape, a protective panel is installed and secured with a plug.
Blocks and controllers
To turn devices on and off while at a distance, several devices are installed and connected. Some of them will be controlled by a person, others will run sensors and other devices.
The automatic control unit is activated by groups of lighting fixtures. It is connected to a specific group of products, and pressing a button signals that power needs to be supplied. There are blocks through which units can be turned on and off using the remote control. Each button of such a device is programmed to perform a specific action.