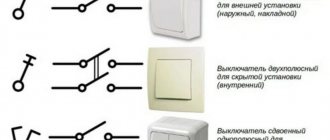
Frequent breakdowns
In practice, various types of breakdowns often occur:
- the LED lighting device does not work at all, neither from the remote control nor through the switch;
- Switching on via the remote control does not work;
- some commands sent from the remote control are not executed;
- a weak or dim glow is visible;
- blinking is observed;
- Clicking noises are heard when switching.
If these or similar breakdowns occur, you should try to figure out the cause of the breakdown and try to repair the LED chandelier with your own hands. Craftsmen who understand electricity can handle LED lighting.
The repair itself
Let's look at the repair of LED devices using the example of a chandelier. It is easiest to carry out work in a situation where there is a simple chandelier that is not equipped with a control panel. All such devices, as we have already found out earlier, are assembled according to the same principle. The circuit diagram of such devices always contains the following elements:
- LEDs. They can be combined into a compact bridge;
- capacitors (electrolytes);
- several resistors (resistance);
- coil with winding.
Let us remind you that this is the simplest operating diagram of an LED chandelier. The repair in this situation will look like this:
- remove the lamp from the ceiling;
- we disassemble it;
Disassembled LED chandelier
- Now you need to carefully examine the device board for visible defects in the driver, broken wires and other components of the electrical circuit. If there are no such defects, then this is considered a good sign;
- Now we remove the lampshade and study the appearance of the LED lamp or LEDs placed in the housing. The presence of burnt spots on the lamp base or the diodes themselves indicates their malfunction;
- If obvious signs of damage are detected (burnout of the driver, LED, broken wires, etc.), repairs involve either replacing the damaged element or soldering broken contacts.
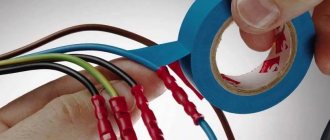
Also in this situation, you can carry out preventive work: tighten all the screws, repack all the terminal blocks, etc.
LED continuity
In addition, if the cause of the breakdown is not identified, then it is necessary to check the functionality of the LED circuit. To do this, carry out the following manipulations (the easiest way):
- fix the lamps;
- we supply power to it. It is best to use a separate power supply for 12 or 24 volt devices;
- You need to ring all the LEDs. For testing, you can use ordinary tweezers when connecting the lamp to the power supply. To do this, you need to alternately close the contacts on each diode using tweezers;
- the lamp will light up when a burnt-out LED is detected;
- Now all that remains is to replace the burnt out diode and return the chandelier to its place.
Block LEDs
Remember that replacing LEDs with a jumper is only possible if their number in the overall circuit is at least 10. Otherwise, the capacitor will be overloaded. In such a block type situation, the LEDs will simply burn out.
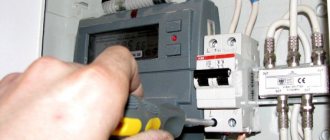
Radio receiver repair
Often, repairing LED chandeliers with a control panel comes down to replacing the device that receives the radio signal. Buying a new device is not a cheap pleasure. Therefore, you can try to fix the receiver:
- Remove the chandelier and take out the receiver;
- Make sure it is faulty. To do this, use a multimeter. If the voltage at the outputs is zero, then proceed to step 3;
- Look, are there any burnt marks? If so, you will have to buy a new receiver;
- If there are no signs of burning, check the capacitors. If the drive capacity is less than 1 microfarad, then replace it with a new one (in the photo the capacitors are indicated by the letters C with a number).
Advice! To repair a chandelier with a remote control yourself, requiring a minimum of financial costs, order spare parts for the lamp in a Chinese store. When buying LEDs in bulk (and there are dozens of them in a chandelier), the cost per unit drops to 60-70 kopecks. In an electrician's store, the same diode will cost 5 rubles. True, you will have to wait 2-3 weeks for the order to arrive by mail, but the result is worth it.
Breathing new life into a chandelier with a remote control is a simple task for a person familiar with the basics of electrical and radio engineering. Otherwise, it is better to seek help from a professional. And if the cost of repairs is comparable to the price of a new chandelier, it makes sense to think about buying a new lamp with a remote control.
How 220 V LED lamps work
It is known that LEDs cannot operate directly from a 220 V network. To do this, they need additional equipment, which, most often, fails. We'll talk about it today. Let's consider the LED driver circuit, without which the lighting device cannot operate. At the same time, we will conduct an educational program for those who do not understand anything about radio electronics.
The driver in the LED lamp does the main jobgauss 12w driver
The 220 V LED lamp driver circuit consists of:
- diode bridge;
- resistance;
- resistors.
The diode bridge serves to rectify the current (converts it from alternating to direct). On the graph it looks like cutting off a half-wave of a sine wave. Resistors limit the current, and capacitors store energy, increasing the frequency. Let's look at the operating principle of a 220 V LED lamp.
Features of the structure of controlled lamps
LED lamps, which can be controlled using a remote control, have appeared relatively recently. To make this possible, devices of this type received additional elements of their design.
Chandelier controlled by remote control
As we found out, a standard LED lamp (for example, a ceiling chandelier) consists of a driver, a regulator unit and a housing. The driver has terminal clamps (terminals). Power is supplied to them. From the regulator block in a simple chandelier, wires run to the lamps. The number of such wires, depending on the design of the device, can be from 1 to 12. In models of LED lamps operating from a control panel, an additional antenna is built into the design, as well as voltage regulators and units that automatically adjust the glow of the product. At the same time, several drivers, as well as various types of LEDs, can be located in raster lamp models. Remember that DIY inspection and repair of LED lamps depends entirely on their type.
LEDs or LED light bulbs?
Let's first find out what LED bulbs and LEDs are used in chandeliers, and how they are connected, before moving on to practical repair issues.
LED lamp and LED - is there a difference?
The difference is fundamental. Let's figure it out.
What LEDs are used in chandeliers
LEDs are single-color (in chandeliers, blue or white are usually used), two-color (red-blue), and multi-color (for example, red-blue-green). At the end of the article I will give links, you can see what is currently on sale. There is also a lot of background information there.
The supply voltage for single-color LEDs is 2..2.4 V (red, yellow, yellow-green, orange) or 3.0...3.6 V (white, cyan, green, magenta, pink). These two ranges are for LEDs of different colors; they have slightly different physical principles of operation. Accordingly, the brightness of the glow is very different.
Here is a reference table for voltages and other parameters of LEDs, taken from the seller’s website:
Table of LED parameters for chandeliers (and not only!) of different colors.
Forward current (If) of all models is 20 mA . This current is optimal in terms of the brightness/durability ratio. That is, the lower the current, the longer the LED will work. And the more current, the brighter.
I discussed this aspect in detail, in particular, in an article about installing an LED strip in a suspended ceiling.
Multi-color (multi-color) can be divided into two types, according to the method of switching colors:
- LEDs without control, with automatic color switching. Switching can be fast or slow, two or three colors.
- LEDs with control, when to turn on one color or another (2 or 3), you need to apply voltage to the desired output of the LED. Voltages, depending on the color, can be different - 2 or 3 Volts.
There are LEDs with a voltage of 5V. This mainly applies to two-color models. Then, the following driver is used:
RB Synchronous double controller – driver for serial LEDs 5 V
This driver says “RB Synchronous double controller” . The number of LEDs is 31-40 pcs, the voltage on each is 5 V. The inscriptions and parameters of such drivers will be discussed in more detail below.
To be honest, I haven’t quite figured out how to use such a driver. I assume that it is the same as the one discussed in the article, only the difference is in the forward voltage, which is not 3V, but 5V. Who can confirm or deny this - please write about your experience in the comments.
There is little specific information on the types of LEDs on the Internet, and it is difficult to use - after all, LEDs are transparent and do not have inscriptions. All that remains is to focus on the sellers’ descriptions (links will be at the end of the article). Or find out experimentally. Below, in the part about repairs, we will tell you how.
The chandeliers use LEDs with a transparent round body, diameter 5 (4.8) mm. Another feature is LEDs in chandeliers without a lens, with a shortened body, like a “straw hat”. They have a wide radiation pattern.
LEDs have wire leads for soldering. Although, in chandeliers they are never soldered, but inserted directly into the “mother” connector. The main thing is to maintain polarity.
LED light bulbs in chandeliers
99% of LED bulbs are 12 V AC or DC. Most often now you come across light bulbs with universal power supply, 12 VDC/VAC, which are powered by a 12 VAC electronic transformer. Such transformers (more precisely, voltage sources, or drivers) are much cheaper than those for direct current.
In this regard, it is possible to change halogen bulbs to LED bulbs without any modification at all. If the chandelier uses a transformer with an output voltage of 12 VAC.
LED light bulbs, as a rule, have a G4 connector (more precisely, a base), which was used in halogen lamps.
Why is “applied” in the past tense? Because halogens are now dying out.
Such a light bulb is shown in the photo above. If anyone doesn’t understand, the transparent little belly is on the left)
Parallel or serial connection?
In the comments, my readers often have a question: are the LEDs in the chandelier turned on in parallel or in series? Often, in order to answer this fundamental question, you need to find out what we are talking about - LEDs or LED light bulbs?
We can confidently say that the LED bulbs are switched on in parallel and are powered by a driver (voltage source) of a stable voltage of 12V. The same applies to halogen and any lamps. Not only in chandeliers, but always and everywhere.
Another thing is LED matrices, which are not used in chandeliers, but are mainly used in spotlights. The main thing for power supply there is a stable current.
My articles on the topic. Installation and repair of LED spotlights.
And something in between - a driver that turns alternating voltage into constant, without any stabilization of voltage and current. LEDs are connected in series to the output of such a driver; it is only important that the number of LEDs be within certain limits. These are exactly the ones used in chandeliers for sequential switching.
If you have come across a chandelier where LEDs were connected in parallel, share your experience in the comments. These are probably some special LEDs.
Okay, enough theory, now the fun part -
Types of breakdowns and their causes
To repair LED ceiling lights with your own hands, you need to study the main types of breakdowns and the factors that cause them.
If the remote control does not respond to touches far/near and it is not the batteries at all, the following reasons for the malfunction are possible: failure of the remote control due to clogged contacts that need to be cleaned with alcohol; dysfunction of a low-quality Chinese device, requiring its complete replacement; poor operation of the device relay.
If the remote control works on the third or fifth attempt, and responds to touches only close, then the problem is a bad relay that needs to be replaced, an interruption in the LED loop as a result of missing contact or its melting. The reason may also be a breakdown of the lamp control unit. Often, repairing chandeliers with a remote control is limited to installing better batteries.
A stationary switch fails as a result of oxidation of wires, malfunction of the transformer, incorrectly selected electrical circuit, regular surges in the network, overheating and overvoltage. Often the cause of the phenomenon is a poor-quality switch and improper operation of the device.
LEDs with light bulbs do not light up due to a failure or failure of the power supply, the LEDs and lamps themselves, or burnout. Also sometimes the problem is network failure, high voltage, overheating of the device and poor-quality lighting fixtures. In any of the above cases, a complete replacement is required.
The LED chandelier does not turn on due to a poor connection, poor-quality wiring, or a failure at the level of the device itself or near the switch. Another problem is the lack of checking the operation of the lamp before purchase - a manufacturing defect is possible. Sometimes the reason lies in problems with the remote control.
Search for burnt diodes
If you have an LED chandelier with a remote control, you need to check the integrity of the diodes.
In order to determine the failure of a ceiling chandelier operating via remote control, it may be necessary to check the lighting element units, including diode emitters.
Replacing such devices involves installing them inside special connectors, strictly observing polarity.
The emitters are connected in series order, so if even one of the diodes breaks down, the functionality of the entire chain is disrupted.
The test is carried out using a tester, after which all failed emitters are replaced with elements with similar parameters, which will prevent the network load from being exceeded. Lighting devices with a remote control quite often do not work due to the burnout of the power elements in the LED unit, and such a breakdown can be determined by direct connection to a 220V network.
If your lamps burn out one after another, you need to find out the reason. Why light bulbs burn out - causes and solutions to problems.
You will find the DRL lamp connection diagram at the link.
Types of malfunctions and their causes
To successfully repair a chandelier with a remote control, you must first study the types of faults and what caused them.
Most common breakdowns
Typical troubles due to which you have to repair a chandelier with a remote control include:
- complete or partial lack of lighting;
- spontaneous shutdown of the lamp;
- short blinking;
- device failure.
A breakdown can be caused by a temperature exceeding 50°, rupture of the contact - either the thread, or the holder, or its detachment. Diode burnout occurs due to overvoltage in the network, burnout (breakdown) of the capacitor. These breakdowns are typical for inexpensive boards. Other potential causes:
- short circuit;
- incorrect connection to the circuit;
- incorrectly implemented device connection diagram.
Breakdowns and factors causing them
Since any malfunction has certain causes, the connection must be established first.
- The remote control does not respond to touch. In addition to battery malfunction, an unpleasant situation can be caused by clogged contacts that need cleaning, poor operation of a radio relay due to poor quality, and gradual degradation of the capacitor. This defect requires replacement.
- The remote control starts working only on the second or third (fifth) attempt, or reacts only close. This malfunction can be caused by low-quality batteries or a faulty relay, interruption of the diode loop due to poor contact, its melting.
- Fixed switch failures. In this case, the culprit is oxidation of the wires, incorrectly selected electrical circuit, constant voltage surges, and overheating. The problem is often caused by a malfunction of the transformer, a bad switch, or improper operation.
Failure of light bulbs and/or LEDs to work is the most “popular” surprise. This breakdown is provoked by a network failure or failure of the power supply, burnout of elements due to their low quality, or overheating of the device. In any of these cases, replacement of lamps or inspection of the unit is required. If the light intensity of the devices in the line differs, it is also recommended to completely replace them.
If an LED chandelier does not turn on, it is possible that the culprit is a poor connection or poor-quality wiring anywhere in the electrical circuit. To avoid such a problem, it is imperative to check the device before purchase, including the operation of the remote control.
Operating principle of dialing
For a better understanding of how exactly the multimeter finds out whether there is an open circuit or not, I will, in general terms, describe the principle of operation of this mode.
Everything here is extremely simple, the operating principle of dialing is based on the well-known Ohm’s law, the main rule of electrical engineering:
I = U / R , where I – current, U – network voltage, R – resistance
Each multimeter has a power source - a battery or an accumulator, with the help of which a voltage is created on the section of the network being tested - a current is supplied and, knowing its characteristics, the result is calculated.
Lamp design
The reasons for the burnout of fluorescent lamps depend on the ballast
Incandescent and fluorescent lamps are connected in different ways, but any, even the highest quality, light sources can burn out. There are many reasons why fluorescent lamps do not work. To identify them, you need to briefly familiarize yourself with the design and operation.
The operating principle of fluorescent lamps is an electrical discharge that occurs in mercury vapor. The emitted ultraviolet light is converted into visible light by a special substance - phosphor, which is applied to the inner surface of the lamp bulb.
For a gas discharge to occur, a high voltage is required, which is created when the lamp is turned on through the use of ballasts.
There are two fundamentally different types of ballasts:
- electromagnetic, which uses a throttle and starter;
- electronic, assembled using radio-electronic components.
The lamp does not turn on from the remote control: what to do?
If the chandelier stops turning on from the remote control:
- Check the voltage on the battery (video example here). If it is discharged, replace it with a new one. Check if the chandelier has started working;
- If the battery is fine and the remote control still does not give a command, check the buttons. Look at the remote control light through the phone's camera while pressing each button alternately. If the button is working, then you will see the light blinking on the phone display (you will not see anything with the naked eye). If there is no blinking when you press one or more buttons, they need to be repaired. You can buy a new remote control. But it is paired with a receiver, and replacing it is a troublesome task;
- If the battery and buttons are working properly, but the lamp still does not turn on from the remote control, then the failure lies in the radio signal receiver. Then you will have to replace it, and the remote control too.
The remote control buttons usually stop working when the contacts become clogged. There are two ways to fix this:
- Clean the contacts from dirt and factory grease. Apply a drop of superglue and apply graphite crushed with a file onto it. Assemble the remote control;
- Instead of graphite, try a piece of foil (without a paper backing, which will not transmit the electrical signal).
And to replace the receiver you need to buy a new control unit with a remote control. The devices must be set to the same frequency. Then:
- Turn off the power to the apartment;
- Remove the chandelier and open its box;
- Remove the old receiver by cutting the wires;
- Get a new power supply. Study it carefully. It has several multi-colored wires, exactly the same ones in the chandelier (you cut them);
- Now place the unit on double-sided tape in the box in the same place where the old receiver was located;
- Strip, connect and insulate wires of the same colors;
- Close the box and hang the chandelier in place.
There is another option for the development of events. Think about it, do you really need remote control of the chandelier? If not, then remove the broken receiver from the chandelier box by connecting the controller directly to the two-key switch. When switching, the first key will change the modes of bright, moderately bright and dim lighting, the second will switch the backlight operating modes.
Repair methods
- Remote controller. There is a very simple way to determine if the remote is working. To do this, turn on any camera - even a smartphone is suitable for these purposes. Point the remote sensor, which emits an IR signal to the relay, directly at the camera lens. Press various buttons on the remote control. A working remote control will display a flashing element on the smartphone screen that emits a signal. We won’t see anything with the naked eye; this happens because our eyes can’t perceive light in the infrared spectrum, but a smartphone’s camera can.
Testing the IR remote control using a smartphone camera
If no glow is observed when you press the buttons, then there is a problem with the remote control. First of all, check whether the batteries are alive - either install other ones that work, or put these in a working remote control. Most likely, the reason will be in the batteries; the remote control circuit is so simple that there is simply nothing to break (unless you bathed it in a bowl of soup or dropped it from the second floor). If the contacts in the remote control are slightly clogged, you can carefully disassemble it and wipe all conductive elements with a cotton swab slightly moistened with alcohol. In the most severe cases, only a complete replacement of the remote control will help; there are plenty of options with a new relay on Chinese online flea markets.
If the remote control is working, but the chandelier still does not light up, we move on to find out the reason why it stopped lighting.
- Next in line will be the relay, which receives the signal from the remote control. There is one effective, but slightly complicated way to check it.
- Completely de-energize the apartment at the meter or panel.
- Unscrew the mounting bolts and carefully remove the chandelier from the ceiling.
- At this point, you can use the camera again. Take a photo of the wiring that is connected from the relay to the chandelier itself. Then carefully cut them off, peel off the relay from the body of the chandelier with halogen lamps and set it aside. Raise the chandelier to the ceiling and connect directly to a 220 V network.
- If, when you turn on the light on the panel, the chandelier with the control panel lights up, then the problem is in the relay. In this case, you will have to buy a new one and connect it in the same way as it was connected earlier (we already have a photo of the wires).
- Return the chandelier to its place and make sure it is working properly.
- If it still doesn’t work even directly from the network, then we return the old one to its place. We are in no hurry to hang the chandelier.
A relay connected to the network and to the chandelier
While this point is not over, you can think about one more scenario - do you need remote control? Perhaps it can be removed altogether, and the chandelier simply connected to a two-button switch?
Variety of transformers for halogen light bulb circuit
With LEDs it's a little more complicated. As mentioned above, they are connected in series, so if one breaks, the entire circuit goes out. Going through them to find the faulty one is often such a lengthy process that it’s easier to completely replace everything with new ones. If it comes to this, then try starting with a power supply for LEDs - it is easier to find and costs less. If after replacing the LEDs still do not light up, you will have to change them. However, the burnout of LEDs in a well-assembled lamp is such a rare occurrence that the problem is usually solved by replacing the power supply.
- It is worth putting into a separate paragraph a problem with an interesting symptom - the entire chandelier or a separate block in it lights up (or the bulbs blink) only after touching the metal body with your hand. This can be explained simply - bad contact. But it’s up to you to find out where. Arm yourself with a bottle of alcohol, a pack of cotton wool, and thoroughly wipe all contacts in the chandelier. It is better to redo bad connections and old twists - strip the wires again, connect them as firmly as possible, insulate them with electrical tape or heat shrink. Don’t forget about the plinths, don’t even ignore the remote control once you’ve started - it definitely won’t hurt to get rid of accumulated dust.
- If the chandelier does not want to turn on after all the manipulations, most likely the problem is in the wiring either inside the device itself or on the approach to the chandelier. Check the presence of current using a multimeter on all circuits in the chandelier, as well as before the network input to the relay. In an area where there is no electricity, we will replace the wires with new ones, or turn on the circuit to bypass the damage, thereby repairing the chandelier with a control panel.
- Is it possible to try to repair an old relay without buying a new one? There's nothing to lose anyway. Make sure it is broken using a multimeter - the device should show zero current at the output. Disassemble the relay, inspect it for burnt cables and contacts. If there are any, then you definitely need to buy a new one. If there are no traces, check the capacitance of the capacitors. They can be replaced if the value is less than 1 µF.
Damaged capacitor that has lost capacity
DIY LED lamp repair: step-by-step instructions
Let's look at a simple LED lamp repair as an example:
| Illustration | Action to be performed |
| After removing the diffuser cover, carefully inspect the LEDs. If such a black dot is noticed, the element has burned out. | |
| LED elements can be soldered from the strip, but it is more convenient to purchase them separately. This is how they are sold. The size of the light diode may vary, but the characteristics should be suitable. | |
| We unsolder the burnt element, clean the contacts and apply a special paste. The element is glued to it, making soldering easier. | |
| The ground corner of the element shows where the negative terminal is located. If the polarity is reversed, the light bulb will not work. | |
| We warm up the light diode with a soldering (or industrial) hair dryer and press it a little with tweezers. | |
| All that remains is to check the light device. In our case, the test is carried out without a diffuser. You shouldn't do this with him, because... dangerous. |
As you can understand, repairing a 220 V LED lamp with your own hands is not so difficult. If there are no new parts, you can use burnt out light bulbs by removing the elements from them. One working light device is assembled from 2-3 old ones.
For what reasons can lamps in a chandelier burn out?
We will give the most likely and common causes of this problem. Let's consider the proposed options for eliminating it and the possibility of extending the service life of lighting devices.
1) The first reason why light bulbs in a chandelier quickly burn out is probably bad contacts of the wiring and the lamp.
As a rule, all home lighting equipment is connected in two ways: by conventional twisting of wires or by terminal blocks.
But when using a terminal block connection, you also need to know one nuance. You should not use stranded wires, since when they are secured in the terminal, the strands spread out and the contact may not be complete. Try to replace the stranded wire with a solid wire. If this is labor-intensive or impossible, then the multi-core contact can be tinned with solder and clamped into the tips.
These tips apply to absolutely all electrical contacts. Try to check the junction box, panel, switches for the quality and reliability of the connections.
2) Faulty lamp sockets or poor contacts in them are the second most “popular” reason why light bulbs in a chandelier can often burn out.
When checking lamp sockets, pay attention to the following:
— reliability and elasticity of contacts between the socket and the lamp inside,
— presence of signs of oxidative processes in the metal contacts,
Any of these reasons leads to overheating of the lamps and their failure.
What kind of lighting do you prefer?
Built-in Chandelier
If in the first two cases it is quite easy to eliminate the cause (bend or clean the contacts), then if there is carbon deposits or darkening, it is necessary to change the cartridge itself.
Our advice: if you often have to clean contacts from oxidation or restore their elasticity, then you should completely replace the cartridge with a better one.
3) Errors in choosing the power of lamps - this is the third reason why light bulbs in a chandelier or other lamp constantly burn out.
Each lighting device is designed to operate lamps of a certain maximum power. And if you use more powerful lamps in it, this leads to undesirable consequences: contacts deteriorate and weaken, internal wiring burns out, and the material of the chandelier elements cracks (including sockets). The end result is obvious - new lamps often burn out.
To prevent such a situation, it is necessary to use lamps of the maximum power for which the cartridges are intended. Otherwise, the material of the cartridges may crack and burn out. Manufacturers indicate the permissible power in the instructions, passport and on the lamp itself in the form of a sticker.
4) Malfunction of switches or junction box can be another reason for the failure of lamps of any type.
Our advice: if on any individual lamp the lamp periodically changes brightness or winks, and you have already checked the chandelier itself and found no faults, then you need to look for the cause in the switch or junction box. Carefully inspect their insides for darkening and carbon deposits, check all contacts. If found, correct the problem immediately.
Expert opinion
It-Technology, Electrical power and electronics specialist
Ask questions to the “Specialist for modernization of energy generation systems”
Why light bulbs in a chandelier often burn out - articles on DIY electrical installation Also, if you can’t get by with just one device, you can divide 1 circuit into groups and power each with a separate driver. Ask, I'm in touch!
Problem with lamps or LEDs
The control controller is the only source of the problem when all LED lighting devices do not turn on. If only some of them refuse to work, then there are two options: either failure of the elements themselves, or failure of one of the two transformers feeding the LED lines.
Since they are connected in series, if one electrical appliance fails, the others will also not be able to work. In this case, the burnt element is found and replaced with a new one. If halogen lamps do not light, then repairing a chandelier with a remote control consists of checking the transformers, as well as the lamps themselves, connected in parallel. They are called, then the faulty elements are replaced.
When all the LED backlights do not light up, the first thing to check is the ballast capacitor. It is connected to a multimeter. If the voltage is normal, then the entire circuit of lamps is often replaced. If the voltage is minimal or completely absent, then the capacitor is replaced with a new device. When all the halogen elements do not light up at once, it is possible that the electronic transformer is the problem. It is also tested, and the faulty one is replaced.
How does a chandelier with a remote control work?
The complete set of a standard chandelier with a remote control consists of control and power units for the chandelier, a driver, a lighting source and the control panel itself, which consists of a power source, a generator for high-frequency vibrations, an encoder, a transmitting device and an antenna, enclosed in a small plastic case.
The control unit belongs to the category of electronic switching devices and receives a signal from the remote control. Through internal devices, the signal is converted to switch lighting circuits. Operation is ensured by alternating current and voltage of 220V.
Installation of a chandelier with remote control
It should be remembered that the operation of the unit and the remote control is single-frequency, and the breakdown of one of the devices will require the purchase of a full-fledged new set.
Malfunctions of chandeliers with PU and their elimination
So, most often the LED chandelier with a remote control simply does not turn on. What could be the reasons?
- The remote control itself does not work. You need to check the batteries, they may simply be dead. Replacing them with new ones can immediately solve this problem.
- If the first reason is excluded, and the chandelier still does not light, then you need to deal with the controller. This is the name of the receiver that receives signals from the control panel.
- Since our chandelier is an LED lamp, the light sources themselves cannot operate directly from a 220-volt network. An additional power supply must be installed in the chandelier design. This is a step-down transformer. Repairing such a malfunction consists of replacing the faulty device with a new one.
It should be noted that combined type chandeliers are halogens as the main type of lighting and LEDs used as backlight. So, you always need to pay attention to which halogen lamps should be installed in the lighting device. This refers to their power. If lamps of higher power were installed by mistake, then either the step-down transformer or the lamp sockets will definitely burn out. By the way, repairing cartridges in such chandeliers is the most difficult.
How to change the controller
Let’s immediately make a reservation that changing the controller to a new one is not a cheap pleasure. Such a device costs half the price of the LED lamp itself, so it’s worth first understanding the faults, and only after that deciding the issue of purchase and installation.
If the controller does not work completely, then the entire chandelier will not light. If some of the light sources are on, then you need to deal with groups of light bulbs separately. By the way, sometimes there are situations when the repair issue is solved by replacing the remote control.
So, let's consider the situation with the inability to turn on part of the chandelier. How to correct the situation, what repairs will be needed?
- To do this, first the controller is disconnected from the circuit;
- then each light group must be connected separately (in turn) to a voltage of 220 volts;
- if one of them does not light up, then you will have to deal with its power supply;
- if, on the contrary, all groups light up normally, then the whole problem is in the controller.
In the first case, you don’t need to think much, just install a unit from the neighboring group in place of the power supply. If in this case the light bulbs light up, you will have to buy a new device and install it in the lamp circuit.
In the second case, you will have to change the controller itself. If you do not have the opportunity to purchase it, then you can exclude the device from the connection diagram and transfer the switching on and off of the LED chandelier from a regular switch. This is not difficult to do, because the controller itself in the electrical circuit of the chandelier is connected by two wires: phase and zero. From it, the zero circuit is supplied to the zero contacts of the power supplies, phase to phase.
Replacing the controller is just as easy. Four contacts are disconnected: two input, two output. The device is dismantled, a new one is installed, and the connection is made according to the old circuit through four contacts. By the way, the connection diagram is usually indicated on the device itself (on the body), which is quite easy to understand.
In principle, it is possible to repair the controller itself. But you must first check it for serviceability, for which you use a multimeter set to check the voltage. The 220 V mode is set and testing is carried out. If the measuring device shows that 220 volts passes through the controller circuit, then the device is working; if not, then there is some kind of defect in it. As practice shows, most often all faults are in the board, other elements are normal. If you are not a specialist in this matter, then do not try to carry out repairs yourself. Because it is very difficult to find a defect, sometimes even experienced craftsmen, not finding it, simply change the plateau.
Sometimes the cause of the malfunction is capacitors, which can also be checked using a multimeter. Typically their capacity is at least one microfarad. If the meter readings are less than this value, then such a capacitor should be replaced.
Repair of the chandelier itself
If all of the above circuit elements are in good working order, and you have checked the functionality of the light bulbs, then you should proceed to repairing the chandelier.
The most vulnerable parts of a classic lighting device are:
- wires - melt and burn out when overheated or if too much load is connected;
- terminal blocks - may weaken or break off at the point where the wire cores are clamped;
- socket - even when the light bulb is working properly, the socket contacts can burn, become deformed and lag behind the terminals of the lighting point.
Rice.
4. Malfunction of the socket in the chandelier Quite often, the above breakdowns occur in cheap Chinese chandeliers, in which the quality of all parts and elements is very poor. To check the wires and connections, use a multimeter - test them for integrity and the presence of electrical contact. The cartridge is checked visually; if you do not know what it should look like in normal condition, compare it with those in which the lamps are lit. Replacing cartridges is easy - just purchase an identical model.
In some types of chandeliers, the fuse in the fuse may burn out. This applies only to modern models that implement short circuit protection. To repair the chandelier in such a situation, simply replace the fuse with a new one.
It also happens that the connection of the chandelier to the wiring is done by twisting in violation of clause 2.1.21 of the PUE . In this case, the place of contact can oxidize until the contact disappears altogether. If you find such a connection, it should be replaced with soldering, crimping or a terminal.
Beauty and versatility
New power line chandeliers look very beautiful and are designed to perform various operations such as switching the brightness of lighting, changing color, turning on the lighting when a person enters, and playing music. The designer endowed the new lighting fixtures with beauty, versatility and operation from a switch and control panel. Typically, incandescent lamps and LEDs should function harmoniously in them, performing any operating modes that the owner desires:
- execution of a command to illuminate only all or half of the incandescent lamps;
- the combined glow of half of the incandescent lamps with a separate level of LEDs;
- lighting of all incandescent lamps and all LEDs;
- operation of LED lamps only;
- other lighting options, color changes, depending on the number of levels and capabilities.
The lighting device must properly perform all these functions through the control panel (sometimes there are 2 remote controls) and perform basic actions through the switch.
Schemes of chandeliers and lamps with remote control
The article “How to connect a chandelier” discusses in detail the options for connecting a chandelier without a remote control to electrical wiring.
The supply voltage from the electrical wiring distribution box, taking into account the color marking of the wires, is supplied through the switch to the terminal block of the chandelier. If you press the switch button, the wires in it will close and the lights will light up.
Currently, chandeliers with remote control are very popular. They are vital for people with disabilities simply for comfort.
To turn a simple chandelier into a chandelier with a remote control, just disconnect the wires going to the light bulbs from the terminal block. Connect the controller to the terminal block, and to its output the wires going to the light bulbs, as shown in the diagram.
When you press the remote control button, the radio signal is received by the controller antenna, and the contacts of the relay installed in it close or open. The light comes on or goes off.
Such a controller with remote control can be installed in any chandelier. The controller is universal and differs only in the power of the connected load and the number of control channels. It can be installed, for example, to remotely control gates in the territory or garage, open a barrier and any other actuator.
The controllers are available with the ability to control up to seven channels. Therefore, if previously it was necessary to install a two-key switch, then using the controller you can independently control the operating mode of several groups of lamps.
The diagram shows the case for two groups of chandelier lamps. If you connect several chandeliers to the controller, you will be able to control each of them individually or all at the same time.
Modern exclusive chandeliers often use not only traditional incandescent and halogen, energy-saving and LED lamps designed for 220 V, but also 12 V halogen and individual LEDs. In such cases, electronic transformers or drivers are additionally installed after the controller.
The diagram of such a chandelier, in which halogen lamps and LEDs are installed, is shown in the photograph. As you understand, any combination of light sources is possible in chandeliers and, armed with knowledge, you can undertake independent repair of a remote-controlled chandelier.
Minor faults
A chandelier with a remote control may not turn on for other reasons that are minor.
- Broken wiring or poor quality contacts.
- The LEDs themselves do not work.
Therefore, before the chandelier is installed on the ceiling, we recommend that you carry out a small check on the floor or table. To do this, it is connected to the network through an outlet using a plug.
It is checked whether there is voltage at the input contacts of the controller, then at the output contacts. Then you need to make sure that electrical current is supplied to the power supplies. Then the voltage is measured after the power supplies (it must be reduced and correspond to the rating indicated on the device body). Be sure to check the wires connecting the power supplies to the light sources. And lastly, the groups of LEDs themselves are checked. In principle, nothing complicated, but sometimes this will determine whether the chandelier is on or not.
Replacing the chandelier control unit
If a chandelier with a remote control does not turn on due to a faulty controller, it cannot always be repaired. In such situations, you have to buy a new remote kit and install a new controller.
The process begins with removing the lamp. First, the faulty receiver is disconnected, and the network zero is connected to all the zeros of the new one. The phases of each group of light bulbs are connected to the channel wires. Next, the receiver is connected to the network, and the lamp is hung on the ceiling. At the last stage, an assistant is required to hold it in his hands.
Common types of breakdowns
LED lighting devices, due to their rather complex design, can have a wide variety of malfunctions, the type of which will determine the repair actions you carry out yourself. But the most common typical breakdowns include the following:
- complete or partial lack of lighting;
- the appearance of short-term blinking;
- spontaneous switching off of the light during operation of the device;
- failure of a light bulb or LED.
Light
A variety of reasons can lead to the breakdown of a lamp of this type. The most common causes of breakdowns of LED lighting devices are the following:
- incorrect operating conditions. When purchasing a lamp, be sure to find out what operating conditions will be considered optimal for it. If a chandelier or wall sconce operates in unsuitable conditions, then there is a high probability of breakdown;
- overheat. Problems with an LED lamp can begin when the temperature of the diodes exceeds 50 degrees. Due to such a high temperature, the contacts of the thread or the holder itself may break, as well as peeling on the contact board;
- LED burnout. It can occur in whole or in part. The reason for this is network overvoltage or capacitor breakdown (burnout);
These are the main reasons that can lead to a malfunction of the LED device. But besides these, there are additional reasons, which include the following points:
- incorrect connection of the product to the network;
- a short circuit that appears in the circuit;
- improper installation of the device;
LED chandelier on the ceiling
- non-compliance with its connection diagram;
- originally purchased low-quality product. For example, this may be poor soldering of the circuit contacts, as well as LEDs and other elements of the lamp device (for example, the driver). Usually such moments are called “manufacturing defect”.
As you can see, a variety of reasons can lead to malfunction of this type of lighting fixture. Therefore, in order to make repairs yourself, you must first find the cause of the breakdown.
Safe and correct operation of the multimeter
Working with electrical devices and networks must be safe. This rule also applies to the procedure for ringing conductors with a multimeter. Let us highlight the main recommendations that must be followed before and during work:
- First of all, the circuit must be completely de-energized by turning off the machine in the switchboard and removing the batteries (if the object in question is an electronic device).
- The capacitors in the circuit must be discharged by short-circuiting. Otherwise, during measuring work, the multimeter may fail.
- For convenience when making measurements, it is recommended to use special tips (“crocodiles”) at the ends of the measuring wires. These devices create reliable contact with the conductor being tested and, at the same time, free your hands.
- When trying to fix the probe, it is not recommended to touch the bare wires and the tip of the probe with your fingers. Otherwise, the results obtained may be incorrect.
How to repair a fluorescent lamp
The optimal repair method is to replace the faulty element
In most cases, the easiest solution is to replace the faulty elements. You can check by installing a known-good element. Complete repair of a fluorescent lamp involves a number of difficulties and requires certain qualifications and experience. Before disassembling the fluorescent lamp, you need to make sure that it is disconnected from the network and that electricity is not supplied to it.
The easiest way is to find a replacement for a faulty starter. You can force the lamp to turn on by installing a button instead. This method is dangerous because holding the button for more than the required time can cause the filaments of the electrodes to burn out.
It is more difficult to use lamps without a choke. Several workable options for such inclusion have been developed. Most circuits use the principle of multiplying the mains voltage for stable starting. These circuits use rectifier diodes and capacitor banks, which causes an increase in the size of homemade ballasts. A powerful resistor or an incandescent lamp of 25-40 W is used as a choke to limit the current, depending on the power of the fluorescent lamp.
The advantage of resistors is their small size, but the problem is the high heat generation on it during operation. Incandescent lamps provide additional light output, but because they operate at a reduced voltage, their lifespan is virtually unlimited.
We search for the problem
Troubleshooting a ceiling light begins with determining the cause of its occurrence. To calculate the section of the chain where the damage occurred, as a rule, three elements are evaluated before moving on to the chandelier itself:
- switch;
- light bulbs;
- electrical wiring.
You can start testing all parts in turn or be guided by the manifestation of any characteristic signs for each of them.
Switch
The first accessible element involved in powering the chandelier is the switch. Most often, key switch models fail in everyday life, this is due to the moving contacts in them, which constantly collide with each other, and creates additional vibration.
To check the switch:
- remove the keys and false panel;
- check the input voltage with an indicator screwdriver or tester;
- Close the switch key and check for voltage at the output to the chandelier.
Rice.
1. Checking the key switch If voltage is present in both cases, then the switch is working. If not, check the condition of the contacts; they may have oxidized or fallen away from the attachment point. In some situations, the core could break from the lamella or come loose, which is why there is no electrical contact through which power was transferred to the ceiling lamp.
Obvious prerequisites for failure are the blinking of the lamps when the switch is turned on or the need to apply force, to press the switching. Also in chandeliers with several groups of lamps turned on from different switches, when one group turns on and the second does not.
Light bulbs
Another reason for the lack of lighting may be a faulty lamp. Such a breakdown is typical for a chandelier with one shade and one lamp. In all other models of ceiling lighting devices, one bulb rarely affects the operation of adjacent ones, so a single burnout occurs.
The easiest way to check is an incandescent lamp in a chandelier; as a rule, the integrity of the tungsten filament is compromised.
Rice. 2. Burnt out light bulb
If LED lamps are installed or no abnormalities are visible in the bulb, then install the lamp in a known-good lamp and check its operation. You can also check any lamp using a multimeter, but the process will be different for halogen, incandescent and LED bulbs. If a malfunction is detected, replace the light bulb.
Wiring
If the two previous elements in the circuit turned out to be serviceable, you should check the condition of the connection of wires and cores in the area from the switch to the chandelier.
To do this, follow these steps:
- Turn off the switch that supplies power to the lighting fixtures.
- Check the lack of potential on the chandelier using an indicator screwdriver. If the switch does not break the phase, you should turn off the machine.
- Remove the chandelier cap to get to the wiring connection. If the chandelier design does not have a cap, remove the entire chandelier.
Rice. 3. Place of connection of wiring to the chandelier
- While maintaining personal safety, apply power to the chandelier and measure the presence of potential differences at the phase and neutral terminals of the wiring. According to clause 2.1.31 of the PUE, the color marking must correspond to blue - zero, yellow-green - ground, other colors - phase.
If voltage is present at the terminals or contacts of the chandelier, then there are no wiring faults. Otherwise, to repair the electrical wiring, you can either find the location of the damage and restore contact, or replace the line completely.
Design and basic operation
LED lamp design
LED lamps are an electric arc ignited in a vacuum at the boundary of a pn junction. By controlling the voltage, you can regulate the arc light. The design of the chandelier includes a mounting unit with a control unit, a radio receiver, a lighting segment, a remote control, and decor. In addition, music systems with speakers and strip lighting are often built into the devices.
The fastening unit includes a bar with a cross, the control unit includes controllers with printed circuit boards and wires, and the lighting segment includes sockets with sockets for LEDs.
Internals and operating principle of a chandelier with remote control
Before you start repairing a faulty chandelier, familiarize yourself with its design, which includes three groups of electronics:
- LED lamp (backlight);
- Halogen lamp (main and additional lighting, sometimes also LED);
- Relay with receiver of the signal supplied by the remote control.
An LED lamp contains dozens of small diode multi-colored bulbs that are used to switch lighting modes. They receive electricity from a capacitor included in the LED design. It also lowers the voltage level to the level required for the diodes to operate. The light bulbs are connected in series, so if one of them breaks, the others immediately go out. Finding a burnt-out diode is difficult; it’s easier to replace everything.
The halogen unit is powered by several transformers that pulse the supplied voltage. If the halogen lights stop lighting, there can be two reasons: a malfunction of the bulbs or a breakdown in one or more transformers.
The relay that receives and processes the radio signal includes several electromagnetic relays that switch current of certain power values. It is powered by a quenching capacitor. The resulting excess electricity goes into a capacitor, which plays the role of ballast. The more hours the chandelier has burned out, the higher the risk that the relay will become detached from the board. The place where they connect is the weakest in the structure.
Each chandelier requires a remote control, which usually has only 4 buttons. Its electronic circuit is simple and very reliable. Therefore, if the chandelier does not turn on from the remote control, but works properly if you give commands using the switch, simply replace the batteries.
What to do if some of the lamps stop burning?
Repairing a chandelier with a remote control will be completely different if only some of the lamps do not light up:
- If some lamps of a halogen lamp do not light, then they need to be replaced, having first de-energized the apartment. Just unscrew the old halogens and screw in the new ones;
- If the LED backlight does not light, then at least one diode has failed. It is better to replace everything at once than to look for a damaged element;
- If the LED and halogen parts of the chandelier are working properly, then the problem is in the transformer, which should power the light bulbs. Attach the multimeter probes to its output terminals. If there is no voltage at the outputs, buy a similar model of transformer and install it inside the chandelier box instead of the broken device.
Attention! Halogen lamps may stop working if touched with bare hands. To prevent this from happening, handle them with gloves. Can be captured using a piece of scrap or paper.
Look at the photo: it shows chandelier transformers with a control panel. Each of them is connected to several multi-colored wires. When connecting a new transformer, it is important to connect them correctly. Replacing the power supply is done in the same way as changing the radio receiver.