The light switch has stopped turning off the light (that is, whether it is on or off, the light remains on). According to the advice, I replaced the switch (or switch) with a new one and stripped the wires. The problem remains the same - the light just stays on! Help - what could be the next question?
24 comments
Need more information on this issue. Did the switch work, and then suddenly stopped, or after replacing the wiring and installing it, did it stop performing its functions due to improper connection of the junction box. Maybe you have a chandelier with a remote control and the relay unit is simply soldered?
Good afternoon I came home and the light is on in the bathroom, although I remember exactly that I turned it off, and when I flip the switch it doesn’t go out, tell me what could be the reason?
The key on the switch works but the contact is not disconnected, it is stuck, this has happened before. The key can turn off, but the contacts have not opened.
You need to inspect the wires in the distribution box. Perhaps they are stuck to each other.
What if after replacing the switch nothing has changed? Is the light still on?
You need to inspect the wires in the distribution box. They stick to each other over time.
Good evening! Yesterday I turned on the switch (light), but could not turn it off! I had to unscrew the light bulbs, but the switch remained on! What should I do?
Disassemble the switch and see what’s wrong with it, and repair if possible. Or just replace it.
Tell me this is the problem, I changed the spotlight, mistakenly set it to 12 V instead of 220 V, when I turned it on, the lamp exploded, and the switch is always on. and the light from the switch does not turn off. (When pressed, it returns back to on). How to treat?!)
Good afternoon! My daughters were playing with a parrot, suddenly everything went out.. The plugs were knocked out.. We turned on everything, but the light in the children's room does not turn on.. Tell me how to fix it!
Hello! You need to disassemble the switch, look at its contacts, maybe they are stuck. As a last resort, replace it with a new one. You can start by deliberately removing the switch in another room, replacing it with the one with the problem, and if the problem is solved, then buy a new light switch.
Kind. Single-key switch in the bathroom with indicator. 4 ice lamps and a fan are connected. It worked for a year without problems. But one day I unintentionally hit the switch with static electricity with my hand. And that's it, the 4 ice lamps are on constantly, and the fan is on only when this switch is turned on. What about him? Thank you.
I have a similar problem. When the light was turned on, something banged. The light went out, the shield on the distributor was knocked out. I looked at the light bulb - it was burned out. I tried to change it - it was on, but now the light does not turn off. I don’t understand what the problem is, something with the wiring or the switch. I'm afraid that the walls won't have to be hammered, only the renovations have been done, the wiring is all new.
First, try removing the wires from the switch - the light will go out, which means the switch is stuck in the on position - it needs to be replaced.
Expert opinion
Viktor Pavlovich Strebizh, lighting and electrical expert
Any questions ask me, I will help!
For those who have never installed switches or done electrical work, it is recommended that you carefully consider your actions. If there is something you don’t understand, write to me!
The LED in the switch is blinking
- After turning off the power supply at the breakdown site, you should carefully check the switch a couple of times for the presence/absence of current supply using a multimeter or an indicator screwdriver.
- After making sure that the mechanism is de-energized, you should carefully disassemble the switch. To do this, first use a screwdriver or other tool to pry the buttons of the mechanism and remove them.
- Remove the plastic rim of the switch housing and put it away.
- Check the terminals of the device being dismantled for the presence of current using an indicator screwdriver.
- In the case of disassembling a two-key switch, you need to use a marker to identify the wire that is common for two types of switching.
- Next, using a regular screwdriver, you need to loosen the 2 bolts that are located at the edges of the mechanism body, and then remove them from the plastic socket.
- After this, the bare wires supplying current to the device are cleaned using previously prepared fine-grained sandpaper and wrapped with insulating tape.
- This completes the repair process.
Causes of the mentioned technical malfunction
The reasons for this situation may include the following:
- faulty electrical wiring;
- presence of backlight at the switch;
- the existence of a special design solution.
The first reason in this list is quite rare. After all, lighting requires very little power from the network. If indeed the reason is hidden in the electrics, then it is likely that it was installed with technical violations.
The second option (the presence of a backlight at the switch) is more common. The point is that lighting is inherently a closing element. Due to this, part of the current flows to the light source lamp. Because of this, the lamp does not light up correctly when the switch is turned to the “ON” position. However, the lamp glow is present.
It is strictly not recommended to leave such a situation unattended. This will not affect the electrical system in any way. And it will not lead to an increase in payments for electricity. However, the lamp life of the lamp expires quite quickly.
Troubleshooting procedure and safety measures
Before you begin repairing light switches in your apartment, it is advisable to thoroughly prepare for this procedure. First of all, you need to stock up on working tools that can be used to repair products of this class. The set includes the following items:
Disassembling and cleaning contacts
Before you repair the light switch, you will definitely have to disassemble it to the point where the fault is clearly visible. It is recommended to start repairing a broken device in the following order:
What kind of lighting do you prefer?
Built-in Chandelier
- Completely remove the voltage from the linear branch of the supply line or from the entire apartment at once.
- Disassemble the switch, for which you first need to remove all the keys.
- After removing them, the switching mechanism with the rocker arm will be “exposed”, the condition of which is used to judge the nature of the breakdown.
If, even before completely disassembling the device, loose contacts were found in the places where phase conductors are supplied and discharged, they should be tightened firmly, first installing the locknuts.
If at this stage of dismantling it is not possible to detect traces of a malfunction or the damage is too serious, it is best to completely dismantle the device from its installation location.
Chandelier repair
To repair a chandelier, disassemble its body and check the joints between the wires. Also pay special attention to the condition of the insulating layer. A common cause of a malfunction is a short circuit, after which one of the conductors burns out.
In addition, lamp sockets are subject to mandatory inspection. Elements made in China especially often fail. If the reason is in the cartridge, it cannot be repaired, this part is replaced with a new one.
If the ballast capacitor fails, strip the wire coming from it and connect a multimeter. A normal voltage level indicates failure of the series lamp chain. If the voltage deviates from the norm, replace the capacitor.
Advice! If replacing the lamp does not give a positive result, it is recommended to treat the board with a degreasing solution.
If the chandelier does not turn on, the control relay may be the cause of the problem. The functionality of the device is checked with a multimeter with a conductor from the relay connected to it. If a fault is found, replace the relay with a new one.
Other problems
The most common faults are described above. However, those who decide to repair the chandelier themselves are faced with others:
- Incompatibility of new lamps with old chandelier models.
- Poor quality twisting of conductors. Insufficiently twisted conductors prevent normal contact, which leads to lighting problems.
- The power of the screw-in lamps does not match the needs. For example, a chandelier is designed for four 60-watt light bulbs, and four 100-watt light sources are installed. For this reason, not only power supplies fail, but also transformers.
- Fuses blown. In the housings of modern chandeliers, fuses are used to break the circuit in the event of a short circuit. Repair work in this case consists of finding the blown fuse, dismantling it and installing a new component.
- Broken chandelier. A break occurs due to mechanical impact on the device or in case of poor-quality hanging (weak fastening).
Expert opinion
Viktor Pavlovich Strebizh, lighting and electrical expert
Any questions ask me, I will help!
If at this stage of dismantling it is not possible to detect traces of a malfunction or the damage is too serious, it is best to completely dismantle the device from its installation location. If there is something you don’t understand, write to me!
Main causes of residual glow
The reasons that cause LEDs to burn can be different.
The most common ones include:
- Problems related to the electrical wiring installed in the apartment. This may be a broken section of the electrical circuit or a violation of the insulation of one of the wires.
- Incorrect connection diagram of the device to the switch or electrical panel.
- The use of a backlit switch, as well as the use of other difficult to compatible devices: sensors, modules, timers, etc.
- Low quality of the devices used or individual features of the models.
Below we will look at each of the reasons in detail, also indicating measures that can help solve problems in various cases.
Reason #1 - switch with backlight option
If you have a problem with constantly burning lamps, you should first look at the switch. According to electricians, the most common cause of this phenomenon is the use of a backlit switch.
In this case, the devices come into conflict: even a switched off switch cannot completely open the electrical circuit due to the backlight, which is powered through a resistance. Since the system remains open, a small voltage reaches the lamp, which causes a dim glow.
Similar problems can be caused when using other electrical devices: photocells, timers, motion and light sensors connected to lamps.
A way to solve this problem . Since such a defect with LED lamps that light up even when the switch is off is quite common, electrical specialists have accumulated a lot of experience in correcting the situation.
These may be the following options:
- switch replacement;
- turning off the backlight;
- installation of an additional resistor;
- replacing one of the lamps in the chandelier with a weaker analogue;
- use of resistance with a high power rating.
The easiest way is to replace the backlit switch with a standard switch model without an additional function. However, such a solution is associated with additional monetary costs, as well as with reinstallation of the device.
If the presence of backlighting on the switch is not important, you can simply use wire cutters to cut through the resistance that sets the power supply for it. Adding a shunt resistor will help turn off the LED while maintaining the backlight. A device with a resistance exceeding 50 kOhm and a power of 2-4 W can be purchased at a specialized store.
To connect it, you need to remove the lampshade from the lamp, and then attach the wires coming from the device to the terminal block with network conductors, which will allow you to connect parallel to the lamp.
In this case, the current passing through the LED will not flow through the driver capacitor, but through the newly connected node. As a result, reactance recharging will stop and the LEDs will go out when the switch is turned off.
If a problem is identified in a multi-arm chandelier, you can install an incandescent lamp with a minimum power in one of the sections, which will collect all the current coming from the capacitor.
A similar solution can be applied to a single-arm chandelier by installing an adapter from one to two sockets. At the same time, when using this method, the weak glow of one bulb will still remain.
The desired result will also be achieved by replacing the usual resistance in the switch with its analogue with a large number of Ohms. However, to perform such a manipulation, you will need to consult an electrician.
Reason #2 - faulty electrical wiring
Quite often, the source of lamps that do not turn off is faulty wiring. If an insulation failure is suspected, high voltage should be applied to the device for several minutes to simulate the conditions that cause breakdowns in the electrical network.
To find the location of damage to a hidden cable, you can also use homemade or professional products designed for this purpose.
If the problem really lies in worn-out insulation, the electrical wiring in the apartment must be partially or completely replaced. With open cable routing, the process will take a minimum of time and effort. More difficult work awaits if hidden wiring was installed in the housing, walled up in the walls.
Repair of halogen chandeliers
Lighting devices with remote controls often break down. The main signs of failure of such chandeliers:
- despite transmitting a signal from the remote control, the lamps do not light up;
- Some modes do not function, the chandelier switches off spontaneously;
- the same modes do not work when controlled from the remote control, but function when switched manually;
- flickering occurs that is not caused by any human action, and spontaneous switching between modes occurs.
The listed problems are the most common, but a combination of several of them is rare. Typically 1 or 2 components of a remote control chandelier need to be replaced.
The search for a problem in a lamp with a remote control begins with checking the batteries. If new ones are installed, but the chandelier still does not work, the next possible cause of the malfunction is the controller.
Different groups of lamps are most often connected in separate blocks. These elements are connected using a controller. A common situation is that it launches only some modules of the device. In this case, it will need to be replaced.
It happens that the light does not turn on either using the remote control or when pressing the switch. In this case, you should pay attention to the number of non-working components. One lamp may burn out. However, when all the bulbs do not work, the likely problem is in the electronic transformer. This element is replaced with a new one, while working with clean gloves.
How to choose an LED switch
When buying an LED switch, there is no need to chase expensive ceramic devices, since the power consumption of lighting devices is generally not very large.
For domestic use, it will be sufficient to use a high-quality plastic LED switch with a reliable contact group. The service life of such devices is about 40,000 switchings.
The choice is also made based on the design of the device, the type of inclusion - they produce keyboard and rotary, push-button, touch and cord.
Depending on the installation method, internal and external devices are distinguished. The case material can also be different - plastic, glass, copper, stainless steel are used, and slate, gold plated and even leather are used as decorative coatings.
But what you really need to pay attention to is the protection class (IP) - it indicates the possibility of using the equipment in certain conditions.
- An IP class of 20 indicates that the device is poorly protected from dust and moisture. Such equipment is used in residential premises.
- Class IP 45 and higher is used for marking switches suitable for connection in rooms with high humidity - baths, saunas, kitchens, toilets, etc.
- An IP class of 65 means that the switch can be used outdoors. Such electrical equipment has increased protection from dust and moisture. Installed outside the building - under the porch, canopy, on covered verandas. It has more massive keys, and at the point where the electrical wire enters there is a rubber seal.
The higher the class, the more protected the device is from external factors. This applies not only to switches, but also to sockets, toggle switches, and other electrical equipment.
How the switch works
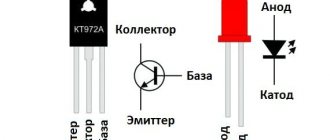
The backlit switch is designed quite simply: in addition to the main element - the key, so that you can turn on or off the power of the lamp, it includes an LED or neon with a resistor. The latter is connected to the terminals of the device, bypassing the disconnect button. Thanks to this scheme, the entire electrical circuit is in a closed state.
However, the resistance of additional lighting is significantly lower than the main source, so ideally the latter does not work when turned off, but only the LED works. When the switch closes the main branch (to the chandelier), the current passes to the main resistance (light bulb) and the LED element turns off.
Note! For various reasons, in practice it happens that even when the lamp is turned off, the lamp in the lamp flickers. The main reason for this is the LED switch. Therefore, it must either be modified, completely removed or temporarily disabled.
Expert opinion
Viktor Pavlovich Strebizh, lighting and electrical expert
Any questions ask me, I will help!
If you are not particularly friendly with electricians and are afraid to get into the wiring yourself, another way to deal with backlit switches would be to install a regular incandescent lamp in the chandelier. If there is something you don’t understand, write to me!
Alternative Methods to Fix LED Lamp Flickering Problem
In order not to turn off the LED in the switch completely, since it is very useful in the dark, you can use alternative solutions to the problem of eliminating the flickering of the light bulb. Two methods are used:
- Increasing the resistance of the additional circuit.
- Adding a capacitive shunt to the circuit.
Increasing backlight resistance
Using the first method, you need to find a resistor in the lighting system of the switch, which serves as the main resistance for the diode or LED element. It needs to be replaced with an analogue with a higher denomination. As a result, the flowing current will become even weaker, which will allow the light bulb driver in the chandelier to be turned off for a natural reason.
LED backlit switch as the reason for the lamps blinking
If there are no other ways to get rid of the flickering lamp lamp, you will need to completely turn off the LED or neon lighting on the switch. Let's look at how to do it yourself and what are the main stages of this procedure.
Preparatory stage
For those who have never installed switches or done electrical work, it is recommended that you carefully consider your actions. Pre-requisite:
- Disconnect the general power supply in the apartment/house from the switchboard switch (by checking its absence with an electrical probe or an indicator screwdriver).
- Prepare a set of necessary tools (mostly a flat-tip screwdriver).
Advice! The switch with the LED is energized at 220 V. Therefore, before starting work, you need to turn off the power to the network. Many circuits still have plug fuses. You can turn them off by unscrewing them from the shield.
Operating principle of the lighting device
What turns on the light
All LEDs and fluorescent lamps operate on direct current. Therefore, at the beginning of their case, a special driver is installed, which includes two required elements:
Step-by-step instructions for disabling
Instructions on how to turn off the LED in a household switch consist of the following steps:
- Dismantle the switch or remove the top panel with keys.
- Having understood the circuit, find the LED and conductors connected to the contacts.
- Disconnect the indicator from the terminals, using wire cutters if necessary.
- After making sure that the main conductors and contact points are in good condition, reassemble the switch in the reverse order.
How to carry out installation correctly
The illuminated switch mechanism involves a small lamp that glows when the switch is turned off. A small neon lamp or LED along with a resistance element can be used to illuminate the device. The backlight has wires that need to be connected to power during installation.
Preparing for installation and mandatory safety precautions
Without basic knowledge of safety precautions, it is better not to start working with electrical equipment at all. Illiterate electrical installation can lead to electric shock, failure of electrical appliances, and fire.
Basic rules of behavior when working with electricity:
- all work must be carried out in a de-energized network;
- it is unacceptable to overload the power grid;
- check the markings of the wires for compliance with the connected network;
- It is better to replace a damaged section of the network rather than repair it;
- Do not touch connected equipment with wet hands.
A regular indicator screwdriver or multimeter will help determine the nature of the conductors - where is the zero and where is the phase. The indicator is sufficient if the electrical network is single-phase. To analyze a three-phase network, use a multimeter.
Installation example of a 2-gang switch with backlight
The main design differences between LED switches are in the backlight mechanism. It can be ready to use and does not require any action to connect it. Another type of design requires connecting wires that power an LED or neon lamp.
Let's consider a more complex option - how to connect a backlit device, in which the conductors need to be connected independently.
First of all, pry up the keys with a screwdriver or other suitable tool and remove them. Separate the core (internal mechanism) from the body.
Next, determine the correct position of the switch using an indicator. To do this, by touching the contacts with a screwdriver on one side and an indicator on the other, check whether the device is on or off.
If the indicator lights up, it means it is turned on. In this state, turn it so that the keys with the pressed side are located on top.
One of the wires coming from the indicator is connected to the input terminal, and the second is connected to the key contact. If there are several keys, then the wire is connected to the first of them, starting from the left. Simultaneously with the wire going from the indicator to the input terminal, the phase conductor is also connected.
The two outlet phase wires that go to the chandelier are connected to the output terminals simultaneously with the second backlight wire, making sure that it does not fall out of contact.
With this connection method, the backlight will turn on after opening the contacts using the first key. The second will not have any effect on turning off the backlight, and the light will remain on even when the lighting is on.
In order for the indicator light to go out when you press any of the keys, you need to make a jumper yourself that will connect the indicator to both keys.
If you do not take into account the connection of the backlight, installation proceeds as in a conventional device. A phase conductor is led through the junction box to the switch and connected to the input terminal L, inserting it into the hole and screwing it in with a screw.
Read also: The specific gravity of water is
Next, two outlet phase wires are connected to the device contacts L1 and L2, which also lead to the chandelier through the junction box. One of them is connected to one lamp, the other to the other two. The zero passes through the junction box in the wiring box, then goes to all the chandelier lamps, closing the contact.
Illuminated switch
The most common reason for a lamp to glow after being turned off is backlit switches.
Inside such a switch there is an LED with a current-limiting resistor. The LED lamp glows dimly when the light is turned off, because even when the main contact is turned off, voltage continues to flow through them.
Why does an LED lamp burn at full heat and not at full power ? Thanks to the limiting resistor, the current flowing through the electrical circuit is extremely insignificant and insufficient to light an incandescent electric lamp or ignite fluorescent lamps.
The power consumption of LEDs is tens of times lower than the same parameters of an ordinary incandescent lamp. But even a small current flowing through the backlight diode is sufficient for the LEDs in the lamp to glow weakly.
There can be two lighting options. Either the LED lamp lights up continuously after turning off, which means that sufficient current flows through the LED backlight of the switch, or the light flashes periodically. This usually happens if the current flowing through the circuit is too small to cause a constant glow, but it recharges the smoothing capacitor in the power supply circuit.
When sufficient voltage gradually accumulates on the capacitor, the stabilizer chip is triggered and the lamp flashes for a moment. Such blinking must be definitely combated, no matter where the lamp is located.
In this operating mode, the lifespan of the power board components will be significantly reduced, since even the microcircuit does not have an infinite number of operation cycles.
There are several ways to eliminate the situation when the LED light is on when the switch is off.
The simplest is to remove it from the backlight switch. To do this, we disassemble the housing and unscrew or bite off with wire cutters the wire going to the resistor and LED. You can replace the switch with another one, but without such a useful function.
Another option would be to solder a shunt resistor in parallel with the lamp. According to the parameters, it should be designed for 2-4 W and have a resistance of no more than 50 kOhm. Then the current will flow through it, and not through the power driver of the lamp itself.
You can purchase such a resistor at any radio store. Installing the resistor is not difficult. It is enough to remove the lampshade and fix the resistance legs in the terminal block for connecting the network wires.
If you are not particularly friendly with electricians and are afraid to “interfere” with the wiring yourself, another way to “fight” backlit switches can be to install a regular incandescent lamp in the chandelier. When turned off, its spiral will act as a shunt resistor. But this method is only possible if the chandelier has several sockets.
Expert opinion
Viktor Pavlovich Strebizh, lighting and electrical expert
Any questions ask me, I will help!
But if the presence of lighting is important and there is a pass-through switch in the pantry, then you can eliminate the flickering of the lamp with its help. If there is something you don’t understand, write to me!
Options for using backlights
As an example, let's look at options for using backlights in Legrand products.
The backlight mode in the illustration is indicated by a picture of the month, the installation of a switch with an operation indication is indicated by a picture of a light bulb.
A single-key switch with night illumination is connected according to the classical scheme: a light bulb on contacts L. To indicate operation, a working zero must be set to the backlight lamp.
Connecting a two-key switch is done in the same way. Each operating line has a separate indicator light. The circuit provides separate indication of the double switch, each backlight works for its own line.
The three-key switch works exactly the same way. There will only be three indicators. By the way, this is another argument for opponents of the backlight: a three-key switch in display mode spends 3 times more energy than a double switch.
The pass-through switch can also work with backlight. Only the switching diagram will be different. The indicator is connected to those contacts that will be open when the key is in the “down” position. As a result, if you turn on the light with one of the “pass-throughs”, the backlight on it goes out.
When using the backlight as an indication of lamp operation, the indicator is connected to the lamp side, and a separate working zero is connected to it. Regardless of the position of the “feeders”, when the lighting is turned on, the indicator will light up.
Legrand sells backlight lamps separately. In essence, it is an ordinary LED with a quenching resistor and a freewheeling diode, packaged in a heat-shrinkable tube.
If you don’t want to overpay for the logo on the price tag, you can make a spare indicator yourself. The circuit is simple: in order to prevent reverse current from flowing through the LED element (we have alternating voltage in the network, the polarity changes with a frequency of 50 Hz), a reverse diode (type D226) is installed. And since the voltage drop across the LED is 2–3 volts (depending on the color), a current-limiting resistor is installed in the circuit. Diagram and part values in the illustration:
Using the glow for good
Let me make a reservation right away: only “smoldering” lamps will do; it’s unlikely to work with blinking lamps. I personally witnessed the long operation of lamps in this mode, but I do not rule out that these experiments can significantly shorten the life of the lamps. There are too many different lamp designs and not enough data to make clear conclusions.
So, a weak glow can be used as a feature, an additional lighting option. A night light in the corridor, a romantic twilight in the room - “smoldering” can be used effectively. The main thing is to learn how to properly control this glow.
Good results will be achieved by proper “correct” wiring and switches without backlights. That is, when the lamp is turned off, it does not glow at all.
If the lamp glows initially, you can try connecting a capacitor in parallel with the lamp to eliminate it, and another capacitor, but of a larger capacity, to the second switch key. In general, you will have to experiment. But overall, I think this idea is quite interesting.
In all my experiments with the “night light” I used non-dimmable
lamps. The photo below shows two types of cheap lamps that “smolder”.
Reasons why the light bulb in the chandelier does not light
Prompt round-the-clock service by a professional electrician is what we do. Read and write reviews about our work
Expert opinion
Viktor Pavlovich Strebizh, lighting and electrical expert
Any questions ask me, I will help!
Quite rarely, but similar processes can occur without your intervention, then the insulation is broken and a fully functional switch does not affect the lighting at all. If there is something you don’t understand, write to me!
A phase is missing in the switch - what to do? — blog SamElectric.ru
How difficult it can be to light a light bulb
In the article I will consider in detail when and on which contacts of the switch there is a phase or zero. This knowledge is needed to quickly determine why the light bulb is not on. And what is faulty in this case - wiring, switch, socket, light bulb?
Background, real case.
The other day I received a call. They told me they needed an electrician, that they took my business card from an electrical store, and that the light in the bathroom didn't work.
The owner of the apartment with the same light bulb suggested that the problem was in the switch.
There could be several reasons for this - a burnt-out light bulb, no contact in the socket, a really broken switch, broken wires near the switch or lamp, no contact in the distribution box. It could have been worse, but I didn't think about it at the time.
Hoping for the best (maximum 5 minutes and minimum 300 rubles), I went to the challenge.
How lighting works in bathrooms
This apartment has aluminum wiring, which is a big minus. When opening the bathroom switch, it turned out that it was working properly and that the apartment was one of those cases where it was not done entirely correctly - the switch opens zero, not phase.
Why is this done? I have asked myself this question more than once. In my apartment, the switch also opens zero.
For safety reasons, it has always been a rule that the light switch must open a phase. This is done so that when replacing a light bulb or wiping a chandelier, the likelihood of electric shock is minimal. It is enough to turn off the switch - and you can safely change the lamp with your bare hands or even dig into the socket. Naturally, first check the absence of a phase with an indicator screwdriver.
So why didn't electricians in older houses (more precisely, in houses where aluminum wiring is used) adhere to this important and simple rule? It turns out that the wire was simply with colorless (more precisely, white) insulation, and no one bothered to distinguish phase from zero. Are the sockets working? Are the lights on? What else does? The phase was observed only in the panel on the site, when connecting the meter and circuit breakers. And then, not always.
If done according to the rules, the lighting must go through a separate power line, through a separate circuit breaker with a current of no more than 10A, and all connections must be made in the distribution box above the switch. The phase opening has already been discussed above.
But these are the rules, but what really happens?
Real example of lighting wiring
There are two switches located in the corridor opposite the entrances to the bathroom and toilet. On the left (closer to the kitchen) - double, turns on the light in the kitchen and toilet. On the right is a single one, for bathroom lighting. A bit counter-intuitive considering the bathroom is between the toilet and the kitchen.
Causes and solutions
Causes of LED light bulbs flickering and how to fix them.
Reason 1
If inexpensive LED lamps are installed, look for the problem there first. Such products, especially those of unknown origin, are made using low-quality components. For this reason, charge accumulation and flickering may occur even when the power is turned off.
To make sure that the problem lies in the low quality of the lamp, try changing it. In 25% of cases the blinking stops. But do not exchange it for the same one purchased from the same batch, but try to install a lamp from a different manufacturer.
Reason 2
If replacing the lamp does not help, check that the switch is properly connected to the network, especially if the electrical installation was done yourself and not by a professional electrician.
The standard connection diagram assumes that the phase wire goes to the switch and is broken by it. When the phase is connected directly to the LED lamp, it will blink in half the cases when the power is turned off.
Please note: when using an indicator probe, only grasp the handle; touching the working part will cause an electric shock.
Reason 3
To eliminate the problem, remove possible sources of electric or electromagnetic fields from the lamp. Disconnect the wiring sections in the junction box one by one. If you find an area where, when disconnected, the LED lamp stops blinking, think about replacing the wire in this area of the apartment network.
Reason 4
Similar flickering can also occur if there is poor contact in the socket or connector with which the LED lamp is connected. Unscrew it and check the condition of this part. In the presence of oxides, conditions are created for the occurrence of current leaks, which cause short-term switching on. Regular cleaning of contacts in most cases solves the problem.
Please note that such work must be performed only with the plugs removed or the machine turned off.
Main reason 5
But mainly the problem of blinking LED light bulbs is encountered when it is connected through a backlit switch. The reason is this:
- To smooth out the ripple of the electric current after rectification on the diode bridge, a capacitor is used in the drivers. You cannot refuse it, as this will cause an increase in the pulsation rate of the LED itself, which is what is found in cheap models of LED light bulbs.
- The backlight installed in the switch ensures the presence of a constant, albeit minimal current in the circuit.
- As a result, the charged capacitor activates the process of turning on the LED, but its energy is only enough to supply the required voltage to the lamp for a short time.
This is what causes the LED lamp to periodically blink. Moreover, this problem is also typical for luminescent housekeepers. The frequency of short-term switching on of the light bulb depends on the capacitance of the driver capacitor.
Expert opinion
Viktor Pavlovich Strebizh, lighting and electrical expert
Any questions ask me, I will help!
On the one hand, this phenomenon has a positive side, if the lighting is in the toilet or corridor it can be used as night lighting. If there is something you don’t understand, write to me!
Subscribe to the newsletter
Switches with an indicator (backlit) are convenient devices that allow you to quickly find the switch in a dark room. Illumination is carried out using a neon lamp installed in the switch housing.
With their appearance, the functionality of the switches has increased, but the problems have not decreased. After all, each mechanism has its own characteristics.
How does the switch work?
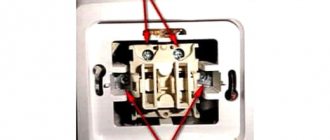
The phase coming to this switch is connected to the L - incoming contact (Fig. 2), and from the outgoing contacts it goes to the lighting lamps. The moving contacts are closed to each other.
A backlight circuit is installed, which includes a resistor and a “neon” - a neon light bulb, and is soldered to contacts L1 and L. Thus, when contacts L and L1 are open, the neon light bulb is lit, and when the light is turned on, these contacts are closed by a moving contact, which eliminates backlight circuit diagrams.
What should you pay attention to?
When choosing a switch with an indicator, it is necessary to operate with the power consumption of all lighting devices connected to the switch. The markings and rated current (maximum permissible) current are indicated on the inside of the switch. Basically, switches are manufactured for currents of 10 and 16 A and, accordingly, the maximum connection power for them is 2.2 and 3.5 kW.
It should also be noted that you should not use backlit switches to work with energy-saving (fluorescent) lamps. Because when turned off, the energy-saving lamp flickers, and this “behavior” of the lamp is unlikely to please anyone.
Currently, there are special types of lighting devices - a flickering candle lamp, which imitate the fluttering of a flame in the wind.
Why does the lamp flash when installing an illuminated switch?
Many users have problems with energy-saving lamps when installing a switch with an indicator, and the question arises as to why the energy-saving lamp is blinking. The fact is that when the switch is in the off state, the current passing through the signal circuit of the neon or LED light bulb charges the electronic ballast capacitor, which is located inside the lamp. This is a common reason why energy-saving lamps flicker - the voltage reaches the trigger value and the lamp flashes, after which the capacitor is discharged and the process is repeated again as it charges.
If the switched-off lamp blinks, you can remove the backlight from the switch or place a resistor or another capacitor in parallel with the lamp.
Currently, some manufacturers of lighting devices have taken into account the problem when the lamp blinks after turning off, and solved it by shunting the lamps or increasing the turn-on delay time - soft start.
Many users have problems with energy-saving lamps when installing a switch with an indicator, and the question arises as to why the energy-saving lamp is blinking.
This solution to the problem when the LED lamp is blinking is optimal. Technologically, 1-2 seconds are allotted for increasing the power of these lamps, however, the disadvantages of these lamps include reaching full brightness only after 1-1.5 minutes.
Another reason why lamps flicker may be an incorrect connection, when zero and not phase goes through the switch. Thus, if the LED lamps flicker, you can reconnect the switch yourself or call a specialist for this. In addition, if a fluorescent lamp flickers, this may not depend on the quality of the lamp itself. In this case, you need to try turning off the indicator.
Thus, when purchasing a switch with an indicator, it is best to choose lamps with smooth switching on, and during installation, carefully check that the wires are connected correctly, in which case problems when the energy-saving lamp flashes after turning off will not be terrible.
The illuminated switch is very practical. In the dark, you won’t have to search for it at random to turn on the light. However, in practice, such a device sometimes creates a great inconvenience - blinking of ice- or energy-saving lamps when turned off. Therefore, we will consider how to turn off the LED in the switch with our own hands, what main parts it consists of and what is the principle of its operation, as well as what are the main stages of the procedure for de-energizing the indicator.
Repair of a chandelier with a remote control: breakdowns and their repair
- The maximum permissible voltage must be at least twice the value in the network, that is, 440 V. 630 V capacitors are suitable for these purposes.
- If this could not be found, a 400 V capacitance will also do, but it should be connected according to a circuit with one series and additional shunt resistance in accordance with the following circuit.
Useful tips Connection diagrams Principles of operation of devices Main concepts Meters from Energomer Precautions Incandescent lamps Video instructions for the master Testing with a multimeter