A switch with LED or neon lighting is no longer uncommon in homes. The use of such switches is quite practical. In the dark, you don’t have to search along the wall with your hand to find the switch. With the advent of LED and CFL lamps, big problems began to arise. In particular, most modern LED lamps blink when the switch is off. Today we’ll figure out how to turn off the backlight on the switch.
This effect occurs due to a closed electrical circuit formed by a resistor with an LED (or neon lamp) and a power converter circuit for the LED and CFL lamp. In this article we will look at the simplest method on the question: how to turn off the backlight in a switch.
How to turn off the backlight on a switch: stage 1
How to turn off the backlight on a switch
First we need to dismantle the switch. Disconnect from conductors by first disconnecting the switch from electricity. For those who have already done this more than once, it’s an easy task.
After the switch is removed, it is necessary to remove the casing where the LED (or neon) itself is located.
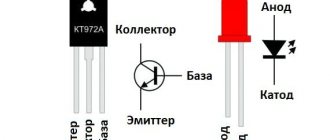
In our case, the backlight consists of a neon lamp and a 150 kOhm resistor. With an LED, nothing fundamentally changes, so the principle: how to turn off the backlight in a switch with an LED remains the same. The neon lamp is connected through a resistor to the switch terminals.
How to turn off the backlight in a switch
How to turn off the backlight on a switch: step 2
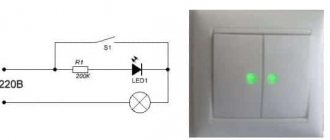
To correct the situation with the blinking diode lamp, we need to replace the resistor. In our case, we take a 220 kOhm resistor and a 1 N 4007 diode. The diode can be removed from an energy-saving lamp, where it is used as a diode bridge. The circuit of the converted switch will look like this:
If we leave a neon lamp, then a 220 kOhm resistor will be enough. If we want to change the indicator to a 3 mm diode, then select a 680 kOhm resistor. This is guaranteed to save you from the blinking of the diode lamp in the chandelier.
Examples of calculations
Since our task is only to illuminate the switch and achieve maximum viability, we take the LED current 30% of the nominal - 6mA
Resistor current limiter
Usd=3.5V, Isd=20mA (0.02A) - We do the calculation at 6mA (0.006A);
R1= (330-3.5) /0.006=55000 Ohm (55 kOhm). In order to reduce heating, the resistor value can be doubled to 100 kOhm.
Resistor power P=Ur1I=3270.006=2W.
It is better to mirror a 1000V diode in parallel with the LED.
How to turn off the video switch backlight
And finally, watch the video again on how to turn off the LED or neon lighting from the switch so that the lamps do not blink. This is a radical solution to the problem. We just bite off all the radio components and don’t worry anymore. However, this method of dealing with blinking does not satisfy me, so it is better to use the above example. And the switch does not need to be turned into a simple key and the functions remain.
Today you can find a switch with LED backlight in almost every home. Using such a switch in the dark is much more convenient, but with the advent of fluorescent and LED lamps, problems began to arise with these “convenient” devices.
Some modern lamps connected through a backlit wall switch flicker even though the light is off. The blinking effect, which is unpleasant for the eye, occurs due to a closed electrical circuit formed by a resistor with an LED (or a resistor and a neon bulb) and a power converter circuit for an LED or fluorescent lamp.
There are several ways to get rid of blinking in a 220V lamp; this has already been written about. In this article we will consider the simplest and most reliable option in more detail. It consists of removing the backlight from the switch. So how do you turn off the backlight in the switch? First things first.
Step-by-step instructions for installing in a backlight switch
When working on the switch, you must turn off the power supply!
Neon light bulbs come with a base and without a base, in which the leads come directly from the glass bulb. Therefore, the method of their installation is somewhat different.
Installing a neon light bulb with flexible leads into a switch
As a rule, the length of the leads of a neon light bulb (neon) or LED is not enough for direct connection to the switch terminals and therefore they must be extended with a piece of copper wire. For these purposes, both single-core and stranded wire of any cross-section are suitable. The best way to connect the wire to the terminal is by soldering.
Before soldering, the terminals of the neon light bulb and the ends of the conductor must be cleaned of oxides and tinned with solder using a soldering iron. Then join to a length of at least 5 mm and solder.
Then the soldering point and the terminal of the neon light bulb need to be insulated by putting an insulating tube on them. You can simply wrap a couple of turns of insulating tape.
For ease of soldering, the end of the soldered conductor is formed using pliers and secured to the switch terminal.
The keys or covers of wall switches are usually made of white plastic and the light from a neon bulb (neon) or LED passes through them well. It is enough to make the switch key visible in the dark. Therefore, there is no need to drill a hole in the switch opposite the backlight installation location.
Next, a resistor is soldered to the second terminal of the neon light bulb, and another piece of wire of the required length is soldered to the resistor to connect to the second terminal of the switch.
An insulating tube is also placed on the soldered resistor or it is insulated with insulating tape. The end of the output is formed into a ring and secured to the second terminal of the switch.
The switch illumination circuit is installed, the switch is connected to the electrical wiring, all that remains is to install the key and the work can be considered complete.
Installing a neon light bulb with a socket into a switch
It is not advisable to use a socket for illumination, since the service life of a neon light bulb (neon) is longer than the service life of the switch, and there is not enough space in the box. Therefore, it is more advisable to connect the base to the circuit using soldering.
To do this, you need to remove the insulation from the wires, tin the bare ends and make small loops. Then solder the light bulb terminals on the base to the soldering points.
A resistor is soldered to the wire extending from the central contact of the base at a distance of 2-3 cm. The resistor leads need to be shortened and wire loops made at the ends. A wire is also soldered to the second terminal of the resistor.
The threaded part of the base and the resistor must be insulated. This can be done using heat-shrinkable tubing, insulating tape, or the method I suggest.
Many good polyvinyl chloride (PVC) tubing is often used to insulate wires. To prevent the tube section (cambric) from slipping, the internal diameters should be slightly smaller than the insulated solder. There are always difficulties in finding a cambric of suitable diameter.
But if you hold the cambric for about 15 minutes in acetone, it becomes elastic and can be easily put on a part that is one and a half times larger than its internal diameter. This is how I insulated light bulbs in a homemade New Year's garland in the distant past.
After the acetone evaporates, the cambric again returns to its original size and tightly fits the lamp base. It is no longer possible to remove the cambric unless it is re-soaked with acetone. This insulation method is similar to heat-shrinkable tubing, but no heating is required.
After the preparatory work, the backlight is placed in the switch box and connected to its contacts.
Preparatory stage
If you have not encountered replacing or installing backlit switches before, you will have to prepare a little and think through your actions. In general, measures to remove a neon light bulb or LED can be divided into two stages:
- removing voltage from live wires;
- preparation of the necessary tools.
The first point is to de-energize the room in which the illuminated switch is located. To do this, the circuit breaker handle must be moved to the “off” position. In some houses, instead of them, fuses (plugs) are installed, which will have to be unscrewed. If the phase and neutral wires are connected to different machines, then for complete safety, turn off both machines (remove both plugs).
The essence of the second stage is to avoid unnecessary fuss in search of the missing tool during work. To remove the backlit switch and turn off the backlight, you will need: an indicator screwdriver, a heavy-duty flathead screwdriver, wire cutters and a knife.
Turning off the backlight
Initially, all actions for dismantling a neon lamp or LED completely coincide with the work of replacing a conventional switch:
- blackout of a room or apartment;
- removing the decorative on/off key from the latches, slightly prying it off on both sides;
- unscrewing the mounting bolts and removing the device from the mounting box;
- Use an indicator screwdriver to double-check the wire contacts for the absence of voltage;
- Having remembered the connection diagrams, the wires are disconnected.
Then you need to carefully examine the design of the illuminated switch and find the latches that hold the two parts of the housing together. By opening the latches, the switch will be divided into two halves. In one of them a resistor is soldered or screwed to a neon light bulb or LED.
All that remains is to carefully cut the terminals of the radio components, remove them and assemble the switch without backlighting in the reverse order.
From the above we can conclude that solving the problem of flickering lamps is quite simple. With the right approach, the entire backlight removal procedure will take about 15-30 minutes, after which any LED and fluorescent lamps will stop blinking when the switch is off.
Modern life and high housing and communal services tariffs dictate new requirements for the choice of lighting type. Energy-saving elements are gaining popularity due to a number of advantages:
1) Low electricity consumption.
2) Brightness.
3) Long service life.
The launch of LED products dates back to 1962.
There are disadvantages to products filled with LEDs - price. Some buyers experience an even more standard, but correctable situation - they buy it, come home, install it in the socket, and observe flickering when the mode is off.
Don’t rush to return it, we know how to solve the problem, we will answer why the light in the apartment is blinking, we will definitely help you fix the problem forever!
How does it work, how does it work?
To understand the reasons and eliminate them, consider the principle of operation of the device and its components.
This type of product consists of a base, a base made of metal, a platform with LEDs, a driver, and a plastic hemisphere.
When a conventional incandescent lamp was operating, voltage was applied to the coil, which was the load resistance. In the case of an LED, the circuit is modified: the current passes from the base to the electronic converter in the form of a driver, after which it goes to the LEDs themselves. The stabilization of the process depends on the complexity of the converter circuit.
For cheap ones, the driver substitute is not able to withstand external influences from the network; for more expensive products, such “outbreaks” occur much less frequently.
LED lighting devices are among the safest.
How to eliminate the flickering problem and its causes will be discussed below.
The touch light switch works automatically
Connecting a touch light switch
It often happens that touch switches operate without being pressed. In this case, you need to carefully inspect the device. Perhaps the reason is shorted contacts.
If the touchpad itself is damaged, you need to seek help from specialists. If they do not fix the problem, you will have to replace the device with a new one.
When working with touch switches, you must follow a number of precautions:
- Devices should be connected to the network in such a way that phase switching is carried out, not zero.
- If the power supply operates using a ground wire, it must be connected to the appropriate contacts.
- If a wire with many cores was used during the installation of the switch, the ends must be crimped and tinned. Otherwise, the contact will be broken and the connection will overheat.
It is important that the load matches the parameters of the switch
Nature of the outbreak
The first thing you need to understand is the nature of the outbreak. This will help you figure out the most likely reason.
Work with electricians only with the switch off!
1) The flickering is periodic. On state. Reasons: starter failure. The problem when the mode is off is the presence of a powerful source of electromagnetic waves, such as a telephone, radio, computer, or router, nearby.
2) Flashing when turned on. Reasons: low voltage, power surges. If you do not get rid of the problem, the device will burn out.
Cheap LED headlights installed in a car are very blinding to oncoming cars.
Illuminated switch: installation features of one- and two-key switches
- Low-quality energy-saving light bulb. It is more often observed in cheap Chinese-made products, when the lamp is defective from the factory. You'll have to spend money again and buy a good lamp.
- The service life of the diode lighting device has expired. The microcircuit element may have failed. As a result, the lamp glows, but blinks and crackles. There is no need to think that if the manufacturer provides an almost 10-year service life for the product, the lamp should work all the time. The service life of even a high-quality device is significantly reduced if voltage drops periodically appear in the network or the device operates at temperatures outside the standards determined by the designers.
The main causes of the malfunction: why does the LED lamp blink when the light is off?
If a recently purchased lamp flashes when it is off or when it is on, there may be several reasons. Let's note the main ones:
- the device was purchased from an unknown manufacturer, of low quality;
- switch illumination;
- surges, low voltage;
- connecting a lighting fixture via a dimmer.
Six signs of a high-quality ice lamp:
The device was purchased from an unknown manufacturer
- Well-known brand, good reputation of the manufacturer.
- The warranty period, the longer it is, the better the quality of the product.
- Not the lowest price.
- Large luminous flux (indicated by numbers).
- Power.
- Successful completion of the test work - check the product before purchasing: lighting quality, lack of flicker.
According to experts, LEDs provide pure light, without harmful elements.
Switch backlight
It often happens that the lamps are the same everywhere, but the switches are different. Where there is an indicator, problems arise with ice lighting, fluorescent lighting, and where there are ordinary ones, everything works normally. What is the problem?
And the reason is that when installing such a switch, the circuit is not completely disconnected, but the current that continues to flow charges the lamp. Therefore, a small glow either remains, or the LED light simply blinks, even when the light is turned off.
The easiest, cheapest way is to remove the backlight from the switch, or you can replace it with another one.
Unfortunately, energy-saving models rarely work correctly with backlit switches, so you just have to remove the indicator.
Jumps, low voltage
One of the most common causes of operational problems is low mains voltage. Both residents of large cities and small settlements suffer from this.
To resolve the misunderstanding, try contacting your electricity supplier or refuse cheap, low-quality lighting elements. If you prefer price to quality, buy a mains voltage stabilizer for your home, which will provide your apartment with constant power and voltage.
Before purchasing a stabilizer, calculate the total power of all devices and the number of phases used by consumers.
The second reason is to simultaneously turn on a regular lamp and an ice lamp, due to which the total capacitance of the capacitors and internal resistance change. Third, install a resistor on the chandelier.
Dimmer available
A dimmer is a device that helps regulate the intensity of the light flux.
Dimming is possible for almost any type of lamp, with the exception of LED. This is precisely why problems arise for ordinary buyers, users who decide to combine these two components. After all, as soon as the light is not turned on at full power, flickering often occurs. There is only one way out - either not to use the ice dimmer at all, or not to set it to display the highest values.
Thanks to the dimmer, you can set a timer to turn off the lighting.
Low frequency flickering of LED lamps
The amplitude of the alternating mains voltage changes with a frequency of 50 times/sec and has the form of a sinusoid. The luminescence of the matrix is provided exclusively by positive and negative half-waves passing through the LED. If a light source equipped with LEDs blinks, this may be the reason for significant savings on the power supply by the manufacturer.
In inexpensive models of such lighting equipment, a single-bridge rectifier is often used to reduce its cost, designed to convert AC voltage to DC. A certain number of oscillations are cut off after the diode bridge, and by adding a capacitor to the electrical circuit, ripple is reduced. Such a scheme allows you to observe the pulsation of the light flux with a frequency of 25 times/sec.
The capacitor, as a rule, accumulates charge at the amplitude maximum and returns it to the load at the minimum. At the output, the average voltage amplitude decreases, and the ripple becomes significantly less. If the resource capacity is insufficient, the capacitor is not enough to recharge the LED elements, whose brightness changes with each half-wave. According to sanitary standards, the pulsation of the light flux should not be more than 10 percent of the nominal intensity.
Eliminate flicker. Instructions.
We have noted the main reasons that can lead to the blinking of an LED lamp. Now we will look in detail at how to eliminate complex causes, for which we will provide step-by-step instructions.
How to turn off the backlight in the switch?
If you are one of the lucky ones who purchased a backlit switch but switched to LED lamps, we sympathize. Because rarely do these two phenomena coexist together. The simplest and most popular solution is to turn off the backlight. How to do it?
- Unplug the breaker (whole house).
- Use a measuring device to check the presence of current.
- Use wire cutters to cut off the wires that supply power to the light indicator.
- Reinstall the device. Secure. Apply electricity.
If, after these steps, the LED lamps also glow after turning off or flicker, just change the switch.
- Unplug the breaker or the entire house.
- Check for current.
- Remove the switching device from the box on the wall.
- Remove all wires.
- Screw and secure the new switch, including the wires.
- Apply current and check if the problem with the blinking LED lamp has been resolved.
Removing errors from wiring
The most common errors encountered in wiring are two. Incorrect connection and non-compliance of network parameters with the requirements stated by the manufacturer on the packaging of the llama. Check:
- Where is the phase wire connected (to which contact, what polarity). Presence of induced voltage (parallel cable);
- And if in the first case the problem is eliminated in no time by rearranging the wires, then in the second option all the wiring needs to be repaired.
- If the LED lamp blinks, we either stabilize it with a capacitor or increase the resistance with a resistor.
As we have already mentioned, one of the ways to eliminate the reason why the lamp blinks after turning off is to add a capacitor or resistor to the circuit.
Attach the secondary element to the lamp, placing it on the back of the switch itself or from inside the socket:
- Step 1. Buy a non-polar capacitor that can withstand a power of 630-640 V. This will help stabilize the current. The best solution would be a metal film capacitor.
- Step 2. If you are strengthening the cartridge, you need to buy a resistor, the power of which will depend on the sum of the power of all sockets. Try starting with 25% additional resistance to the existing resistor. If the problem is not solved, increase to 50%. If there are two or more buttons on the switch, you should purchase a separate resistor or capacitor for each. True, take into account the risks, because the design is already quite fire hazardous.
- Step 3: Make sure that none of the added elements are in contact with the housing or wire itself.
The question - why the LED lamp is blinking has been resolved!
We found out why LED light bulbs blink, and it doesn’t matter at all whether the lamps are turned off or on. They gave clear instructions on what to replace, add, or buy again.
Today you can purchase a special device, a lux meter, which will help you check the quality before purchasing, measure the pulsation coefficient, and control the quality of the light flux.
The most important thing to remember is that flickering lamps can harm not only your nervous system, but also cause irreparable damage to your vision. Make the right choice, do not skimp on your health!
The pulsation parameters specified by the manufacturer will allow you to understand how much harm such a lighting device can cause to the health of your eyes.
Today you can find a switch with LED backlight in almost every home. Using such a switch in the dark is much more convenient, but with the advent of fluorescent and LED lamps, problems began to arise with these “convenient” devices.
Some modern lamps connected through a backlit wall switch flicker even though the light is off. The blinking effect, which is unpleasant for the eye, occurs due to a closed electrical circuit formed by a resistor with an LED (or a resistor and a neon bulb) and a power converter circuit for an LED or fluorescent lamp.
There are several ways to get rid of blinking in a 220V lamp, more on that already. In this article we will consider the simplest and most reliable option in more detail. It consists of removing the backlight from the switch. So how do you turn off the backlight in the switch? First things first.
Types of switches for home use
Each manufacturer produces different models of switches, which differ both in shape and internal structure.
However, several main types should be distinguished. Table 1. Types of switches by switching principle
| View | Description |
| Mechanical | Devices that are easy to install. Instead of the usual button, some models have a lever or cord. |
| Sensory | The device works at the touch of your hand, and you do not need to press a key. |
| With remote control | This design is equipped with a special remote control, which comes included, or a sensor that responds to movements around. |
The most popular is the first option, which is installed everywhere. Moreover, such switches have become in demand since the very beginning of the appearance of the electrical circuit. The second option is less popular, especially in our country. The third option is a modern model, which is gradually displacing outdated switches from the market.
Installing a motion sensor in a structure is advisable both from the point of view of energy savings and home safety. For example, if you install a structure at the entrance, residents will notice if intruders break into the apartment.
Switch with additional lighting
Depending on their design features, there are devices with one or several buttons (on average, for standard electrical appliances, switches with two or three buttons are used). Each button is responsible for turning on and off a separate circuit.
So, if several lamps are installed in one room at once: the main chandelier, spotlights, sconces, then it would be advisable to install a design with three buttons.
In addition, no less popular are devices with two buttons, which are installed in all apartments without exception. Most often they are needed for a chandelier when there are many light bulbs.
Depending on the installation method, there are internal and external switches. The first option is installed in the apartment, because such structures look aesthetically pleasing. For safety during installation, a special box is installed, which is called a socket box.
Connection diagram
Built-in switches are used when there is electrical wiring hidden in the wall. Overhead devices are mounted in the presence of external conductors. In this case, the connection diagram has no fundamental differences.
Where is the switch installed?
Preparatory stage
If you have not encountered replacing or installing backlit switches before, you will have to prepare a little and think through your actions. In general, measures to remove a neon light bulb or LED can be divided into two stages:
- removing voltage from live wires;
- preparation of the necessary tools.
The first point is to de-energize the room in which the illuminated switch is located. To do this, the circuit breaker handle must be moved to the “off” position. In some houses, instead of them, fuses (plugs) are installed, which will have to be unscrewed. If the phase and neutral wires are connected to different machines, then for complete safety, turn off both machines (remove both plugs).
The essence of the second stage is to avoid unnecessary fuss in search of the missing tool during work. To remove the backlit switch and turn off the backlight, you will need: an indicator screwdriver, a heavy-duty flathead screwdriver, wire cutters and a knife.
Turning off the backlight
Initially, all actions for dismantling a neon lamp or LED completely coincide with the work of replacing a conventional switch:
- blackout of a room or apartment;
- removing the decorative on/off key from the latches, slightly prying it off on both sides;
- unscrewing the mounting bolts and removing the device from the mounting box;
- Use an indicator screwdriver to double-check the wire contacts for the absence of voltage;
- Having remembered the connection diagrams, the wires are disconnected.
Then you need to carefully examine the design of the illuminated switch and find the latches that hold the two parts of the housing together. By opening the latches, the switch will be divided into two halves. In one of them a resistor is soldered or screwed to a neon light bulb or LED.
All that remains is to carefully cut the terminals of the radio components, remove them and assemble the switch without backlighting in the reverse order.
Manufacturers of backlit switches do not always indicate that the use of these devices is recommended in electrical circuits with a predominantly resistive load. That is, the light source must be incandescent lamps.
Even more often, the technical data sheet of a product is sent to the trash bin unread, along with the packaging. The consequences of such technical nihilism appear immediately after fluorescent or LED lamps begin to be used instead of incandescent lamps. Even de-energized (it would seem) they somehow flicker in the dark.
This phenomenon not only causes psychological discomfort, but also leads to their premature failure.
To understand the physical essence of this phenomenon, you need to look inside both the switch itself and the light source
. Let's try to figure out why the LED lamp blinks, and whether a backlit switch could be the reason for this.
Operating principle of the lighting device
For the backlight device, a circuit is added that is parallel to the switched contacts. Its main element is LED or neon
. The resistance of this additional circuit is much higher than that of short-circuited contacts.
When the switch is in the "on" position, no electricity passes through it. And in the “off” position it, bypassing the open main contacts, reaches the load
.
If it is resistive, then its strength is not enough for the thread to heat up to glow.
If fluorescent or LED lighting devices are used, then the load is reactive in nature, since to ensure the operation of these light sources, a circuit consisting of capacitors, coils and semiconductor devices
. It can also work with low current.
What turns on the light
Both LED and fluorescent ones operate not from alternating mains voltage, but from constant voltage. To do this, a device (driver) is placed in their sockets.
, which rectifies the current and performs some other actions. For example, the final stage of a fluorescent lamp control circuit is a high-voltage transformer, which ensures the occurrence of an arc discharge in a gaseous environment.
The LED lamp driver circuit is somewhat simpler. It consists of capacitors and ballast resistors that provide protection for semiconductor devices that are connected in series, due to which the supply voltage is divided between them.
All driver circuits have two common elements
. The first is the so-called diode bridge, which cuts the alternating voltage sinusoid and converts it into a series of pulses of the same sign. The second is an electrolytic capacitor parallel to it. At the moment when the voltage drops to zero, the capacitor discharges and smoothes out the gap between the pulse peaks. It is this element that causes the unauthorized operation of the lamp.
The weak current from the backlight circuit is still rectified, but the process of charging the capacitor is very slow. In the end, it is filled to the brim with electricity and discharges at the moment the rectified voltage drops to zero again. This is enough for a short-term occurrence of an arc discharge in a gas environment
or ensuring the operation of a chain of series-connected LEDs.
For luminescent lamps, this mode is harmful for the reason that their service life is determined by the number of starts. In a few minutes of blinking it can be completely used up. LEDs are more tolerant of intermittent operation
.
What to do if the switch needs to be moved
In some situations, there is a desire or need to move the switch to another location. For example, when there are children in the family who have already grown up, but cannot yet reach the top switch. Therefore, according to the rules for installing electrical equipment, it is permitted to move the device to another location.
The benefits of replacing the switch yourself
It is allowed to mount the switch at a distance from 82 to 165 centimeters from the floor level. However, in order to begin work on moving equipment, you must first decide on the exact location of its installation. It is recommended to place the switch at a distance of no more than 25 centimeters from the door frame (the side does not matter, but more often the device is located on the right).
Moving the switch - step-by-step instructions
Step 1. If you move the equipment within 100 centimeters from the existing position down or up, then make a groove in the ceiling. As a rule, it has a depth of 2 times the cross-section of the cable in the corrugation. So, the wire should not stick out from the opening. You can prepare such a recess using a hammer drill or a special tool for grooves.
Prices for popular models of wall chasers
Wall chaser
This is what a cable groove looks like in the ceiling
Step 2. Now, directly at the installation site of the new switch, you need to make a recess for the mounting bowl. This is done using the same hammer drill and a special round attachment. If the wall is concrete, then the depth of the opening will be about 50 millimeters, and if it is brick or panel, then 45 millimeters. The diameter of the nozzle itself will be about 7 centimeters (selected individually).
This is what the opening for the mounting bowl looks like
Step 3. Now you need to completely de-energize the apartment and dismantle the old switch (using the method we discussed above). Only here, in addition to the switch, the mounting bowl is removed from the wall. To do this you will need the same hammer or a hammer with a flat screwdriver. Most often, socket boxes are fixed with gypsum mortar, which begins to crumble upon impact.
It is important not to damage the integrity of the plastic base.
It is necessary to carefully remove the mounting bowl from the wall
Step 4. Now you should extend the cable to the required length. The wires, as a rule, are connected with special clamps or a block, but if this is not possible, then their ends are bunched together and then insulated. According to the installation rules, the cable must be in a special plastic corrugation with a diameter of about 1.6 centimeters. It is also necessary to wrap insulating tape at the junction of the two parts of the corrugation. When extending the cable, you must leave a few centimeters as reserve.
There should be no exposed wires, so they are wrapped with insulation tape
Step 5. Now you need to install the mounting bowl in the new opening; it will be easier to fix it using alabaster, which contains gypsum. Since the plaster begins to harden within a few seconds, it is quickly diluted with water according to the instructions, and then the hole is covered.
You need to work with alabaster quickly before it has time to harden.
Step 6. The grooves in the ceiling must also be covered with the solution. In this case, the wiring should be laid according to all the rules, because it will no longer be possible to change its location. Then the surface of the wall must be finished with finishing putty in order to completely hide the locations of the grooves. When the surface dries, it is treated with fine-grained sandpaper.
Prices for popular types of putty
Putties
The grooves should also be puttied
The switch should be connected only after the solution has hardened. Therefore, you will have to wait a few hours.
If you plan to move the switch a significant distance from its original location, then most likely it will need to be connected to another box. In this case, it is advisable to seek help from an experienced electrician.
How to fix the problem
Illuminated switch is a very practical device
, making life easier. There is no point in giving it up for the sake of using modern light sources. To prevent light bulbs from blinking due to a backlit switch, you can use one of two methods:
- Increase the ballast resistance of the additional circuit;
- Use a resistive or capacitive shunt.
In the additional circuit of the switch there is already resistance (). It is installed in series with a neon or LED. If you increase the value of the resistor, the current flowing through it will be even weaker
. Then the capacitor after the driver rectifier bridge will not be fully charged due to natural losses.
The disadvantage of this method is the difficulty of selecting the value of the ballast resistance - if it is too large, the backlight will stop working. In addition, it is quite technically difficult. You must have truly golden hands.
The simplest resistive shunt is 40 W. The resistance of its cold thread is no more than 100 Ohms. This is less than the driver input impedance. All current from the backlight will go through it
. However, different light sources in a chandelier are very unsightly. But the bypass process is extremely simple.
It can be replaced by a resistor with a nominal value of 100 Ohms for circuits with a voltage of 250–400 volts
. It is installed between the wire from which the cable is laid to the switch.
If you can’t get to it (for example, it’s covered with wallpaper), then a shunt resistor can be soldered to the input wires of the chandelier.
The disadvantage of this method is that the shunt resistor can heat up
.
The capacitive shunt takes electricity from the capacitor, which causes light sources to flicker. Just use not an electrolytic (having the polarity of the terminals) element, but an oil-paper element, marked with the ≈ sign and designed for a voltage of 250–400 volts
. Its capacitance should not exceed 1 µF. It is mounted in exactly the same way as a resistive shunt - between the phase and neutral wires.
Incorrect installation also causes de-energized lamps to glow. For example, if the neutral wire is switched, and not the phase wire. In addition, the flickering intensity of luminescent housekeepers is influenced by the quality of their manufacture.
. It is best to carry out work on bridging the circuit breaker during its installation.
When connecting energy-saving or LED lamps to a backlit switch, the lamps do not go out completely or blink. In our video review, we suggest you look at options for solving this problem:
Did you like the video? Subscribe to our channel!
Switches with an indicator (backlit) are convenient devices that allow you to quickly find the switch in a dark room. Illumination is carried out using a neon lamp installed in the switch housing.
With their appearance, the functionality of the switches has increased, but the problems have not decreased. After all, each mechanism has its own characteristics.
How does the switch work?
The phase coming to this switch is connected to L - the incoming contact (Fig. 2), and from the outgoing contacts it goes to the lighting lamps. The moving contacts are closed to each other.
A backlight circuit is installed, which includes a resistor and a “neon” - a neon light bulb, and is soldered to contacts L1 and L. Thus, when contacts L and L1 are open, the neon light bulb is lit, and when the light is turned on, these contacts are closed by a moving contact, which eliminates backlight circuit diagrams.
What should you pay attention to?
When choosing a switch with an indicator, it is necessary to operate with the power consumption of all lighting devices connected to the switch. The markings and rated current (maximum permissible) current are indicated on the inside of the switch. Basically, switches are manufactured for currents of 10 and 16 A and, accordingly, the maximum connection power for them is 2.2 and 3.5 kW.
It should also be noted that you should not use backlit switches to work with energy-saving (fluorescent) lamps. Because when turned off, the energy-saving lamp flickers, and this “behavior” of the lamp is unlikely to please anyone.
Currently, there are special types of lighting devices - a flickering candle lamp, which imitate the fluttering of a flame in the wind.
Parsing the circuit
Everything is quite simple here. A voltage of 220 volts is supplied from the AC mains to the diode bridge through a fuse. It is designated “F1” in the diagram. After the diode bridge, a constant current with a certain small ripple comes out. To smooth out the ripple, a capacitor is installed in the circuit. It is designated as "C4".
So this capacitor is the very reason, mind you, the main reason why the energy-saving lamp blinks after being turned off. True, this is not the only reason why these lighting devices blink after being turned off, so let’s look at them all in order.
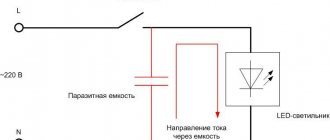
Reason #1 – switch illumination
To quickly find the switch at night, manufacturers install neon bulbs or LEDs on them. It is convenient from all sides. So the backlight is connected in parallel to the contacts of the switch itself. Moreover, any electrical circuit has a certain resistance. In our case, with an LED it is 100 kOhm with a power of only one watt, with neon backlighting it is 1000 kOhm and a power of 0.5 to 1.0 W.
So why is the light blinking? The thing is that when the switch is on, the current load goes entirely to the energy-saving lamp through the contacts. Once the switch is turned off, the circuit connecting the lamp and the network is broken. But a small bridge in the form of LED (neon) lighting remains. The current passing through it has a small load value, but it is enough to charge the filter capacitor in the lamp connection circuit.
As soon as the capacitor collects the required amount of electricity, it will begin to try to turn on the circuit of the lamp itself. But its charge is not enough for this. That is, I collected a charge, gave it to the lamp, discharged, and again it takes time to charge. But in reality it turns out that the energy-saving light bulb blinks all the time.
What to do
- The easiest option is to remove the switch backlight by disconnecting the connecting wires between the contacts and the backlight source.
- If the switch operates on several light sources at once, it is recommended to replace one energy-saving lamp with a regular incandescent light bulb. In this case, a small current passing through the neon or LED will be spent on heating the filament. But this current is not enough, so nothing will blink.
- If the switch only works for one energy-saving lamp, but you do not want to change it, then you can install it in parallel directly in the chandelier with a resistance of 50 kOhm and 2 W. Essentially, this resistance will perform the functions of an incandescent lamp. Let's face it - it's a crazy idea that shouldn't even be used; it's better to buy a switch without backlighting.
Reason No. 2 – incorrect installation
What does incorrect installation mean? This is when the switch is supplied not with phase, but with zero. That is, the light source will always be under low voltage. In any case, it will be enough to recharge the capacitor. In this case, there is only one way out - to swap the phase and zero in the switchboard.
I would like to add that the energy-saving lamp will blink even if the wiring in the house is in poor condition. What to do in this case? There are two options here:
- Change all wiring. This is long and costly, in any case, you will have to wait for the next major overhaul. Although it is possible to carry out the replacement in an open way.
- Install an RCD and ground the network in sections.
Reason #3 – poor quality
The third reason why an energy-saving lamp blinks is its low quality. To be honest, there are a huge number of energy-saving lamps on the market that do not meet state standards. These are not only Chinese-made devices, domestic manufacturers are also guilty of this. Therefore, these devices installed in the home lighting network sometimes not only blink, they simply do not light up.
Therefore, my advice is to purchase lamps only from branded manufacturers who have proven the reliability and high quality of their products. Although it should be noted that such manufacturers also have defects. So no one is immune from this.