The cable is connected by turning the contact mechanism a quarter turn, as shown in the figure.
After this, crimping is carried out. Thus, the current passed along a closed path. At the final stage, all that remains is to eliminate the gaps between the socket box and the wall, covering it with gypsum mortar, and also seal the channels with the laid telephone cable. Initially, stationary devices did not require connecting sockets, since the wires were simply connected directly to each other. How to connect a telephone socket
Installation is complete. This has virtually no effect on the quality of communication.
The excess part, if any remains, can be easily hidden under the socket body.
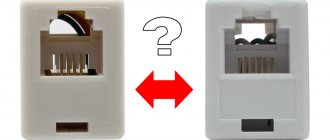
You can view the models using the photos of telephone sockets presented. Further, both types are distinguished by the number of connectors: single-connector and multi-connector models.
All terminals are distinguished by color, each of them is connected to the corresponding color of the cores. Methods for installing telephone sockets Taking into account certain technical issues, telephone sockets are installed using the same methods as ordinary electrical ones. 6 Video tutorial Installing and connecting electrical and telephone sockets
Features of a telephone socket
Telephone socket
To connect a telephone socket you will need a PBX cable coming from an external telephone line. To make calls, an external PBX cable is connected to an outlet. Then an additional connector cable goes from the outlet to the box, and the phone itself is separately connected to the electrical network using a plug. The telephone socket is usually mounted on the wall, and there are two options for installing this device:
- With external mount . With this installation option, the socket and wires are mounted on the wall from above. This option is simpler and faster, since the craftsman does not have to make recess holes to mount the box. However, such a box is easier to damage, so external sockets are more likely to fail.
- With internal fastening. With this installation option, the socket with wires is mounted directly into the wall. This installation allows you to hide the box and wiring, so such devices are less likely to be damaged. True, the master will have to make a notch in the wall, which complicates the work.
Preparatory work
Before starting work, you need to prepare all available tools and materials. Using a hammer drill with a round crown, a place is drilled in the wall to install a socket box.
When considering how to connect an outlet for the Internet and a Schneider, Legrand phone, you should know the general principle of this process. At the preparation stage, all actions will be the same.
After drilling a recess in the wall, the installation site is thoroughly cleaned of construction debris. The socket box is installed in the recess. An asbestos mixture is used to fix it.
Next, you need to pay attention to the outlet itself. It will need to be disassembled. The manufacturer's instructions describe this process in detail. But the principle is approximately the same for all sockets.
Types of telephone sockets
There are several options for telephone sockets depending on the type of connector:
- RJ-11 . The connector is compact in size and consists of a two-core wire. Used to connect one telephone in the house (connected to one line). The RJ-11 connector is most often used in private apartments and small houses.
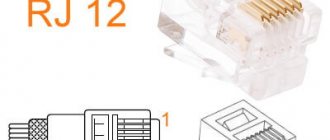
- RJ-12 . Made in the form of an oversized connector, which consists of a four-core wire. It is usually used in offices and in production to create a large telephone network (connected to several lines at once).
- RJ-14. The connector has increased dimensions, and the device itself consists of a four-core wire. Can be connected to one or several lines. Therefore, RJ-14 is considered a universal device that can create both large and small telephone networks.
Attention! There are also obsolete RTShK-4 models on sale, but they are characterized by complicated installation, so in practice they are almost never used.
Connecting the connector to cables without a crimper, using available tools
The previously described method is well suited for professional installers who are constantly installing telephone sockets and laying lines. They need special tools: streamers for wires of various diameters and crimpers for several connector standards. For an ordinary consumer who decides to install the phone themselves, this is an extra cost. After the work is completed, the tool will rarely be in demand or will not be needed at all. Therefore, let’s look at how to secure a wire to a connector with a regular flat-head screwdriver; the dimensions of its working part should be commensurate with the contacts on the connector. The width of the pen is 3 – 4 mm; larger sizes are unsuitable for this work.
Sequence of operations:
- Stripping the outer shell and installing the wires into the corresponding grooves is carried out as in the previous case;
- Using a flat-head screwdriver, press all contacts in sequence;
- Then the common clamp is pressed until a characteristic click is heard, fixing the cable sheath in the connector.
When using this method, you must be extremely careful not to damage the cable or destroy the connector body with excessive force.
Tip #2. Professionals check the quality of the connection with a special tester; at the household level, this can be done simply by connecting the cable between the phone and the outlet. Pick up the phone, if everything is done correctly, there will be a characteristic dial tone, just to be sure, call any number.
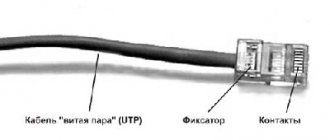
Socket design and cable operating principle
Socket design
The socket has the same design regardless of the type of device. It consists of three main elements:
- Frame. Usually made of dielectric material - it can be ceramic or plastic. The case acts as an insulator - it protects the contacts from mechanical deformation and water, as well as from accidental touch.
- Nest . It is made in the form of a recess on the body, which is connected to the electrical contacts inside the device. The socket device may include one or more sockets, depending on the needs of the landline telephone user
- Contacts . Used to connect external PBX wires to the device. The contacts also connect to a socket inside the case, which allows you to create a subscriber connection via telephone. They come in two types - clamping (screw) and in the form of terminals.
To transmit the signal, two copper wires are used, which are located inside the contacts. The cross-section of these wires is very small, so they are used to transmit low-power electric current. In the absence of a call (when the network is not connected or the pipe is laid), a direct current runs through them with a voltage level of 40-60 volts. During a call, the current becomes alternating and the voltage level increases to 100-120 volts. If the handset is picked up, but there is no call, then the voltage drops to 4-12 volts.
Note! These numbers can be used to check that the telephone jack is assembled correctly using a voltmeter or multimeter.
general characteristics
Before considering how to connect an outlet for the Internet, you should say a few words about the features of its design. The main difference is the presence of a twisted pair of wires. There are 4 of them in total. Accordingly, the socket accepts 8 wires. They twist, interrupting electrical interference.
This allows you to achieve high quality communications, as well as good information transfer speeds (up to 1000 Mbit/s). The connector used by different manufacturers in such sockets is called RJ-45. It is present in the vast majority of the products presented.
This input is suitable for connecting a wire from the Internet or a landline telephone. The connection is made according to specific instructions.
Connection algorithm
Connection algorithm
In Russia, the most popular devices are the RJ-11 category (for home use) or RJ-12 (for creating a network in the office or at work). Their installation will be carried out almost according to the same algorithm, and only the wiring diagram will differ. Below we will first find out what preliminary work needs to be done before connecting RJ-11 and RJ-12, and then we will look at the step-by-step installation algorithm for each device.
Preparatory work
Before installation, you need to decide on the location of the future outlet device. If you are mounting the device inside the wall, then you need to use a hammer drill to make a recess in advance, where you should put the sealing box and cover it with construction mixture so that it adheres well to the wall. You will also need the socket itself, as well as additional tools:
- Rubberized gloves - to prevent you from getting an electric shock while working.
- Screwdriver - for connecting contacts and securing the device to the wall.
- Sharp knife - for removing insulation from telephone wires.
- Wire cutters - for cutting wires in case of improper stripping.
- Electrical tape - to protect contacts in case of damage.
- Tester - to determine the “plus” and “minus” on the wires.
Stripping the ends of the cores
Before installing the outlet device, put on gloves and take the PBX cable. Using a knife, carefully scrape back 3-4cm of the ends to create smooth, clean ends. If you make a mistake while stripping, be sure to cut the wire using wire cutters, and then repeat the stripping. If you cut off a lot of insulation, you can restore it using electrical tape. If you can’t do the cleaning efficiently, you can buy a cross-cutting knife - it will make the work much easier with it.
Note! Stripping the ends should only be done in the case of clamp contacts - if you have terminals, then it is not performed.
Connecting a two-wire socket (RJ-11)
To install RJ-11, follow these steps:
- First you need to disassemble the case. Typically, the housing elements are connected using small bolts or screws - carefully unscrew them using a screwdriver.
- Now look carefully at the contacts. If you have crimp (screw) contacts, then use a tester to determine the polarity, and then connect the red wire to the negative and the green wire to the positive. Finally, tighten the screw terminals.
- If your contacts are made in the form of terminals, then you just need to insert the unstripped wires into connectors 2 and 3. In this case, the green wire is usually attached to the 2nd connector with a plus, and the red wire to the 3rd connector with a minus. Polarity can be checked using a tester. At the end, the terminals are tightened using a screwdriver.
- At the end, you need to check the correct assembly. To do this, use a voltmeter or multimeter - it should show 40-60 volts. If the indicators match, then attach the device to the wall and assemble the case back - the RJ-11 assembly is ready.
Connecting a two-wire socket (RJ-11) video
Connecting a four-wire socket (RJ-12)
The RJ-12 connection will be carried out according to a similar scheme. Only the wiring connection will be different:
- Remove the housing and decide on the type of contacts. If you work with clamp contacts, then the telephone exchange is connected to the corresponding wires inside the housing. That is, the red wire connects to red, black to black, and so on. Finally, tighten the contacts using screws, and then assemble the box.
- If you have terminals, the work will be even easier. Insert the black one into the first slot, the green one into the second one, the orange one into the third one, and the yellow one into the fourth one. After this, tighten the terminals to ensure good contact and assemble the box.
Wires and contacts
When considering how to connect an Internet outlet from Legrand, Schneider and other manufacturers, you need to understand their diagram. There are terminals on the back of the product. They are marked with special colors. Each of them clearly matches the color of the conductor.
The cable is not stripped of insulation before connection. Only the common protective tube in which the contact pairs pass is removed. The terminal clamping mechanism is designed so that it correctly cuts the core sheath. This way the contacts fit directly into the conductor material.
When stripping the insulation, there is a high probability that the core will be damaged. There are 2 main wiring diagrams. They are called A and B. The choice depends on how the service provider connects the network to the consumer. Therefore, before installation, it is necessary to consult with the provider about the layout of their conductors.
Popular mistakes
When assembling, a person can make the following mistakes:
- Installation without using gloves . In the PBX network, the voltage level is 40-60 V, and during work it can increase to 120 V. If you do not wear gloves, there is a high risk of electric shock, which can be fatal.
- Buying a socket without instructions . The arrangement of contacts and wires inside the box may vary depending on the device manufacturer. Therefore, it is recommended to have the instructions with you during assembly in case you get confused.
We also note that if the conductors are incorrectly fastened, a short circuit may occur, which will lead to the de-energization of the telephone line.
However, there is no need to panic - the PBX station operates in clock mode, and the voltage level is updated every few minutes. Therefore, if a short circuit occurs, just wait 5 minutes - after that the line should work again. Connecting a telephone socket video
Useful tips
Well, the last thing I would like to provide you with is useful tips on connecting a telephone socket with your own hands. So, consider the following nuances during installation:
- Today, the most popular is the internal telephone socket. Since it can harmoniously fit into any interior of the room and is not very noticeable. But when installing it, it is necessary to take into account the fact that the wall decoration may be damaged. And it will take more time.
- You should buy products from trusted manufacturers. These include the companies Legrand and Vico. After all, they have already proven themselves positively in the modern market.
- If the contact numbering was not indicated on the body of the purchased device, then you need to familiarize yourself with the rules for marking wires by color. So, to indicate positive contacts, green, blue and orange are used together with white. For negative contacts, use the same colors, only without white.
- The old format telephone socket has a different marking standard. Therefore, if you are installing just such a device, then you need to know these rules. For example, the colors used for plus are black, orange and green. For minus - yellow, blue and red.
Read also: Paths for beam cranes
Finally, we recommend watching a video that addresses the issue of installing a telephone socket:
So we looked at the technology for installing and connecting a telephone socket to the line. We hope the information provided helped you complete the installation yourself!
It will be useful to read:
- ordinary user
- Group: Users
- Posts: 99
Mosquito (01/19/2013 – 20:25):
- Megatheronosaurus
- Group: Users
- Posts: 7,960
- local
- Group: Users
- Messages: 17,259
extazi (20.01.2013 – 17:07) :
In practice, the process of connecting a telephone socket is many times simpler and more accessible than an electrical one. The main criterion is based on complete safety, because the voltage present in the supply is safe for humans. So a telephone socket for a novice home craftsman can become a starting practice.
- Device characteristics
- Preparing to connect
- Direct process
Types of equipment
With the development of technology, telephone sets are improved, but in general the principle of their operation remains unchanged. To connect them to the communication line, special sockets are still used.
In Russia, from the 80s until recently, a single standard was used - RTShK-4. Even earlier, wires were connected by simply twisting them together. Now there are several standards.
The development of microprocessor technologies has led to the replacement of RTShK-4 type sockets with others - marked RJ. With their help, you can connect up to four telephones to the line. The abbreviation RJ stands for Registered Jack. There are several standards for telephone sockets with this designation:
- RJ 9 - connector that connects the handset to a landline telephone,
- RJ 11 - it is the one most often used in residential buildings and apartments, the first standard adopted in the USA, also called the “Euro socket”, has two contacts and connects one telephone,
- RJ 14 - often used in office premises, has contacts and 4 wires, is convenient for connecting additional lines - you can connect two telephones with a separate line, in apartments it is rarely used to connect a telephone,
- RJ 25 is a model with three pairs of contacts; it is difficult to connect it yourself; it is better to entrust such work to specialists.
- RJ 45 is a device with 4 pairs of contacts, it is used to connect computer and telephone networks or connect a telephone to a line.
There are also combined versions of RTShK-4 and RJ 11 with both types of connectors. Such devices are used to connect computer and telephone networks. In addition, they can be used to connect devices with old and new plugs to the network.
There are also RJ 12 sockets, but they are not standard, as Legrand products are designated as RJ11 or RJ 25. TAE type devices are used to connect German and French telephone sets to the line.
Adviсe
To properly connect your phone and get a well-functioning line, you need to take into account some recommendations.
- Most often, an internal (hidden) outlet is installed. It fits well into any interior, but it is more difficult to install, and it can also damage the decorative finish of the walls. Open type sockets are easy to maintain, install and dismantle; their installation does not damage the finish, but they do not look very aesthetically pleasing.
- Preference should be given to products from well-known manufacturers. These include the companies Legrand and Vico.
- If the socket does not come with a wire marking diagram, you can use the tables above. In the new marking, the positive wire of the RJ 11 socket is the same color as the negative wire, but with the addition of white. According to the old scheme, positive is green and negative is red. In the German version, negative is white, and positive is brown.