Connecting an outlet is a procedure that has to be performed during construction and major repairs of residential, administrative and commercial buildings. To carry out this activity, there is no need to call a professional electrician; everything can be done with your own hands. The main condition for carrying out work on the line is strict adherence to safety measures. Devices can only be connected after the apartment has been de-energized. You also need to familiarize yourself with the possible connection diagrams for sockets and the rules for their placement.
Socket device
Electrical socket design
A socket is a device used to connect energy consumers to the electrical network. Products of various types are designed for voltages of 220 V, 380 V and currents up to 25 A.
The device consists of the following parts:
- box - designed to accommodate internal parts and mechanisms, protecting them from the influence of the external environment;
- body - used for fastening and connecting components;
- terminals - for connecting wires (clips or bolts);
- contacts (petals) - for contact with the power cable plug;
- clamping device (legs) - hold the body in the socket;
- lid - covers the insides and performs a decorative function.
Modern electrical points are equipped with automatic stabilizers, residual current devices (RCDs) and displays.
At what height should sockets be installed?
The installation height of sockets is determined based on purely practical considerations. It is necessary to take into account user convenience, the length of the power cable for heavy devices (refrigerator, washing machine) and safety. Sockets break down from time to time and need to be replaced or repaired. When preparing installation, you should remember this.
The distance to the sockets from the floor is usually from 30 to 80 cm. When installing at a low height, you should take care of the safety of children by choosing devices with special curtains. The upper point of the outlet location is not determined by the standards.
But you need to know that there should be at least 15 cm from the floor slab to the socket, and at least 10 cm from the edge of the window opening. A socket block installed away from the window is better protected from temperature changes, from water, dust and other atmospheric factors.
Common types
Ratio of power and current
Manufacturers produce products that have a wide range of applications, designed for use in certain conditions.
Based on the number of consumers, products are divided into single and double. To create blocks of 3-5 points, sources are combined into one system.
Regarding the ability to withstand loads, the devices have the following power ratings:
- weak - 1.7 kW;
- medium - 3.4 kW;
- strong - 6.6-10 kW.
The most popular products in everyday life are those designed for a voltage of 230 V and a current of 16 A.
According to the level of protection against electric shock, products are divided into conventional and grounded. Protected sockets have external contacts that are connected to a separate terminal to which the ground wire is connected.
5-pin socket plug
Since devices and equipment with certain properties are used in various spheres of life, the sockets have a configuration corresponding to them.
The number of connectors is as follows:
- 2 - phase and zero;
- 3 - 2 phases and zero;
- 3 - phase, zero, ground;
- 4 - 2 phases, zero, ground;
- 5 - 3 phases, zero, ground.
An important characteristic is the level of protection of sockets from moisture. This indicator is marked on the product body with the letters IP and numbers.
Table of degrees of protection
The classification according to the degree of protection is as follows:
- IP 0-24 - no;
- IP 25-40 - against splashes;
- IP 41-54 - from weak water flows, equipped with a lid;
- IP 55 + - absolute, have a sealed plug.
The main difference between the products is the way they are placed.
Installing a block with two and three keys
Installation of such a block makes it possible to control two light sources in different rooms, or two in one room. In this case, not 4 wires are supplied from the distribution box, but five.
- The phase is connected to the jumper of the switching block.
- Only the neutral wire and the grounding conductor are attached to the socket contacts.
- Then the two remaining conductors are connected to the switch contacts.
- In the distribution box, twists are made of the cores that supply the core and those that go to the lighting fixtures.
Three-key combined devices are the best option for small apartments. They often have a bathtub, a toilet and a kitchen nearby, and the lighting is switched on on one wall. If there are three keys, then you will need a cable with six cores, three of which are also connected to the switch terminals.
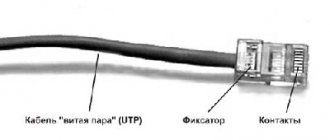
Wiring and socket installation method
Installation of hidden wiring
Depending on the material from which the supporting surface is made, a choice is made of the method of laying lines and installing devices.
In accordance with the requirements of SNiP, the following installation options are possible:
- Internal. Used in buildings made of brick and concrete. If the load-bearing walls are sufficiently thick, it is practiced in houses made of foam blocks. Cables, mounting boxes and sockets are buried in the base and sealed with mortar. The switching connections are hidden; if they are damaged, power is restored by opening the channels or installing a new line. Laying is carried out only in vertical and horizontal directions. The wrong option is diagonal. Such an approach to saving material, time and effort is prohibited by regulatory documents.
- Outdoor. It is used for electrification of buildings made of wood, wall blocks made of polyurethane foam and plasterboard. This rule is dictated by fire safety requirements and the low bearing capacity of the foundations. You need to know exactly how to connect an outlet in such buildings so that the system is functional and durable. Cables and points are attached to the surface of the walls openly or in channels.
Each method has its pros and cons. The choice is made based on an analysis of all factors regarding the regulatory framework and ease of use.
Components
Input metering panel
The general arrangement of the electrical circuit in the building is the same for internal and external structures.
They include the following elements:
- Input panel. It contains fuses, switching blocks and batch switches. One or more lines extend from the shield.
- Cables. They spread throughout the building to the end points, which are sockets and key switches. It is recommended to connect powerful devices (water heaters, electric stoves) directly to the packetizers. The cable type is determined based on the maximum load created by household appliances. For wiring to the ceiling, a line with conductors with a cross section of 1-1.5 mm is enough. For the lower level, this figure should be at least 2.5 mm.
- Sockets. Depending on the operating conditions, devices with two or three terminals are selected. Grounded sockets should be installed in the bathroom and kitchen. Where it is not planned to use powerful equipment, you can install devices with phase and zero.
Distribution boxes for open wiring - Key switches. Products can have from one to three buttons, some models are equipped with LEDs. To avoid additional work on laying lines, combined devices combined with sockets are used.
- Mounting boxes. Designed for wiring lines in each room. To connect the wires, busbars, clamps, bolts and nuts or twists are used.
- Ground line and circuit. Copper wire with a cross-section of 10 mm or more is used as a conductor; the circuit is made of copper or iron profiles and fittings. The pins are driven into the ground 200-300 cm.
The meter can be installed inside the apartment, in the entrance or in a special box on the street.
Connection type
Color marking of wires
The choice of sockets in the house is determined by the type of wiring that is installed in it. In buildings of various series, cables with 2, 3 and 4 cores are laid. Labeling will help you figure out what they are intended for.
The color of the insulation corresponds to the following characteristics:
- red (brown) - phase;
- blue - zero;
- green-yellow - earth.
If all the wires are colored the same, you need to use an indicator to determine their identity.
Before connecting the outlet, you need to determine the locations for placing household appliances.
Socket terminal location
Switching can be done in the following ways:
- If there is ground, but not connected, the neutral and phase are screwed on, the yellow-green wire is bent and insulated.
- Two phases are suitable - both wires are twisted and attached to one contact, or one of them is transferred to an adjacent device.
- Three phases. The option is the same - through wires to points, zero connects three contacts.
Disconnection of sockets is carried out in cases where it is necessary to replace the product or carry out its maintenance - clean the contacts, tighten the bolts, secure it more tightly in the box.
At what height should sockets be installed?
Electrical points cannot be installed wherever you want, based on the aesthetic or practical side of the issue.
The following standards exist for the placement of devices:
| An object | Distance (cm) |
| Floor | 20-120 |
| Doorways | 100 |
| Corners between walls | 80 |
| Gas pipes | 50 |
| Water and sewer pipes | 60 |
| Heating devices | 100 |
| Gas and electric stoves | 30 |
| Water taps | 40 |
Failure to comply with these parameters may result in a fine from the inspector or a complete disconnection of the home from the network.
Schemes for connecting sockets to the electrical network
Parallel connection
When conducting electricity into the house, the following schemes are used:
- Parallel (loop). It is used in cases where the property is equipped with a three-phase line. Each point is connected to a separate wire through which electricity is supplied. This option is convenient because you can simultaneously connect to several powerful consumers at once.
- Consistent. It is used in houses where the cable consists of only two cores - phase and neutral. In such cases, jumpers are installed between terminals with the same poles. It should be remembered that the total load cannot exceed the power of one point.
Regardless of the choice of circuit, you need to use wires whose cross-section corresponds to peak loads.
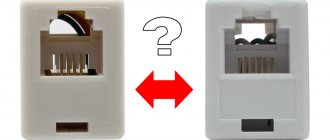
Types and characteristics of socket boxes
Modern sockets, both in appearance and in the installation method, differ significantly from those installed in Soviet-era houses. If previously they were simply embedded in the wall without the possibility of replacement, today installing them and, if necessary, changing the socket is not particularly difficult.
A socket box is a mounting device designed for reliable fastening of electrical installation products for hidden wiring.
Regardless of whether the installation of a single or a group of socket boxes is carried out, before their installation, the walls are chipped
When buried in a brick or concrete wall, these mounting boxes or glasses are secured with alabaster
The socket box is fastened to partitions and false walls made of plasterboard using adjustable spacer legs
Almost all building materials and slab options used in rough wall cladding are suitable for installing socket boxes in them
In the line of products for hidden wiring you can find options for arranging log and timber buildings
Socket boxes are used for installing single switches, power points and socket blocks
During operation, it is easier to tighten the “loose” mechanism in the socket box. With its use, installation is carried out faster and more accurately
Selecting a socket box based on wall material
The main selection criterion is the material of the walls into which the socket boxes will be installed.
On this basis, there is the following classification of boxes:
- structures intended for installation in walls made of solid materials: concrete, reinforced concrete, aerated concrete, brick;
- glasses for walls made of composite materials: plasterboard, plastic boards, chipboard, plywood and others.
In the first case, the socket box is a round glass without any additional elements. It is fixed to the wall using mortar.
There are mounting holes in its walls or bottom for electrical wiring. When installing a socket box, it is enough to remove the jumpers and push out the plug.
Socket boxes with side docking units allow you to quickly and easily install two or more sockets at once
To install several sockets located nearby, you can use glasses, on the side of which there is a fastening mechanism. The socket boxes are connected to each other using special grooves and combined into blocks.
Drywall boxes contain special plastic or metal clamping tabs designed to secure elements into hollow walls. The clamps are attached to screws, which rotate to adjust their position.
When the screw is turned, the foot rises or lowers. Clockwise rotation brings the clamping element closer to the wall and secures the glass in the drywall
What shapes are the products produced in?
Round socket boxes have become most widespread. It is very easy for them to make a hole in the wall using a variety of tools.
Round glasses can be used both for mounting a single socket or switch, and they can be combined into groups, connecting to each other using docking units.
Square boxes, although not used as often, have certain advantages. Their volume is much larger, so you can hide a lot of wires in them.
They are often used to install elements of the “smart home” system. There are single and group square-shaped socket boxes designed to install up to five sockets.
There are also oval boxes on sale, which, like square ones, have a large internal space. They are convenient because you can immediately connect a double socket to them. All the products described above are mounted in walls and used for hidden wiring.
There is another type of mounting boxes that stand somewhat apart - plastic linings or, in other words, multiboxes, designed for open installation on the baseboard. They are designed for one or more outlets and are usually square in shape.
This type of installation of plastic overlays can only be used on dismountable plastic skirting boards
External socket boxes have two modifications - designs with installation to the middle of the baseboard or to the floor. Since multiboxes are mounted on top of the baseboard, their distinctive feature is their aesthetic appeal and original design.
Installation box size
An important parameter of socket boxes is their dimensions, which are selected based on specific installation conditions. The fork dimensions are 60-70 mm in diameter and 25-80 mm in depth.
Standard designs have external dimensions of 45 x 68 mm, but it must be taken into account that the internal depth in this case will be 40 and the diameter 65 mm.
When installing several round socket boxes in a group, one of them, which has an increased depth, can, in addition to its main purpose, serve as a distribution box
Glasses of increased sizes, the depth of which is about 80 mm, are advisable to use when there is no distribution box in the electrical wiring, and its functions are performed by the electrical outlet itself. As for square products, as a rule, they have a size of 70x70 or 60x60 mm.
Material for making mounting boxes
The most popular are socket boxes made of non-flammable plastic. They can be installed in concrete walls and structures made of composite materials.
There are also metal boxes, which were used everywhere in the past, but today they have almost been replaced by plastic products.
Metal socket boxes are usually installed when installing electrical wiring in wooden houses. They are made of galvanized or non-ferrous metal and cannot be welded, so the connection to a metal pipe is made by soldering.
For safety reasons and fire prevention, when installing electrical wiring in wooden houses, it is necessary to use metal socket boxes
Installation process
Preparing tools for installing sockets
Installing sockets is a procedure that is carried out in a certain sequence.
First you need to prepare the following tools and materials:
- perforator;
- Bulgarian;
- level;
- roulette;
- indicator;
- knife;
- pliers;
- screwdriver;
- pencil;
- putty knife;
- cement;
- sand;
- primer for concrete.
When installing the electrical system, you must wear safety glasses, gloves, and a respirator.
Preparatory work
Wiring layout rules
The scope of this process depends on whether a new cable will be laid or everything will be limited to replacing the socket.
The sequence of actions when electrifying a building under construction or its major renovation is carried out:
- Drawing up a diagram and marking. It should be calculated so that the holes for the mounting boxes are on the same vertical or horizontal line.
- Wall chipping. Grooves are made for the cable and round holes for the points. After drilling, they are connected to each other to install jumpers. The openings are cleaned of dust and crumbs and treated with a primer. If the external method is chosen, channels or fasteners are installed - plastic boxes, metal or plastic pipes, ceramic insulators, strings.
- Installation of socket boxes. The plugs are broken off from them, after which the products are coated with a solution and inserted into the holes. Excess putty is removed.
When the solution has completely hardened, it is sanded flush with the wall surface.
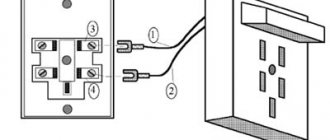
Connecting wires to the outlet
To prevent damage to the cable when the building shrinks or comes into contact with moisture, it should be pulled through a corrugated plastic tube. After this, the channel is walled up in grooves. The ends of the cable are led out into mounting boxes so that there is enough material left to make the connection. Further actions are carried out after the solution has completely hardened.
Connecting the socket
Connecting a double outlet with grounding
Before connecting the wires to the outlet, you need to make sure that they are not live. To completely protect yourself, you should turn off the input switch.
After this you need to do the following:
- Remove the insulation from the cable, and then from the cores, exposing 10-12 mm of metal.
- If the wire is copper, twist it and solder it. This will prevent it from oxidizing.
- Connect the ends of the wires to the holes on the terminals. Tighten the bolts as tightly as possible.
- Insert the socket housing into the installation box. After alignment, secure it with presser feet.
- Install the cover. Check the strength of the fastening using the plug - insert it and pull it out of the connectors several times.
After this, you can supply electricity and use the point.
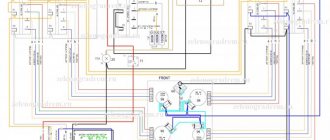
Connection diagrams
Even a novice master will not face any special difficulties, everything is very clear, but it is better to consider the features of each option.
Single-phase network without grounding
The diagram is indicated by numbers:
1 - general machine;
2 - the one that turns off the phase on a specific line;
3 - zero bus;
4 - distribution boxes, separate for each outlet;
5 - cables.
Any electrical specialist knows that the phase should be located on the left, but owners often break this rule. If there are problems in the electrical network, they create additional difficulties for themselves when diagnosing, as well as in the case of self-repair.
Single-phase network, but with grounding
In this case, only one element is added, number 6, this is the main grounding bus for the protective conductor (PE). It is indicated in green.
There is another option, used for outbuildings if they have open wiring. In this case, the grounding runs along the floor - along the perimeter of the walls, and a separate wire leads to the sockets below. There are no other differences in the eyeliner.
How to properly connect a socket from an outlet
General diagram for connecting a group of sockets with a cable
The most popular way to connect sockets is to install jumpers between their terminals.
The advantages of this solution are the following:
- ease of implementation;
- there is no need to groove walls for a new line;
- speed of implementation;
- minimum consumption of materials.
There are also disadvantages:
- a large number of connections contributes to heating the circuit;
- there is a risk of wires coming loose and short circuiting;
- You will still have to drill and cut - you need to make channels and a hole for the glass.
If you carefully perform each stage of the work, the structure will be strong and safe.
Why double socket?
It is very difficult to find any disadvantages to the decision to install a double socket. Almost the only argument that is given against it is most likely expressed simply “out of harm” and says that connecting it to the network increases the risk of overload - except for families that have electricians, no one will even think about whether it will “pull” or one point two powerful electrical appliances.
In practice, to connect such devices that consistently consume high amperage current, separate sockets are made, so under normal conditions, several factors must come together to cause a long-term dangerous overload, the combination of which seems very, very unlikely.
What is the average outlet designed for?
The first point is the current strength that the outlet can withstand - usually this parameter is indicated on its cover, less often - on the inside. Old Soviet devices, which are now increasingly rare to find (they are replaced almost primarily because of the need to connect modern Europlugs), are mostly designed for a current of 6 Amps. Modern ones, even of mediocre quality, are already marked with 10 (if it is without grounding) or 16 Amperes.
What these numbers mean, the school formula for calculating the power of electric current will help you find out - even humanists should understand it. P (power) = I (current) * U (voltage), and given that the voltage in the household network is always constant and equal to 220 Volts, it is quite simple to calculate what the current marking indicates.
- 220 Volts * 6 Amps = 1320 Watts = 1.3 kW
- 220 Volts * 10 Amps = 2200 Watts = 2.2 kW
- 220 Volts * 16 Amps = 3520 Watts = 3.5 kW
Power of household electrical appliances
You can clearly imagine where you can safely connect a double socket by comparing the most commonly used electrical appliances:
Taking into account the recommendations of the PUE: how to properly connect powerful kitchen electrical appliances, boilers and air conditioners - a separate line is always connected to them, it is very difficult to imagine in what situation the installation of a double socket will entail the simultaneous inclusion of two devices with a total power of more than 2.2 kW. Using an iron at the same time as a vacuum cleaner or hairdryer is quite problematic - only a microwave and an electric kettle remain, but together they work for a maximum of 5-8 minutes, and the safety margin in electrical engineering is not an empty phrase. Plus, for such electrical appliances they usually install good 16 Ampere sockets.
Features of connection in three- and four-wire networks
The presence of a three-wire network in a house means that in addition to phase and neutral, there is a ground line. To connect to such wiring, you need to purchase sockets with three terminals. Phase and zero are attached to the extreme contacts, and ground is in the middle.
Four wires mean that two phases are supplied to the house. The second conductor can be used to directly connect double points. When connecting to a single socket, it is advisable to insulate and bend the second phase, since two wires will not fit into one hole.
Features of a socket with a switch
Triple socket with switch
Devices for three consumers with a shutdown button are convenient because the switch de-energizes part of the electrical circuit. This eliminates short circuits or the accumulation of static electricity. The special feature of the device is a one-piece body with three sockets and a power button.
The combined designs differ:
- versatility - can be installed on concrete, stone, wood and plasterboard walls;
- economical - a minimum of installation trenches and holes is required;
- ease of connection - a common wire is pulled, rather than a separate cable for each point;
- speed of surface marking due to the same sizes of products;
- the ability to simultaneously control light sources and turn on electrical appliances.
If one element fails, the entire unit must be replaced.
Advantages and disadvantages
Several sockets are used to install household appliances in the kitchen or room.
- air conditioners;
- fans;
- local heaters;
- devices for hair, nails and appearance care;
- humidifiers and air ionizers, many other products.
here
- low price;
- ease of use;
- easy installation;
- in case of malfunction it is easy to repair;
- can be installed in socket boxes of single predecessors, so changing a single socket to a triple socket will not be difficult;
- does not require additional wiring;
- have a secure fastening;
- reliable.
- Multi-section block ones are characterized by large dimensions, which often leads to their mechanical breakdowns, since the load from several appliance plugs increases.
- It is necessary to calculate the maximum permissible load. If you connect 3 powerful electrical appliances at once, the socket, contacts and all wiring to the distribution box may burn out, which requires labor-intensive repairs.
- Since the weight of three forks of different devices will constantly affect the entire structure, over time the decorative coating and the plastic body will deteriorate. This may cause a short circuit.
Important To prevent these shortcomings, before installation it is necessary to correctly calculate the power of the devices connected to it and take a small reserve. All fastenings of elements should be done with high quality.
Components for assembling a triple socket
Let's look at what main components our triple socket will consist of. The modern electrical equipment market offers customers a wide range of sockets. However, in this abundance, finding a triple socket in a single housing is very problematic. Even after finding the product you are looking for, a person may encounter two problems:
- 1. Obviously overpriced product;
- 2. The model does not meet the buyer's requirements.
What to do in such a situation? Most craftsmen use this method in 99% of cases - they assemble a block of single sockets of the required size. Therefore, a triple socket is often assembled from three ordinary sockets.
To do this, we need three regular sockets with a rated current of 16 A. Moreover, we only need their internal part. You can safely throw away the overhead frames for each outlet, since we won’t need them. And to combine three single sockets, we need a special overhead frame with three holes, which will create the appearance of a single whole.
How to install it yourself?
Installation requires strict adherence to several steps:
- markings;
- drilling a recess for the socket box;
- installation of the device;
- assembly.
Wall marking
Attention It is necessary to use a building level (up to 1 m long) to align the device strictly vertically and horizontally. This guarantees easy connection.
postpone
Detailed instructions on how to make a socket in the wall yourself
Drilling a hole
The deepening is done like this:
- You need to hold the drill perpendicular to the wall, drill to the depth of the socket with a margin of approximately 0.5 cm.
- Using a chisel and hammer, the middle part of the brickwork or concrete is removed.
- When installing in a sheet of drywall, use the appropriate nozzle.
- Drilling is performed similarly to concrete or brick surfaces, but the excess remains inside the crown. If there is no such tool, then a hole is cut in the plasterboard using a stationery or shoe knife.
2
Fixing a socket box in a concrete wall
- A box is inserted into the brickwork or concrete and fixed to alabaster or mortar.
- When mounting in a plasterboard sheet, you need to insert a socket box into the hole, and then tighten the screws that hold the sliding legs. It is necessary to tighten it with such strength that the fabric does not crumble and the device does not wobble.
Important Before installing the box in a niche, you must cut a hole in it for the wiring that will be connected to the terminals of the socket core.
- If it is alabaster, then it will take about 2-3 hours for the solution to harden.
- If there is a different type of mixture, drying will take longer.
Connection diagram
First determine the exact location and orientation of the triple socket block
- To fix triple sockets in the kitchen, you need to choose a place where several household appliances will be located - usually above the countertop, so as not to use tees or extension cords.
- If the installation is carried out in a room, install it closer to the TV or computer - so that the screen masks the structure.
- When installing in a kitchen or bathroom, where there will be high humidity and microclimate fluctuations, it must be mounted no closer than 0.6 m from the water source and no lower than 0.5 m from the floor. This will ensure the safety of the devices.
Preparatory work
We are talking about installing a triple internal socket. Again, there are two installation methods:
- with one socket box;
- with three sockets.
Whatever the choice, it is necessary to mark the installation location. Some people recommend using a level, however, if the floor is not level, the structure will look uneven. Therefore, it is better to make the socket for the socket a little larger so that it can be adjusted. If you decide to install a triple socket in one socket box, then you need to measure the dimensions of the socket box, make an allowance and drill a hole in the wall.
When installing three single sockets, you need to put a socket box under each of them. This requires special precision. It is necessary not only to set the level, but also to calculate the distances so that each of them fits into its own slot on the front panel.
It is necessary to fasten the socket box firmly, even a small looseness can destroy the plaster, and it will be unpleasant for yourself. You can secure it with dowels if you have the skill, as you can destroy the socket box. However, it would be more practical to use screws; who knows, you may have to change or remove them.
Stores sell sets of screws and sleeves. We place the socket box in the hollowed-out nest and mark the place for the fasteners. We drill a hole according to the diameter of the sleeve (a little smaller, but not more) and insert the sleeve; it should hold firmly. When tightening the screw, the sleeve will be pressed even more tightly to the wall. If the wall is brick, you can use a regular drill, although if you have one with soldering and the required diameter, it’s better. For concrete, it’s definitely worth taking a brazed drill, since they are now freely sold.
Wire preparation
It's time to think about laying cables or wires. To do this, you need to decide what you will use. According to the rules, each outlet must have its own wire. If the sockets are equipped with grounding, then an additional conductor is needed. The grounding wire is used without insulation.
It would be nice to have one or two cores in stock. When connecting a triple socket, one of the wires can be damaged. Aluminum wire, especially if cut, breaks easily. You can make a mistake and cut it shorter than necessary. During operation, due to heavy load, the wires may burn. Then the reserve core will come in handy more than ever.
A little more about the material of the current-carrying conductor. Earlier it was said about the need to think about what load the outlet will operate under. This is also true for wire. There are many reference books and tables for calculating the cross-section of a conductor depending on the current passing through it. A stranded conductor carries much more current than a single-core conductor of the same cross-section. Based on this, you can decide what will be used - wire or cable.
After you have bought everything you need, draw a line on the wall from the main electrical outlet or box to the made socket.
Remember, the line must go strictly vertical or horizontal. Hollow out the path so that the cable or wires go completely under the plaster. If there is a suspicion that there will be wiring nearby, it is necessary to turn off the power to the apartment.
This is possible in the case when the gasket is made to a box that is located nearby, but slightly to the side.
Main varieties and designs
Design solutions of modern sockets are limited by certain technological frameworks.
However, these products are produced in a wide range, represented by various models and modifications. Any triple socket in one socket box is structurally available in two main versions. In the first case, a common frame is used, closed with a single lid, and in the second, a common body-lid covers three sockets, spaced separately. Among such designs, products with switches are in high demand, significantly increasing the functionality of the network at a given location.
Such switches serve to disconnect a section of the circuit if the unit is not used for a long time. This measure completely eliminates short circuits and other negative phenomena in the absence of the owners.
Modern sockets are equipped with an additional contact for connecting a ground wire. The highest quality products are from foreign manufacturers, capable of withstanding loads of up to 15 amperes.
Three separate connection points with a common fastening require additional holes to be drilled. However, from the point of view of operation, such products are considered more convenient.
The triple socket block is the simplest and most economical option. One mounting hole is sufficient for its installation. Despite the increased load on the wire, this method has its advantages. A single unit occupies a minimum wall area, and a high-quality product is not inferior in its parameters to separate devices. However, this type of sockets is significantly limited by technical limits.
Market sellers can sell products with low-quality contacts that will quickly become unusable. Therefore, when purchasing, you need to check the socket to ensure that the contacts are made of brass, the core is made of ceramic, and the cover is made of high-quality non-flammable plastic.
Double and triple sockets made from ordinary
The meaning of this connection is that the phase and neutral wires are connected from the distribution box to one of the sockets, and the third is connected from its terminals with the next wire, and so on. In essence, these are not double, but double (triple) sockets, which are connected into a separate block, which is still powered from one wire.
A series of sockets connected in this way can be easily repaired - if any part of it fails, then only the broken part will have to be replaced.
The wire connecting the blocks of sockets is selected with the same cross-section as the one that comes to the first of them. If there is no such thing, then without any problems you can take wires with a conductor of a larger cross-section, but in no case vice versa - with a load greater than gentle, the wire connected to such contacts will soon begin to heat up and oxidize. Socket blocks are generally installed in places where the use of a large number of powerful devices is not expected, although if the supply and connecting wires are of sufficient cross-section and the contacts of the sockets are well clamped, then they will easily withstand the operation of the heater in tandem with several other devices.
There is one more nuance when installing socket boxes - they can be installed one at a time, or you can find a whole block that is immediately inserted into the holes drilled in the wall. Otherwise, everything is done in the same way as with a regular outlet.