Fuse selection procedure
To ensure uninterrupted and safe operation of the electrical network, fuses must be selected taking into account the expected operating conditions. To do this, the general power indicators of the operated devices are summed up.
A simple calculation example. In the house it is possible to simultaneously turn on the following electrical appliances with power indicators:
- refrigerator (450 W);
- electric stove (6000 W);
- microwave oven (2000 W);
- TV (180 W);
- washing machine (800 W);
- lighting devices (400 W).
The total value of the electric current is calculated using the formula:
A = ∑Р/U, where:
- A is the desired current value in amperes;
- ∑Р – the total power of electrical appliances, in this case equal to 450 + 6000 + 2000 + 180 + 800 + 400 = 9830 W;
- U – rated voltage value equal to 220 V.
Substituting the numbers into the formula, we get:
A = 9830/220 = 44.68 A.
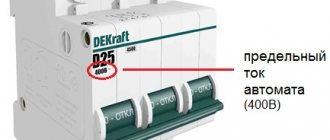
Circuit breakers are manufactured with different current limit values. The closest standard model in terms of current is rated at 50 A.
Additionally, you will need to check the cross-section of the electrical wiring wires for the total power of electrical appliances in order to eliminate the risk of thermal overheating of the network. The indicator is checked against the table, depending on whether copper or aluminum wiring is used:
In the example given, the cross-section of the wires must be no less than:
- for copper – 6 mm;
- for aluminum – 10 mm.
If it turns out that the cross-section of the wire in the home network is less than specified, it is recommended to change the wiring to eliminate the risk of fire and failure.
It is recommended to purchase circuit breakers instead of outdated plugs. It is advisable to use a two-pole switch that turns off both phases simultaneously. If you install separate switches on the neutral and phase wires, when the contact at zero is disconnected, the phase will remain connected, which is associated with the risk of failure of electrical appliances.
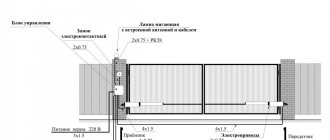
Installation of circuit breakers
After the network is de-energized, work is carried out in the following order:
- Remove the electrical plug holders.
- Install the DIN rail in their place. It must first be cut to fit the size of the switch. Fastening to wood or metal is done using screws, and when working with a concrete wall you need to use dowels.
- Connect the protective device. In this case, two current-carrying wires are connected from the top of the device (to avoid confusion, the letter N is marked on the terminal for connecting the neutral wire).
- From the bottom of the AB you need to connect the cables through which electricity is supplied to the home network to the installed devices.
After the conductors are connected, the safety switch is placed on the DIN rail.
This completes the replacement, but this scheme can be improved somewhat, making it safe for humans.
Sequence of replacing electrical plugs
If the apartment has base-type plugs, you will need to redo the fastening design. The replacement procedure sequence is as follows:
- using a multimeter or an indicator screwdriver, the location of the phase and zero is determined;
- the power supply to the apartment is turned off;
- the base sockets of old fuses are removed;
- instead, a DIN rail is mounted to mount new switches. The rail is cut to the required size. For installation on a wooden or metal base, self-tapping screws are used; for concrete, you will need to insert dowels, having previously drilled holes in the intended locations;
- the circuit breaker is connected with the correct wiring. To avoid confusion, the neutral wire is marked with a tag with the letter N;
- wires are connected to the bottom of the device, supplying electricity to the home network;
- After connecting the contacts, the device is mounted on a DIN rail.
To ensure additional safety when operating the home electrical network, it is recommended to install a special device, an RCD, together with the circuit breaker. It will turn off the voltage if a person accidentally comes into contact with a bare wire.
The operating principle of an RCD is based on monitoring the value of electric current in the network. If a person accidentally comes into contact with a live wire, the current balance will be disrupted and the device will turn off the network.
The RCD is selected in the same way as a circuit breaker based on the maximum current value. If an RCD is installed, the owner must provide additional space on the DIN rail. The connection is made in the same way, with insertion and crimping of the phase and neutral cables into the installed connectors.
In most cases, you will not need to remove the electric meter. But if the cables are arranged in such a way that the meter needs to be removed, you must first agree with the energy supply company to remove the seals. After the replacement has been made, it is necessary to invite inspectors to reinstall the seals on the meter.
Correctly installed circuit breakers to replace outdated electrical plugs will eliminate the danger of an unforeseen situation and ensure normal operation of the home network. The main thing is to choose fuses with parameters corresponding to the expected operating conditions. To purchase high-quality devices, you need to contact official trusted dealers and choose products from trusted manufacturers. It would not hurt the owner to first consult with a competent specialist regarding the choice of model and place of purchase of circuit breakers.
Replacing base-mount automatic circuit breakers with circuit breakers:
Replacing automatic traffic jams:
RCD connection
In order to prevent people from being electrocuted by accidental contact with a bare section of the cable, as well as by a breakdown on the housing, it is advisable to include an RCD in the general network. The basis of the operation of the residual current device is constant monitoring of the balance of currents passing through the device. If an electric current leaks to the chassis or to the ground, an imbalance occurs. Having detected an imbalance, the device is triggered and de-energizes the circuit.
The rated current of the RCD is selected in the same way as for the input machine. The residual current device is connected to its output. It is recommended to check the performance of the RCD monthly - for this purpose there is a “Test” button on the device body. From the output terminal of the device, the phase is connected to the input of the first AV, and then through jumpers it goes to other switches. The neutral cables must be connected together with a bus block, then secured to the DIN rail.
If the connection is three-wire, then the grounding conductors are connected in the same way by a bus block. However, it should be noted that they should not be in contact with zero.
Types of safety circuit breakers
There are many designs of protective devices used in household electrical circuits to ensure safety and timely opening of the electrical circuit when the load increases or a short circuit occurs. Let's look at the most common ones.
Electrical ceramic plugs
The device is a cylindrical porcelain shell with a thin conductor located inside. As the current passing through the conductor increases, the metal heats up and breaks.
Disadvantages of ceramic stoppers:
- they are disposable;
- It takes a long time to unscrew to open the circuit.
Advantages
reliability, 100% guarantee of opening.
Apartment owners who have connected a large number of electrical appliances to the electrical circuit, in order not to constantly change a blown old-style fuse, insert a piece of metal (an old screwdriver) into the plug. Thus increasing the risk of a short circuit in the power supply system of a house or apartment.
Automatic traffic jams
If you are tired of constantly changing old-style disposable fuses, you can install an automatic plug. Externally, this device is similar to a ceramic fuse, but its operating principle is different. Due to the thermal expansion of the metal when heated, the length of the spring inside the breaker increases and the fuse turns off. To turn it on, just press the button on the case.
Advantages:
- the circuit breaker is reusable; there is no need to install a new one each time;
- To turn it off, just press a button.
Flaws:
- unreliable, a situation often occurs when the machine heats up and the spring does not work due to the design features of the circuit breaker;
- short device life.
The best option would be to dismantle the plugs and install circuit breakers; we list their advantages:
- durable;
- Convenient to turn on and off power;
- automatic machines are more reliable than automatic traffic jams;
- have compact dimensions.
Procedure for replacing traffic jams with automatic ones:
- Calculate the network load and select the required switches. To calculate the load, we add up the power of simultaneously switched on devices in the apartment or part of it and divide by the voltage of 220 V, we obtain the maximum calculated current. Based on the obtained value of the current in the circuit, we select a circuit breaker and wires with a cross-section that can withstand the load without heating up.
- If during the work it is necessary to open the electric meter, or if it is planned to change the meter itself, the apartment owner needs to contact the electricity supplier. Procedure for replacing the electric meter:
- write a statement of desire to replace the meter to the local branch of the energy sales company;
- invite a representative of the electrical network to check the seals on the device and record the readings of the old device;
- change the plugs on the meter and the electricity meter itself;
- invite a representative of an energy sales organization to check the connection of the electric meter and seal the new device.
- Carry out a set of works to replace traffic jams with automatic machines.
First of all, before carrying out work, you need to turn off the voltage; this can be done by de-energizing the input circuit breaker located under the meter or in the panel located in the entrance on the floor. Carrying out work under voltage means exposing yourself to great danger.
What are traffic jams to the meter?
The plug in the old type of meters is a fuse made of a ceramic casing with a fusible element inside. Such protective equipment worked with minimal network overload, and the residents of the house had to change the internal fuse link 2-3 times a day.
Today, circuit breakers are used. When the current is exceeded, they are triggered and break the electrical circuit.
The plugs work like a fuse. When a short circuit occurs in the electrical network, the element heats up and burns out, which leads to a break in the circuit.
Who should change the machines in the dashboard?
Who should change the machines in the panel for free?
NOBODY should change the machines in your sign at the entrance for free. There are exceptions, such as unscheduled major repairs or an emergency situation in the switchboard itself (the circuit breakers or wires burned out) - in these cases, the control company or emergency service will replace the circuit breakers for you. In all other cases, you must call an electrician, paying him for the work and materials.
Or change the machines in the dashboard yourself. If you can and know how to handle electricity. But remember that everything that is located before the meter (including seals and wires to the meter), all live parts that are live, cannot be touched without special permission and notification of the electricity supplier.
How to install machines correctly
In order for the machine to sit firmly in its seat, it is necessary to securely fasten the DIN rail. If the DIN rail is installed correctly, the machine being installed simply snaps onto it.
Installation and dismantling of the machine
How to insert wires into the machine correctly? You must always remember that no more than two wires can be inserted into one terminal (single-pole circuit breaker), and in no case copper or aluminum. You also need to remember that soft stranded wires (for example NYM or PVA) must be crimped with a sleeve.
Jumpers between machines must be made with a cable of the same cross-section, with a cross-section of at least 4 sq. mm (or with a cross-section corresponding to the expected load on this group of machines).
Jumper cable is too thin
It is best to use special combs for jumpers between machines; they greatly simplify the entire process and also allow you to create better contact between machines.
Comb
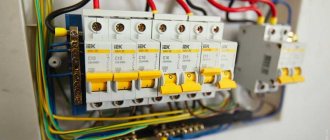
Installation and connection of circuit breakers
After dismantling the plugs, we proceed to attach the machines for the meter. We install the DIN rail, cut a piece of the rail to the required length and attach it to the place where we plan to install the switches. We attach the circuit breakers to the rail, along the edges of the circuit breakers, so that they are tightly secured and do not move, we install metal stops on the sides.
We connect wires with phase voltage that go to the apartment or house to the lower inputs of the machines. It is more convenient to connect the zero contacts from the meter and those that go to the apartment to a bus pre-installed on the DIN rail.
Replacing electrical plugs with automatic ones
Before installing automatic plugs instead of electrical plugs, you need to make sure that the wiring can withstand the load that home appliances will give
Outdated models of electrical plugs can be called disposable, since they can withstand small loads (no more than 5A). Some people additionally equip the system with “bugs”, which allows the electrical device to withstand heavy loads, but this is fraught with a short circuit and fire.
Automatic fuses can withstand heavy loads of household appliances and electrical appliances. In case of prolonged overloads or short circuits they are switched off.
Despite the large number of advantages, these designs have disadvantages.
- If you purchase models of questionable quality, they will turn on and off poorly.
- Limited safety factor of the mechanism.
Algorithm of actions
Replacing electric plugs with an automatic one
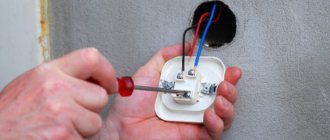
For personal safety reasons, it is required to work in personal protective equipment. Wear rubber gloves and goggles in case sparks fly from the switchboard. There should be no difficulties when replacing old plugs. First of all, you need to de-energize the room; this can be done using a switch installed on the distribution panel. Next, depending on the characteristics of the fuse, they are unscrewed or removed with special pliers. These pliers can also be used to remove the insert from removable blocks.
Finally, new, fully functional plugs are installed in the place where the outdated structures previously stood.
Simple recommendations that all electricians are advised to familiarize themselves with when choosing and installing new electrical plugs:
- You should purchase only high-quality machines from reputable manufacturers and from reliable places.
- It is prohibited to install machines with a higher permissible power.
Fuses must not be used as switches.
Why do traffic jams heat up?
Outdated models of electrical plugs often overheat, which can cause a fire. Overheating can be caused by the following reasons:
- insufficient contact on traffic jams;
- poor contact in sockets on switched on devices or connections in electrical wiring;
- excessive total power of switched on consumers;
- abnormal operation of household electrical appliances.
If such a situation occurs, it is necessary to immediately turn off the power to the home electrical network and identify the cause of the malfunction. To do this, you should conduct a complete audit of the wiring, checking the condition of the sockets and wire connections.
Instructions: how to install a machine gun in the dashboard
Most often, instead of old traffic jams, a two-pole machine is installed in apartments and private houses. Such a device, in the event of emergency situations, immediately turns off both phase and zero. Sometimes specialized stores recommend installing two machines. This is prohibited: during voltage surges, only one circuit breaker can operate to zero. In this case, the phase in the room will remain on.
In order to install the machine in the panel you need to:
- Unscrew the old plugs and, using an indicator screwdriver, determine where the phase is and where the zero is (if the light on the screwdriver lights up, then you have a phase).
- Turn off the electricity. Working under voltage is not only inconvenient, but also life-threatening.
- Remove the plug cartridges.
- Using self-tapping screws, dowels or screws, install the DIN rail in place of the cartridges, above the contacts. The size of the rack must correspond to the size of the machine.
- Connect the machine. To do this, the neutral wire must be connected to the upper terminal with the “N” indicator, and the phase wire must be connected to the “L” terminal. Wires that go into the home are connected to the lower terminals.
The machine is ready to work! The equipment can be improved by installing a residual current device on it. It can protect a person from electric shock when touching bare wires and prevent fire when a phase conductor comes into contact with the ground or housing.
Preparing for work
Another nuance of this procedure is working with a counter. Sometimes electrical protective plugs cannot be replaced with automatic devices without breaking the seals on the accounting device. If you manage to do without this, the task is simplified, otherwise you need to invite a representative of the energy supply organization to seal it. The use of an unsealed meter is prohibited by law; such a violation is subject to a considerable fine.
Instead of traffic jams, it is best to install an input two-pole circuit breaker. Sometimes the opinion is expressed that you can get by with two single-pole circuit breakers, but in reality this is unacceptable. In this case, the phase and neutral conductors will be protected by different devices, and if the AV set to neutral is triggered, the phase current will continue to flow into the network, which can lead to a fire. A two-pole device, having detected a fault, will disconnect both wires simultaneously, de-energizing the circuit.
Before starting work, you need to use a multimeter or an indicator screwdriver to determine the location of the phase and neutral in the plugs, having first unscrewed them. Then turn off the electricity supply to the network - according to safety regulations, it is prohibited to carry out installation work on the wiring into which current is supplied. This is not only inconvenient, but also poses a real threat to health and life.
An example of replacing traffic jams with machines in the video:
What you need to know in advance
First, if you have knocked out old-type plugs with fusible inserts, under no circumstances put bugs in them, but now not only for safety reasons. Modern household appliances are full of electronics. A roughened fuse does not repair or eliminate the source of the problem. Connecting anything - from a tablet to an iron to a washing machine - to a faulty network can cost repairs many times more expensive than buying a couple of circuit breakers that can completely replace a current circuit breaker.
Secondly, before determining the reason for the operation of the automatic protection, everything that is plugged into sockets or through standard switches must be turned off. Disconnections and test starts are carried out only on de-energized wiring sequentially for consumers: turn off the general circuit breaker (see below) or circuit breakers, remove all plugs from the sockets, turn off the switches. You need to check some device or lamp - plug it into a socket or switch, turn on a common circuit breaker or plugs. To check, you need to connect the next device or lamp - turn off the general automation again, connect it, etc.
Handy tools for checking the presence of voltage in sockets
Third, let’s assume that you don’t have a tester, a phase indicator, and you have no idea what it is. In this case, you can check the presence of voltage in the apartment during a test turn-on, without risking yourself and expensive equipment, using a phone charger with a light indicator (on the left in the figure) or a rechargeable LED flashlight (on the right). The charger is plugged into the socket without the phone, and the flashlight is plugged in without turning on the light. No regulatory documents provide for the possibility of using these devices in this capacity, but for an amateur they are even safer than a phase indicator and a tester: due to inexperience, it is impossible to grab the bare part of the probe or try to measure the voltage with a tester turned on to measure current. The “quasi-indicators” themselves on the emergency network can fail (the conductors inside them are very thin), but they are inexpensive and repairable. However, we are getting ahead of ourselves, first we need to get to where it was knocked out.
VShch and ShchA
Protective automation in an apartment is most often mounted next to the electric meter on the input switchboard of the VS. If the protection is with plugs, the VSC can be completely antediluvian (pos. 1 in the figure), poorly made, pos. 2, but next to the VShch there is always a distribution box (dispenser, “dose”, shown by the red arrow). Wiring branches spread out from the dispenser throughout the rooms. So, you cannot open the dispenser without being an electrician. In this case, the source of the malfunction must be sought by test switching on (see above and below).
Introductory boards and automation board in the apartment
In an apartment with a modern type switchboard (item 3), the search for why the protection is knocked out begins by sorting out the wiring branches: they are connected through separate circuit breakers at currents lower than the common one (the main one). In this case, first turn off the branch machines, turn on the main machine, and, turning on the branch machines one by one, find the faulty one, and then check it, as in the previous one. case. If apartment meters are on the staircase, then instead of a power supply in the hallway there will be an automatic switchboard. In this case, it will be more difficult to find the reason for the reactivity protection, see below.
Replacement technology
So, to make it clear to you how to replace old traffic jams with automatic machines, we will provide step-by-step instructions with photo examples:
Using this technology, you can independently replace traffic jams with automatic ones. As you can see, there is nothing complicated, the main thing is to be careful and understand all the technology.
We hope that the instructions provided were clear and useful for you. In addition to installing circuit breakers, we recommend connecting an RCD in the panel, which protects against current leakage and, accordingly, electric shock. If you still don’t understand how to replace traffic jams on machines with your own hands, you can ask your question in the comments below the article!
From the articles, in this article I will talk about old-style electrical plugs with fusible links, how to determine which electrical plug is faulty, what kind of plugs there are and is it worth replacing them with automatic ones?
The picture shows three types of electrical plugs with different ratings for 6A, 10A and 20A (from left to right).
If you still have such plugs installed in your electrical panel at home, then it will be useful for you to learn how to determine the malfunction of such a plug and how you can temporarily fix it.
All plugs contain fuse links, which actually protect your electrical wiring from high currents caused, for example, by a short circuit or excessive load when many electrical appliances are turned on at the same time. Sometimes an increase in current is associated with poor twisting in junction boxes, or when. If the current passing through such a fuse-link is greater than its rating, then the wire inside the fuse-link burns out and, thereby, breaks the electrical circuit. Accordingly, the electricity in the apartment disappears partially or completely, depending on how many lines the apartment has. As a rule, this is one (two plugs) or two lines (four plugs). How can you determine which plug is burned out?
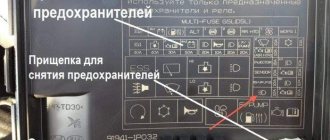
Checking fusible links.
To do this, you will need a simple screwdriver-test indicator, or a multimeter (tester, ohmmeter), you can also use any of the devices discussed in the article. The indicator must first be checked for functionality - touch the index finger of one hand to the indicator patch, and touch the tip of the indicator with the finger of the other hand, as shown in the figure. If the indicator light comes on, then the device is working properly and we begin checking the fuse links.
To do this, you need to touch the metal cap on the fuse-link with one hand and, touching the indicator patch with the index finger of the other hand, touch the tip of the indicator to the other cap of the insert. If the indicator light is on, the fuse link is working. If not, then the insert needs to be replaced. When checking with a multimeter, touch its probes to the metal caps of the insert, the multimeter needle should deflect to the end, the multimeter should be set to measure resistance, which is indicated by the Ω icon, measured in Ohms. You can also buy the entire cork if the inserts are not sold separately. But I’ll give you some advice right away: buy an automatic plug right away.
Types and denominations of plugs.
There are different types of plugs, for example they are distinguished by the size of the cap (thread). In apartments and houses, in 90% of cases there are plugs with an E27 base, but you can measure the diameter (for E27, respectively, 27 mm) or take the burnt-out plug with you to the store to select the size there. Also, the plugs differ in design, for example, there are plugs with a piece of glass at the end; through the piece of glass you can immediately determine whether the insert has burned out or not; in a burnt-out one, a spring will push out a colored pin with a wire soldered to it. But the most important parameter of the plug is the rating, which is determined by the maximum possible current at which the plug does not burn out. In an apartment, most likely it is 6.10 or 16 A (Ampere). This can be read on the insert itself. Inserts with a colored receipt under the glass are marked as follows:
green - 6A, red - 10A, gray - 16A, blue - 20A, yellow - 26A.
By the way, fuse links also differ in diameter, so measure yours before purchasing. Is it possible to install a cork with a higher denomination than it was? Depends on the condition of your wiring, it’s better to have a specialist look at it. You can also see what current is allowed for your wiring.
Do I need to change traffic jams to automatic machines?
Yes, of course it's worth it! In any case, changing plugs with fusible inserts to automatic ones is a must. Now I will explain why. The fact is that the fuse-link operates slowly, and at currents slightly higher than the nominal value it may not operate at all, but it will heat up properly, can you guess what this can lead to? That's right, to the fire. Also, if there is a short circuit or malfunction of the device/wiring, such a plug will not respond immediately, which has a bad effect on your electrical wiring. Therefore, if you are not ready to change the design of the shield, and this action will probably lead to replacing the meter, then at least buy automatic plugs. By the way, there will be benefits - you don’t need to change it, if it works, you just need to press a button.
How to temporarily fix a plug malfunction.
I emphasize - temporarily
eliminate. That is, in an emergency situation, when it is not possible to buy a new plug, you can use this method, but at the first opportunity, replace the plug (fusible link) with a new one.
Remove the metal caps from the insert using pliers, gently rocking them from side to side. If they cannot be removed, heat them with a lighter, match or on a gas stove. Pour special quartz sand onto the paper from the insert; we will need it. Sand serves to extinguish the electric arc that occurs when the wire burns out. Remove any remaining old wire.
Strip the ends of the new copper wire that will contact the insert caps. Pass the wire through the insert and bend it on both sides. Put on one cap. Pour the sand back into the insert. Put on the second cap.
The diameter of the new wire is selected from the table below:
A more detailed table for selecting wires is available in the article.
The diameter can be measured with a micrometer, or using a ruler: wind several turns of wire tightly together on a ruler and divide the number of millimeters wound by the number of turns to get the diameter of one wire. The more turns are wound, the more accurate the calculation. If you have a multi-wire cable, for example, the cross-section of which is known, then you can calculate the diameter of one wire.
Example: we have a cable, we strip one of the three wires and count the number of wires in it. In my case it turned out to be 22 pieces. We divide the cable cross-section (1.5 mm²) by 22, we get the cross-section of one wire approximately 0.068 mm². We calculate the diameter of the wire using a simplified formula: d = √(1.27*S) = √(1.27*0.068) = 0.29 mm (approximately). We look at the table - such a wire is suitable for repairing a fuse-link with a nominal value of 10A.
But remember that you need to purchase a new plug in the near future; this measure is only temporary.
I recently came across a question online: “is it possible to use plugs for different amperages in an electrical panel?” As I understand it, there were plugs on the neutral and phase wires of the same line. In principle, it is possible, but in the event of a malfunction or overload, a plug with a lower rating will operate.
Electrical plugs are fuses that were previously installed in electrical networks, serving as protective devices. Often in old apartments there are still Soviet-style plug fuses installed on the meter. They can be ceramic or plastic. Electrical plugs are not highly reliable, and when they fail, a jumper is often placed in the panel, which allows current to pass through, but does not protect against a short circuit and the unpleasant consequences associated with it. To avoid problems, just replace the plugs with circuit breakers. And in this article we will talk about how to replace traffic jams with automatic machines with your own hands.
Replacing the machine in the dashboard with your own hands: choosing a plug
Automatic Euro plugs can work effectively and for a long time only if they are properly selected. The choice of plug must be made taking into account the parameters of the electrical circuit and the individual protection requirements of the consumer. What kind of plugs should I put in?
To choose the right automatic equipment you need to:
- Calculate the power of the machine. To do this, you need to take the sum of all household appliances (not forgetting about lighting fixtures) that will work simultaneously, and divide them by the network voltage (220 or 380 V). At the same time, it is advisable to take a new machine with a small power reserve. The most popular are the 16A and 25A machines.
- Make sure that your wiring can withstand the voltage of the machine. This can be done by knowing the cross-section, diameter and material of the electrical wires.
- Decide with the manufacturer. The highest quality, proven equipment is produced by foreign companies Moeller, ABB, Legrand.
It is better to buy automatic devices through official dealers or the company’s sales website. If you need to perform frequent switching off and turning on of electricity, then instead of a conventional machine it is better to choose relays or magnetic contactors.
The sequence of replacing traffic jams with automatic machines with your own hands
We will show the sequence of actions when replacing plugs with automatic machines with our own hands using an example when the plugs could not be disconnected from the voltage. First of all, we find the plug through which the phase passes. To do this, unscrew all the plugs and remove the protective carbolite casing from them. We find the phase with a voltage indicator.
The phase wire coming from the meter (terminal No. 2 of the meter) must be located on the top terminal of the plug. On the second plug at the top there will be a neutral wire coming from the neutral output (terminal No. 4) of the meter
Now you need to very carefully unscrew the fastening of the phase wire with an insulated screwdriver (it is advisable to work with rubber gloves) and move it to the side
Replacing plugs with one single-pole circuit breaker
The wire is live and needs to be insulated. If this wire is short and you need to lengthen it, then it is better to put a plastic terminal block on it, which does not need to be insulated. Thus, unscrew all the wires of the plugs and mark them. The upper live phase wire comes from the meter output,
Replacing traffic jams with a dual automatic
The lower wire from the same plug goes to the load. The upper wire of the second plug comes from the zero output of the meter, and the second lower wire goes to the load. Once all the plugs have been removed, you should have four wires. The machine is selected according to the cross-section of the wire, and not higher. For an aluminum wire cross-section of 2.5 mm2, a 16 A machine is suitable, and for 4 mm2 - 25 A. Everyone has a washing machine, so you need to add another machine for the washing machine, and RCD protection.
Now we go to the store and select two 16 A circuit breakers, a 40 A RCD with a leakage current of 30 mA. For the automatic machines and RCD we select a small panel for 2 automatic devices and an RCD. A bus for the working zero must be installed in the shield. Now we try the shield on the carbolite base, mark and drill holes for further fastening with self-tapping screws.
The wires must be prepared in advance and extended through the terminal block. The upper and lower wires from the zero plug are attached to the zero bus. On the left circuit breaker, a live wire is connected to the upper terminal. And a piece of wire of the required length is added to the terminal block and connected to the machine. Next, the washing machine machine is connected to the upper terminal of the second machine using a cable.
Connecting a washing machine via a dual automatic device and an RCD
From the bottom terminal of the first machine there is a phase wire to the load. The neutral wire also goes to the load from the neutral bus. A phase is taken from the output (lower terminal) of the second washing machine and connected to the upper terminal “L” of the RCD protection.
The neutral wire from the neutral bus is attached to the upper terminal “N” of the RCD. From the lower terminals of the RCD “L” and “N” the cable is connected to the washing machine. When the installation of the machines is completed, close the panel panel and turn on the network (if it is not turned on). They check the operation of all machines and test the RCD with the “TEST” button. The RCD is triggered and turns off the network.
If you are replacing plugs on automatic machines yourself, then you can replace the old wires on the meter. Why is a statement written to energy supervision? After some time, an inspector comes and removes the seal. Records the latest meter readings. After installing the machines and replacing the wires, the installation of the panel is checked and the meter is sealed.
Preparatory work
Before you start upgrading your home panel, you need to choose the correct rating of the circuit breaker. In turn, to correctly select the characteristics, you need to determine what load your wiring can withstand, if when replacing plugs you do not plan to change all the electrical wiring in the apartment. To do this, it is enough to pass through your rooms and, according to the table below, determine the maximum possible load:
Already relying on the obtained values, you can safely.
In addition, you may want to replace the electricity meter with a new one. If this is the case, you will have to obtain permission from the energy supply company before starting work. To do this, write an application, an inspector comes, checks whether the seal is broken, writes off the meter readings and gives you permission to replace it. After all electrical installation work has been completed, you need to call the inspector again, who will check the correct connection and can do it again.
If replacing the electric meter is not planned, you can change the plugs on the machines without breaking the seal on the meter, and therefore without calling an inspector.
Also at the preparation stage, you need to purchase the size of the circuit breaker and acquire tools with insulated handles (screwdrivers and voltage indicator). After this, you can proceed to the main process.