Laying wires and accessories
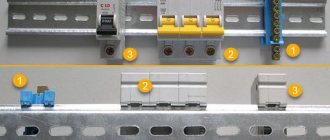
First of all, the panel and RCD are installed, the number of which corresponds to the number of connection groups. A piece of wire with a cross section of 5 mm² is inserted inside the shield. Blue - attached to zero, white - to the top contact of the machine, grounding (yellow with a green stripe) - to ground. The RCDs are connected in series with a piece of white wire.
It is recommended to start installing new wiring in an apartment with your own hands from the farthest connection point.
The wire is cut into pieces of the required length with allowance for connections, pulled into corrugations on the floor and then laid in grooves.
To connect sockets, a wire with a cross-section of 2.5 mm² is used, for lighting fixtures and switches - a wire of 1.5 mm². It is advisable to attach a tag to the end of each wire indicating the purpose and location of the connection group (point).
Wires in junction boxes are connected using PPE or simply well insulated. The main wire inside the panel is connected as follows: the blue conductor - to the neutral bus, the phase conductor, in red or brown insulation - to the RCD below, the grounding wire - to the ground below.
After this, the wiring is called and, if the installation is done correctly, all that remains is to call an electrician to connect it to the distribution board. How to properly install and lay electrical wiring in an apartment with your own hands, you can watch further in the video:
https://youtube.com/watch?v=srxk7BEr0KM
All work is performed only with working tools; the handles of hand tools must be insulated. For additional protection, rubberized gloves are required; wall-shaping work is performed with safety glasses and a respirator. Grooving at height is done from a trestle or from a stepladder with a side support.
In this video, an experienced specialist will tell and show how to change the electrical wiring in an apartment with your own hands:
Determine what kind of electrical wiring you have now
Important! Before describing the work, I must warn that any work related to electricity should be carried out only when the power supply to the apartment is turned off. So where to start
Of course, from the beginning, namely from the place where the power supply to the apartment comes from. Depending on the type of house, this may be a floor distribution board or a separate one, an apartment panel or a symbiosis of floor and apartment panels
So where to start. Of course, from the beginning, namely from the place where the power supply to the apartment comes from. Depending on the type of house, this may be a floor switchboard or a separate one, an apartment switchboard or a symbiosis of floor and apartment switchboards.
To begin with, let’s open the floor panel and find the circuit breakers that are “responsible” for your apartment. There must be one device that turns off all power to the apartment. This is an introductory device. It could be a circuit breaker, then it is located on the left in the row of your machines, or a switch, then it is located separately at the top or bottom, although there may be options.
Photos of old floor boards
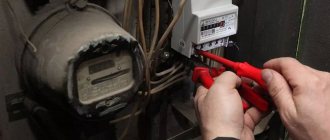
You will not be able to replace the input device yourself, since you need to turn off the power supply to the entire (or part) of the entrance, and this can only be done by an employee of the operating organization. But you can see the nominal value of the introductory machine. Watch and record.
Let's move on. Let's see how many circuit breakers are installed for your apartment. There should be at least two of them. Three with electric stove. One machine is lighting. Second automatic socket. The third automatic electric stove. If you have more machines, then you need to determine which machines are turned off.
Note. The circuit breaker is designed to protect electrical wiring from overvoltage, short circuit and simple communication (turning on and off the power supply).
To determine which machines are being turned off, turn on the lights in the apartment, plug in the lighting fixtures into the sockets and simply turn off the circuit breakers and see what will turn off in the apartment when the machines are turned off sequentially. Do not use complex household appliances for such diagnostics to avoid their damage if the machine is abruptly turned off.
Let's analyze the situation and determine what to do next. So, after such a simple diagnosis, you have a diagram of your old electrical wiring.
It may well look like this:
We will determine the stages of electrical wiring repair.
Marking and gating of walls
To mark, you will need a level, tape measure, chalk or construction pencil. In the places where the sockets are installed, 7x7 cm squares are drawn; if a double socket is to be installed, a rectangle 14 cm wide is drawn on the markings. Then cable routing routes are drawn on the wall in accordance with the plan.
Lastly, mark the location of the switches, marking them with squares, just like the sockets. 9x20 cm rectangles are drawn for distribution boxes.
The holes for sockets and switches are marked with a core drill, then grooves are cut along the marked lines with a grinder.
The depth of the groove is at least 20 mm; the width of the groove depends on the number of wires that must be laid in a particular area. All wires must fit completely freely.
After cutting the grooves, all that remains is to knock out the grooves and all the intended holes. Grilling is a labor-intensive, dirty and noisy process; work should be planned during working hours and neighbors should be notified in advance.
Where to begin
Initially, it is necessary to resolve organizational issues. In order to replace the electricity input, you will need to open the sealed meter. Since the homeowner is strictly prohibited from doing this on his own, coordination with the organization involved in the control and supply of electricity will be required. As a rule, this is done by the relevant departments of district or municipal electrical networks.
At the first stage, you need to determine the scope of related work for the planned installation. The degree of complexity and labor involved will largely depend on the material of the walls of the house, how the old line was laid, the distance from the access panel to the wall of the apartment, as well as the decision to what extent the work will be done, with or without replacing the meter.
When deciding whether to do the work yourself, you should remember that this type of installation requires a professional solution to the issue by an experienced electrician who knows and complies with the requirements of regulatory documents. To attract specialists, it is better not to try to solve the painful question of who to call as an electrician, but to contact a management company or another organization involved in the operation of electrical equipment at home.
How to change the input cable in a private house
Instruction 1 There are three ways to connect electricity - using a SIP wire, laying a cable in the ground and laying a cable using a cable. The easiest and most common is the air method, using a self-supporting insulated wire, abbreviated SIP. Electrical input into the house begins with the selection of material.
The length of the SIP wire consists of two values, the distance from the support to the house and from the entry point to the electrical cabinet. We measure the distance using a tape measure, take the wire with a reserve, taking into account sagging and installation. 2 The main points of the work are fastening the SIP wire to a support, installing the wire on the wall of the house, entering the house through the wall and laying it along the wall of the house to the electrical cabinet.
If the input power supply is 220 volts, then use a two-wire SIP, if 380 volts - a four-wire one. 3 To install SIP on the wall of a building, special fittings are used.
Residents of old housing stock often face such an unpleasant problem as replacing the input cable (from the panel to the apartment itself). Owners of private houses face the same problem when they want to replace an input with old (aluminum) wiring.
Important
Our article will tell you in detail about the nuances of replacing the cable. Reason for replacing the cable The reasons for replacing the cable are very different.
Attention
Sometimes these are breakdowns of the input line, and sometimes the cable’s service life has come to an end and needs to be replaced. Often, many electrical appliances, which are found in almost every person’s home, create large current loads, exceeding the permissible power that the input line can produce.
Another reason is the installation of your own switchboard in the apartment. Distribution access panels in older housing often have only one electric circuit breaker.
How to change the input cable to the house
Replacing the electrical input requires opening the sealed meter, which the homeowner is prohibited from doing. To do this, you need to submit a request to the organization that controls and provides electricity to citizens.
Next, the amount of work is calculated based on the material of the building walls, how and where the old line is laid, the distance from the access panel to the place where the panel will be in the apartment, whether the meter will be replaced or not.
If you decide to replace the input cable yourself, then you must take into account that such installation is usually carried out by professionals who act in accordance with regulations. If you choose a professional electrician, contact an organization that operates electrical equipment at home.
Replacing the input cable in a private house from a beginner
The insulators on the wall of the house must be spaced at least 20 cm apart from each other. Rules for installing a branch cable For low buildings, use a pipe stand and the cable entry is made through the roof. In some cases it is convenient to use a stand.
Scheme for organizing cable entry using an attached pole. In this case, it is also recommended to run the cable down the pole in a steel pipe.
For any connection method, the branch wires or cable must be intact and have no breaks or connections.
They must be connected at one end to the line insulators, and at the other end directly to the terminals of the input circuit breaker for switching to the electric meter.
How to connect electricity from a pole to a house
The twists are tied with a rope to the tensioned input, specifically so that the wind does not blow against the wall. Well, to complete the picture, the antenna cable is hooked up there. Like - if anything, the TV burns out first! Copper cable (3) enters the house. Somewhere there, in the depths of the walls, he goes into the hallway. Where the counter used to be.
What do we see? The old meter comes with aluminum wires. So what happens? A copper wire from the street, somewhere in the house, under the plaster, is connected to an old aluminum one. Most likely connected by twists. Naturally, poor electrical contact.
The wire, even under a small load, overheats and, as a result, the machine near the meter constantly turns off.
We decided to completely replace the input cable into the house. For this I use aluminum AVVG 2x10. I throw it in one piece, from the hallway to the counter.
To avoid problems in the future, I lay the cable taking into account the possibility of replacement.
Replacing the electrical input to the house with a sip
Many panels still have cork fuses. Today it is very convenient to distribute residential power supply into several zones, each with its own automatic machine.
Features of replacing cable glands in the house
In most cases, the power supply to a private home is carried out via a tap from an overhead power line, for which a self-supporting insulated wire with aluminum conductors of the SIP grade is used. It is possible that part of the entrance highway will be laid along the façade of the building. Replacing part of the input from the pillar to the wall does not cause any special problems; it can be easily done by specialists
It is very important to install wiring along the wall of the house in accordance with the requirements of electrical fire safety standards, as well as to correctly enter into the wall. If the facade is made of non-combustible materials and is not finished with siding, the input cable can be laid in a box or corrugated pipe. The owner of a private house needs to know that the SIP has a flammable sheath, and therefore it is prohibited to lay such wiring on wood, therefore, before attaching the line to a wooden wall, it is necessary to connect to a cable with copper conductors using special sealed clamps
In the case of siding trim, the SIP, even if it is laid in a protective shell, must be at least 7 cm away from the wall. The entrance to the building through a wooden wall is equipped with a metal sleeve, which is used as a thick-walled pipe. We talked in more detail about how to run a cable through a wall in a separate article.
A special issue is replacing the input cable in a wooden house, as it requires strict compliance with fire safety standards. In this case, it is better to use a metal hose or a metal cable channel for installation; you can use a pipe
It is important to remember that only cable products with a three-layer non-flammable sheath are allowed to work. Of the domestic products, the VVGng-p brand is best suited
The entrance to a wooden wall should be equipped with a metal cup, wrapped in asbestos and fixed with an alabaster mixture. Placing the cable in metal protective equipment is possible only if there is a grounding loop, since they will require mandatory grounding.
Replacing the power wire from the panel to the apartment | Electrical installation Orion-M
The need to replace the power wire from the panel to the apartment usually arises among residents of an old multi-apartment housing stock in which major repairs have not been carried out. The complexity in this case is aggravated by overload of the clamping contacts, which are connected to a large number of wires.
Modern buildings, in addition to a common distribution board that provides power to the entire house, have not only floor panels for a group of apartments in one entrance, but also apartment panels. This method allows you to increase the security of systems and limit interference in electrical equipment by persons who do not have access rights.
The electrical network installed in houses built after 1995 also provides for the presence of a grounding wire.
You can start replacing the power wire from the panel to the apartment yourself only if you are confident that you have the necessary knowledge and have the required tools and materials. The main material will be insulated wire (double insulated):
- The number of wires (cores) in it will depend on the voltage required to power the existing electrical appliances and the presence or absence of grounding. Let's consider more favorable options, that is, the presence of a grounding bus on the main input-distribution panel:
- When all electrical appliances installed in the apartment operate from a 220 V network, it will be a single-phase 3-wire network: phase, neutral, ground. The cross-section of such a three-core cable is about 4 mm2.
- A three-phase network, allowing the supply of 220 and 380 V, consists of five wires: phase 1, phase 2, phase 3, neutral and ground.
- Having decided on the number of wires that should be part of the power cable, you should set its length. It is measured simply: from the distribution box or apartment panel to the floor panel. A reserve should be provided to ensure ease of connection. It is about two meters.
- The next stage is the selection of conductor material. Instead of previously laid aluminum wires, it is more advisable to use multi-turn copper wires. They are easy to install and connect. This choice will be the only one even if the wiring throughout the apartment is made with copper wire. Combining copper and aluminum by twisting will lead to overheating of the joints.
- The method of laying the cable depends on the number of floors of the building. If there are no more than five floors, hidden and open installation is possible. For taller buildings only hidden installation. Naturally, this is a more complex type of work that requires gating. This creates dust and debris, and after laying the wires, a mortar is needed to carefully seal the cut areas. But this method is more aesthetically pleasing and will protect against vandalism. Open wiring should only be done using steel pipes or ducts.
When replacing the power cable from the panel to the apartment, work safety should be ensured. In this case, first of all, it is necessary to turn off the power supply using the input circuit breaker. Along with the tool, you should have a convenient device for performing work at a certain height, for example, a stepladder.
When carrying out work on combining wires in a junction box, you should carefully fix the places by soldering or twisting. In this case, all exposed parts must be insulated. Convenient fixation is provided by special devices: terminal blocks and clamps.
Determining the complexity of the work
So, first you must analyze the old wiring and find out the following points:
Is there a grounding system at the site? This is very important, because without a grounding loop you can suffer if household appliances fail or insulation breaks down. Is it possible to partially change the wiring in a private house or is it necessary to completely replace the electrical system?
Perhaps some rooms have recently been renovated and, accordingly, a new, more powerful cable has been installed that will meet modern requirements. Will you be able to carry out the electrical installation yourself or will you have to hire a specialist for this? It should be noted that replacing the electrical wiring in the house with your own hands is not difficult, but the undertaking is labor-intensive and requires special care. If you don’t doubt your abilities, of course, do everything yourself
Otherwise, first find out the cost of the master’s work, because... To do this you will have to pay a considerable amount of money.
Having collected all the necessary information about the complexity and scope of work, you can get down to business. The video explains in detail whether it is worth completely replacing the old wiring with a new one:
Pros and cons of completely replacing electrical wiring
Reasons for replacing the wire
Most people living in the private sector are concerned about why and how to replace the cable from the pole to the house. The supply of electricity to cottages, country houses, and private houses is usually carried out from overhead main lines. Electric poles carry bare wires secured through support insulators. Most of the main lines are long outdated, in a dangerous situation, and also heavily overloaded, because electricity consumption increases every year.
Often in bad weather, due to strong winds, wires break or a short circuit occurs. Organizations whose responsibilities include servicing main lines usually do not immediately come to the scene of an accident, and when they arrive, they generally perform their work poorly. Therefore, the next time unfavorable weather occurs, everything repeats again.
How to connect electricity from a pole to a house
Work on connecting the cable from the power line pole to the input distribution box at the house should be carried out by a specialized organization: this is too sensitive an area. However, you need to decide on the input method - overhead or underground - as well as the type of cable and its cross-section. So you will have to figure out how you can connect electricity from the pole to the house and choose your option.
Electrical supply by air
The air supply method is attractive because it does not require a lot of time and money. But the standards set requirements that not all houses meet:
- The cable entry into the house must be located at a height of at least 2.75 m. If the height of the house is sufficient, a distribution panel with an RCD is mounted on the wall, and the cable from the pole is connected to it. If the house has a smaller height, a special rack (pipe rack) is installed. It can be of a curved shape called a “gander” (in the picture on the left) or straight (in the picture on the right). These two input methods differ in the method of fastening to the walls of the house (see photo). Methods of installing a rack for air supply of electricity into the house
- The distance from the pole to the entry point should not exceed 10 m. If this distance is greater, additional support is installed. The distance from it to the power line should not be more than 15 m.
- The tap from the power line is made: up to 10 m - with copper wire with a cross-section of 4 mm;
- from 10 to 15 m - with a wire with copper conductors with a cross-section of 6 mm.
- aluminum wires are used in any case with a diameter of at least 16 mm.
Connecting to a power pole by air
Although copper wires require a smaller diameter, they cost significantly more than aluminum wires. Therefore, the introduction of electricity into the house from a pole is most often made from cables with aluminum conductors. There are two ways:
- Stretch a torso or wire between the posts and attach a current-carrying cable to it with special clamps.
- Use self-supporting wires for which support is not needed: SIP (self-supporting insulated wire). It is connected using:
- insulators (glass, polymer, porcelain);
- special fittings.
Reasons for replacement
There may be several reasons. Firstly, due to the failure of the input line or the need for replacement is dictated by the service life of the cable. Secondly, the home of a modern person is equipped with an extensive fleet of electrical appliances, the operation of which creates a significant current load that exceeds the calculated power value for which the cross-section of the existing input main is designed. Thirdly, the desire to equip a personal apartment switchboard. It is no secret that entrance panels, for example, in an old panel house are equipped, at best, with only one electrical circuit breaker, which provides power supply and protection for the entire apartment. At the same time, not everywhere has yet managed to get rid of such a heavy legacy of the past as plug fuses.
The realities of our time suggest dividing the residential power supply system into several groups, connected to separate circuit breakers, as well as the need to connect modern means of protection against surge voltages, RCDs, differential circuit breakers that guarantee trouble-free operation of household electrical appliances and electrical fire safety of housing. Before installing and connecting an apartment switchboard equipped in accordance with the latest requirements, it is advisable to change the input cable to a more powerful one, the service life of which will begin from scratch. In addition, you need to correctly select the cross-section of current-carrying conductors corresponding to the planned total load of consumers. Next we will talk in detail about how to replace the input cable in an apartment or private house.
Electrical wiring diagram in the apartment
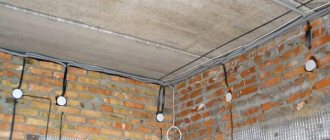
When laying a cable along the ceiling, the wiring diagram is made according to the following principle.
To light outgoing lines, it is better to make at least two. One outgoing branch for the bathroom, which must be connected via an RCD or differential circuit breaker. The second is through a conventional circuit breaker with a rating of 10 A. The cable for light is a three-core cable with a cross-section of 1.5 mm square. designated as VVGng 3*1.5.
A typical switching diagram for switches looks like this:
The number of socket groups in the distribution board is determined by the number of rooms. Sockets are wired with a 3*2.5 mm square cable. and are protected by a circuit breaker with a rating of 16 A. In addition to the sockets in each room, consumers such as an air conditioner, an oven and a router should be connected to separate branches.
You should also connect a heated floor to a separate differential machine: if available, a power cable to the loggia, dishwasher and washing machine (one can be used).
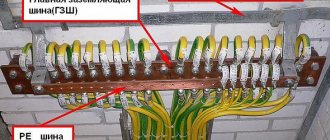
In wet areas, it is necessary to provide for the installation of potential equalization boxes (PEC). To do this, you need to install a separate wire with a cross-section of at least 6 mm square. and install the PMC. Then it will be necessary to ground all metal parts from it (the bathtub, shower stall, frame of the slatted ceiling, distribution manifolds, as well as socket housings must be grounded with a separate wire). The last point causes a lot of controversy, but according to the rules it should be done this way. About how not to do electrical work here.
Typical switchboard diagram for a one-room apartment
When laying cables on the floor, junction boxes are not required. The cable enters the socket box from the floor, and the second goes up to the light source - switching occurs in the socket box.
If you need to power several sources, then two power wires (incoming and outgoing) will enter the socket box from below, then the second one goes to the next room, etc. Connecting sockets occurs in the same way.
With such a loop in a group of sockets, it is necessary that the incoming power cable be in one extreme socket and the outgoing one in the other extreme socket, then it will be more convenient to install the sockets themselves.
For switching wires in socket boxes and in junction boxes, it is most convenient to use WAGO terminal blocks. Twisting and welding go back to the Mesozoic period. If everything is done correctly, then there will be no burnout of the terminal blocks. All the scary pictures on the Internet about melted contacts of such terminal blocks appear due to exceeding the permissible current as a result of incorrectly selected circuit breakers. You should also purchase original products.