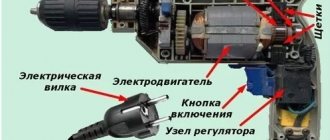
Not all electrical wiring repairs require calling a specialist. To figure out how to fix an outlet, school knowledge of physics (in particular about the structure of electrical circuits) is often enough, and to do the work itself, having the necessary minimum of tools and free time. You also need to remember that before you repair the socket, the input circuit breaker must be turned off.
Repair Tips
Experience is important in every business, so before starting work it is recommended to consider the following tips:
- Check that there is no voltage before work;
- If possible, call an electrician or an experienced technician;
- Use high-quality machines, sockets, conductors;
- Cotton insulating tape is safer and more reliable as insulation;
- Through holes and thinning metal clearly indicate that the socket is beyond repair.
In this case, the device needs to be repaired. To do this, remove the outer cover and carefully examine the insides. Crackling indicates periodic breakdown of electrical contact and spark breakdown of the gap that occurs in this place. Contact can be broken in several places:
- Connection of electrical wiring with a contact clamp. In this case, you can repair the socket as follows: turn off the power supply, depending on the design, or simply tighten the contact clamps with a screwdriver, or unscrew and unfold the internal part to gain access to the clamp screws. After the repair, we put the product in place and screw on the cover.
- Connection of spring contacts with a plug. The outer cover must be removed by turning off the power supply. Identify the cause of loose contact visually. In most socket designs, connection is ensured by the elastic properties of the contact socket material. When the plug is turned on, the sockets elastically deform, creating a pressing force that ensures contact. If the sockets are excessively deformed without an overall loss of elasticity, they can be repaired by gently compressing them with pliers to return them to their original shape. If the contact plates have lost their elasticity (this happens when they overheat, which is accompanied by a change in color), that is, when compressed with pliers, they do not spring back, but are deformed plastically, it will not be possible to repair the socket.
- At the point where the wiring is supplied, the wire is broken and 2 mm of the remaining conductor sticks out in the wall. In this case, unreliable contact can be ensured by the end contact of parts of the broken cores supported by insulation. Upon examination, partial damage or blackening of the insulation may be observed at the site of the fracture of the current-carrying conductor. If the damage site is not visible visually, the wiring should be checked with your fingers “for shifting”. The place where the wire is held only by insulation can be easily identified. In order to repair the damaged area, it must be cut off at this point, the insulation must be stripped and secured in the terminal. For ease of connection, it is better to cut the second wire to the same length.
Read more: How to choose plastic windows, expert recommendations
A situation often arises when a wire that is broken or burnt out after a short circuit turns out to be too short. In this case, during repairs, you can extend the wire. The best way to do it is as follows. Cut the second wire to the same length and strip it. Take two pieces of copper stranded conductor, several centimeters long, and solder them to the wiring, after stripping the ends. Place pieces of heat-shrinkable tubing of a suitable diameter onto the repair areas and gently heat them with a lighter.
This is one of the best repair methods, but you can also repair it with insulating tape and repair the connection with twisting. Then, strip the ends of the flexible wire and connect them to the terminals. This repair method is good because the flexible conductor fits very conveniently in the socket box, and further breaks are excluded.
Features of operation of Euro sockets
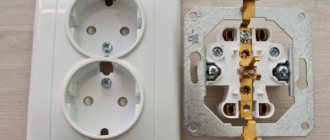
The German standard of the Schuko company is widely used in our country. It uses two grounded spring-loaded clamps on the receptacle and corresponding contact pads on the plug.
They are designed specifically to provide reliable electrical connection with the ground loop of the generator end through a PE conductor. This mandatory safety condition is necessary for connecting an RCD or a breaker.
When installing or removing the fork, it is necessary to overcome the force of the springs, calculating the mechanical load created. It cannot be exceeded.
Some old European sockets use housings into which the plug may not fit completely inside, which creates not only an incomplete contact connection along the length of the electrode, but also creates the danger of touching open live parts, which is a prerequisite for electric shock or short circuit.
Possible causes of malfunction
To start repairing, you need to follow the following algorithm:
- Check all outlets. If one product does not work, they look for the reason in it.
- The electrical circuit is susceptible to breakage in weak points, for example, when connected by twisting or unreliable insulation. If everything is fine in the electrical outlet, a break is looked for in the junction box.
- Find out how the voltage went out - the devices stopped functioning or the machine was triggered before that.
- Determine whether the outlet is regular or special for high-power electrical appliances.
In one room there is light, but the socket does not work
The most common problem is when the lights in the room turn on, but the sockets do not work. At the same time, voltage is supplied to other rooms. Possible reasons for inoperability:
- exceeding the permissible load;
- failure of a cable section.
It is necessary to check the electrical wires in the panels, the working part of the power points. If a cable breaks or breaks, an electrician is called in, as new wiring may be required. The most common problem is careless installation or damaged insulation. In this case, the indicator will show a power failure in the faulty area.
One outlet does not work, but the rest are working in one room
When one power point does not work, the cause may be a loose connection or melted insulation.
If during a visual inspection the cover is melted and the socket does not function, then the contact wire has burnt out. When disassembling the device, the burnt area is visible.
The problem may be in the wire itself, then you need to inspect the cable, check the condition of the core and insulation.
If overheating occurs repeatedly, there is a high probability of destruction of the core, so you will have to replace the faulty piece.
If the insulation breaks, put a cambric or electrical tape on the exposed area. Darkened contacts are carefully cleaned with sandpaper.
Another cause of failure is a short circuit (short circuit). A short circuit is determined simply - the closed section of the conductor is missing, and the inner part is covered with an oily coating. In this case, the socket cannot be repaired - only replaced with a new one.
The socket in the kitchen near the stove or hood stopped working
A stove, hood, and washing machine are appliances with a power above 2000 Watts that require separate sockets. The most common problem is choosing the wrong power point, which is designed for less power. In this case, replace the electrical outlet with a new one with the required value. If the permissible power is exceeded, the wire may break. The problem should be fixed by a professional. A separate machine is installed for powerful devices. It can be triggered by a current drop. To return the voltage to the outlet, you need to look at the machine and turn on the toggle switch leading to the kitchen.
What to do if the socket itself is broken, but there is voltage
Before starting repairs, make sure that the outlet can be repaired. The burnt device is replaced with a new one. If there is no voltage when checking with a multimeter, the wires are checked. After making sure that everything is in order with the conductors, proceed with the repair.
To repair you will need:
- screwdrivers;
- sharp knife;
- insulating tape;
- pliers;
- multimeter
Procedure:
- Before carrying out work, turn off the power to the apartment. It is prohibited to repair a live power point.
- Unplug devices from the electrical outlet.
- Use a screwdriver to remove the housing.
- Unscrew the clamping bolt and check the quality of the connections. Loose contacts are strengthened.
- Trim the melted ends with a knife or wire cutters. Repair damaged insulation using electrical tape.
- If the clamping bolt is broken, install a new one.
- After troubleshooting, reassemble the socket.
- Turn on the electricity and make sure the problem is corrected. To do this, you need to connect a low power device. If the outlet works without unusual sounds or odors, the repair was successful.
Ways to solve the problem
It is logical that you cannot leave the outlet in this state. Firstly, it is not aesthetically pleasing. Secondly, it is dangerous, especially if there are small children or pets in the house. The simplest and most correct option is to install a new outlet, but you may not have such an electrical appliance at hand. This kind of work is quite dusty and requires special tools and skills. The second method of solving the problem is to repair the old socket that falls out of the wall, with further strengthening of the frame.
Quick screwing of the socket
You need to understand that the cause of the socket falling out is faulty claws that no longer hold the device in the wall. If there is no time for a full repair, then you can try to bend these legs so that they press the socket more tightly to the wall surface.
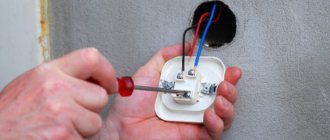
First of all, you need to turn off the power to the outlet and get rid of the front panel. Look how tightly the screws are screwed; if they are loose, they should be tightened
It is important that the spacer tabs fit snugly to the device. Often such measures do not help, since it is not possible to fix the electrical appliance in the old socket box. In this case, you can use fixing gaskets made from scrap materials.
You will need leftover linoleum, rubber gaskets for plumbing fixtures, sandpaper or wood fragments
In this case, you can use fixing gaskets made from scrap materials. You will need leftover linoleum, rubber gaskets for plumbing fixtures, sandpaper or wood fragments.
The prepared materials at hand are cut into a rectangular shape. After this, paper, linoleum or wood are smeared with glue and inserted deep into the socket box. In total, you will need two such gaskets, installed opposite each other so as to be located at the level of the spacer legs. After this, all that remains is to press the socket tightly against the box and tighten the screws that adjust the spacer tabs. The final stage is screwing the front panel.
Loading …
Major repair of the seat
Often the reason for the socket to loosen and fall out lies in an incorrectly mounted socket. In this case, a major modernization of this element will be required. To do this you will need to arm yourself with the following tools:
- box for mounting a socket measuring 6.8 by 4.5 cm;
- gypsum;
- construction knife;
- polymer-based primer;
- spatula in the form of a small spatula.
Work must begin by disconnecting the device from the network. If this is your first time doing this, you should mark the wires with a marker in advance so as not to confuse them after the repair. After this, the socket with the drop-down contact group is dismantled. Next, you need to unscrew the screws, remove the plugs and pass the wires into the box. The bottom of the box will probably get in your way, so you need to cut it out first.
After this, you can begin installing the socket base into the box. Maximum fit will avoid further problems with the electrical appliance falling out. Next, the inaccuracies are corrected and the location of the seat is outlined. All that remains is to prime the outside of the box and wait for it to dry. Next, plaster is diluted, which is used to treat the wall and seat. The mounting box is inserted into the prepared cavity, then the material is removed and the gaps are filled. It takes approximately 15 minutes for the gypsum mortar to set. After this time, you can install a new socket by first wedging the base and tightening the adjusting screws. The final stage is installation of the front panel.
How to independently remove an old socket from the wall and install a new one
In order to replace the socket, you need to take some preliminary steps and prepare the necessary tools. The work consists of several stages:
- removing the decorative panel;
- loosening the screws securing the wire cores;
- removing fasteners and loosening the spreading legs;
- actually, dismantling.
Installing a new socket is done in the reverse order.
Tools
To dismantle and install the socket, you must have the following tools:
- screwdrivers with flat and Phillips blades;
- knife for stripping insulation;
- side cutters;
- pliers.
The type and size of the screwdriver blade must match the slots of the screws used.
A discrepancy between the dimensions will lead to the spline breaking, which will complicate further work.
Dismantling process
First of all, remove the decorative cover. Different manufacturers have their own methods for attaching the cover to the base of the socket, but the most common method is one or two screws located between the holes for the plug pins. To prevent the screws from getting lost, they can be held on the reverse side with locking washers.
The lid is often secured using latches. Here you need to be careful not to damage the latches.
It is recommended to first release the base of the socket from the wall and then disconnect the wires. In old sockets, the screws stick strongly to the terminals and it is often impossible to unscrew them while holding the socket suspended. The screwdriver may break off and cause injury.
It's easier to loosen the screws while the case is still attached to the wall. Then remove the housing and finally disconnect the wires.
It is important not to apply bending forces to the wires, since the insulation of old wires is fragile and may crack or crumble. Aluminum conductors can break, and they cannot be extended inside the wall
You will have to change the section of wiring between the outlet and the junction box.
Stages of work with an external device
External sockets are distinguished by the fact that their base is not recessed, but is attached to the outer surface.
When installing a new socket, do not pull it too hard to the surface so as not to break the housing. If you place plastic washers under the screw heads, the risk of breakage can be reduced.
Attaching a new mechanism to the cores
Before installing a new socket, prepare the ends of the cable and the mounting location for the socket. The length of the conductors must be such that they can be easily connected to the terminals. It's not scary if there is some margin in length. The wires must be carefully moved in opposite directions from the base of the socket to the walls of the socket box.
Before installing a new socket, the ends of the wires are cleaned of oxides. Bent parts are straightened with pliers. The length of the stripped part must be such that the wire completely enters the fastening part of the terminal, without leaving a bare part outside. If necessary, the core is shortened using side cutters. When breaking off the cores, you need to remove the insulation to the required length. To remove insulation, you cannot use pliers or side cutters, since the core, crushed by the cutting edges of the tool, will break. This is especially true for aluminum wires.
A sharp knife is used for stripping, and the process itself is carried out in the same way as when sharpening a pencil, cutting the insulation at an acute angle to the surface of the core.
If there is no voltage in all outlets
Most often this happens during a power outage initiated by the power supply company. It is necessary to check the presence of voltage at the terminals of the input circuit breaker in the electrical panel. You can also ask your neighbors if they have electricity?
The input machine itself may be faulty. If there is voltage at the input terminals, you can try turning off and turning on the machine again. If there are no changes, the input machine should be replaced, as it is probably faulty.
You also need to check the integrity of the line connecting the apartment electrical panel to the one installed on the landing. In the case of a private house, you should make sure that everything is in order with the overhead line connecting the house to the power line.
Preparatory measures for repairs
Repairs should be made only after preparation for them. Even to correct the most minor problems, you should turn off the power to the apartment and make sure that the switches are turned off. After a power outage, you should check the voltage in the network with an indicator screwdriver - it should be absent in phase.
What will be needed for repairs
Every electrician has a set of tools. If a complete set is not available, then its individual components will have to be purchased to repair the electrical outlet.
In addition to the indicator screwdriver, you will need the following materials and tools:
- flat screwdriver;
- Phillips screwdriver;
- pliers (pliers);
- insulating tape (vinyl);
- sharp knife for stripping wires.
In case of some breakdowns, a soldering iron may be useful.
Repair sequence
To fix an electrical outlet that has come loose from the wall, just tighten the fastening screws. They are accessible by removing the protective cover. The screws are visible on the sides of the block. There are cases where the socket becomes loose, leading to it falling out of the wall. This usually happens with a structure secured without a cup holder. The sockets are secured with spacer plates.
They are metal, fastened with tightened bolts. The sharp teeth on the outer edges of the spacers cut into the concrete bed of the rosette. In old houses, building materials may crumble. How to fix a fallen socket? A cup holder is added to the old design. It is advisable to strengthen the bed around it with cement mortar. If the old socket is broken, the action algorithm is as follows:
- The bolt on the front panel is unscrewed.
- The front panel is removable.
- Contacts and wiring are inspected.
- If there are wires that have fallen out of the socket, they are returned to their place and clamped.
- If melted or scorched ends of the wiring are detected, they are cut off. The tops of the remaining wires are stripped.
- Oxidized contacts are protected with sandpaper.
- The structure is assembled by closing the front cover.
If you decide to repair the outlet yourself, you may encounter difficulties. It may, for example, require extension of wires. After burning and stripping, their length is not enough for connection. We have to build up new cables.
The wire strands on both sides are extended and twisted and covered with electrical tape or caps. You can connect the extended wire to the original one using terminals. However, they rarely enter the socket box.
The problem of extending wires often arises when deciding how to fix an outlet if it sparks. A short circuit in the structure leads to heating and charring of the cables. Internal contacts can literally fall apart. In this case, repair is impossible. The socket needs to be replaced.
DIY wiring
Nowadays, hidden wiring is mostly used, and this is not at all surprising, since modern trends in the design of residential premises simply do not allow the use of open wiring. Hidden wiring is technically easy to organize, both on brick and wood walls. If the walls are brick, then grooves (grooves) are made in them, into which the wires are laid, and then they are covered with mortar or putty. If you use drywall, grooves are not needed, but then you will have to use corrugated sleeves that are attached to the wall using clamps. If the house is made of wood, then you can do the same, covering all the “art” with finishing material.
How should internal wiring be laid? In a private home, when installing it yourself, you must follow all the rules
In any case, it is necessary to adhere to a number of requirements that are aimed at the reliable and safe operation of electrical wiring. These rules include:
- The wires are laid either strictly vertically or strictly horizontally, without beveled or rounded corners.
- All connection points must be located in junction boxes.
- Horizontal wiring should be at a height of 2.5 meters from the floor level. Vertical wiring should run along the line of sockets and switches.
Such rules, as well as a saved diagram of the electrical wiring of the house, can help in the future if repairs are required. Then, even without a diagram, you can easily determine where and how the wires go and how they fit into sockets, switches and other devices. Secondly, such a scheme will help you avoid getting caught in the wires if you have to drill holes in order to mount some decorative element or some piece of furniture on the wall.
How to connect wires correctly
A fairly common problem that arises with unreliable electrical wiring is related to poor contacts resulting from poor wire connections. Wires are connected:
Using twists. As a rule, this connection method is not used when connecting copper and aluminum wires. To make a connection, the ends of all wires are stripped of 4 cm of insulation, after which the required ends are securely twisted. After this, the twisted areas are insulated using electrical tape or heat-shrink tubing. Although such a connection is considered unreliable, this connection method is used quite often. This is not surprising, since this type of connection has a number of advantages.
Using terminal connections. To do this, you need to use special distribution boxes that have metal terminals. Wires are clamped with screws
This connection method is considered more reliable, and the terminals allow you to connect copper and aluminum wires, which is very important. Using pads with springs
Reliable contact is ensured by a spring
Using pads with springs. Reliable contact is ensured by a spring
To make such a connection, it is enough to strip the end of the wire about 1 cm and insert it into the socket.
Despite these methods of connecting electrical wires, soldering and welding are considered the most reliable, although it is not always possible to do this, especially when it comes to welding.
THE MOST RELIABLE WIRE CONNECTION. All types of wire connections. How to connect the wire.
Watch this video on YouTube
Whatever type of connection is used, the main task is to fulfill the basic requirements, which is the key to reliable and safe, in all respects, operation of DIY electrical wiring.
An equally important stage is checking the correctness of all connections, as well as checking for short circuits and insulation integrity. Often, uncertified products of dubious quality are sold, which is impossible to determine visually. As a rule, low-quality products will ultimately cause various emergency situations. Commissioning is possible only if the electrical wiring is checked by specialists from the electrical laboratory, who, after checking, will issue a test report with signatures and seals indicating that the electrical wiring in the house can be used.
Laying methods
Do-it-yourself installation of electrical wires indoors can be done in an open or closed way. But if it is recommended to install wiring in a wooden house according to the first option, then in an apartment the second one is almost always used. To do this, you will have to punch the walls in the rooms with a hammer drill or cut channels for cables in concrete or brick with a grinder. But then all the electrical wiring turns out to be hidden from view by the finishing, which even looks more aesthetically pleasing in the photo.
Options for laying wiring in an apartment along the ceiling and floor
Open
The external method has the following advantages:
- Cheap installation work.
- Easy to install yourself.
- Simplified possibility of rewiring and forming new lines.
But with this type of electrical installation, the wires remain visible and can be accidentally damaged. In an apartment, open wiring is recommended to be done only as a last resort.
It is better to spend time and effort on chipping concrete and brick walls, but to make everything more beautiful and safe.
Hidden
Among the advantages of hidden wiring are:
- Increased safety and durability of wiring.
- Less risk of fire due to overheating and melting of wires.
- Aesthetic appearance of the interior.
However, for these advantages you have to pay with great labor intensity and an increase in the cost of installing electrical wiring, as well as difficulties during repairs.
Wire cross-section size for open and closed installation of electrical wiring
What is the danger of a dropped socket?
The main danger of falling out or falling out sockets lies in electric shock.
If there are small children in the house, you should take special care and keep them away from potentially dangerous structures. Seeing a “hanging” socket, an inquisitive baby will want to stick his hand into it
Therefore, protect him in a timely manner from a possible tragic outcome.
Therefore, protect him in a timely manner from a possible tragic outcome.
Another reason for sockets falling out is a broken wire core, which may not appear immediately, but over time. As a result, you will have to partially destroy the wall just to extend the cable. This is troublesome, not very aesthetically pleasing, and also expensive. A socket hanging on wires also does not add harmony to the surrounding environment. Now let's talk about how to fix the socket if it falls out.
Friends, now I’ll tell you how to fix a socket if it fell out of the wall using a live example. We will divide this question into several stages.
Removing the fallen socket
Before performing all the work, you will have to temporarily dismantle the fallen socket. So, first of all, we turn off the power to the room. Having turned off the machine on the panel, we use a special device to check the absence of voltage. After unscrewing the screw, remove the socket cover. Then the socket securing clamps, with the exception of the fallen sockets, are loosened. Next, disconnect the wires. After the screws of the wire clamps are loosened, they need to be pulled out. The removed socket is set aside.
Preparing holes for socket boxes
First and most important. If a metal socket box (Soviet) is installed in the nest, we dismantle it without the slightest regret. In its place we will install a modern plastic socket box with special holes for attaching the frame.
First, completely remove the structure, clean the nest from the old putty and try on a new box in the hole. The socket box is placed in the wall at the same level with the surface. As it protrudes, the size of the hole changes. To remove part of the material, use a hammer or chisel.
Installing a new socket box on the solution
When the dimensions are completely adjusted, the nest is moistened with water and primer. A layer of alabaster is applied to the walls and bottom of the moistened surface.
For improved fixation, the outer part of the box should also be lubricated with a small layer of alabaster. Wires are threaded into the box, inserted into the socket, recessed and secured level. For a tighter entry of the socket into the wall, it is tapped a little with a hammer. To get rid of excess alabaster, a spatula is used.
We are waiting for the mixture to set. If it is alabaster, wait approximately 1 hour. For putty-based mixtures, wait approximately 1 day.
Fixing the socket support
New socket boxes fix the mechanisms in two ways: spacer tabs and screws, which are located directly on the socket box.
After the power wires are connected to the outlet, the mechanism is installed in the mounting box. After horizontal alignment, it is fixed with screws. This is how you can reliably fix the mechanisms of sockets and switches.
In addition to the difficult question of how to secure a falling out socket, this method would be appropriate. Duplicate fixation is carried out using spacer tabs, since the socket is constantly subject to a lot of overload when the plug is pulled out of it.
The final step will be to put on the frame and front panel. The installation has come to an end, and we can only hope that the socket is securely fastened and will not fall out.
The need to repair an outlet often arises. The device may become loose in its fastenings, sometimes a short circuit may occur, and a number of other troubles may occur. Repairing an outlet can be done with your own hands if you strictly follow the recommendations.
Step-by-step dismantling instructions
Working with electricity requires care and caution
When dismantling and replacing an outlet, it is important to follow safety precautions. In this article we will talk about replacing a socket in a two-wire network
But if you need to replace a grounded outlet, we recommend that you familiarize yourself with this material.
The first thing that needs to be done is to turn off the circuit breaker on the apartment panel that powers the line on which dismantling work is planned to be carried out
In multi-storey buildings, panels with package switches that cut off the supply of electricity to apartments are located on staircase landings. It is necessary to determine on the dashboard the bag that corresponds to the apartment, and then move it to the upper “off” position.
If desired, you can de-energize only one room in which the replacement will take place. But for this you need to clearly know which of the machines is responsible for the corresponding line.
Since when the power goes out you will be temporarily deprived of lighting, when replacing an outlet in a dark room or during the twilight period of the day, you should think about an alternative light source in advance. As a backlight, it is convenient to use a battery-powered flashlight or a lamp connected to another power line.
To ensure that there is no mains voltage, use the single-pole low voltage indicator, available in the form of an indicator screwdriver.
The wires at the connection point are separated into phase and neutral threads. The indicator alternately touches the phase and neutral wires of the socket. If it is energized, the light on the screwdriver will light up. You can safely replace the connection point only if the indicator does not react when the probe comes into contact with the bare ends.
Dismantling the socket is performed in the following sequence:
- Remove the body of the old device. To unscrew the central mounting bolt located on the cover, you will need a Phillips or flat-head screwdriver. Under the removed cover you will see the working mechanism.
- After making sure that there is no voltage in the network, proceed to removing the internal unit of the device. To do this, special spacer tabs are opened on the sides of the working board. In some models, the metal plate of the mechanism is secured with two screws. They need to be unscrewed.
- Having removed the socket from the socket box as far as the wires allow, unscrew the clamping screws that secure the power cables. The current-carrying conductors in the block are sequentially disconnected.
When dismantling a socket for external wiring, keep in mind that there are devices with a mechanism that is separated from the socket box and models whose mechanisms are combined with overhead socket boxes. Both are subject to analysis. Only in the first option, you first need to remove the housing, and only then disconnect the working element, and in models of the second type, only remove the housing.
If, when dismantling the socket for hidden wiring, the screw securing the cover cannot be unscrewed, you can take an extreme measure - with a precise, but not very strong blow of a hammer, split it. The socket itself should be removed very carefully so as not to damage the cables leading to it.
To loosen the spacers, you must first unscrew the corresponding screws, and then use the freed wires to pull the “core” out of the cell in the wall
After dismantling the socket, it is necessary to inspect the insulation of the wires. If the braid is melted or damaged, the wire should be cut back to undamaged insulation. For the future, keep in mind that one of the main reasons for insulation melting is an incorrectly selected fuse rating or circuit breaker, which leads to a malfunction of the protection device.
In old-built houses, situations often arise when, after dismantling the socket, it is discovered that the socket box is missing in the niche, and the “core” itself is attached directly to its walls. You cannot install the socket this way: the device will not be securely fastened. In this case, you will have to install a new plastic socket box.
Connecting electrical wires
We cut the electrical wires with pliers so that approximately 15 cm protrudes from the wall. If you leave too much length, the wiring will not fit in the socket box or there will be too little space for the socket.
- We clear the end of each wire from the insulation, leaving a bare cord approximately 1.5 cm long. For this work, you can use a regular knife, but it is advisable to take pliers or pliers specifically designed for removing insulation.
- We bend the wires so that they take the shape of the letter C or the letter G. For this action we use a universal working tool for working with wires, that is, pliers. We connect the wires to the working part.
- Each wire must fit into a specific connector in the outlet. Yellow or green insulation color means grounding, brown, white or red - phase, blue or black - neutral supply. Color markings when connecting wires may differ depending on the country of manufacture.
The grounding wire is connected to the central part of the outlet. The location where the neutral wire is connected depends on the brand of the outlet. In most cases, its location can be anywhere. The phase wire is inserted opposite the neutral one.
What tools do you need to prepare?
Before installing the outlet, you should prepare the following tools and parts - they will be needed in this order:
- A pencil, marker, charcoal, or anything that can be used to make markings on the wall.
- Ruler. Even an ordinary school one is suitable for one device, and if a block of sockets is installed, then preferably a large one.
- Level – bubble or laser. At the initial stage, it will only be useful when installing the socket block.
- Drill with a “concrete bit” attachment. If you don’t have an attachment, a concrete drill will do. Some people cut the wall with a grinder. If the wall is particularly strong, then water will not hurt, as it will cool the crown.
- Chisel and hammer - needed for fine adjustment of the walls of the hole.
- Socket box – provides rigid mounting of the device in the wall.
- Putty - gypsum, alabaster or cement mortar.
- A spatula that can be placed in a socket box.
- A voltage indicator - by and large, could be useful at the beginning, but you cannot do without it at this stage.
- Additional wires are needed if several points are being installed.
- Knife – maybe the smallest one.
- Pliers – preferably with wire cutters.
- The socket is what everything is started for.
- A screwdriver - most often a Phillips screwdriver, but in some cases a slotted one is also useful - it all depends on the bolts that need to be tightened.
It is assumed that before installing the socket in the wall, wires have already been laid to this place and it is known which of them is the phase and where the neutral is with grounding. If not, then you will have to plan large-scale work to punch grooves (grooves) in the wall for wiring. To do this, you will have to rent a wall chaser, prepare to drill them out with a drill and hammer drill, or cut them out with a grinder.
Rules for safe calling using a multimeter
Working with electricity does not allow for unprofessionalism, so a certain list of rules has been developed that make it possible to make it as accurate, fast and safe as possible.
When making calls, it is most convenient to use special tips at the ends of the measuring wires, which are more commonly known as “crocodiles”. They will make the contact stable and free your hands when taking measurements. When testing, the circuit being tested must always be de-energized (even low-current batteries must be removed). If there are capacitors in the circuit, they must be discharged by short-circuiting
Otherwise, the device will simply burn out during work. Before checking the integrity of a long length of conductor when taking measurements, it is important not to touch its bare ends with your hands. This is due to the fact that the resulting readings may be incorrect.
When testing a multi-core cable, it is necessary to separate and strip all existing cores from both ends. After this, you need to check the circuit for the presence of short circuits in it: to do this, a “crocodile” is attached to each core in turn, and all the remaining ones are touched with the other measuring end in all possible combinations.
In this case, a sound signal will indicate the presence of a short circuit between the tested conductors
This may not be of practical importance for small cross-section multi-core cables operating in low-current networks, but when working with high voltages it is fundamentally important
To determine the integrity of the cores, the same operation is performed, only at one end of the cable all stripped cores are twisted together
When searching for a break, it is important to consider that the absence of a sound signal at either end will indicate a violation of the integrity of the conductor
We fix the falling out socket with liquid nails
In this example, a plastic socket box is used that does not fit into the concrete wall. It is not possible to attach it with self-tapping screws through dowels. The socket itself is well and securely fixed in the socket box. This method, which I want to show, is not entirely standard, but very reliable. We will use liquid nails. I have already used liquid nails in my practice, so I know very well that this is a very excellent building material with excellent properties. First of all, we must turn off the electricity so that the repair object is definitely de-energized and does not pose a threat. Using a gun, first apply glue to the hole in the wall in a circle. There is no need to squeeze it out far, just apply a thick strip along the edge. It is advisable to first remove the front panel from the socket; it is not necessary to remove the socket box itself. We will apply the same strip of glue around the edge of the socket box. Before starting work, be sure to read the instructions for using liquid nails and all the steps Proceed according to it. Insert the socket into the wall and hold it tightly for a while. Remove excess glue with a piece of cloth. Wait for the glue to initially harden and assemble the socket completely. Wait for the glue to dry completely and harden. Until this moment, I highly recommend not using the outlet for its intended purpose. After the time specified in the instructions, we check the installation. Everything holds up perfectly, securely, without any swaying.