- June 2, 2019
- Tools and equipment
- Alexander Mishkin
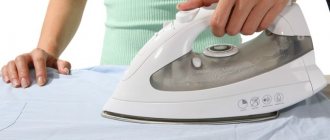
There is an iron in every home. This household appliance is used for ironing clothes. There are hundreds of models and varieties. Users often ask the question of how to repair an iron, as situations arise in which such a device may malfunction. Most of them can be fixed manually, even without special skills and knowledge.
This repair manual will cover the following main points:
- The principle of operation of a household device.
- Main types of malfunction.
- How to identify the problem and solve it.
- What parts and tools will you need to troubleshoot.
All recommendations and repair tips are universal and suitable for almost all models of these types of household appliances. The exception is older versions of irons that are 20 years old or older. They are not subject to updating and replacement of parts, since they have not been produced for a long time.
How the device works
Before considering the question of how to repair an iron, you should familiarize yourself with the principle of its operation. This will allow you to understand its structure and quickly detect a malfunction. Whether it is a simple iron without modern functions, a cordless model, a compact travel iron or a steam iron with many options, the principle of operation remains unchanged. All models smooth out creases in fabric using steam moisture, pressure and heat.
When the steam valve is closed, the iron runs dry due to pressure and a heated soleplate. When the blower element is opened, water drips into a hot chamber, from where it exits as steam through vents located at the bottom of the appliance.
The working surface of the iron, or sole, can be made of plain metal or coated with an easy-to-clean non-stick compound. There are also more modern ceramic models that are better at eliminating wrinkles and creases in clothing. When asked how to fix an iron, users most often mention problems with the soleplate of this device. It is often damaged due to improper use.
What is the essence of all malfunctions
Fortunately, there is very little inside modern irons that can fail. Many models have simplified designs without complex electronics or electric motors. Most repairs concern:
- Faulty cords.
- Damaged handles.
- Blockages of steam chambers in the form of mineral deposits.
- Unregulated temperature conditions.
- Poor heating of the sole.
Problems with the electronic parts of the iron should be resolved by an authorized service center. Replacing a burnt-out board yourself will be problematic due to the lack of suitable components for microcircuits in retail sales. How to fix an iron with such a problem yourself is a capacious question. This requires soldering skills and specialized equipment. Without proper knowledge in this topic, it will be impossible to carry out such work.
Many note that, as a rule, it is more profitable to replace rather than repair an iron with internal problems. However, if the problems are related to external defects, they can be easily solved on their own. Consult your iron's owner's manual for the manufacturer's cleaning recommendations and storage tips. This will avoid many breakdowns in the future.
Tap water contains various impurities and minerals that can damage your appliance and harm your clothes. Use filtered or distilled liquid instead. Stores also often sell special water for ironing, which is poured into such a device.
What you need to repair your iron
Moving on to the question of how to repair an iron with your own hands, you should immediately understand the necessary tools. Large hardware stores may have replacement parts for many models of these appliances. Basically these are replaceable cables and soles. However, you should not purchase internal components and microcircuits in stores yourself or order them from repair shops. Incorrect installation of the boards can lead to complete failure of the device or even fire.
Maintenance and repair tools you will need:
- Screwdriver.
- Toothpicks or thin needle.
- Steam compartment cleaning solution.
- Solution or pencil for cleaning soles.
- Accessories for replacement.
All these tools and solutions are suitable for almost all models of devices. Perform all actions slowly and carefully. Be careful when cleaning the soleplate of the iron. Most coatings are scratch sensitive. If you damage the top layer of the sole, then when ironing clothes in the future, stains or burns may remain on it. You can read below about how to repair an iron with your own hands if this type of malfunction occurs. This will not require much time and large expenses.
Tool
To successfully repair an iron, let's first prepare some homemade tools; It will not take much time and will not require significant expenses:
- 2-4 lid squeezers;
- squeezer for hidden latches;
- a cheap LED flashlight (namely LED) and a magnifying glass;
- a strip of suede, a nail file, alcohol;
- or, instead of step 4 - a pencil eraser, an ink eraser, a piece of a clean cloth, alcohol.
Note: about the purpose of tools according to paragraphs. 4 and 5 see below.
Push-ups
Opening the top cover of the iron with a table knife
The lid squeezer is made from the top, strongest layer of bamboo, the size and thickness of an ice cream stick; one end of it is cut into a wedge. The covers on the body of irons are often placed on latches without fixing. At the service center, such a cover is compressed with special pliers and removed. To remove it using a makeshift method, you need to pry off the cover: the teeth of the latches without fixing are beveled on both sides and come out of the grooves intact. But open the lids on tight latches with a table knife or a wide screwdriver, as in Fig. on the right, don’t: the steel will leave marks on the plastic. The flexural strength of the surface layer of bamboo is higher than that of plastics, and the shear strength is lower. Therefore, a bamboo squeezer will remove the lid if it is properly lifted, but perhaps it will be crushed from the surface on its own without damaging the plastic. If the lid is not lifted correctly and does not give in, the bamboo squeezer will break without damaging the iron. They use bamboo squeezers in pairs, prying the part from both sides.
A good thin squeezer for fixed latches is obtained from a plastic coffee stirrer cut into a wedge, which are issued by coffee machines. The squeezer from the stirrer fits into any gap and gently removes the latches with fixation, without scratching or breaking either them or the body parts.
Flashlight and magnifying glass
Cheap mini LED flashlights produce very hard light with harsh shadows. In this case, this is an advantage: such light penetrates deeply into thin cracks, and under a magnifying glass you can see what the part is holding there. To do this, first they pry off the lid, which is not clear how to remove, with bamboo squeezers, highlight it and look at what is holding it there.
How to handle latches
It is best, of course, to find a diagram for disassembling the iron of this model, but try it! And don’t look for typical layouts of secret locks either: they can be different for the same model from the same manufacturer. Have you read in the instructions: “The manufacturer reserves the right to make changes to the design that do not affect the performance of the product”? That is, when disassembling the iron, you will most likely have to look for hidden connections yourself.
It must be said that Western companies are gradually moving away from the principle: “Do you want to fix it yourself? Well, break it and buy a new one!” But Asians stubbornly cling to it. For example, if your iron is Chinese, then the nose mounting screw (see below) will most likely be not under the filler cap, but... under the water and steam supply buttons!
Hidden latches in the iron buttons
Let's light it up and see. Do you see the green circle in the pic? So, this is not a latch, but a sliding tenon in a groove. The latches are on the other side of the buttons. To remove the buttons and disassemble the iron, you need to:
- Push forward button.
- Insert the wringer from the mixer behind it.
- Release the latch.
- Without removing the wringer, lift the button up until it stops. You should hear a faint click of the latch tooth coming out of the groove.
- While holding the button so as not to fall, remove the wringer.
- Continuing to hold the button, move it forward with an inclination so that the sliding tenon turns out of the groove.
- Do the same with the other button.
Shaped fasteners
The screws in irons from Western manufacturers are most often either ordinary with a Phillips or hexagon head. For the latter, there is no point in buying a special screwdriver with a set of bits for a one-time repair: a screw with a hexagonal slot can simply be unscrewed with a flat screwdriver with a thin blade of a suitable width. It can also be used to unscrew screws with a trefoil slot, which the Chinese are very fond of (on the right in the figure), but without strong pressure: this creates a significant lateral force and the screw in the thread can simply jam. If the screw is tight, it is torn off with a series of small jerks, moving the screwdriver to other pairs of slots.
Shaped screws
The most difficult thing will be to unscrew the screw with the TORXX slot (on the right in the figure): scissors or tweezers will only take it if the screw is loose in the thread. It is most convenient to unscrew TORXX screws without a special key using small duckbill pliers; You can also use side cutters, but then there will be dents on the slot bridge. They won’t do anything to the screw, but if an experienced master suddenly gets his hands on this iron, he’ll charge him for repairs for previous unskilled access.
How to disassemble the device
In most cases, disassembling the device is necessary when the iron burns out. How to fix it is an interesting question and does not require special skills. You will need a screwdriver of the appropriate size and care when carrying out this action.
Gain access to the internal parts of the electric iron by removing the back cover. Some models have unique clasps to prevent you from opening them. Contact your local hardware store for the correct screwdriver.
All bolts are hidden under a protective layer, which can be easily removed with a flat-head screwdriver. The back cover is held in place by 4-6 fixing fasteners on each side. Next you need to unfasten the latch. After this, the cover will be easy to remove.
Replacing the cable is also necessary when the iron burns out. How to fix a damaged wire? If you need to replace the cord, look at the back of the unit. At the top there will be an adapter that attaches the power cable using a clamp to a special circuit. By unhooking the terminals, the wire can be easily pulled out.
Video
To learn more about the procedure for disassembling Vitek irons models VT-1207, VT-1229, VT-12125, watch the video:
About the author:
Electronic engineer with many years of experience. For several years he was involved in organizing the repair of household appliances, including washing machines. Loves sport fishing, water tourism and travel.
Found a mistake? Select it and click the buttons:
Ctrl + Enter
Interesting!
The first officially patented washing machine was made of wood and was a box with a frame, half filled with wooden balls. Laundry for washing and detergent were loaded inside and the frame was moved using a lever, which, in turn, made the balls move and grind the laundry.
Cleaning Basics
Do-it-yourself iron repair mainly begins with preventative actions. To do this you will need to do some cleaning. Only after this can you begin analysis. Unplug your iron and make sure it is cool before cleaning. Drain completely. Allow the sole to dry completely. Use a toothpick or appliance cleaner to remove any debris from the steam vents, being careful not to get any debris inside the chamber.
Use a fine sewing needle to thoroughly clean the spray nozzle of mineral and salt deposits. Be careful not to damage the valve.
To remove residue from a steam iron, pour 1/2 cup water and 1/2 cup vinegar into the appliance's reservoir. Place the iron on the stand and set the steam setting until the liquid in it completely disappears. Repeat this procedure several times if necessary. Or follow the directions for using a solvent you can buy at the store. The procedure is usually written on the bottle.
Checking the thermostat
The thermostat looks like a plate with a group of contacts and a protruding plastic pin, onto which a disk is then placed.
This is the thermostat on the iron
Two contacts fit to the plate. We install multimeter probes on them and check their functionality (call them). In the “off” position, the sound of the multimeter should disappear; when turned on and turned to any position, it should continue to sound.
The damage may be that in the “on” position there is still no contact - then the iron does not heat at all. There may be a different situation - it is not turned off by the regulator and/or does not respond to the position of the regulator. Both reasons are in contacts. And most likely they got burnt.
In the first case, carbon deposits may interfere, which can be cleaned off by inserting a piece of fine-grain sandpaper between the contacts and “sliding” along the contacts a couple of times. If you don’t have sandpaper, you can use a nail file, but you need to act carefully - the temperature settings depend on the bending of the plates. So you can’t bend them too much.
In the second case - if the iron does not turn off - the contacts may have become burnt or fused. Repairing the iron in this case consists of trying to separate them. But such a trick rarely succeeds. The solution is to replace it.
Thermostat from a different angle
There may be another point: when falling, the contacts could somehow interlock. When the sole of the iron heats up, the bending thermal plate presses on the contact groups, but the contacts cannot open. The result is the same - the iron does not turn off when heating. Repairing an iron is also similar - we try to restore mobility to the plates, trying not to bend them. If it doesn’t work, we change it.
Common faults
It is better to start repairing an iron yourself by determining the type of problem. Knowing exactly what the problem is, you can quickly fix it. In addition, this will reduce the likelihood of making mistakes that could lead to complete failure of the device. The following will list the main malfunctions and problems that occur with these types of household devices. Please note that the problems listed are those that occur in the most common models.
Many of them will not fit, for example, vertical steam irons or older models. Do not forget to also refer to the instructions for your device. It often lists all the main causes of problems, as well as the necessary actions related to preventive maintenance.
Visual video lessons
If the boiler does not heat the water or knocks out the RCD when it is turned on, you can check the heating element of the water heater as follows:
Checking the serviceability of the heater in the boiler The reason why the water heater may be electrocuted
If you want to ring the heating element of the washing machine, you will have to get to it first. All instructions are provided step by step in this video:
We disassemble the body of the washing machine and call the heating element
https://youtu.be/5oV3E7b08Xc
To check the iron with a multimeter, just disassemble the body and touch the leads with the probes, as shown here:
https://youtu.be/KnTYT_qWeXA
As for the kettle, you can ring it using the following method:
DIY electric kettle repair
https://youtu.be/KC7cdowo8P0
In a similar way, you can check the serviceability of the heating element in a dishwasher, heater (for example, in a heat gun coil) or other household electrical appliance. We hope our instructions helped you and now it’s clear how to check the heating element with a multimeter at home!
The work of the master Dialing diagram We check the serviceability of the heater in the boiler The reason why the water heater may be electrocuted We disassemble the body of the washing machine and call the heating element
https://youtu.be/5oV3E7b08Xc
We repair the iron
https://youtu.be/KnTYT_qWeXA
Do-it-yourself electric kettle repair
https: //youtu.be/KC7cdowo8P0
Doesn't heat up enough
When asked how to repair an iron, users often indicate this type of fault. As a result, it will be impossible to iron the laundry properly. Possible causes for this could be an incorrectly installed thermostat, problems with the electrical connections, or damage to the switch or power supply.
If you experience frequent clicking noises when ironing your clothes or there is a plastic smell, it is likely that the internal circuits have been damaged. It will be difficult to repair such a problem on your own. Therefore, it is better to seek help from professional repairmen who have all the necessary diagnostic equipment.
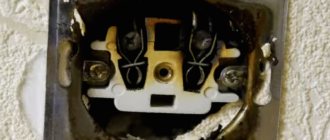
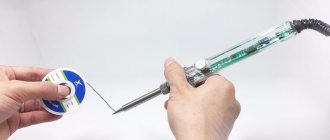
Checking the serviceability of the power cord on the iron using the phase indicator
Iron repair cannot be carried out without an indicator screwdriver. It will help determine the performance of your device. In order to check the terminal with an indicator screwdriver, you must first provide access to it. If, when you touch one of the wires, the indicator lights up, but does not light up on the other, it means that the wire that the indicator lights up when you touch it is working properly. If it lights up in both cases, it means the wire that is connected to the phase in the socket is working and the entire circuit of the iron, including the thermostat, fuse and heating element, too.
Complete failure
Also, in the question of how to fix the iron (you can do this by reading this manual), users many times mention a problem associated with a complete lack of heat in the lower part. Insufficient heating of the sole and inoperability are different problems. If after connecting the device to the network it does not work, check all connections to the main power cable.
In most cases, it is the network cable that causes the equipment to fail. It may show open damage in the form of tears. In this case, a complete replacement of the entire cable will be required.
The sole of the device constantly gets dirty
Many people wonder how to fix an iron, Tefal, for example. A common reason for repairs is contamination of the bottom of a household appliance. As a result, the device begins to function poorly. Any type of iron can have problems with the soleplate. During use and ironing, the lower part may become dirty and its holes may become clogged. This can affect the heating of the device and overall performance.
In addition, overloads may occur due to excess pressure in the steam generator due to blockages. Many users seek repairs precisely because of this problem. If you do not carry out routine cleaning as indicated in the instructions for the household device, this may lead to problems in the future.
Checking the electric heater
The heating element in modern models is a reliable unit and rarely breaks. When this problem occurs, it is better not to buy a new heater. It's easier to buy a new iron. But first you should make sure that the problem is in the heating element.
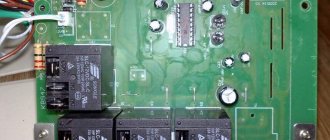
In all models, the heater contacts are soldered to the device contacts and connected to an indicator lamp. If the lamp is on, but the iron does not heat up, then the malfunction is related to the heating element.
On some models, the thermal fuse is included in one heater circuit, and the regulator is included in another. If the fuse is faulty, then a false “diagnosis” can be made, suspecting a faulty heating element. To accurately determine the cause of the device failure, it should be completely disassembled.
Clothes cling to the soles
How to fix a Philips iron if clothes constantly stick when ironing is an equally pressing question. This brand has many positive reviews. However, without proper care of the device, the first signs of such a problem may appear. This malfunction may occur due to a burnt sole. If, for example, you leave the iron on the fabric, it may cause it to burn. Its remains will remain in molten form at the bottom of the household appliance.
In the future, when ironing, traces of previously burnt fabric will create many problems. Special cleaning of the entire sole with solvents will be required. You can read about this below. It is not recommended to iron with such stains on the underside of the device.
Check all settings
The first thing to do if one or more modes are not working is to check all the settings and make sure everything is in order. Different fabrics require different ironing temperatures. If you use the options of such a household device incorrectly, this can also cause many malfunctions.
Basic temperature conditions for laundry:
- Cotton - 200 °C.
- Wool -145 °C.
- Polyester - 145 °C.
- Silk - 145 °C.
- Nylon - 135 °C.
Refer to the user manual that came with your home appliance and ensure that all connections and settings are made as recommended in the instructions. Tips for use may vary depending on the model of the device. It is better to check the ironing modes and temperatures for each type of fabric in the manual.
Checking the thermostat
The thermostat looks like a plate with a group of contacts and a protruding plastic pin, onto which a disk is then placed.
This is the thermostat on the iron
Two contacts fit to the plate. We install multimeter probes on them and check their functionality (call them). In the “off” position, the sound of the multimeter should disappear; when turned on and turned to any position, it should continue to sound.
The damage may be that in the “on” position there is still no contact - then the iron does not heat at all. There may be a different situation - it is not turned off by the regulator and/or does not respond to the position of the regulator. Both reasons are in contacts. And most likely they got burnt.
In the first case, carbon deposits may interfere, which can be cleaned off by inserting a piece of fine-grain sandpaper between the contacts and “sliding” along the contacts a couple of times. If you don’t have sandpaper, you can use a nail file, but you need to act carefully - the temperature settings depend on the bending of the plates. So you can’t bend them too much.
In the second case - if the iron does not turn off - the contacts may have become burnt or fused. Repairing the iron in this case consists of trying to separate them. But such a trick rarely succeeds. The solution is to replace it.
Thermostat from a different angle
There may be another point: when falling, the contacts could somehow interlock. When the sole of the iron heats up, the bending thermal plate presses on the contact groups, but the contacts cannot open. The result is the same - the iron does not turn off when heating. Repairing an iron is also similar - we try to restore mobility to the plates, trying not to bend them. If it doesn’t work, we change it.