An electric kettle is one of the most commonly used household appliances, and, as a rule, it is used intensively. Over time, such operation inevitably leads to breakdown of this equipment. However, there are different types of faults. Sometimes it is easier and cheaper to purchase new equipment than to try to repair a broken one. But in many cases, repairing electric kettles is justified, because... it can be produced quickly and without unnecessary costs. You can repair equipment at home, but to do this you need to have an idea of how to disassemble an electric kettle, what typical breakdowns occur with this equipment, and methods for eliminating these breakdowns.
For a small family, it is convenient to use electric kettles of small volume, less than one liter. Water boils faster in such kettles, and in addition, electricity is significantly saved.
Operating principle and electrical circuit of the electric kettle
Structurally, an electric kettle usually consists of a base (stand), to which electric current is supplied through an electrical cord, and a removable container in which water is heated. The removable part of the device contacts the base through contacts located on the outer part of the bottom. When the device is turned on, electric current is supplied to the so-called. a tubular electric heater (TEH), which heats the water. In general, the electric kettle circuit is quite simple, which makes repairing this equipment easier. Modern models are usually additionally equipped with overheating protection, an automatic shutdown system when water boils, and some other options, which will be discussed in more detail below.
The kettle heats but does not boil water
If the kettle turns off before the water boils, there may be one of the reasons for this:
- Presence of scale on the heating element. It overheats excessively due to plaque and the fuse trips earlier;
- Faulty thermostat. The unit must be disassembled, ringed, and replaced if necessary.
Arrangement of electric kettle components
In addition to the power cord, heating element and switch, modern electric kettles are equipped with additional functions. This mainly includes protection against overheating, a function that automatically turns off the kettle when water boils, as well as an operation indicator located on the body of the kettle and internal lighting of the water container. Let's take a closer look at the features of these options.
Overheat protection system
It often happens that the kettle is forgotten about being turned on, the water in it boils away, while the heating element continues to intensively produce heat, which can lead to damage to the equipment and even a fire. This is possible if, after turning on, the lid of the electric kettle is not closed, as a result of which the automatic shutdown of the device does not work after the water boils. In this case, an overheating protection system is provided. Its basis is a temperature sensor, thanks to which when the structure heats up to a certain temperature, the electrical circuit of the device automatically opens and the kettle turns off.
There are two types of thermal protection systems. A simpler system ensures that the kettle turns off when it overheats, but after the device cools down, the electrical circuit closes again, the heating element begins to heat, the structure heats up and the sensor is triggered again. Such protection prevents the equipment from catching fire, but the kettle itself may break due to a burnt-out heating element. Another type of protection, when triggered, not only opens the electrical circuit, but also activates the switch, making it possible to turn on the equipment only manually after the protection is triggered.
Auto shut-off system when water boils
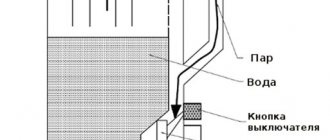
This auto shut-off system ensures that the equipment automatically turns off when the water boils. The operating principle is based on a jet of steam from boiling water hitting a temperature sensor, after which the kettle turns off. The temperature sensor itself is connected to a switch, which turns off the device. Typically, this system is located in the handle of the kettle, in the same place where the switch is located. There are models of electric kettles that can be turned on with the lid open. In this case, the auto shut-off system does not work. This problem is eliminated in models equipped with additional protection - they cannot be turned on if the kettle lid is not closed.
Indication and backlight
A glowing electric kettle operation indicator means that the device is connected to the network and is working, i.e. heats the water. This indicator is usually located on the body of the removable container or on the handle of the kettle. The light source is an LED or light bulb. In addition, some models are equipped with LED lighting that illuminates the water. Such lighting, in general, is a purely decorative element and as such looks quite impressive.
The kettle turns off before the water boils: reasons, disassembly and DIY repairs
The electric boiler was invented a long time ago and is extremely simple in its functionality.
But in the modern world, program-controlled devices are already in use, which will not only boil water at a set time, but also maintain its temperature at a given level for quite a long time.
Regardless of the simplicity or complexity of the design, any thing is subject to malfunctions. One of them is that the kettle turns off before the water boils. It is this problem and ways to eliminate it that will be discussed in this material.
With a huge number of manufacturing companies, all kettles have the same electrical circuit. The differences can only be in the added little things. For example, now the device is often improved by installing a control module containing various timers. But, despite the additional indicators and backlights, the design of the device remains reasonably simple for any home craftsman to understand.
A modern electric kettle consists of two parts:
- stable stand with power cord;
- housing containing a flask with a heating element.
A durable cord supplies voltage to contacts hidden deep inside the stand to prevent accidental contact with the human body. The same contacts are located at the bottom of the device body. When the kettle is placed on the stand, the terminals are short-circuited, and the current travels further through the wires to the thermal switch, which operates in two modes:
- manual activation via a button on the frame;
- Automatic shutdown when liquid boils.
Important! There is also backup protection. It is constantly in the on mode and switches off only when you try to turn on an empty kettle.
After activating the switch, current flows to the heating element (tubular electric heater). The consumer will see the indicator light up, which informs that the device has started the boiling process.
After boiling, the steam hits the bimetallic plate in the thermal switch, where two different metals come into contact with each other. When heated by steam, one of the plates will bend and the contact will open. The device will disconnect from the network.
overheat protection
In backup protection, plates with different expansion coefficients act as temperature sensors. Having a special sample inside, the plates are glued together and fit tightly to the bottom of the kettle. They are helped in this by a paste with increased heat-conducting properties, which is applied to the surface. Under no circumstances should it be removed from the thermal protection switch.
Using a ceramic rod, the plate is connected to the contacts. When heated, one of the plates bends, the rod moves and opens the circuit. But then a gradual cooling occurs, and the rod closes the connection again. This action will continue in a circle until the heating element burns out or the kettle is removed from the stand. To prevent automatic switching on, backup protection is installed, which cuts off the voltage supply to the device.
Disassembling the electric kettle
To understand why the device turns off prematurely, it is necessary to partially or completely disassemble it, which will allow you to quickly find the faulty unit and repair it or completely replace it. The dismantling algorithm will be considered using the example of a kettle from a brand manufacturer - Bosch. At the bottom of its case there are four screws that need to be removed. To do this, select a screwdriver that matches the screw heads. A cross is usually suitable.
But recently, the manufacturer has begun to use protection against attempts at self-repair. For example, he can hide the bolts under plastic plugs, which can be easily pulled out by prying them with something sharp. Or use one screw (or all) with a non-standard head. Then you will need a two-pronged fork type screwdriver, which can be replaced with tweezers. You can also do it yourself by sawing a groove in the flat blade of a regular screwdriver with a needle file.
Advice! If the self-tapping screw does not want to unscrew, then the easiest and fastest way to deal with this problem is to heat it up a little by applying the switched-on soldering iron to the head. The plastic will soften slightly and the screw will come out easily.
The last level of protection is the clever latches on the case and the lid itself. There is an opinion that sometimes removing the cover is more difficult than making the repair itself. In this case, two thin screwdrivers will help. The first one is pushed under the lid to create a gap. And the second one in this gap is to find the place of the latch and carefully release it.
Important! After disassembling the electric kettle, be sure to check all wire connections for integrity. Loose contact can cause many problems, including early shutdowns.
Main reasons for premature shutdowns
The main reason for this problem is the long service life of the boiling unit. Over many months of operation, a layer of scale and soot forms on the heater, which reduces heat transfer . Because of this, the heating element overheats, and, as a result, the protection mechanism is triggered. Even if there are only a few seconds left before the water boils, the thermostat turns off the device earlier, since it interprets this situation as a fire hazard.
Most often this happens with open-type heating elements. In such cases, you can carry out the repair yourself.
And if in models with disk heaters it is enough to boil the flask with a solution of citric acid or vinegar several times, then the spiral must be removed and cleaned with a knife. You need to remove the plaque carefully, but at the same time being careful not to damage the coating of the element.
Then the part should be wiped until shiny with a dry cloth. After this procedure, the heater becomes like new, the problems stop and the kettle continues to serve for a long time.
Due to age, the thermostat may not work correctly. After many years of regular expansion and contraction, the bimetallic strip becomes deformed and begins to turn off at the wrong time. Taking advantage of the fact that the protection is duplicated and both thermostats are identical, some masters swap them. Often this solves the problem.
Important! It is strongly not recommended to replace a faulty thermostat with a backup one yourself, as this may lead to a fire.
It's better to try to bend the plate into place. The measure, although temporary, is more reliable. Don't forget about low-quality Chinese stampings. The service life of such products is short, and, as a rule, they cannot be repaired.
Other reasons why an electric kettle turns itself off
If the above is not related to the problem, and the kettle still turns off without boiling, then the problem may be due to the following breakdowns.
- A faulty switch where the contacts can burn due to poor connections. And he himself may turn out to be defective. To check this, the button must be disconnected and the wires connected directly. If everything works, then, without a doubt, the switch should be replaced with a new one. Often you don’t even need to disassemble the kettle to do this. A few cases when the button does not snap back are enough to replace it.
- Liquid leakage from the flask, which most often affects plastic and glass water containers. Accordingly, metal flasks are much more reliable (they are often used as a thermos). Even a few drops of leaking water can affect the operation of the device. At home, you can only change the rubber gasket on the bottom between the body of the kettle and the compartment with the heating element.
- Broken electrical wiring contacts. When disassembling, having reached the heating element, you should carefully inspect the contacts at the junction of the wires. Their violation contributes to loose attachment of the heater to the body. If the heating element is an open type at home, it is not difficult to solve the problem yourself by cleaning the contacts and high-quality insulation.
- Thermal fuse is broken. Many models have additional protection in the form of a thermal fuse. It is needed in case the device does not turn off for some reason after the thermostat is activated. Typically, contact opening occurs at temperatures above 100 degrees Celsius. But if the thermal fuse is faulty, then it can operate at lower settings, thereby preventing the water from boiling.
When to take it to the master
It is not recommended to undertake DIY repairs if:
- insufficient knowledge, experience and self-confidence;
- The thermostat needs to be repaired or replaced;
- you need to repair the crack in the flask body;
- We have to work with a closed-type heating element.
Advice! In such cases, contact a service workshop.
Water in a faulty kettle does not boil completely for many reasons. And only the user can decide whether to repair it himself, take it to a workshop, or buy a new one.
The best electric kettles of 2022
Kettle Kitfort KT-633 on Yandex Market
Kettle Braun WK 3110 on Yandex Market
Kettle Kitfort KT-623 on Yandex Market
Kettle Kitfort KT-621 on Yandex Market
Kettle Zimber ZM-11181/11182 on Yandex Market
The main causes of breakdown of electric kettles
Electric kettles have a relatively simple design and, as a rule, a long service life. However, this technique can also become unusable for various reasons. We list the main reasons why you may need to repair an electric kettle.
- The formation of too thick a layer of scale inside the electric kettle, as a result of which the heating element constantly overheats and quickly fails.
- Operation of equipment without water or after it has boiled away. If there is protection against overheating, then the kettle automatically turns off in this situation, but frequent activation of the protection leads to accelerated wear of the equipment.
- Gradual oxidation of contacts and breakage of electric kettle contacts. This usually happens after prolonged use of the equipment.
After completely draining the boiled water, you should not immediately fill the electric kettle with cold water. This can lead to cracking and breakage of various elements of this equipment.
Troubleshooting
To determine the cause of equipment malfunction, it is advisable to have an understanding of the design of an electric kettle and some skills in working with electrical measuring instruments. In particular, diagnostics may require disassembling the kettle and examining its individual elements. Let's consider the optimal order of actions when performing these operations.
Disassembling the electric kettle
Before disassembling the kettle, it is recommended to read the operating instructions. Some manufacturers provide descriptions of the procedure for disassembling the device - this significantly speeds up and facilitates the disassembly process. But most often there is no such description. Features of disassembly of different models, especially from different manufacturers, may differ significantly, but there are general recommendations for this process. Let's list them.
- To disassemble the device, you need to unscrew the fastening screws, first of all on the bottom of the kettle from the outside. Sometimes they are covered with plastic plugs. In this case, you will have to pry off the plugs and remove them using some pointed object.
- Most often, screws are used for a Phillips screwdriver, but sometimes manufacturers use screws for a special double-pronged screwdriver. If you don’t have such a screwdriver at hand, you can try to remove the screw with thin tweezers or side pliers.
- Often, parts of an electric kettle are fixed not only with screws, but also with latches. It is convenient to free yourself from such fasteners using a thin flat-head screwdriver. Please note that in some models, external elements are attached exclusively to latches.
Ringing elements
Using this procedure, it is determined whether the cause of the kettle breakdown is a broken electrical circuit, or whether another reason needs to be looked for. A tester (multimeter) operating in voltmeter mode is used as a working tool. The tester checks the power cord, contact groups and other elements available for testing. If it turns out that the electrical circuit is broken, you will have to disassemble the kettle with your own hands and continue identifying the internal elements (terminal blocks, heating element, power button contacts), and then either restore the integrity of the circuit or clean the junctions of the elements from oxide.
Checking the thermostat
A thermopot is a device with a thermostat, similar to an electric kettle, but capable of heating water to a certain temperature (up to boiling point) and maintaining this temperature as long as necessary. Another feature of the thermopot is that water is drained from the container using a built-in pump, which can be either mechanical or electric. The design of a thermopot is more complex than that of an electric kettle, but testing of this device is carried out according to the same principles. A thermostat is added to the number of elements being checked. The test begins by ringing the contacts located on the base (stand), while one probe of the tester is connected to the pin of the power cord plug, and the other touches the contacts in turn. Next, the remaining elements available for verification are called.
Electric kettle switch repair
- Switch the measuring device to voltmeter mode and insert the probes into the socket. If the voltage is normal, then move on to the next elements.
- We check the plug, cord and contact group on the electric kettle with a multimeter: set the ringing mode and press one probe to the pin of the plug, and with the other we check the two conductive wires and grounding. All this is on the receiver. If the ringing is positive, then the stand is working, and the problem needs to be looked for elsewhere.
- We disassemble the bottom of the kettle to get to the terminal block. As a rule, it is fixed with a special paste and combined with a thermostat. Using a multimeter, we call all contacts: each should react on its outer or inner ring. If there is no signal, then we disassemble the block and clean the contacts using sandpaper or technical rags. After cleaning from carbon deposits and oxidation, we collect the elements and call them again. If there is no signal, we replace the wires with new ones and repeat the diagnostic procedure.
- Next, let's check the button. You can get to it in several ways: disassemble the handle or pull out the button itself if it is latched. We turn on the multimeter and touch the core that goes to the heating element with one probe, and the cable on the switch with the other. In the disabled state there will be no signal, whereas when the button is activated it should ring. If not, then we repair or replace the switch with a new one.
Useful tips Connection diagrams Principles of operation of devices Main concepts Meters from Energomer Precautions Incandescent lamps Video instructions for the master Testing with a multimeter
Typical faults
Only after determining the cause of the malfunction can you begin to resolve the issue of how to repair an electric kettle at home. There are a number of typical, frequently occurring malfunctions, such as problems with the heating element and with turning the device on and off, constant water leakage, etc. Let's consider all these malfunctions, as well as the reasons for their occurrence - this will simplify the repair of the electric kettle with your own hands.
How to properly disassemble a thermopot
- The first step is to remove the top cover, as it will get in the way. The next thing to do is turn the device upside down and use something flat and sharp to remove the corkscrew ring, such as a screwdriver or knife. To perform this action, it is worth using some physical force.
- Several screws will appear under the corkscrew ring; they can be easily unscrewed using a shaped screwdriver.
- The next step is to remove the bottom of the kettle using a knife or flat screwdriver, which requires little effort, because the bottom is secured with latches.
After that, all the electronic stuffing is before your eyes. Now you need to check all terminals for connection strength.
Important! In order to properly disassemble a thermopot, you must have at least a little knowledge of electrical engineering!
Minor damage to the kettle may occur. In such cases, you can repair the thermopot yourself.
The electric kettle does not turn off automatically
This malfunction is expressed in the fact that the boiling water field does not automatically turn off the electric kettle. This can happen if the kettle lid is not closed or is not closed tightly. But if the device does not turn off when the lid is normally closed, then there may be two reasons for the automatic shutdown system not working:
- scale or some foreign object has blocked the hole through which steam flows to the temperature sensor;
- The auto shut-off system has failed, and it needs to be checked visually, for which you will have to disassemble the kettle.
The device does not turn on
The user may encounter a situation where the electric kettle stops turning on. Common causes of this malfunction are as follows:
- the power cord is faulty; to verify this, you need to ring it with a tester;
- contacts on the stand are oxidized or burnt out - this malfunction is determined visually;
- the switch has become unusable - to identify this malfunction you will have to disassemble the kettle.
Electric kettles with a boiler function are convenient to use - they can heat water to a user-specified temperature and automatically maintain it in this state for a long time.
Heating element burnout
One of the most common malfunctions is the failure of the heating element. If this element is a disk type, i.e. is integral with the bottom of the container, it cannot be replaced due to design features. In this case, you will not have to solve the question of how to fix the kettle, but buy a new electrical appliance. If the heating element is installed openly above the bottom of the kettle, then it can be replaced. However, designs with an open heating element are rare.
Slow heating of liquid
Often, after using an electric kettle for a long time, it begins to heat the water too slowly. As a rule, the cause is the appearance of a thick layer of scale on the heating element. As a result, the heating element heats up this scale more than the water. This situation is also unpleasant because it leads to accelerated burnout of contacts, as well as failure of the heating element of the electric kettle.
The device turns off prematurely
Another typical malfunction is the automatic shutdown of the device when the water in it has not yet boiled. This problem is also associated with excessive scale accumulation in the container. In this case, the heating element mainly heats the accumulated scale, and not the water, and at the same time it itself becomes very hot. In such a situation, overheating protection is triggered and the electric kettle automatically turns off before it has time to boil water.
Water leak
One of the fairly common reasons for repairing an electric kettle, especially budget models from little-known manufacturers, is the constant leakage of water from the separated container. The cause of the problem may be poor-quality assembly of the device, as well as severe wear of the seals (or a poor-quality seal). In any case, to identify and eliminate the cause of the leak, you will have to disassemble the leaking device. Sometimes a leak occurs due to a crack in the plastic or glass housing. In this case, if the crack is small, the leak is eliminated using sealant.
Doesn't turn off
- A kettle that does not turn off after boiling needs constant monitoring. If the water completely boils away, the device will simply burn out.
- Most often, this malfunction is caused by melting or clogging of the bimetallic plate inside the button.
- When the water in the tank boils, the rising steam heats the plate and it bends, pressing the button.
- Do-it-yourself kettle button repair begins with disassembling the handle. You need to snap off the plastic clips and unscrew the bolts on the handle to get to the button.
- All contacts need to be cleaned. If the plate has melted and looks worn, it must be replaced with a new one.
If the kettle turns off before the water boils, there may be one of the reasons for this:
How to repair an electric kettle yourself
After determining the cause of the breakdown, you can begin to solve the problem of how to repair the kettle. It was stated above that not all faults can be repaired. However, most problems can be fixed at home, although most likely you will need to disassemble the equipment. Let's consider typical repair operations that are most often required to restore the functionality of household appliances of this type.
The electric kettle does not heat water, the indicator is on
Such a malfunction may occur due to a lack of contact between the heating element’s terminals and the terminals or due to a malfunction of the heating element itself. In the second case, the malfunction is usually irreparable, so you will have to purchase a new kettle. If the device does not work due to lack of contact, then it can be repaired. After disassembling the electric kettle, it becomes clear whether the burnt-out terminal needs to be replaced or whether you can limit yourself to cleaning it from carbon deposits and oxide. As for the output of the heating element, as a rule, after removing the burnt-out section, the remaining part is quite enough to connect to the terminal.
Restoring contact in terminals
If the terminal is burnt out, it cannot be restored; it must be replaced. For replacement, you can use either a new terminal or a used element that has not lost its functionality. If a used terminal is used, it must first be freed from old wiring. Next you will need to press the wire into the terminal. To do this, the wire, stripped of insulation, is inserted into the tail part of the terminal and crimped with pliers, after which the restored contact can be used for its intended purpose.
Restoration of welded contacts
Some manufacturers connect the leads of the heating element to the wire using spot welding to ensure contact. In this case, a special ribbon wire is used. If the welding is not of sufficient quality, over time the wires simply fall away from the terminals and the contact is broken. To eliminate this problem, it is recommended to wrap a ribbon wire around the terminal (one turn is enough) and, for reliability, secure the connection with strips and screws.
When repairing an electric kettle, you must adhere to safety regulations, in particular, do not forget to unplug the power cord from the outlet. If any actions are performed while the power is connected, you need to act carefully and do not touch the bare contacts with your skin.
The electric kettle does not heat water, the indicator does not light up
In this case, first of all, it is necessary to check the serviceability of the power cord - this is a common cause of such a malfunction. The problem may be a broken cord or a loose connection in the cord plug. It is not always advisable to eliminate such a malfunction. In extreme cases, you can completely change the cord. However, not only the power cord can be problematic, but also the contacts at the base of the parting or the power button. Ways to resolve such problems are discussed below.
Repair of the contact group of the stand
Electrical contact between the removable part of the electric kettle and its base is made through contact groups located in the center of the base and, accordingly, in the center of the bottom of the detachable container. A characteristic sign that not everything is in order with the contact is the situation when, in order to turn on the kettle, you have to turn it on the base until contact appears. To repair the device, you first need to inspect the contact groups. It often happens that they are simply oxidized, and repair in this case will consist of cleaning the contacts from oxides. To access the contact groups, you will have to disassemble the kettle.
It happens that contacts burn out and need to be replaced. This can be a problem because... It is difficult to buy such parts separately. In this case, you can use any suitable contact plate, for example, taken from a relay or old household appliances. In this case, you will probably need to give it the shape and size of the burnt plate.
Repairing the electric kettle switch button
The electric kettle button is a mechanical part of the switch. Breakage of the button can be expressed in its failure into the handle or body (depending on placement), which is usually caused by the breaking off of the axis of this element. The cause is reliably established after disassembling the equipment. It is often possible to repair a button using available tools. For example, replace a broken plastic element with a piece made of metal wire. To securely fix the new part, it is recommended to fuse it into the button using a soldering iron.
Electric kettle switch repair
The electromechanical part of the electric kettle switch may fail due to oxidation or burnout of the contacts, as well as wear of some parts. Again, to establish the exact cause of the breakdown, you will need to disassemble the equipment and remove the switch. Oxidized switch contacts are cleaned, burnt contacts are replaced with new ones. Weakened springs that fix the position of the switch can be replaced with new parts or straightened a little - this will return them to the required elasticity.
How to fix a water leak from an electric kettle
As mentioned above, leaks can occur at the junction of the bottom of the container, as well as due to cracks in the body. If a leak occurs at the joints, you will need to disassemble the kettle to determine the location of the leak and eliminate it. The bottom of the removable container is disconnected. Then you will have to replace the worn out seal or use silicone sealant to seal the joint. For such an operation, you can use a special sealant that is harmless to food, but in principle, a regular sealant will do. After sealing the joint, it is recommended to boil water in a kettle at least once and drain it completely.
As for cracks in the body, it is often impractical to seal them, because sealed large cracks soon begin to leak again. The same silicone sealant is used for sealing. After this procedure, you also need to boil water in a kettle and drain it.
Replacement of disk and spiral heater
If the kettle diagnostics showed that the heating element has failed, it must be replaced, since it cannot be repaired.
The spiral heater is usually held in the housing by 3 screws that need to be unscrewed. Next, the spiral is freed from the terminals connected to it and carefully removed from the housing. Along with the heater, it is advisable to change the rubber gasket, which prevents water from leaking out of the flask. Assembly is carried out in reverse order.
Fastened with ordinary screws through a rubber gasket
Step-by-step instructions for replacing the heating element: video
Things are not so simple with kettles equipped with disc heaters. Disassembly and replacement of the heating element in such devices is not provided by the manufacturer. The heater disk itself is soldered into the housing and is an indivisible whole with it. In addition, even if you remove it from the kettle, it is almost impossible to buy a replacement. They are not on sale.
Repairing a device with a disk heater (video)
Such teapots require more careful care. Because if the heater breaks down, it has only one road - to the landfill or, at best, to spare parts. You need to be especially careful about the formation of scale and clean it in a timely manner.
To do this, you should follow simple rules.
- do not pour water out of the kettle as soon as it boils
The heater disk has a temperature much higher than the boiling point of water. If water is poured out immediately, microcracks may form on the disc due to overheating. Over time, this leads to the destruction of the heating element material.
- monitor scale formation
It is scale that, like stalactites, grows inside the kettle and destroys the silicone gasket between the kettle body and the heater, breaking the tightness of their connection.
- use purified water
The reason for scale formation is the high salt content in the water. If the water is filtered and has undergone a purification process, much less scale will form.
How to clean an electric kettle from rust
Often, tap water, although outwardly transparent, is saturated with particles of iron oxides, simply put, rust. Over time, rust in the form of sediment begins to accumulate inside the kettle. Outwardly, it looks like the appearance of a reddish coating. Removing plaque is quite simple. To do this, just pour the maximum allowable amount of water into the kettle and add a standard sachet of citric acid. Then you need to boil this water, drain it and rinse the kettle with clean water.
The body of the electric kettle can be made of metal, glass, porcelain or earthenware, as well as heat-resistant plastic. The most common are plastic models.
For what kind of breakdowns can you return an electric kettle under warranty?
If a faulty electric kettle is under warranty service, it is advisable not to try to repair it yourself, but to take it to a service center for free warranty repairs or for exchange for a similar product. This action is possible in case of the following malfunctions:
- failure of the heating element during normal operation of the equipment;
- the appearance of leaks due to depressurization of joints;
- repeated breakdowns of the same components;
- occurrence of fatal faults.
In the event that a breakdown occurs after the warranty period has expired, you can contact the service center to have it fixed for a fee, or you can try to deal with the problem yourself. In many cases, you can repair your electric kettle at home using available tools.
DIY kettle repair: 4 comments
Oh boy! I have the same problem, only the Tefal kettle has the name and looks exactly the same (globalization). I screwed self-tapping screws from the models into the drilled holes.
Thanks for your feedback! If you can take a photo of the “modernization”, that would be great! I would post it here on the page, it will probably be useful to someone. If it works, here's the mail
Please tell me, I came across a problem where the button in this kettle does not lock, I took it apart, I also thought there was something wrong with the plastic claw of the switch, but everything is perfect, but then, following your example, when I press the safety button, there is no reaction. Is there any way to fix this kind of problem?
Alas, I won’t give you any advice. The kettle is no longer “alive” (it was broken).