Brick, concrete, solid wood (timber, log)
The fastening method is the simplest, carried out according to the standard method:
- Before drilling, find out where the wiring is located using a metal detector.
- Mark the holes.
- Drill holes (a hammer drill is suitable for concrete and brick walls; if the wall is wooden, use an electric drill).
The process of drilling into a brick wall is quite simple, but you may encounter some difficulties. For example, burnt bricks must be drilled at low speeds in combination with the activation of the impact function. Burnt brick can be recognized by the black color of the dust.You need to start drilling a brick wall for a 12 mm hole with a 4-6 mm drill. They reach the planned depth, then the width of the hole is expanded with a 10 mm drill. Having reached the required depth, a similar action should be repeated with a 12 mm drill.
- Blow holes through a small diameter tube to remove debris.
- Place dowels with polyethylene plugs into the holes (usually a diameter of 12-14 mm is used)
- Secure the bracket: screw a capscrew bolt into each hole and tighten with hex head screws, securing the bracket. On a concrete wall, use an anchor instead of a cap screw.
- Assemble the “plate” according to the instructions.
- Connect the measuring device (Sat-Finder) and, based on its readings, rotate the plate at the optimal angle.
- Pull the cable inside the room: you can through a window, but it is better to drill a hole for it in the wall.
- Connect the cable to the set-top box.
When installing on a concrete or brick wall, dowels with polyethylene plugs with a diameter of 12-14 mm and hex head screws for the appropriate key are used. Anchor bolts are also used for fixation to concrete.
How to route the cable
Installing a signal reception system also involves installing the appropriate cable. The cable must be installed in such a way that weather conditions have minimal impact on it.
The wire is laid parallel to the length of the antenna mast, with clamps included in the design, and then laid along the ridge of the roof, the wall to the window where the TV is located.
Where it is inserted into the window, the cable must be securely fastened. There must be a hole in the window frame for the cable.
To prevent rain or snow from getting into the hole, after installation the opening must be treated with sealant. The cable should have some slack to reduce exposure to temperatures.
Installation should be carried out in accordance with technical requirements. The staples should not put pressure on the wire, and the radius of the wire bends should not be too large.
Ventilated facade
In the case of a ventilated facade, the first stage of work will be to remove the facing tiles from the “hooks” of the steel frame to make room for fastening. Cut a hole in the insulation layer and secure the bracket in the standard way, as described above. The antenna mount should be mounted at one of the edges of the resulting opening.
On facade tiles:
- The location of the cut is marked (make sure how the antenna will be directed);
- A grinder makes a cut (use a tile cutting circle; cut on a perfectly flat surface).
Next, the tile is installed in its original place.
Requirements for mounting a satellite dish
The bracket selected for fixation must meet a number of requirements:
- Reliable fastening of the structure, which will not suddenly fall on the residents of the house.
- The strength of the formed connection.
- Rigidity.
- Light weight. The distribution of the mass of the entire structure must be uniform over a relatively large area.
- All fasteners used must be resistant to corrosion, moisture, and sudden temperature changes.
- Different types of antenna brackets have different operating features, which should also be taken into account when purchasing a specific model.
The ability to regularly replace fastenings at home, which will significantly reduce the costs of home owners.
Wall covered with foam plastic and siding
If there is a brick or other strong surface under the decorative elements, two fastening options are used.
1. Standard wall mounting
In this case, a piece of foam plastic and siding is cut out exactly to the size of the bracket mounting area and installation is carried out using standard materials.
Disadvantage: Significant reduction in the “reach” of the bracket, which subsequently does not allow the antenna to be rotated towards the base station.
2. Installation of fastening using special spacer tubes and extended length anchor bolts
You will need rigid metal tubes, the length of which corresponds to the width of the interlayer. With their help, soft materials such as siding or foam will not experience stress, and the fastening will remain reliable.
Working method:
- Cut holes in the foam for the metal tubes;
- Drill through the walls;
- Install the metal tube;
- Secure the bracket.
Extended length anchor bolts (for example, No. 200) can be used. Select an anchor so that half the length is located in a strong wall, the other half in foam. Drill a hole, insert an anchor, remove the nut from it, attach the bracket and tighten the nut again.
Features of the telescopic bracket
The design of the telescopic model of the bracket for satellite antennas is almost identical to the wall mount. However, the manufacturer provided one feature.
The external structural element consists of two elbows made of a metal profile. Two elbows are inserted into each other like a “pipe into pipe”. In addition, holes are made in the profiles themselves, allowing you to adjust the size of the distance from the wall for various situations.
Frame house wall
Option 1
Before starting work, the location of the metal frame is determined. You will need a powerful magnet or a special metal detector.
Drill all the way through the wall and secure the bracket with threaded rods the length of which matches the width of the wall. In this way you can quickly and securely attach the bracket. However, in this case, cold bridges are created, because the hole opens onto the street.
Option 2
- Take a wooden plate (or sheet of plywood) 20-30 mm thick.
- Drill holes in it and secure the bracket to the plate using bolts and nuts.
- Attach the plate with the bracket to the wall and secure it with self-tapping screws.
What to do with grounding
There is no need to bypass the antenna grounding. Typically, in summer cottages there is no system to help drain thunderstorms.
If lightning strikes, grounding the antenna will help avoid not only damage to the TV, but also a fire.
Some experts and electricians argue that this precaution is unnecessary because many people don't watch TV during storms.
You can create a lightning rod yourself by installing a grounding loop in a private house and having certain knowledge of the material.
This is all you need to know when installing an antenna in a private home. Thanks to this, your TV can work well and stably, saving significant money!
Facade and walls made of hollow blocks
When installing brackets on a wall made of foam concrete or aerated concrete, it is recommended to use chemical anchors.
- Drill a cone-shaped hole for the dowel;
- Insert the dowel;
- Place a metal pin in the hole;
- Pour in the chemical composition and leave for a while.
If you have any problems during the process of installing antenna brackets yourself, contact our specialists.
Our specialists will answer your questions or install equipment at the highest level. All work is guaranteed. Tell friends:
Which antenna is better to install in a dacha near the city?
Alexander 2 :
– Just in a place where there is good reception there is no need for a built-in amplifier. Without a built-in amplifier, a decimeter TV antenna receives fewer channels, but cleaner! And Samsung and LG TVs have a function to amplify a weak television signal, which in some cases allows you to do without an amplifier.
An article about whether thatched roofs are suitable for modern life is available at this link.
If even one strongly protruding channel exceeds the maximum permissible level after the amplifier, it will “overturn” the amplifier (overload) and the output will be a mess of channels.
The main disadvantage of active antennas is the impossibility of adjusting the gain (“playing” with changing the supply voltage - nothing), the impossibility of Skylink rejection, the impossibility of weakening strong “crawl-out” channels.
If the outdoor antenna and the amplifier are located from each other at a distance of 0 meters to 10 meters (mast + descent into the attic), then in the vast majority of cases this does not lead to signal attenuation.
It is also necessary to remember that for the amplifier to operate normally, it is necessary that the signals arriving at its input be approximately the same and of a certain level. Any television channel (or interference from a 450 MHz cellular network, radio alarm, etc.) that greatly exceeds the level of other channels overloads the amplifier and “dirt” appears on the screen. At a very high level, the amplifier may overload so that nothing will be visible on the screen at all. In this case, it is impossible to turn off the amplifier without modifying such an “antenna”.
Alexander 2 :
— Good antennas for the dacha are good, but a lot depends on the cable, I advise you to take SAT 50 or SAT 703.
And even living next to a transmitting repeater does not guarantee reliable reception.
Danchenkoff:
– It seems to me that the signal from the air is getting worse and worse from year to year. I can’t say about the Moscow region, but my TV antenna at the dacha is an ordinary inactive UHF broadcast, a year ago it showed 15 channels, and this summer 10 federal +2 regional. Here, the problem is obviously in the frequencies, which are affected by the many installed cell towers. My clients on satellite television live a hundred meters from the TV station, and still their TV shows poorly! Therefore, it is better not to rack your brains about which outdoor antenna to choose for your dacha, but to switch to satellite TV.
Alexander 2:
– “Ultra-close” TV reception is a special case! You have to think here. Branded terrestrial antennas require installation at an angle of +5 - +10 degrees to the horizon and it is necessary not to amplify the signal, but to selectively suppress channels using notch filters.
And in order to prevent obstacles and range from affecting the quality of picture reception, digital terrestrial television was invented.
Legal formalities ↑
Installation of antennas on the roof of an apartment building, unlike installation on the roof of a private house, requires approval.
Familiarity with certain articles of the Housing Code will save you from possible troubles with the housing office in the future. You should know that each resident of an apartment building has an equal right to use the roof, basement and other auxiliary premises of the building.
If the house is being maintained by the housing office, then the exit to the roof is usually closed in order to prevent attempts of unauthorized entry. In accordance with the rules, only housing office employees have the right to access the roof. That is, you can install an antenna on the roof only with permission to install it.
We recommend
Having written permission in hand, you need to contact your neighbors, also apartment owners, and decide on the installation location of the device so that it does not disturb anyone.
If housing office employees create obstacles, you need to use your right, enshrined in the Constitution, to demand that the obstacle to the use of property be removed.
Precautionary measures
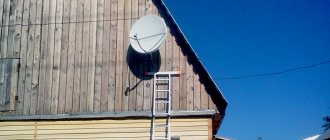
Antenna installation poses certain hazards, so basic safety precautions must be followed. You should not carry out installation work during rain or immediately after it. The roof remains slippery, making it easy to fall off. When working at height, it is necessary to have a safety belt and rope that will prevent injury if a person falls. When working on pitched roofs, you will need to attach a special ladder to the ridge in order to move freely along it. The ladder will also increase the contact area, which will reduce the pressure on the roof deck. When installing the antenna on the facade or gable of a building, it is better to use a stepladder or platform. In this case, it is advisable to have a partner who will provide support. The process of installing a satellite receiver can be assessed in the video.