Digital channels
Today, users use all kinds of TV models: with flat LCD or plasma screens, equipped with Smart TV - all of them support viewing digital channels. Television equipment experts say that setting up digital or cable TV on all modern TV models, for example, Sony or Philips, differs in minor nuances. We will clearly look at how to set up digital channels on the latest LG TV models.
- Select the settings language from the list - set Russian as the default.
- Now we select the country - Russia.
- Then you need to select the viewing mode - home, in a special window we set it to On. on the power indicator.
- Now you need to select your time zone - this is very important for our TV brand Lzh.
- We check the antenna connection and select “cable TV”.
- Next, select “Network” -> write the initial frequency: 746000 kHz -> OK.
- Another window appears, check the box for “digital television only” and click “execute”.
We monitor how an automatic search for all digital television channels is carried out, their configuration and installation. After setting up 100 channels, we turn off the automation, because then there will be duplicates, and the tuned ones will be enough for exciting viewing.
To sort channels, there is a “List” key on the remote control, which means list, register.
As you have seen, setting up channels on an LG digital TV is quick; you just need to sort the configured list and enjoy watching.
Connection nuances
When installing and connecting satellite equipment, there are a number of nuances that need to be taken into account. The main ones will be discussed below.
F connector connection
The television cable is attached to all devices using an F-connector. To connect it, you first need to cut off the top insulation by 10-15 mm and bend the shielding braid underneath onto the cable. Then you need to cut off the second layer of insulation and expose the central core.
Next, you need to screw the F-connector onto the television cable over the screen so that the cable core protrudes beyond its edge by 2-3 mm. Then you need to cut off the shielding braid protruding beyond the edges of the F-connector. The cable prepared in this way is connected to the converter, TV or disk.
Diseqc connection
Diseqc (or disek) is a device that is required to connect several converters . A cable must be connected from each converter to the disk and connected using an F-connector. In the same way, the cable from Diseqc is attached to the receiver.
Advice! The disk must be carefully hidden from moisture during precipitation. The cable connections do not need to be wrapped with electrical tape, as this will lead to the formation of steam. It is better to use heat shrink; it fits much more tightly to the cable and the F-connector.
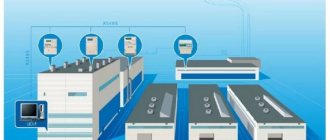
Multiswitch connection diagrams
A multiswitch or switch is a device designed to multiply a signal from one dish to several receivers, be it a receiver or a TV, and at the same time provide the devices with independent viewing of different channels in different polarizations.
On a note! Some multiswitches allow you to send a signal to one TV receiver from several independent satellite dishes, as well as from an over-the-air street or indoor antenna.
The cable length from the antennas to the multiswitch can reach up to 50 meters, and from the switch to receivers or TVs - up to 100 meters. For large lengths or multiple joints, it is recommended to use amplifiers; they will help compensate for signal loss.
The connection diagram is as follows. Wires from all antennas converge to the multiswitch, are connected, after which a cable runs from the switch to the connected devices (set-top boxes or television panels). Their number can vary from 4 to 80.
Multifeed assembly
A multifeed is a device that is used when installing additional converters on a satellite dish to achieve the correct angle and required height in relation to the central head . The use of several converters is relevant when the satellites are close to each other, and the angle between them is no more than 10°. In this case, the main converter is tuned to the satellite from which the weakest signal is received, because only part of the antenna reflector works for the additional heads.
The most common antennas in the Russian Federation are Supral. The multifeed assembly for them looks like this:
- a clamp assembled from two halves is attached to the converter and tightened with a connecting bolt;
- the clamp with the head is attached to one of the strips, after which it must be tightened with a bolt;
- the strip with a fixed clamp and the empty strip are installed perpendicularly in the adjusting bracket and tightened with screws;
- A free adjustment bracket is fixed into the head holder on the satellite dish, and a bar with the assembled multifeed is inserted into it at an angle of 90°.
The location of the multifeed in relation to the central converter depends on where the satellites are located. To make adjustments, tighten or loosen the screws on the brackets. Once the converters are set up, all connections must be carefully tightened.
Setting up a Smart TV
When purchasing new LG Smart TV household appliances, users can not only watch their favorite shows and movies, but also receive constant access to the Internet. How to set up an LG TV yourself if it supports the Smart function? Setting up the TV is done only after ensuring a stable connection to the worldwide network via a wired connection or Wi-Fi router. By connecting the product to the electrical network and providing a connection to the Internet, you can tune in analog channels or digital TV.
Installation is done as follows:
- go into the settings of the Lg TV receiver and select the “Network” item;
- select a network connection and click “select” on the screen;
- Select the desired type from the list - wired or wireless network, press the update button;
- Now the smart product sees the Internet connection, click ready;
- We register on a special portal: create a call sign, enter a password, then a letter is sent to your email - you need to open the specified link to confirm all actions;
- access has been obtained, go to the Internet using your nickname and password, move on to the main thing - how to set up channels on your LG TV for reception;
- install the “SS IPTV” application.
After this, you can directly tune the channels on your LG TV in the same way as the previously discussed method. Setting up Smart TV on Samsung TVs also has its own nuances. Now you know how to set up digital TV on various models.
Satellite TV
LG TV models can broadcast satellite channels - the image will be of very high quality if the user correctly performs the necessary steps, according to the operating instructions. Setting up satellite channels is done after installing the antenna in a previously prepared place - this is a spacious loggia for houses with increased comfort or a balcony in an ordinary apartment building. This choice is not accidental: there must be constant free access to the satellite television antenna for the necessary adjustment of its position. It can be installed independently, but after mandatory consultation with a specialist responsible for satellite TV from the nearest service center.
Important! In order to safely watch channels from satellites in any region of Russia, the digital tuner must support the DVB-S2 standard.
Here are approximate instructions on how to independently set up satellite TV on an Lg TV.
- We insert the antenna cable into the connector on the tuner, and connect the product to the television receiver. On the remote control, press the Settings key, get to the main menu -> “Channels” -> OK.
- A pop-up window opens -> program mode -> OK. In the list that opens, check the box next to Satellite -> OK on the screen and control panel.
- Enter the Satellite field -> select EUTELSAT 36 A/B 36.0 E -> OK.
- We go back and enter the frequency for 2-band converters - 9750/10600, and for 1-band converters, respectively, 10750.
- Turn on the power.
Searching for a satellite and tuning channels
Once all the cables are connected, the TV and receiver are turned on, and the satellite dish is installed and pointed south, you can begin setting up the antenna.
With multiple converters
If several converters are connected, you need to start working with the middle one, tuning it to the Sirius satellite. The sequence of actions will look like this.
- The receiver needs to set the frequency to 11766, speed to 27500 and “H” polarization. 2 bars will appear on the screen: red, which indicates the connection of the dish and the receipt of a signal from the satellite, and yellow, indicating the level of this flow. When the antenna is aligned correctly, the first bar will be at the 40% mark.
- To adjust the signal level, which is initially at 0%, you need to point the antenna dish up and turn it to the left as much as possible. Next, smoothly turning the antenna to the right, you need to find the best signal.
- If there is no result, you should lower the antenna 2-3 mm and repeat the steps described above.
- The antenna must be lowered lower and lower until the yellow bar reaches 21%.
- Having remembered the position, you should lower the antenna slightly, turn to the right and check if the signal improves. If it gets worse, return the antenna to its original direction, turn left, lower and raise. Check the location of the strip. Actions must be performed until the signal improves to 40%.
- Next you need to move on to setting up the converter. Smoothly rotating it clockwise and then counterclockwise, you need to move the yellow strip to the 65-70% mark. At this signal level, the image quality will not be affected by precipitation, wind or other weather conditions.
In the same way, you need to configure the remaining two converters: the first is tuned to the Amos satellite, frequency 10722, speed 27500, “H” polarization, and the second is tuned to the Hotbird satellite, frequency 11034, speed 27500, “V” polarization.
Setting up channels
The process of setting up satellite antennas for any other satellites, at the user’s request, is similar. This will require data on their location and approximate frequency.
After completing the antenna setup and achieving a good signal level, you can begin searching for channels on the set-top box. To do this, you need to start a scan, after which a list of all available channels will appear.
Digital channels
Today, users use all kinds of TV models: with flat LCD or plasma screens, equipped with Smart TV - all of them support viewing digital channels. Television equipment experts say that setting up digital or cable TV on all modern TV models, for example, Sony or Philips, differs in minor nuances. We will clearly look at how to set up digital channels on the latest LG TV models.
- Select the settings language from the list - set Russian as the default.
- Now we select the country - Russia.
- Then you need to select the viewing mode - home, in a special window we set it to On. on the power indicator.
- Now you need to select your time zone - this is very important for our TV brand Lzh.
- We check the antenna connection and select “cable TV”.
- Next, select “Network” -> write the initial frequency: 746000 kHz -> OK.
- Another window appears, check the box for “digital television only” and click “execute”.
We monitor how an automatic search for all digital television channels is carried out, their configuration and installation. After setting up 100 channels, we turn off the automation, because then there will be duplicates, and the tuned ones will be enough for exciting viewing.
To sort channels, there is a “List” key on the remote control, which means list, register.
As you have seen, setting up channels on an LG digital TV is quick; you just need to sort the configured list and enjoy watching.
Setting up a Smart TV
When purchasing new LG Smart TV household appliances, users can not only watch their favorite shows and movies, but also receive constant access to the Internet. How to set up an LG TV yourself if it supports the Smart function? Setting up the TV is done only after ensuring a stable connection to the worldwide network via a wired connection or Wi-Fi router. By connecting the product to the electrical network and providing a connection to the Internet, you can tune in analog channels or digital TV.
Installation is done as follows:
- go into the settings of the Lg TV receiver and select the “Network” item;
- select a network connection and click “select” on the screen;
- Select the desired type from the list - wired or wireless network, press the update button;
- Now the smart product sees the Internet connection, click ready;
- We register on a special portal: create a call sign, enter a password, then a letter is sent to your email - you need to open the specified link to confirm all actions;
- access has been obtained, go to the Internet using your nickname and password, move on to the main thing - how to set up channels on your LG TV for reception;
- install the “SS IPTV” application.
After this, you can directly tune the channels on your LG TV in the same way as the previously discussed method. Setting up Smart TV on Samsung TVs also has its own nuances. Now you know how to set up digital TV on various models.
Satellite TV
LG TV models can broadcast satellite channels - the image will be of very high quality if the user correctly performs the necessary steps, according to the operating instructions. Setting up satellite channels is done after installing the antenna in a previously prepared place - this is a spacious loggia for houses with increased comfort or a balcony in an ordinary apartment building. This choice is not accidental: there must be constant free access to the satellite television antenna for the necessary adjustment of its position. It can be installed independently, but after mandatory consultation with a specialist responsible for satellite TV from the nearest service center.
Important! In order to safely watch channels from satellites in any region of Russia, the digital tuner must support the DVB-S2 standard.
Here are approximate instructions on how to independently set up satellite TV on an Lg TV.
Setting up satellite channels yourself
Most users prefer to entrust the installation of a satellite dish to representatives of the provider. This is understandable, because the process is much more complicated than installing a conventional analog antenna. But if you are not looking for easy ways and have technical skills, if you know the nuances of installation, you can install the equipment yourself.
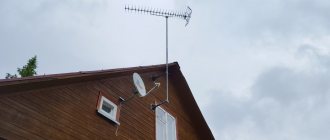
Antenna installation
Before installing a satellite dish, choose the right location, because this is a guarantee of a continuous, clear signal. You need:
- make sure there are no obstacles in the direction of the satellite - multi-story buildings, tall trees, advertising posters;
- place the rest of the equipment as close to the “plate” as possible to simplify the setup of the equipment;
- exclude placement of the device receiving the signal in the balcony area, especially with glazing.
- The satellite dish should be installed in places where snow and ice cannot fall from the roof. For fastening, only parts purchased as a set are used, since they are designed for a certain load. When installing the structure, you must follow the attached instructions.
Installation is done as follows:
- Using the supplied elements, screw the anchors into the supporting surface.
- The support pipe is attached to the installed fasteners, and a metal bracket is already attached to it.
- According to the instructions, install the converter in the support ring so as to guarantee its complete tightness. If moisture gets into the device, it will not work properly.
- Using the specialized “F” connector included in the kit, connect the cable to the converter module. The joint is also carefully treated, for example, with silicone sealant to prevent moisture from entering. From the connection point, the cable is pulled without unnecessary tension along the converter support rod. it is secured at equal distances with plastic ties or another method.
- The prepared satellite dish is installed on the bracket without tightening the screws yet. This is necessary in order to adjust it exactly to the satellite after final installation, that is, you have to move the device in different directions.
- Particular attention is paid to securing the F-connector to the coaxial cable. The last 1.5 cm of the wire must be cleared of the top layer of insulation. But this should be done in such a way that the screen braiding underneath maintains its integrity.
- After this, the second layer of insulation is removed 1 cm from the same side of the cable, exposing the central copper core. The stripped end of the wire is pushed inside the connector as far as it will go, passing a copper tip into the desired hole.
A TV with a built-in satellite receiver has some advantages.
History Corner!
Yes, that’s what I wrote in 2013! In a word, a few lyrical memories, or what we worked with not so long ago.
- No need for a separate receiver.
- No need for HDMI-HDMI connecting cord
- No need for a separate remote control.
But, you can forget about Aunt “sharu”, which is not a disadvantage for owners of official access cards.
But if the TV has a built-in digital tuner that supports the DVB-S2 standard, this means that the TV will receive (if the antenna is correctly tuned to the satellite) the signal of satellite channels.
TV with built-in satellite receiver, however, be careful:
This is where confusion can sometimes occur, because other tuners with similar names are built into the panels and have nothing to do with satellite TV.
So:
— The tuner for terrestrial digital broadcasting is called DVB-T2 or DVB-T (not suitable) — The tuner for cable digital broadcasting is called DVB-C (not suitable) — The tuner for satellite digital broadcasting is called DVB-S2 or DVB-S (Suitable)
The letter T stands for terrestrial TV, the letter C for cable, and the S for satellite. As you can see, the difference is only in one letter, and the tuners are completely different.
Installation of antenna equipment does not differ from standard installation using an external receiver.
TVs with a built-in satellite receiver can easily scan channels both manually and automatically, but will only show unencrypted channels.
Almost all modern TVs with a built-in satellite tuner support the DiSEqC 1.0 protocol, which means you can receive signals from at least four satellites using a 4x1 DiSEqC switch.
One... just a satellite receiver and antenna built into the TV will not be enough.
The fact is that almost all television channels broadcast from satellites are not broadcast in an open format, but in one encoding or another.
"AS PLUS" - in Crypt On, Tricolor TV - in DRE Crypt, "NTV +" and many erotic operators - in Viaccess, "Raduga TV" and "Continent TV" - in Irdeto, "Telekarta" - in Conax and etc.
And therefore, having installed an antenna and tuned in the channels of one or another operator on your TV, on the screen, instead of the long-awaited high-quality image and favorite program, you will only see an inscription something like “Coded channel”.
To solve this problem, you need to purchase and install a decoding device in your satellite TV - the so-called access module (CAM module and access card inserted into the CI+ slot)
Do you mean that 90% of satellite TV channels are encoded!
And so... TV with built-in satellite receiver
NTV+ conditional access module Viaccess CI+ for setting up NTV-Plus channels on DVB-S2 TVs of various brands.
Let's start with Samsung, for example:
First, it is advisable to reset the TV to factory settings:
Menu > support > self diagnostic > reset > ok.
After the reboot, go to menu > channel > antenna > select the “satellite” value.
Further in the same section: satellite. system - enter the password > 0000
We uncheck all satellites that are installed by default (if this fails, you need to remove the CAM module from the slot and reset the TV again).
We scroll through and select the EutelsatW4 36E satellite, in the LNB settings we select transponder 12130 R, lower gene. LNB - 0, top - 10750.
Antenna operating principle
Satellite television is a system for transmitting information from a data source to a consumer through a repeater. The role of a relay is played by a satellite located in a circular orbit of the Earth above the equator. The satellite system makes it possible to transmit a signal over a large area. Compared to terrestrial broadcasting, this type of broadcast transmits data much more efficiently.
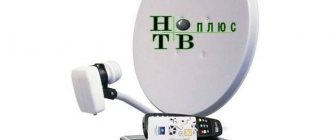
Equipment for capturing and processing satellite television signals:
- Satellite antenna. There are many types of antennas for receiving satellite signals. The most famous type of satellite television antenna is the parabolic dish. Externally it looks like a concave disk. A satellite dish is a mirror antenna. Electromagnetic waves hit the metal surface of the plate and are reflected by a reflector.
- Satellite converter. This is a device that contains a signal amplifier and a frequency converter that works downward. The converter is mounted on the antenna feed. It is powered by electricity and connected to the receiver via a coaxial cable. By installing several satellite converters at once, you can receive many free TV channels.
- A satellite tuner, also known as a receiver, is a small flat box. Receives television signals and decodes them, adapting them for further transmission via wire to a television device. The receiver can be built directly into the TV body. In this case, the cable from the converter goes directly to the TV, or to an adapter.