Video monitoring of the area near a private home allows you to increase the level of security and always know about ongoing events, even at a great distance. However, without knowledge of some technical features, it is impossible to implement such a system. Therefore, we will analyze in detail how to connect a video surveillance camera, what types of technologies are available to the modern consumer, what are the criteria for their selection, what are the main stages of the installation procedure for video recording devices of analogue and IP standards, as well as what the TOP programs for video review look like.
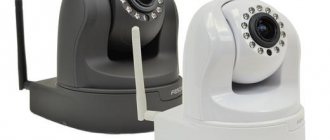
General diagram for connecting IP cameras Source stroy-podskazka.ru
Types of technologies
Manufacturers of video monitoring systems produce two types of cameras:
- Analog.
- IP models.
Connecting video surveillance in each case has its own characteristics. However, the first difference that a potential consumer may notice is the different composition of the equipment. Let's consider this aspect in more detail.
Analog
A video surveillance system based on analog technology includes the following necessary equipment:
- Camera. The most suitable models in terms of quality, image clarity and cost are models in AHD, CVI and TVI formats. In addition, special brackets will be required to fix them in a suitable place.
- Recording recorder. A DVR is necessary for an analog system and for converting information into digital format, and for performing additional useful functions - connecting to the Internet, maintaining an archive, etc.
- Recording device. A large hard drive will be required for recording and storing materials. The recommended minimum volume is 1000 GB.
- Conductors. The required minimum set of cables and wires for the operation of all equipment - KVK, PVS, etc.
Cables for connecting a video camera Source ytimg.com
- Connectors. Connectors, passive transmitters, amplifiers - with cable lengths exceeding 400 m.
- Energy module. Batteries, UPS, power supply and other equipment - depending on power supply conditions.
- Internet communication device. For wireless connection of cameras and the need to work remotely, a router is used.
Note! Protecting outdoor cameras from the elements requires reliable protection. Distribution modules with a resistance level of IP 52 and higher protect the connectors from getting wet, rain and dust. A high-quality modular distributor helps protect against high-voltage impulses during a thunderstorm.
Video camera for connecting via cable Source ixbt.com
See also: Catalog of companies that specialize in electrical work of any complexity
IP models
Systems operating using IP technologies include the following set of equipment:
- IP camera. The model independently transmits the signal in digital format - both via cable and wirelessly. Video recording goes to a PC disk or your own flash card - a DVR, like analog models, is not required. The CCTV camera is configured through the menu, as well as software, and configured for the Internet – in automatic mode.
- Disk. Required to record records using the registrar.
- Cable. Twisted pair.
- Connectors. An RJ 45 type connector is required. Alternatively, connection via 4-pair twisted pair with POE standard is possible.
- Nutrition. Connect to a stand-alone module or a standard power supply, as well as a POE switch.
- Router. Required to connect to the local network.
Advice! Although connecting an IP-standard outdoor CCTV camera to the DVR is not mandatory, its presence increases the efficient processing of stored data. In addition, the device improves the reliability of the system as a whole and sets the format for its operation in a rhythm - 24 hours a day, 7 days a week.
Wireless outdoor camera Source obi.ru
Equipment selection
When choosing equipment for independently equipping your local area with a video surveillance system, you need to pay attention to a number of factors:
- The area of the land.
- View radius.
- Clear interface.
- Functionality and capabilities.
- Manufacturer.
- Reviews.
- Resistance to environmental influences (operation down to minus 5 or minus 35), for example frost resistance or continuous shooting indoors in an installation location with high humidity.
Necessary equipment (Equipment and materials)
The type of accessory kit depends on the type of camera being connected. For the analog model this is the following set:
- Network cable for power supply.
- Coaxial cable or twisted pair.
- DVR or board.
- Hard drive (if recording is required).
- Connectors or transmitters.
- Male power plug.
- 12 volt power supply, as well as an additional battery for autonomous operation.
- Cables for connecting to playback devices.
What is needed to connect a video camera
To connect the camera and obtain a high-quality image you need:
- Power unit.
- Connection cable.
With the analog model, a coaxial cable is used. In addition to the camera, it is connected to a recorder or screen. The further away the devices are from each other, the higher quality cable is required. In this case, the conductor itself is connected via output connectors. In addition, to operate, the equipment must be equipped with software determined by the type of video camera.
Installation instructions
When all components are assembled according to the diagram, you can begin installing them. The camera is fixed using fasteners corresponding to the type of surface material and exactly according to the diagram. The laying of wires is carried out according to the rules of electrical installation work with protective boxes.
Last but not least, correct identification of camera connectors is important. On analog models they have the following features:
- The power supply is plugged into the red connector.
- Yellow RCA output – video signal.
- White RCA output – audio signal.
The receiver of images from cameras can be, for example, a TV. To do this, the audio and video inputs must be connected to the appropriate equipment cables. In the classic circuit, the red wire in the wire is a plus, the black wire is a minus, and the yellow wire is a video signal. Therefore, when connecting a camera, the video output is connected to the central core, the rest in accordance with the polarity. In this case, an RCA plug is added to the other end of the cable.
Connection and setup
Connecting the camera to the TV is possible via a cable or through:
- TV tuner.
- Cards for capturing sent files.
- DVR.
- USB converter.
If the number of cameras does not exceed 16, capture cards are usually used. They are installed inside the system unit and attached to the PCI Express output. To connect to a laptop, you will need adapter devices - recorders, independent capture cards and other similar systems. The connection to the phone occurs directly or using cloud servers or P2P. In this case, access to the image usually occurs via the Internet. Therefore, the speed and technology of the latter are always critical - the higher, the better.
Examination
To make sure your surveillance system is successful, you need to not only know how to install an outdoor video camera, but also how to test it. The easiest way to do this is through a specialized Internet resource using a remote computer via ActiveX. To do this you need:
- Get the router's IP address.
- Enter it in the appropriate line.
- Connect port No. 81.
Criterias of choice
To understand what is better for the home - analogue or IP standard - it is necessary to compare how cameras of both types behave in terms of specific functions:
| Function | IP standard | Analog technologies |
| Video analytics | Possibility date | Not available |
| Cloud storage | Writes down | Not applicable |
| Wiring for the camera | Wireless options using Wi-Fi technology are used where it is not possible to lay wires. | Works only with wires. |
| The need to know the principle of computer networks | Need study. | Can be connected without special knowledge. |
| Arrangement of a video monitoring system at a distance of 100 to 400 m | There are specifics. | Created without additional devices. |
| Selecting the cross-section of the power cable depending on the distance to the camera | Wireless options do not have such disadvantages. | Correct calculation is necessary to prevent voltage drop. |
Video monitoring of a home at a distance Source video.tcb-spb.ru
Helpful information! Using a PC, you can set the operating algorithm of the video device and obtain full data storage and processing. There are three main ways to connect a video surveillance camera to a computer: using a video capture card, a specialized video server and a USB converter. In addition, the connection can be made via a TV tuner.
Wireless video surveillance via radio channel
The most common video surveillance systems until recently. Their essence is that a video signal is transmitted via a radio channel from an analog camera to the appropriate receiver, which converts it into video, which can be recorded using a relatively simple DVR recorder or even a VCR.
The disadvantage of such a system is that if the transmitting equipment is often located inside the camera (although it can be an external, separate unit), then it is necessary to use its own receiver for each channel. That is, any camera must be equipped with both its own transmitter and a tuned receiver.
On the other hand, to record a video signal, it is enough to take a regular multi-channel DVR video recorder, each of whose inputs will have its own receiving equipment connected.
There is also recording equipment that is already equipped with a package of receiving equipment, but it is a rarity that can only be purchased in a set with a limited number of cameras. The reliability and parameters of such a set do not inspire enthusiasm.
One of the disadvantages of radio cameras is the limited space for signal propagation without interference. Its repeaters, to lengthen distances, do not exist or are very rare. The average transmission range does not exceed 200 meters, in the absence of physical obstacles to the radio signal.
Preparing for installation
Actually, preparing the installation of radio cameras is no different from that in the case of IP equipment. The installation location and location of the client base with monitors and DVR recorder are selected. The only nuance may concern the choice of camera model - outdoor or for indoor use. The former are much better protected from the influence of weather.
Accessories and tools
The tools needed to attach the camera to the surfaces of walls or ceilings are selected: hammer, pliers, screwdrivers, drill or hammer drill, wire cutters. Just like for IP, the connection between the camera base and the surface can be done using double-sided tape, glue or self-tapping screws.
Procedure for installing and connecting equipment
Actually, the whole procedure of how to install a camera and video surveillance at home or in an organization with your own hands using radio cameras is relatively simple. First, the cameras are installed and turned on. Then the receivers are connected to the DVR recorder and it is configured, as for working with conventional analog image capture devices.
Peculiarities
The peculiarity of radio cameras can only be called the occurrence of interference or “snow” and deterioration in image quality as the distance between the transmitter and receiver increases, as well as in cases where any spark electrical equipment (electric motors, welding, transformers) operates nearby. This is due to the fact that the camera transmits an analog video signal, which is very sensitive to interference.
Installation of analog cameras
Instructions for setting up a video surveillance system based on analog cameras in general look like this:
- Proper layout of the location of all devices, components and cables with a schematic image on a sheet of paper.
- Selection of the necessary equipment and software environment.
- Installation of equipment, electrical wiring, cables.
- Setup, connection.
- Combining several cameras into one system.
- Checking the work.
Scheme of organizing video surveillance with analog cameras Source vcctv.ru
In this case, there are several options for how to connect video surveillance to a computer:
- The distance to the cameras does not exceed 50 meters. The power module and DVR are installed nearby. To transmit signal and electricity, one cable is used - KVK. Its cross-sectional area does not exceed 2x0.5. Its analogue with a slightly larger cross-section - 2x0.75 - transmits a signal up to half a kilometer, but the power weakens every 70 meters.
- The cameras are located at a distance. The signal is transmitted by cables of type RK-75 or RG-6, the current is transmitted by a standard conductor.
- Several cameras are close to each other. Twisted pair cable is used - you can only send a signal to 4 cameras or fully connect 2 devices.
On a note! Connecting a CCTV camera to a private home most often has the purpose of monitoring the territory. In this case, the type of video recording device is selected based on the quality and detail of the image. Despite the high resolution, the analog still loses to the IP standard. However, a significant difference between them in these indicators is revealed only at a professional level, for example, when reading a car license plate on the road from a long distance.
Analog video camera Source nabludau.ru
Choosing a CCTV Camera
Digital cameras have a higher resolution and are capable of analyzing images.
Cameras based on charge-coupled device devices (CCD matrices) are widely used. An integrated circuit with photosensitive photodiodes is used. Models are installed that work according to the standards HD-CVI, HD-SDI, HD-TVI, AHD.
The devices have a higher resolution compared to analogue units, the production of which has been declining since 2016. IP video cameras are functional devices; they use local networks for broadcasting and analyze the image.
When choosing, design characteristics are taken into account, for example, a modular device, a case model, a dome, controlled or gyro-stabilized camera. The method of transmission via wires or without them matters.
Installation of IP cameras
Planning, selection of equipment and installation in the case of installing IP cameras is similar to the case discussed above. However, in the installation of digital devices, slightly different connection materials are used. Two options apply:
- Using 4-pair class 5E twisted cable. The cable is crimped from both edges under the RJ 45 connector - one is connected to the camera itself, the other to the router or switching module. Power is supplied by a separate wire through the male connector. With this method, the signal weakens after 100 meters.
- PoE standard. The signal and power go through one cable. This will require a PoE switch, as well as support for this standard in a specific video camera model.
DIY CCTV camera installation steps
The work begins with laying a shielded cable to connect video surveillance. The wire is mounted from remote areas and brought to the receiving site; its length is calculated with a small margin.
The cable is protected from moisture and frost if it is laid openly on the street or if a corrugated pipe is used indoors or underground. The lines are not located closer than 40 meters from electrical mains.
The camera must be connected in such a way that the location is accessible for maintenance and repair. The red coaxial cable is used to connect to the power, while the yellow and white are used to transmit the signal. Digital modules operate on twisted pair cables.
Video description
Video on how to mount and connect an IP camera to a computer:
Connecting a video surveillance camera to a computer is performed according to the following algorithm:
- DVR software is installed and configured on the PC.
- A password and user name are specified.
- In the settings area, select the information input field - then “Add zone”.
- After the window opens, click the “Find device” function.
- The program automatically searches and displays a list of connected devices.
- Next, if necessary, name the cameras via the “Add device” tab.
- To display the image from the camera on the screen, select the corresponding device and press the “View” function.
- The operating mode of the equipment is set in the “Settings” area.
Connection methods and configuration diagrams
DVR for security camera Cameras
can be directly connected through a multiplexer, which is a device for synchronously transmitting multiple videos onto one screen. A matrix switcher is used to separate images and display each image on its own monitor.
Hard drive data recording devices are divided into types:
- video servers work with Linux or Windows and contain a video capture card for analog models;
- DVRs are represented by Stand-alone, non-PC, DVR devices.
Setting up video surveillance is carried out using other installations that solve individual problems. IP cameras are equipped with a memory cell where recording is carried out and recording is reserved in case of failure of the main recording unit.
Through the Internet
Camera connected to the Internet via a router
It is popular to connect video surveillance to the network cable of the provider. The method is implemented by allocating the user's IP address, which is assigned to the tracking device. You need to connect the outdoor camera to your computer and enter the address in the browser line. The IP data of the camera can be found in the user manual on the manufacturer's label.
The user goes to the network settings section after opening the interface and manually enters the IP address or checks the automatic receipt box. The entry port becomes available to him (more often it is open at No. 80). A password and login are set for personal login to the network portal, then the module is disconnected from the gadget and the Internet provider cable is connected to the camera.
To the computer
A computer video server receives, stores, processes video or audio, and manages security circuits.
The devices differ in parameters:
- applications - by type of broadcasting, on demand, in video surveillance schemes;
- interface - stream transmission via IP or ASI;
- type of output and input - analog or digital;
- synchronization capabilities;
- probability of local safety of information.
The connection of the video camera is carried out depending on the type of screen resolution, taking into account the number of working channels. The potential for synchronous time marking of received data from external emitters NTP, VITC, LTC is taken into account.
Connecting to a monitor and TV
Connecting surveillance cameras to monitors
The image is displayed on the television screen, events are broadcast in real time. You will need a camera, a power module, connection contacts, a mounting bracket and a cable, then you can install the video surveillance yourself.
The location is chosen so that the object of observation is in the center of focus most of the time. In this case, tree branches and free-standing objects blocking the view are taken into account. The lens should not be exposed to sunlight or light rays, as the image will be overexposed.
To work with the monitor, cameras with a viewing angle of 70 – 100° are used. Analogue models connect to the TV via the composite AV input, which is found on all receivers. For outdated screens, a SCART-AV adapter is used.
Video description
Video instructions for connecting an IP camera via a router:
Recommendation! Setting up video surveillance from an IP camera involves entering its basic data into the appropriate fields of the program. This is first of all – IP address, port, authentication information. As a standard, this information is indicated on the equipment packaging and is therefore publicly available. In order to prevent possible unauthorized access from the outside in the future, they need to be replaced with new ones.
Hidden video surveillance
Of course, organizing covert video surveillance, that is, placing a camera in places inconspicuous to outsiders, is a big plus. But, unfortunately, in the Russian Federation, even in cases where the camera is hidden, a warning must be posted in a visible place that hidden video recording is being conducted. Otherwise, the owner of such a system risks falling under Article 138.1 of the Criminal Code of the Russian Federation.
Of course, this does not apply to the placement of image recording equipment on private property, as long as objects of other people’s property do not fall into the frame.
Preparatory work
The camera type itself is selected. The main requirements are minimal size and no backlight, including infrared. When using it, in any case, the glow of LEDs in the dark will be noticeable, which unmasks the camera. Accordingly, the issue of its location and the supply of power there is resolved.
You can increase the invisibility of surveillance equipment by building it into pieces of furniture, placing it in window grooves, mounting it inside walls and plastering or sealing the device itself, leaving only an exit for the eyepiece.
Accessories and tools
The tools used are those that will help install and disguise the image-capturing device. Of course, for IP surveillance cameras (and most likely they will be used due to the favorable price-quality ratio), you will need a WIFI switch and a DVR recorder, however, instead of which you can use a regular computer.
The procedure for installing and connecting equipment
Like any IP camera, its hidden version can be configured through specialized software designed for this purpose. Often it comes with the equipment itself. The only difference is the method of connecting to the computer. To do this, most often, access to the camera via a WIFI connection is used. On the body of the device itself there is a button, pressing which the camera switches to wireless access point mode. Which you need to connect to for configuration.
TOP programs for video surveillance
The most affordable way to connect an outdoor CCTV camera to a computer is with special programs. Among the most popular of them, the following range of professional and standard software stands out:
- WebcamXP.
- GLOBOSS.
- Web Cam Monitor.
- IP Camera Viewer.
- Xeoma.
- EyeLine Video Surveillance.
- XProtect GO.
- Axxon Next.
- AbelCam.
- iSpy.
The choice of software should be made for a specific video camera model and the necessary functions. This could be the need to broadcast video to the Internet, enable recording based on a motion sensor signal, or work on time settings.
Video surveillance via the Internet
There are two options for making video surveillance with your own hands for a home, apartment or business via the Internet. The choice depends on the communication channel provided by the provider.
If you use a dedicated line and a static IP address, you can set up direct access to the transmitting equipment via the Internet. In the case of dynamic addresses, using a third-party cloud service will help. An agreement is concluded with the owners, and the existing equipment is configured to the parameters provided by the experts of the lessor’s company.
You just need to remember that all existing possibilities for transmitting video data to the Internet basically relate to IP and WEB cameras. Very few analog DVRs have similar functions.
Preparing for installation
In the case of Internet broadcasting of video surveillance via the Internet, after installing the equipment and selecting equipment that can perform such functions, it is necessary to study market offers for providing streaming functions via a cloud service. Having chosen the one that suits you, you contact their representative via the website, email or phone. Afterwards there are procedures for payment and paperwork, as well as setting up connections with cameras according to the recommendations of experts.
Accessories and tools
If you do not take into account the installation of recording equipment, then only communication equipment will be needed. If you have a DVR recorder or a video recording computer, then a router and modem connecting the network to connect to the Internet. In the case of no intermediary between IP cameras and the Internet, only a modem with WIFI functions is needed.
The process of installing and connecting equipment
As already mentioned, detailed instructions for connecting the equipment will be issued by the cloud service lessor. In the case of a static IP address, after installing the entire network, it will be enough to indicate it in the client program on the user’s device (phone, computer, laptop, tablet).
Peculiarities
The main difference between this format for transmitting video data is the increased requirements for equipment and the quality of the communication channel. Only WEB cameras are used together with a computer, or IP cameras with a modem with good Internet bandwidth. If you use mobile communications, then due to the volume of traffic in connection with the client, there is a large consumption of megabytes in the operator’s tariff, which also has its own cost.
Briefly about the main thing
Modern video cameras are manufactured according to two standards - analog and IP. To organize a surveillance system, they require additional equipment:
- DVR.
- HDD.
- Cables, connectors, connectors.
- Batteries, uninterruptible power supplies, power supplies.
- Router, switch.
In order for a specific user to determine for himself which of the two standards is better, it is necessary to compare their features in relation to the primary functions - data storage, wiring, remote installation, etc. The easiest way to connect video surveillance to a computer is to install the program. The following are in greatest demand - Axxon Next, AbelCam, iSpy, WebcamXP, GLOBOSS, Web Cam Monitor, IP Camera Viewer, Xeoma, EyeLine Video Surveillance, XProtect GO.
How to set up a DVR
In order to connect and configure the DVR, you must adhere to the following recommendations:
CCTV Cameras
Cameras are installed according to the plan of the protected area, viewing angles and the required number of cameras are set. For PTZ cameras, the settings can be made independently from the control station, i.e. directly from the DVR.
Entering the DVR menu
Before using the recorder, you need to install a hard drive; the device will prompt you to format it. Be sure to do this! On some models, the device will format the disk automatically.
Most DVRs have a similar menu, so recommendations for setting up the device are advisory in nature.
So, enter the menu with the right mouse button:
Registration
The screen should, among other things, display the “Main Menu” line. Next, you should specify your username and password. This information should be indicated in the instructions for the device description; if such information is not available, most likely it is: user name “admin”, and password “1111” or “0000”. After authorization, the password and username can be changed.
Language selection
There is a high probability that the menu will be in English. After authorization, find the line “General”. By clicking on the “General” button, the “Language” button will appear. After clicking, you are prompted to select a language.
General settings
In this submenu you are asked to select the time zone, date, time.
Setting up hard disk recording
Configuring the DVR's action when the hard drive (HDD) is full. The following options will be available to choose from:
- Rewrite . When the hard drive is full, new video files will be recorded on the old ones, without the possibility of recovery.
- Stop recording. Once the hard drive is full, the DVR stops recording video.
Connecting cables
- First of all, connect the cable to the video camera, then from the video camera to the DVR through the video input connectors.
- The next step is connecting the DVR to the monitor using video output connectors. Audio inputs/outputs are connected using the same principle.
- Depending on the monitor you connect, you will need cables with BNC, VGA, HDMI connectors.
Recording setup
The following options will be available to choose from: 1. Continuous. 2. On schedule. 3. By motion/sound detector, etc. In a word, from any sensors, if any. 4. Manually.
How to connect a DVR to a TV (monitor)
To connect a TV or monitor to the DVR, you may need the following cables:
- HDMI.
- DVI.
- RCA.
- BNC.
- S-video.
Which cable will be needed depends on the DVR itself and the TV (monitor). There are also cases when a certain cable is not available, or even one does not exist, then an adapter from one connector to another can come to the rescue. For example, an adapter from RCA (“banana”, “tulip”) to BNC (looks like a plug for a TV antenna).
Next, one end of the cable is inserted into the connector on the back panel of the DVR, the other connector, respectively, into the connector of the TV or monitor.
Not all cables are capable of transmitting video and audio signals over the same channel, so a situation may arise when you need an additional cable to transmit audio. Audio cables are connected by color and connect the audio input of one device to the audio output of another.
Setting up your TV (monitor)
After all cables are connected according to the instructions, you need to set up the TV (monitor). To do this you need to follow these steps:
- Turn on the TV.
- Call up the menu on the screen.
- In the menu, find “connected devices”, “used connectors”, etc. This menu item may differ for different TV models.
- Find the one you need among the connected connectors and put a tick in front of it. The image transmitted through the connected cable should appear on the screen.
Programs to expand the capabilities of the webcam
The standard interface of non-specialized programs does not always allow you to qualitatively reveal the features of a webcam. The same codecs for sound or HD quality for the camera are implemented only in conjunction with the correct drivers and fine-tuning through third-party interfaces. Below are the three best variations of such software for beginners in this business.
1) ManyCam
| Functional | ★★★★★ (5.0 out of 5.0) | Overall attractiveness ★★★★★ 5.0 |
| Price | ★★★★★ (5.0 out of 5.0) | |
| Reviews on work | ★★★★★ (5.0 out of 5.0) |
The main function of the program is to correct the image when broadcast through channels on video hosting sites and social networks. If desired, the user can replace the background, add animation, and so on. Thanks to fine settings, the number of variations in video presentation is almost unlimited.
How to set up video surveillance yourself using a webcam
Program features:
- function of recording a video with effects;
- the ability to connect several cameras simultaneously;
- advanced level of channel settings when publishing a feed;
- an abundance of effects and masks;
- synchronization with popular video hosting sites and instant messengers.
In addition to standard effects, the software includes a set of tools for creating your own. All of the above is nicely packaged in the free version. There is a PRO variation, but the number of differences from the standard version is so insignificant that I don’t see any point in overpaying here at all.
2) Movavi Video Suite
| Functional | ★★★★★ (5.0 out of 5.0) | Overall attractiveness ★★★★★ 4.5 |
| Price | ★★★★ (4.0 out of 5.0) | |
| Reviews on work | ★★★★★ (5.0 out of 5.0) |
The program is perfect for users who not only want to get a high-quality picture, but also don’t mind making basic video conversions on the spot. A person can immediately edit, trim and arrange the cuts in the form of a clip - and this is just the beginning. Thanks to synchronization with video hosting sites, you can upload material to the channel instantly.
Software functionality includes:
- certificate in Russian;
- editing and editing tools;
- synchronization with instant messengers;
- converter.
The utility is not demanding in terms of hardware components and works well even on computers with weak specifications. The license is paid, but its cost is acceptable for such extensive functionality.
Instructions for quickly connecting a webcam to a PC:
3) Cyberlink YouCam
| Functional | ★★★★ (4.0 out of 5.0) | Overall attractiveness ★★★★ 4.0 |
| Price | ★★★★ (4.0 out of 5.0) | |
| Reviews on work | ★★★★★ (5.0 out of 5.0) |
A popular program with simple functionality that I use myself. The presented capabilities are quite enough to meet the requirements of the average user - effects, adjusting the quality of the stream and the function of printing pictures that are created by the software on the spot. The license is shareware, but you can also find cracked installation options.
That's all for today. I hope my article helped you solve the question of how to connect a webcam to your computer. If you have any problems, you can ask questions in the comments. Good luck and don't get sick!
How to connect a DVR to a computer
NVRs do not need to be connected to a computer, as they are by definition designed to operate and transmit data over the Internet. NVR recorders work directly with IP cameras, which in turn connect to the recorder using UTP (unshielded twisted pair) or using Wi-Fi.
DVRs can be connected to a computer. DVR recorders are divided into:
- PC-based DVR . In principle, this is the same personal computer, only with a video capture card installed.
- Stand-Alone DVR . An autonomous device that records, processes, and stores video material in binary code.
Connecting a PC-based DVR to a computer
In this case, the computer is used as a server for the video surveillance system. A PC-based DVR is a video capture card that must be installed in a free slot on the motherboard (the video capture card's passport must indicate which slots the card is compatible with).
The board itself must meet the following parameters:
- The number of inputs must correspond to the number of video cameras.
- The design of the board must be suitable for the size of the computer.
- The video capture card must be compatible with the motherboard.
- Compatible with video card.
In the case of using a personal computer for one or two video surveillance cameras, it is possible to use a computer running on any version of Windows, even with a small amount of RAM.
For a larger number of cameras, you will need a powerful processor, at least 2 GB of RAM, and a high-speed hard drive of 320-500 GB. Insufficient RAM capacity causes the image to freeze.
Analog cameras are connected to the video capture card using cables that usually come with video surveillance equipment or using a BNC-SVGA splitter; this method allows you to connect up to 8 video surveillance cameras to one connector on the card. In turn, the video capture card must be equipped with an installation disk with a set of necessary drivers to ensure device compatibility. In addition to drivers, the installation disk must have an installation program that allows you to manage video surveillance functions, such as:
- Simultaneous viewing and recording of video around the clock.
- Recording from CCTV cameras according to schedule.
- Recording and sending alarm messages when motion sensors are triggered.
- Sorting the video archive according to specified parameters.
- Remote control of the entire system via the Internet.
A PC-based DVR system must be reliable and protected from such factors as:
- Voltage fluctuations or power outages. An uninterruptible power supply is required.
- Hacking a video surveillance system. The computer or server must be protected by a strong password system.
Connecting the Stand-Alone DVR to a computer
This type of recorder is an independent device capable of the following actions:
- Receive video signals from CCTV cameras.
- Compress the signal using a given algorithm.
- Archive video files to your hard drive.
- Record sound from microphones built into CCTV cameras.
- Processing signals from sensors.
You can connect the Stand-Alon DVR to your computer using special cables. On the back panel of the recorder there is a “NET” connector, through which the recorder and PC are connected. But since this connector is the only one in the PC case, and it is occupied by a connection to the Internet, you will need another network card, which is inserted into a free slot on the motherboard and connected to the DVR using a patch cord. Next, you will need to configure the network card.
Setting up a network card for the DVR
The steps for setting up a network card may vary depending on the version of Windows installed on your computer. After connecting the recorder to the PC, you must perform the following steps on the computer:
- Go to the Start menu and find the Control Panel section.
- In the window that opens, find “Network and Sharing Center.”
- “Change adapter settings” should appear on the left side of the screen.
- After clicking on “Change adapter settings” the “Local Area Connection” window will appear, press RMB.
- Next, find and click “Properties”.
- In the list that appears, find and check the box “Internet Protocol Version 4 (TCP/IPv4)”.
- Next, click on “Properties”.
- In the window that appears, find and about. Next, write in the line: IP type: static (the service may be paid by the provider). Server port: Server port (or in some models it is called “media port”) - 9000. HTTP port: 80. If it is occupied by another application, the manufacturer recommends entering 81, 8080, 8888 or another number. IP address: 192.168.1.1 Subnet mask: 255.255.255.0 Default gateway: 192.68.1.1
- When finished, click “Ok”.
- Next, you need to do o. The fields in this tab can be left blank. You should save the actions by pressing the “Ok” button.
- Reboot your personal computer.
Setting up the DVR
- Enter the menu.
- Find and enter “Network Settings”.
- In the IP address line, the last digit must differ by one unit from the value registered on the PC.
- String “Subnet Mask”: 255.255.255.0
- Save the values and reboot the device.
Connection software
As mentioned above, one way or another, any type of camera requires installation of software on a PC. This is especially important if you plan to record.
If you use a video capture card, the software is included. It can be installed from the included disk or downloaded from the manufacturer's website.
When using a registrar, a program is also supplied, usually called a CMS. This program is installed on your computer, and the program searches for the registrar by IP address.
In all other cases, software for working with IP cameras is used. The program allows you to control the camera, record to the hard drive, as well as view accumulated recordings and upload them to a flash drive.
For testing or home use, it is advisable to choose free programs. For example, iSpy, ZoneMinder, Veeyesys Rapidvms, OpenALPR. It is worth noting that they not only run Windows OS, but also support Linux and MacOS OS.