IP camera definition and operating principle
Wireless IP video camera PTZ IP
surveillance cameras are often called network cameras because they record video in digital format and use a computer network for broadcasting, transmitting data through local computer network nodes to the end user over vast distances. Modern IP cameras have high resolution and are equipped with various additional functions:
- converting the image into the required format;
- scaling;
- incline;
- pan;
- intelligent image analysis, in particular face recognition;
- Motion Detection;
- audio tracking;
- automatic alerts.
The network camera has its own IP address, so it can be found through a computer on the local network.
Network devices differ in type:
- Case-mounted – have a sealed casing that protects from the influence of the external environment.
- Cabinet-mounted multimedia – installed indoors, equipped with a microphone and a connector for a flash card.
- Dome – provide a 360° view, usually installed indoors on the ceiling; there are also outdoor devices.
- Rotary – used to track an object, change the viewing angle, and are equipped with a zoom.
- Cylindrical - universal, installed inside and outside.
The first IP video camera was created in 1996. It had a resolution of only 0.3 megapixels and at that time could not compete with analog systems.
Flaws
Like any complex technology, IP CCTV cameras have their drawbacks. For example, resistance to environmental factors. Which, in principle, increases as part of the procedures for protecting the housing of image capture devices or information transmission lines. The main disadvantages are:
- Increasing the cost of the camera depending on its capabilities. Although the latter is not as noticeable as in the case of analogue broadcasting. Additional features that require additional payment include Wi-Fi, GSM, microphone and night surveillance. There are cameras that allow you to broadcast the operator's voice if necessary.
- The more aggressive the environment, the more reliably the device itself must be protected from its influence. Although the latter applies to any electronic equipment.
Actually, this is the end of the list of shortcomings.
Differences between an IP camera and an analogue one
Analog cameras transmit a signal to the DVR using a cable.
Analog and IP cameras find their buyers. The choice between analog and IP equipment is fundamental, because these devices differ significantly from each other and have objective advantages and disadvantages.
A classic analog camera is characterized by low resolution. Video is transmitted over the cable as a low-frequency signal. Advantages:
- work does not depend on the degree of illumination;
- perform better when shooting in motion;
- unlimited bandwidth;
- not subject to hacker attacks.
When choosing systems based on analog cameras, you should be prepared for the following disadvantages:
- limited recording duration;
- analogue interference arising from exposure to an electromagnetic field (the longer the cable, the more interference);
- low image quality;
- problems with storing a large number of videos.
Gradually, classic devices are being replaced by video cameras, which are also designed for analog surveillance, but have high resolution. Currently there are three standards: AHD, CVI, TVI. The differences between them are minimal, but they are not compatible with each other:
- The TVI standard video signal transmits images with a resolution of up to 1920×1080 pixels. The main difference: separation of the luminance and chrominance signal for a clearer image.
- CVI stands for High Definition Composite Video Interface. The video signal is also transmitted over coaxial cable. The technology is controlled by Dahua.
- An AHD standard camera transmits an image whose geometric parameters are close to a digital signal, and the frame size is 1280×720 pixels.
Analog video cameras are easier to connect and do not require specific settings.
Analog cameras have the following advantages:
- It’s easier to connect because they don’t require network settings, network bandwidth calculations, or connections to a router or switches. When connecting AHD equipment, you can use the old cable route left over from the classic analog system; you just need to change the cameras and recorder.
- There are no delays or stutters during signal transmission. In real time, video from analog devices is broadcast at a speed of 25 frames per second, so the picture is smooth.
- If a high-quality cable is used to lay the route, the video signal is transmitted without interference and amplifiers over a distance of 500 m, and with the help of active type transceivers the transmission range can be increased to 1500 m.
- AHD equipment from different manufacturers is compatible with each other thanks to a single standard.
- At night, analog cameras shoot better video because they have higher light sensitivity compared to IP cameras.
Using AHD cameras, you can create an analog-type system with image quality approaching the quality of IP systems, while avoiding complex setup. If necessary, AHD cameras are connected to an analog video recorder, having previously switched them to the analog video surveillance operating mode of the PAL standard.
Digital surveillance cameras have a facial recognition function.
IP cameras are more expensive, but this does not stop those who value the benefits of an IP video surveillance system:
- IP cameras are much more functional than analog devices. They can be integrated into a general security system, which also includes an access control management system and a fire safety system.
- Advanced IP cameras allow you to recognize faces, license plates, take screenshots, and send notifications when an object disappears from a given area.
- So far only network equipment has ultra-high resolution. If the absolute maximum for analog devices is 3 megapixels, then network cameras can have a resolution of 10-12 megapixels and even higher. Their installation is justified where high image detail is required.
- Some models can shoot at an increased frame rate and provide a 360° view, without blind spots.
- A network video surveillance system is installed on a computer or DVR. The latter is optional.
- Since to connect IP cameras that support POE technology, a network cable is used, which simultaneously transmits video and audio signals, power supply, no additional lines are required.
- A network video recorder costs significantly less than a hybrid video recorder. Devices only for connecting analog cameras are no longer produced.
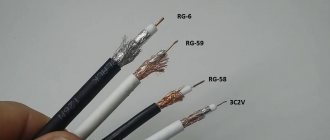
IP cameras transmit the signal better if a 0.5 mm copper cable is used.
Disadvantages of network equipment are:
- Low photosensitivity and color rendering quality.
- In the case of IP cameras, the transmission range is no more than 100 meters, provided that a high-quality copper cable with a core thickness of at least 0.5 mm is used. If you lay a network cable made of copper-plated aluminum in cold conditions, the transmission range is reduced to 25–30 m. To broadcast the signal over long distances, it is necessary to use switches that relay the signal.
- High-definition IP equipment does not always transmit video at 25 frames per second, often only 17 frames per second or lower, so the video is more choppy. In addition, delays in image transmission of 1–2 seconds are common.
- Connecting an IP camera can be a difficult or even impossible task for a person who is not well versed in computer technology.
- The use of devices from different manufacturers in the system can lead to various operational problems, for example, lack of sound recording.
The most popular resolution: 1 MP, 1.3 MP, 2 MP are provided by both network and analog equipment.
Transformation systems
The end user of IP video surveillance systems can use not only purely digital image receiving or transmitting equipment, but also the creation of unique hybrids. For this purpose, specialized converting devices are used. Some of them can turn analog into digital from a regular camera, others, on the contrary, stream code into a video signal for recording on a classic recorder. The latter is economically weak. However, in some cases, connecting a digital capture device to an analog video recorder is justified. For example, if the latter is part of a larger established system, no one will change it entirely for the sake of several cameras. This includes security systems for enterprises and industries, or classic visualizers of industrial chains operating in environments hazardous to human life.
Connection and installation of IP video surveillance
Surveillance cameras are connected with special cables and patch cords.
Connecting and installing a network camera are tasks that require special skills and knowledge. Users have to contact specialists due to problems that arise during the process.
Camera pinout
The cameras are connected using special “patch cord” cables. It may be included in the kit. The cable is crimped using a special crimping tool - a crimper. In this case, it is important to observe the pinout.
A cable with pinout according to the T568A standard is used to connect a switch or modem to a computer. When the terminal is positioned flat side down, the diagram is read from right to left:
- white-green;
- green;
- white-orange;
- blue;
- white-blue;
- orange;
- white-brown;
- brown.
To connect two computer devices via a network card, the T568B standard is used. The diagram is also read from right to left:
- white-orange;
- orange;
- white-green;
- blue;
- white-blue;
- green;
- white-brown;
- brown.
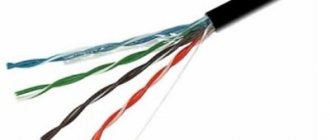
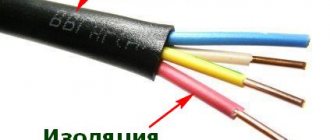
Eight-core twisted pair cable for connecting cameras
To connect IP cameras, an 8-core UTP cable is used - twisted pair. The insulation from the end of the cable is removed. The wires are inserted into the RJ-45 connector in the order corresponding to the T568B standard. Since a simple Internet connection only uses 1, 2, 3, and 6 wires, the free wires can be used to power the camera, for example, 4 for blue and 8 for brown. In this case, the brown and blue conductors are stripped and fixed in the power connector: brown – in “+”, blue – in “-”.
If the network camera uses a Wi-Fi connection, only a power cable is needed.
The conductors are then cut to 1 cm and fixed into the RJ-45 connector in the appropriate color sequence. Crimp with a crimper.
The finished connectors are inserted into the sockets of the IP camera and the wires are laid to the DVR, switchboard or laptop/computer. The second side of the cable is also crimped according to the diagram and connected to the existing device. The power cord is connected to the power source, making sure to observe the polarity.
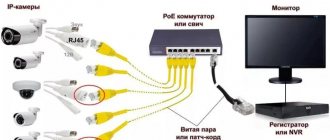
Connection diagram
According to a typical connection diagram, to create a full-fledged IP video surveillance system you will need several IP cameras. Images from them can be viewed via an Internet connection using a computer or phone or tablet. For devices to work properly, you need a switch or switch. It connects cameras into a local network. You may need a network video recorder whose function is to record, display and store recorded footage. To access IP video surveillance, you need to organize Internet access. For this purpose, the switch is connected to the router. A computer is used as a server. It is necessary for direct interaction with cameras: requesting images, transferring them, saving them.
The equipment is connected to each other using twisted pair cables: UTP, FTS and STP. These varieties differ in the type of shielding. After that, settings are made to access the cameras and recorder. Access to viewing video from an IP camera is configured via an Internet browser or client program. The first allows you to view video remotely, but to control multiple cameras, special software is required.
Special software has a graphical interface and sufficient functionality for comfortable viewing and analysis:
- rewind;
- viewing in recording;
- changing the frame rate;
- retrieval of video materials;
- recording initiation;
- scaling;
- camera tilt.
Popular free software products include:
- XProject Go;
- Zone Minder;
- Axxon Next;
- Xeoma.
Sometimes the software comes with the camera on disk.
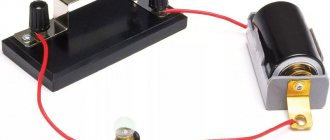
Connect directly to a laptop and via a browser
Connecting the camera directly to a laptop using a twisted pair cable and a power supply
The IP video camera can be directly connected to a laptop or PC because it has its own web server. However, a maximum of one camera can be used and the LAN port will be occupied. If you connect to the Internet via Wi-Fi, the port can be used to connect an IP camera.
You will need:
- camera;
- complete power supply;
- twisted pair cable.
The video camera comes with a connecting cord with a through pinout (patch cord). One side is crimped according to pattern 568A, the other - according to 568B. The end of the patch cord is inserted into the RJ-45 connector, and the other into the laptop/computer. A power supply is connected to the camera and plugged into a power outlet.
The camera's IP address is set by default. It may be indicated in the instructions, on the box, or on a sticker. It can be changed via a web browser. The laptop and device must be on the same subnet. This means that the digits of the IP address, except those after the last dot, must match. To change the default IP, you need to open the Network and Sharing Center, then go to the Status tab and go to Properties. In the properties of the Internet Protocol Version 4 (TCP/IPv4) component, specify any subnet address. Sometimes the port is indicated separately through a colon.
To check the connection, you need to enter the address of the IP camera into the address bar of your web browser. If there is a connection, the system will require you to enter your login and password to view the image. Next, special software for video recording is installed. Thus, video from an IP camera can be viewed from any device that connects to the Internet through a standard web browser. The address bar indicates the IP address and port number.
What could go wrong, and what should you do in this case?
Video surveillance is a rather complex topic, and setting up video surveillance via the Internet is doubly so. Therefore, when problems arise, it is important to correctly identify and eliminate them. It happens that it is not at all obvious what is going on - everything seems to have been done according to the instructions, but remote access does not work.
Let's finally look at the most common problems that arise when setting up remote video surveillance and how to fix them.
Remote viewing does not work
The most common problem when setting up remote video surveillance is that everything works fine locally, but remote access does not work. Typically, the problem is port forwarding. You need to make sure that in the router, in addition to setting up port forwarding itself, this port forwarding is also allowed. This is usually configured in the Firewall section.
Recording doesn't work
Everything works fine, but the archive is not created. Check, have you connected the hard drive? If yes, then it may be faulty. Some recorder models require you to first format the hard drive. Do it. Rebooting the recorder also helps. In general, before all the settings on the recorder are completed, it is advisable to reboot it.
Remote viewing program does not work
This often happens - everything is configured and checked through the browser, but through the program on a smartphone or tablet it is impossible to start viewing. Perhaps you are using the wrong program or the wrong version. Sometimes you can waste a lot of time trying to figure out a problem. In this case, if there is such an opportunity, it is better not to hesitate and call or write a request to technical support. Usually they immediately provide a link or say the exact name of the client program that should be used with this specific equipment.
It is also useful to first try to connect using the program to the video surveillance system locally via WiFi (if you have a WiFi router). And only after that proceed to setting up access via the Internet.
Yesterday everything worked fine, but today it doesn't work
There are many different systems along the video signal path from the camera to the person. And if something somewhere stops working, then the entire video surveillance system will stop working. To fix the problem, you need to find out the cause, and to do this, the system needs to be tested. At the same time, the order of testing is important, otherwise you can spend a lot of time fighting the wrong problem, which actually exists. Typically the testing order is as follows:
- Make sure that all equipment at the site is working: cameras are working, there is a picture on the recorder monitor, recording is being made and an archive is being created. All this is easy to check, but you need to have access to the equipment.
- Make sure the system is running locally. From the local network, you need to connect to the system through a browser or through a client program and make sure that everything works: all cameras open, the video goes smoothly without delays.
- Only after this should you check remote access. It is better to check first through the browser, and then through the mobile client.
By going through these three simple steps, you can easily detect and fix the problem. It is also worth taking measures to prevent similar problems in the future. For example, if a regular hard drive fails, then a new specialized one must be installed.
To contents
Common IP Camera Resolution
Recognition of a person’s face at different camera resolutions
When choosing the resolution of an IP camera, you need to clearly understand whether a highly detailed image will be beneficial. You can purchase a network camera with a resolution of 12 megapixels, but the aspect ratio of the 16:9 image has only a resolution of 1 megapixel and 2 megapixels, respectively, 1280x720 pixels and 1980x1080 pixels. Higher resolution cameras produce images with a 4:3 aspect ratio, so in reality, video from a 4-megapixel camcorder may look worse on the same screen than video from a 2-megapixel device. All other things being equal, the higher the resolution, the more informative the image.
Do not rely on a simple description of technical characteristics. To evaluate the quality of the video recording, it is worth viewing a demo recording made by a specific model. If the resolution is increased by the processor, it is actually Full HD, but the image quality is poor.
Step-by-step guide to connecting video surveillance systems at home
This is true when no amplifiers or additional power sources are used. It is this device that greatly simplifies the process of connecting the system to a personal computer.
The number of amps on the power supply should be selected based on the number of cameras. Twisted pair cables have recently been used to establish communications between components of digital systems.
Analogue video cameras have higher light sensitivity than digital ones. Category: High-Tech Modern analog video surveillance cameras do not differ in image quality from their digital counterparts. Please note that all devices will be connected to the same power source. But you don't have to drill into the walls.
That's all, installation of the video system is complete. Do not confuse the information exchange cables that are connected to them. HDD. To fully view the territory, it is necessary to install a camera on each wall and another one in front of the entrance.
Used to connect a microphone and supply power to the camera. It’s a complex question that requires a lot of thought; a whole Talmud of articles has been published on our website telling about the advantages of certain things, let’s get to the point. POWER SUPPLY FOR CCTV CAMERAS AND LED TRIPS. 12V 30A!!!
We recommend: Laboratory performing measurements
Setting up an IP CCTV camera
It is not recommended to increase the frame rate, as the video will deteriorate.
The quality of the video stream from the IP camera can be adjusted. For the MJPEG format, the following parameters are adjusted: resolution, frame rate, quality. For MPEG-4 and H.264 – resolution, bit rate, quality. The frame rate is the number of frames per unit time, and the transfer rate is determined by the amount of bandwidth. The higher these values, the smoother the video will be and the heavier the video files will be. However, the frame rate is limited by bandwidth, so these parameters should not be increased. For smooth video footage, a frame rate of 24 frames per second is sufficient; if this characteristic does not matter, you can use professional recommendations:
- cash register – 12–15 fps;
- corridors of schools and offices – 5 fps;
- parking – 1–3 fps;
- stadiums in the absence of competitions – 1 frame/s.
The required frame rate depends on the speed and direction of the object's movement. A higher frequency is required when the object has a high speed in the horizontal direction.
Video surveillance via the Internet
One of the features of IP surveillance cameras is their operation via the Internet. It is usually available in the IP registrar functions. But in some models, video recording and playback is implemented on the global network, without any physical intermediary device at all. That is, the video recorder directly saves the image to cloud services, where the end user can view it from anywhere in the world. Remote control of such a capture device is also available.
There are also disadvantages of this system:
- dependence on intermediaries and the performance of their servers;
- non-zero cost of such services;
- good communication lines are required;
- Not only the owner, but also the hosting owners can get access to video data.
The most important of the above is unnecessary intermediaries. Failure of any of the elements of the video surveillance structural diagram below will lead to the unavailability of recordings to the end user:
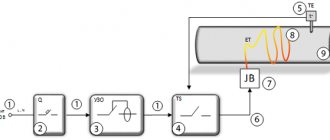
Connection diagram
The scheme for connecting an IP camera to a DVR involves an intermediary - a router, or a communication provider acting in its role. Visually, its general structure looks like this:
The image-capturing device is physically connected to the switch by connecting with a UTP cable through a regular LAN port (usually yellow). The same one, or marked as UpLink (blue), is where the network cable from the DVR or router of a higher level is supplied. If you need to ensure communication between several routers and cameras, the connection is made in a kind of “herringbone” pattern:
Setting up the router
Each model of the recipient device differs in the configuration interface, so we will not consider specifics. There is only one general recommendation. If the router allows it, you need to enable a DHCP server in it that distributes IP addresses to assign a unique one to each camera.
For those cases where there is no such functionality, a similar option is used in the registrar itself.
DVR
Capture devices are searched for in the corresponding settings menu item. All cameras located within the IP space of the recorder's subnet will be automatically detected. The numerical value of the latter is taken based on manual settings or the address issued by the DHCP server at the highest level.
Ready solutions
There are several ways to organize IP video surveillance systems. The lowest price of which is the independent construction of connections of a set of equipment and the separate purchase of routers, cameras, with the assembly of a personal computer as a recorder. However, in this case, you may encounter software incompatibility of the equipment. In addition, the physical dimensions of the PC will be larger. And setting up everything in a complex is more difficult. The main advantage of this approach is the ultimate extensibility and flexibility of the system.
Usually they choose ready-made video surveillance solutions. Standardly, they are represented by a recorder, a set of cameras (which can later be purchased if necessary) and all the accompanying hardware (power supplies, cords, adapters). The unifying router is usually not included in ready-made kits. Its individual purchase is within the interests of the end user. The main advantage of this approach is that the recorder is already configured initially, which will definitely work with the presented capture devices. In addition, its software does not contain unnecessary modules, and the software itself has been tested for security against third-party penetration.