Selecting a protective block
When selecting a suitable soft starter, it is recommended to take into account two factors - power and manufacturer. The power of the block is discussed above. As for brands, the most famous companies are:
- "Feron" (PRC);
- "Camelion" (PRC);
- "Shepro" (Russia);
- “Granit 1000”, “Granit 500” (Belarus);
- "Composite" (Russia);
- “Zipper” (co-production between Russia and China).
The most popular models are also produced by “Granite”. The products of the Chinese manufacturer have low prices. Like most products from China, blocks from China are considered not of very high quality. They are characterized by the following disadvantages:
- voltage drops, which disrupts the operation of the lamp;
- flashing of the lamp when connected and during operation;
- regular interference;
- average soldering quality;
- savings on the materials from which the block is made.
The products of the Belarusian company are considered to be of significantly higher quality. However, “Granite” is not compact, which in some cases is a critical drawback (for example, when placing a switch in a socket box). It should also be noted that the cost of “Granite” is higher than that of Chinese manufacturers.
Repair of protection units
As for the repair of protection units, it is this triac that fails first of all. When replacing, it is advisable to choose a triac with a higher current. More details on malfunctions and repairs can be found in the article on repairing dimmers , which are practically the same in terms of the power part of the circuit.
Any ideas for improving the stability of the unit? Who has experience in repair and modernization? Write in the comments!
If you are interested in what I will publish next on the SamElectric blog, subscribe to receive new articles.
Update of the article on August 3, 2013: Following a tip from Andrey and nata16 , I am publishing diagrams of the lighting lamp protection device from the Radio Amateur magazine. Author – Alexander Protopopov.
Radio amateur_Scheme 1 of a device for complete protection of lighting lamps
Radio amateur_Scheme 2 of a device for complete protection of lighting lamps
And also the magazine itself, where the article on page 6 shows these diagrams and describes in detail the principle of operation.
• Magazine “Radio Amateur”, 2005, No. 6 / Magazine “Radio Amateur”, 2005, No. 6, rar, 1.71 MB, downloaded: 2987 times./
How to connect 12-volt halogen lamps?
A halogen lamp is almost similar in design to an incandescent lamp, which means that the power source is not particularly important for it. They can be connected to network transformers, but more often so-called electronic transformers are used.
An electronic transformer (ET) is a pulsed power supply, which is usually based on a self-oscillator circuit. Its main feature is that the output is an alternating high-frequency pulsating voltage, the approximate shape of which you can see in the following oscillogram.
Widespread use is due to a number of advantages over network 50 Hz transformers, such as:
— with the same power, the dimensions of the electric vehicle are several times smaller and lighter;
— there is no low-frequency hum, like its 50 Hz counterparts;
- low cost.
You can see a typical electronic transformer below. The inscription INPUT is highlighted in red and the arrow shows the black wires that come out of the case opposite it - they are connected to a 220V network, and the green OUTPUT and two white wires are the low voltage output, 12V light bulbs or lamps are connected to these wires
Pay attention to the words “AC OUTPUT 12V 60W MAX” - this means that the output is alternating current
When connecting halogen lamps, we see that they operate normally.
If you simply replace them with LED bulbs, they will also seem to glow, but it’s not that simple.
You can observe a barely noticeable flicker; on some light bulbs it is more pronounced, and on others it is weaker, which is primarily due to the pulsating output voltage and the circuit design of the lamp itself. The camera does not transmit these flickers, and there was no heart rate monitor at hand, but there is an easy way to roughly evaluate the pulsations of the light flux - a mobile phone camera. If there are pronounced horizontal stripes in the frame, then there is something wrong with the lighting, and the closer you bring the camera, the more noticeable these stripes are.
You may have noticed that different light bulbs were used, this is not just the case. Let's figure out how they work
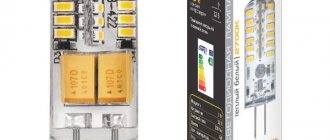
Conventionally, 12V LED lamps can be divided into 2 groups:
- “cheap and simple”, in which a diode bridge, resistors and LEDs are installed. The diode bridge allows operation from alternating voltage, and when connected to a direct voltage source, the polarity does not matter. Resistors are needed to limit the current. You see such a lamp in the picture on the right. In the close-up, two resistors and a diode bridge are visible through the silicone shell; they are located on both sides of the printed circuit board. The shell is elastic, but quite hard, vaguely reminiscent of bouncing balls.
- “expensive and complex”, in which the current is not limited by resistors, but is stabilized using a pulse converter. This particular instance does not use a set of discrete SMD LEDs, but a separate crystal filled with a yellow phosphor.
Causes of lamp burnout
Dimmer for energy-saving lamps: device and types
Incandescent lamps operate according to the principle of thermionic emission. When current enters the coil, it heats up, resulting in the production of light in the visible part of the spectrum. Moreover, the heat generation power is inversely proportional to the diameter of the conductor. As a result, the thinned sections of the spiral heat up very quickly, which leads to a loss of their strength. It is the thinned places that are the weak link, where burnout occurs.
Note! Lamp burnout is caused not only by voltage surges, but also by such phenomena as induced and parasitic pulsation.
Halogen light bulbs are also prone to burnout due to power surges. Such light sources have a feature that is unique to them - a tendency to overheat. An overheated light bulb can burn out at any time.
Not only incandescent and halogen lamps need protection, but also LED lamps. At first glance, this looks strange, because LEDs do not have a spiral, and the glow of the crystal occurs as a result of the excitation of electrons, and not the heating of the spiral. However, the operating principle of LEDs also involves thermionic emission. After several years, the semiconductor section burns out and, if you look closely at the LED lamp, you can see dull crystals with a pierced semiconductor layer.
Installation and connection
The installation of the protective block is usually carried out on the ceiling, that is, where the lighting devices are fixed. If the light bulb is not the only one, the soft starter is installed before the first light source.
The blocks are also placed in mounting boxes under the light switch. However, it should be borne in mind that there is a limitation for placing the unit in a mounting box: the maximum power of the device should not exceed 300 W.
Note! Whatever location is chosen for installing the unit, the device must be provided with unobstructed access for repair work. A typical block connection diagram is shown in the figure below
A typical block connection diagram is shown in the figure below.
In the case of an illuminated switch, a resistor is connected in parallel to the block. The resistance level for the resistor should be in the range of 33–100 kOhm, and the power should not exceed 2 W.
For 12 volt lamps a protection unit is also required. When using an electromagnetic transformer, the unit is placed in the gap of the primary winding. For an electronic transformer you will need a special block with four inputs.
The power level of the unit is selected based on the total power of all consumers. In this case, a certain power reserve is required, usually within 50% of the nominal value of all lighting devices.
For normal operation of the protective unit, it must be cooled. To allow air to enter, special holes are created in the housing.
Precautionary measures
When a light bulb burns out, the filament opens, which leads to a short circuit. As a result, there is a risk of failure of the protective unit. To prevent this, do the following:
The protective device is installed in the most accessible area (socket box or panel). Getting to the ceiling block will be much more difficult. Install a dedicated circuit breaker on each line
The nominal value of the switch is selected with a small margin, since current drops are not taken into account with this connection option. Installation of the protective unit in rooms with high humidity levels is not allowed.
Protection block design
The top view is shown at the beginning of the publication, but here is the same protection block, only a bottom view:
Design of the lamp protection unit - bottom view
We open the block, we see a very simple design device, which includes a printed circuit board, on which there is a powerful control triac on the radiator, and a plastic case with slots for natural cooling. Here is the lamp protection unit disassembled:
Disassembled Feron PRO11 protection unit
Personal production of UPVL
Devices with which you can start a smooth start can be made independently. For a thyristor circuit, a lamp is included in the rectifier bridge circuit. It acts as a limiter. The rectifier arms contain a shifting chain and the thyristor itself. Installation of a diode bridge is required.
After voltage has been applied to the circuit, the current, passing through the tungsten helix and the rectifier bridge, enters the resistor. The electrolyte container begins to heat up. The thyristor opens and passes current through itself. The tungsten filament heats up smoothly, the heating time depends on the resistor and capacitor.
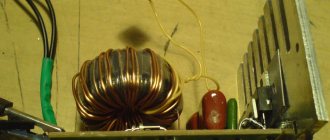
Triac-based circuit
In the circuit for smooth switching on of lighting devices, the triac acts as a power switch. The choke, as the main part, is a coil of copper wires, on the core of which a magnetic circuit is wound. The current strength in the windings increases gradually; the magnetic field is not able to quickly change direction. A triac (symmetrical thyristor) combines 2 stabilizers under the housing.
A resistor that transmits voltage to the electrical electrode acts as a current limiter. The circuit that sets the time is connected to a resistor and an electrolyte capacitance. Compared to a thyristor device, a triac has several disadvantages: when working with an inductive load, voltage surges are critical.
Devices can switch quickly. The reliability of the devices is ensured by the absence of mechanical parts and contacts. To increase the dimensions, the triac must be connected to a radiator to minimize the degree of heating of the electronic keys. Fans can be equipped additionally; they help to quickly cool electronic parts.
IC based
Microcircuits that allow smooth start-up were specially designed for faster construction of phase regulators. The small design is capable of controlling the voltage supplied to the lamp (up to 150 V). To increase the current when there are several lighting fixtures in the same room, a triac is connected to the microcircuit.
The devices can be used for soft starting of not only incandescent lamps, but also halogen lamps. To extend the life of an electrical appliance, you can install parts that have a similar mechanism of action.
Inside most microcircuits there are parts responsible for signal amplification. The load is completely switched off at zero. The control circuit is closed under the influence of a capacitor, which charges quite quickly. This allows for smooth acceleration. To be able to quickly turn off the power supply, it is advisable to install an emergency switch.
Why do lamps burn out?
Unlike conventional incandescent lamps, the operating principle of halogen lamps allows for partial restoration of the spiral, which constantly becomes thinner during the glow. This slightly extends its validity period. The LED crystal lasts an order of magnitude longer, but it is also not immune to burnout. In addition to the natural wear of the helix or semiconductor matrix, there are a number of specific reasons that significantly reduce their durability. These are the properties of a 220 V household network, such as:
- Voltage surges.
- Fatal jumps.
- Induced pulsation.
- Parasitic pulsation.
Let's look at their features in more detail.
Power surges
A change in voltage value is a fairly typical phenomenon for the domestic household network. Any energy-saving LED lamp equipped with a basic damping driver is protected against the effect of over-rating. On the other hand, the ice element cannot be protected from its fall by such a block. You will also need to install a high-voltage capacitor.
Fatal power surges
This type of cause of breakdowns of LED and energy-saving lamps includes an ultra-high increase in current and voltage in the network. This occurs when lightning strikes in close proximity to a power line. As a rule, standard protection units do not have time to block the impact of such power, and the electronics burn out instantly. In this case, the effect of flashing LED lights occurs when the LED lights are turned off.
Induced ripple
When two conductors are located close together, one of which leads to a powerful consumer, in the second, leading to the LED lamp, a current sufficient to initiate the glow occurs. The problem is that such additional switching on/off (equal to the frequency of alternating current, that is, 50 times per second!) will very quickly render the energy-saving device unusable.
Parasitic Ripple
The effect of parasitic ripple occurs when using LED-illuminated switches. A current of sufficient strength passes through its elements to excite the crystals of an LED energy-saving lamp. As a result, it blinks and, naturally, gradually consumes the resource of the semiconductor matrix.
A simple diagram for DIY assembly
The circuit below is easy to assemble, reliable and notable in that it is designed not only for smooth switching on of 220V incandescent lamps, but also for their smooth switching off. It is also worth noting that the flash and fadeout delays are set at the assembly stage at your own discretion.
Scheme
A schematic diagram of the smooth switching on of incandescent lamps is shown in the figure below. It is based on the KR1182PM1 (DIP8) microcircuit, inside of which there are two thyristors and two control systems for them. Capacitor C3 and resistor R2 set the duration of smooth on and off, respectively. Triac VS1 is necessary to separate the power and control parts, and resistor R1 sets the control electrode current. C1, C2 – external capacitors necessary to control the operation of thyristors inside KR1182PM1. Chain R4, C4 protects circuit elements from network interference.
Principle of operation
In the initial position, the contacts of switch SA1 must be closed. This nuance should be taken into account when connecting the board to the wall switch. At the moment the contacts SA1 open, capacitor C3 begins to gain capacity, thereby launching the thyristor control system into operation. At the output of the IC, through resistor R1, a gradual increase in current occurs, which controls the operation of the power switch. The result of the operation of the control system is a smooth start of the triac VS1 and the EL1 light bulb connected in series with it.
The rate of current rise at the control electrode depends on the value of capacitor C3. In order for the lamp to gradually light up within 3 seconds, capacitance C3 must be 100 μF. To increase the time to 10 seconds, you will have to set C3 to 470 uF. The soft shutdown duration is set by resistor R2. It is recommended to start selection with a nominal value of 2 kOhm.
Printed circuit board and assembly parts
- DA1 – KR1182PM1;
- C1, C2 – 1 µF-16V (polar);
- C3 – 470 uF-16V (polar);
- C4 – 0.1 uF-630V (non-polar);
- R1 – 470 Ohm-0.25 W±5%;
- R2 – 3 kOhm-0.25 W±5%;
- R4 – 51 Ohm-0.25 W±5%;
- VS1 – KU208G.
The use of devices that ensure smooth switching on of incandescent lamps has been benefiting people for several decades.
With the help of UPVL, the service life of incandescent light bulbs increases by at least 40%. As for the above scheme, its performance and reliability have been tested from our own experience. No tags for this post.
Types and design of transformers
Step-down transformers for chandeliers are designed, first of all, to protect light sources from sudden energy surges. They are used mainly for small light bulbs designed for voltages from 6 to 24 volts. Currently there are two types available:
- Toroidal (electromagnetic).
- Pulse (electronic).
The first type has a simple design and has good power indicators. However, you should also remember about quite serious disadvantages - large weight and dimensions. Do not forget also about heating the transformer windings, which negatively affects the service life of halogen lamps. As a result, toroidal-type devices are extremely rarely used in residential areas.
Electronic devices have a large number of positive qualities, which contributes to wider distribution. In fact, their only drawback is the relatively high cost. At the same time, the presence of additional functionality in some models, for example, built-in short circuit protection, helps to increase their service life.
It is pulse devices that are used in situations where lamps need to be placed in walls or furniture. Unlike toroidal devices, pulsed ones transform energy thanks to semiconductor radio components. Using an electronic transformer for halogen lamps is optional, but recommended. This is due to an increase in the operating life of lighting elements.
Electrical equipment, light, lighting
In Europe, the program for the transition to energy-saving technologies started in 2009, when from September 2009. It was prohibited by law to sell the most popular incandescent lamps in the world.
Russia also set a course for energy efficiency in 2009. Thus, in November 2009, a law on energy conservation was adopted, which defined the main stages of the gradual withdrawal of general-purpose lamps from circulation. So from 01/01/2011. a ban was introduced on the sale of incandescent lamps with a power of 100 W or more, from 2013 - from 75 W, from 2014 - from 25 W and above.
Let's figure out why such familiar “Ilyich light bulbs” fell out of favor, what can replace them, and how to properly switch to more energy-efficient sources.
Content.
- Why are general purpose lamps being phased out?
- What is a halogen lamp? Advantages and disadvantages
- Features of the operation of halogen lamps
- Types of halogen lamps
- Halogen lamp protection unit
- Halogen lamp: connection diagram via transformer
- Photo album: halogen lamps
- Photo album: halogen in the interior
- How to replace a halogen lamp (video)
Why are general purpose lamps being phased out?
The main reason for the removal of general purpose lamps (GPLs) from circulation is low energy efficiency, which is inherent in the very principle of lamp operation. The light source in it is a spiral of tungsten wire (incandescent filament), which, when current is applied, heats up and emits light. But, in fact, only 5% (!) of the energy consumed by the lamp is converted into light. The remaining 95% turns into heat. That is, the lamps we are used to do not so much shine as they heat!
The second significant drawback of incandescent lamps (Il) is that over time they begin to shine worse. This occurs because tungsten deposits on the walls of the bulb, which gradually evaporates from the filament, thereby reducing the luminous flux. A filament without tungsten burns out (frequent switching on/off also speeds up the burnout process) - and the lamp goes to waste.
Of course, the cost of the incandescent lamp itself is much lower compared to other types of modern lamps. But this only seems at first glance. In fact, LON has a much higher operating price, which means that one-time savings on purchase will be more than offset by high energy costs. In addition, LN has a short service life: the highest quality of them can last up to 1000 hours, and lamps from unscrupulous manufacturers burn out after just a few starts. Therefore, you have to buy such light bulbs often.
And another disadvantage of general-purpose lamps is their low light output: from 7 to 17 lm/W.
What do modern technologies offer us instead of incandescent lamps? An alternative to LON are several types of lamps: halogen, induction, LED, fluorescent, gas-discharge, energy-saving.
In our article we will dwell in detail on the study of halogen lamps, their types, performance characteristics and methods of commissioning.
What is a halogen lamp? Advantages and disadvantages
A halogen lamp is an improved incandescent lamp that has become widespread relatively recently. High production technologies have made it possible to improve the performance of halogen lamps in all respects in comparison with standard lamps. The efficiency of halogen lamps is 20–50% higher than conventional lamps (accordingly, energy consumption is reduced by the same amount).
The main advantages of halogen lamps are their affordable price, excellent color reproduction, the ability to create different light shades and bright light throughout the entire period of operation. Thanks to the addition of halogen vapors (bromine, chlorine, fluorine, iodine) to the flask, which reduce the evaporation of tungsten, the service life of the lamp has significantly increased (up to 2000 - 5000 hours of operation). Tungsten evaporation occurs more slowly, including due to the high gas pressure in the flask, the volume of which has become significantly smaller compared to LON. Thus, the service life of halogen lamps is 3-5 times higher than conventional ones. Moreover, it is lower than that of luminescent ones.
Halogen lamps have a rich, bright, even light, which differs significantly in spectral composition from the light of a conventional lamp. This light is as close as possible to the spectrum of sunlight. Therefore, it perfectly conveys the complexion of a person, as well as the colors in the interior in warm and neutral tones.
Halogen gases, unlike inert gases, protect the flask from a decrease in the light flux (halogen gases, reacting with tungsten atoms, bind them, preventing them from settling on the walls of the flask). The brightness of the lighting is regulated by a large assortment of reflectors of different diameters. Thermal radiation is removed outside the illuminated area thanks to dichroic reflectors.
Halogen lamps, like LON, can be dimmed, i.e. change brightness level. The consumer can replace an incandescent lamp with a halogen lamp in lighting fixtures with a dimming function without any additional effort. At the same time, energy consumption at the same light output is reduced by 30% less. But keep in mind that an increase or decrease in the supply voltage by only five to six percent reduces the working life by half, and also provokes the deposition of tungsten on the flask.
In addition to the above, halogen lamps protect illuminated items from fading thanks to special filters applied to quartz glass that do not transmit ultraviolet radiation.
It is not surprising that these lamps were put into mass production and became so widespread in both domestic (home, public buildings) and professional fields.
But halogen lamps also have their disadvantages. Due to their high sensitivity to power surges, they are much more likely to burn out when turned on than general-purpose lamps. Therefore, they must be switched on through protection units, voltage stabilizers or transformers (for low-voltage lamps). The protection units for halogen lamps will be discussed below.
Another significant drawback is the very strong heating of the flask (above 250 to 500(!) degrees Celsius). Therefore, firstly, when installing them, you must take care to comply with fire safety standards (provide a sufficient distance between the ceiling and the suspended ceiling, exclude the possibility of the lamp coming into contact with any object or material located nearby to prevent it from catching fire). And secondly, the flask should never be handled with bare hands.