Sooner or later, the battery pack of a screwdriver exhausts its life. However, the price of a new battery is almost comparable to the cost of the device itself, and therefore the only inexpensive alternative is to replace the batteries in the screwdriver. Let's look at what types of batteries there are and what their features are, how to quickly identify a fault, what recovery methods are available and how, if necessary, to repair or replace individual units.
To restore the battery, you must use batteries with parameters similar to those installed at the factory Source ytimg.com
Types of batteries for screwdrivers
Almost all modern models of screwdrivers have the same battery pack design - elements connected in series into a single circuit. Their shape, dimensions and denomination are always the same. Together they create the final voltage of the device. The only difference between them is the capacity. This makes it easy to trim and replace such batteries.
As a rule, 3 main types of batteries are used:
- Nickel-cadmium.
The rating of each block is 1.2 volts. Their main advantages are as follows:
- Availability due to prevalence and low price.
- Resistance to negative ambient temperatures.
- Preservation of characteristics when stored in a discharged state.
Disadvantages are manifested in small capacity, as well as a number of factors such as:
- Presence of memory effect.
- Self-discharge.
- Small range of charge-discharge cycles.
In addition, due to the toxicity of the production cycle, this type of battery is produced by manufacturers in 3rd world countries, which in itself can manifest itself in manufacturing defects and low quality.
The simplest nickel-cadmium batteries installed in a battery for a screwdriver Source alicdn.com
- Nickel metal hydride.
Batteries of this modification produce a voltage of 1.2 V. Many people prefer them as an alternative to failed units when they need to repair a battery for a screwdriver. This is explained primarily by high quality, since the production line does not pollute the environment, and therefore the technology is widely used in developed countries by well-known manufacturers.
In addition, they have the following number of advantages:
- Minimal memory effect.
- Low self-discharge rate.
- Higher capacity - in comparison with the above variety.
- Maximum operating range of charge-discharge cycles.
Disadvantages are manifested in high cost, inability to operate at low temperatures and deterioration of performance during prolonged storage in a discharged state.
Nickel-metal hydride batteries for installation in a screwdriver battery Source alicdn.com
- Lithium-ion
Batteries of this type provide a nominal value of 3.6 V. The main advantages are as follows:
- Large capacity.
- Several times greater range of operating cycles compared to other modifications.
- No memory effect.
- Minor self-discharge.
- Possibility of reducing the weight of the battery pack - due to the need to use fewer batteries in the circuit due to their greater potential and capacity.
The disadvantages are expressed by the maximum price and limited shelf life. After just 3 years, batteries lose most of their capacity due to chemical breakdown of the filler.
Note! The main cause of screwdriver failure is the failure of the battery, or more precisely, the loss of the nominal value or capacity of its individual elements. Thermistor failure, disconnection of contacts and other reasons are extremely rare.
Lithium-ion batteries for installation in screwdriver batteries Source virtustec.ru
See also: Catalog of companies that specialize in electrical work of any complexity
Re-flashing the capacity of battery cells
How to change elements in a screwdriver battery? Rechargeable batteries with Ni-Cd cells, if the recommended charging mode is violated, begin to lose capacity, but this loss is reversible. This can be done by flashing these elements . Thanks to this method, approximately 80% of the original capacity can be restored. The essence of flashing is to supply current with a voltage 3 times higher than the nominal value. Before starting work, the battery is disassembled into elements. Using pliers, tear off the nickel tape from the poles of the cans. On a high-power charger (you can take a car battery), the pulse mode to 3.6 V. The terminals of the device are placed against the same poles of the non-working cans for 3-5 seconds. Then all elements are measured with a multimeter. If the values exceed 1.4 V, they are restored. Banks in which the voltage indicators have not changed or have not reached the required value are replaced.
Troubleshooting
Due to the fact that the power supply is a chain of series-connected elements, it is necessary to determine which specific member has failed in order to replace it to restore the functionality of the screwdriver battery. Since one non-working link de-energizes the entire chain.
For this purpose, the following algorithm of actions is used:
- The battery is installed in the charger until the charging signal is received.
- The battery pack is being disassembled.
- The voltage of each bank is measured with a voltmeter.
- Marks are placed on all elements whose value is lower than those that normally work. For example, nickel-cadmium devices produce 1.1 or 1.0 volts instead of the required 1.2 V.
- Next, the device is assembled and turned on until the motor power noticeably decreases.
- After this, the disassembly and voltage measurements of all elements are repeated.
Banks whose nominal loss is 0.4 volts or more compared to normal ones are not suitable for further use and require replacement.
A battery for a screwdriver consists of a chain of batteries connected in series Source acums.ru
Advice! An alternative way to create a load for the battery before testing is to connect a light bulb of the appropriate rating. When the lamp begins to dim, the battery cells can be checked for differences in rating.
Technology for replacing Ni-Cd with Li-ion in a screwdriver
To select components for repair, it is necessary to determine the electrical characteristics of the screwdriver. This is the battery voltage, its capacity and the overall dimensions of the compartment where the batteries are installed.
Determining the number of Li-ion batteries
Typically, the battery parameters are indicated on the body of the screwdriver, and taking into account the fact that in terms of specific energy intensity, lithium batteries are many times larger (110-270 Wh/kg) than Ni-Cd (45-65 Wh/kg), then the dimensions of the compartment, You don’t have to worry about where you plan to install the batteries, they will fit in for sure.
As can be seen from the plate on the body of the screwdriver, it contains six cans of Ni-Cd batteries connected in series with a total voltage of 7.2 V and a capacity of 1.2 Ah each.
Since one bank of a new charged Ni-Cd battery has a nominal voltage of 1.2 V, to determine their quantity it is enough to divide the voltage indicated on the screwdriver by 1.2 V. Divide 7.2/1.2 = 6 pcs.
| Table for determining the number of Li-Ion batteries depending on the voltage of the Ni-Cd battery | |||||||||
| Voltage value, V | 7,2 | 10,8 | 12,0 | 14,4 | 16,8 | 18,0 | 20,0 | 24,0 | 36,0 |
| Number of batteries, pcs | 2 | 3 | 3 | 4 | 5 | 5 | 6 | 7 | 10 |
The number of Li-ion batteries to be replaced is determined in the same way. The nominal voltage of one Li-ion battery is 3.7 V. We divide the voltage that the standard screwdriver battery should have by the voltage of one element of the Li-ion battery is 3.7 V. 7.2/3.7 = 1.95 pcs. After rounding, it turns out that 2 cans are needed.
It is worth noting that the voltage supplied to the electric motor of the screwdriver is not critical, and increasing it to 20% will not cause harm, it will only slightly increase the operating power of the engine. Therefore, it is advisable to round up the number of batteries when calculating.
After disassembling the battery compartment, it turned out that the original batteries had already been replaced with new ones once. This was visible in the soldering and in the difference in the battery capacity markings on the body of the screwdriver and on the bodies of the cans.
It is worth noting that batteries connected in series do not all fail at the same time. Therefore, sometimes it is possible to make one working battery from two rechargeable batteries from a power tool, choosing the ones that are still in good working order. But its service life will be short, so such repairs should be carried out only as a last resort.
Selecting a Li-ion battery
The next step is to select the type and determine the parameters of the Li battery. Currently, two types are widely used - Li-Ion (lithium-ion) or Li-Polymer (lithium-polymer). In terms of technical characteristics, in contrast to price, they differ slightly.
| Table of technical characteristics of Li-Ion and Li-Polymer batteries | ||
| Parameter | Li-Ion | Li-Polymer |
| Rated voltage, V | 3,7 | |
| Minimum voltage, V | 2,75 | |
| Maximum charging voltage, V | 4,2 | |
| Charging current, part of capacity C | 0,1-1 | |
| Charging time | 1 hour | |
| Specific energy intensity, Wh/kg | Li-Po has twice as much as Li-Ion | |
| Number of charge-discharge cycles before capacity decreases by 20% | 600 | |
| Capacity loss per year (self-discharge) % | ≈20 | |
| Memory effect | Virtually absent | |
| Optimal load current, relative to capacitance C | up to 30C | up to 2C |
| Operational safety | Li-Ion is more dangerous than Li-Polymer | |
| Price | Li-Ion is cheaper than Li-Polymer | |
As can be seen from the table, Li-Polymer batteries are safer and have a much smaller size than Li-Ion, but they are more expensive and cannot deliver large currents to the load, which is necessary for starting and operating the screwdriver motor. Therefore, we choose a Li-Ion battery. The rated load current must be at least 20 A, the capacity is not less than that of standard Ni-Cd batteries, that is, more than 1.2 Ah.
All that remains is to go to the Aliexpress website to select and order batteries that match the technical characteristics and price. When searching for batteries, you need to proceed not only from the technical requirements, but also from the reliability of the seller. The criterion is the number of orders and reviews. The bigger, the better. This means that the turnover of batteries is large and they do not sit in storage for years.
It is better to choose batteries with welded flexible leads, since Li-Ion does not like overheating and it is not advisable to solder them again. In addition, under the positive terminal of the battery, a bimetallic plate is often mounted to protect against overheating, which bends towards the terminal when heated. By the way, sometimes it is possible to repair an overheated battery by bending this plate through the existing holes to the reverse position.
As a result of the search, a Li-Ion battery of standard size 18650 (18-diameter in mm, 65-height in mm, 0-cylindrical shape) Liito Kala with a capacity of 3.0 Ah, an operating current of 20 A and a cost of only 328 rubles per pair was found including delivery costs.
Before choosing a battery, the screwdriver was connected to a stationary power supply and the current consumption was measured. In free rotation mode, without load, the current was 2.7 A. With load, it did not exceed 15 A. Therefore, I did not incur extra costs to purchase a battery with a high operating current.
How does the battery voltage affect the operating time of a screwdriver?
Many people find it difficult to choose a screwdriver or other battery-powered tool, not understanding how the voltage (measured in Volts) affects the duration of its operation. It has an effect, but indirectly, since there is also such a parameter as the battery capacity (the current strength that the battery can produce during that hour).
Therefore, in order to find out which power tool is better, you need to calculate the power of the battery installed in it. To do this, you need to multiply the voltage by the battery capacity.
For example, the power of the selected battery for the screwdriver being repaired will be 7.4 V·3.0 Ah=22.2 W. A battery with a voltage of 14.4 V and a capacity of 1.5 Ah will have a power of 21.6 W. As you can see, in the second case the voltage is twice as high and the capacitance is less. As a result, the operating time of power tools will be the same.
BMS Protection Board Selection
Despite the large specific capacity and virtually no self-discharge, Li-Ion batteries require strict adherence to a number of rules during their operation. This task is usually performed by the BMS board. When charging, it does not allow the voltage to exceed 4.2 V per battery, and when operating, the voltage does not drop below 2.55 V. It controls the maximum permissible current (protection is triggered) and ensures balancing of the charging current between battery cells.
The main parameters when choosing a BMS board are the number of batteries connected in series (indicated by 2S, 3S, 4S, 5S, and so on, where the number indicates the number of batteries) and the protection current in Amperes.
To repair the screwdriver, I needed to connect two batteries, the operating current of which was 20 A. Therefore, a BMS type 2S board with a protection current of 20 A was selected. The connection diagram for the batteries to the BMS board is shown in the photograph. Strict polarity must be observed. The electrical circuit of the screwdriver is connected to the red and black wires. Voltage is supplied to these same wires when charging batteries.
| Table for selecting a BMS board depending on the number of Li-Ion batteries | |||
| BMS board designation | Number of batteries | Voltage (min-max), V | Maximum operating current, A |
| BMS 2S 20A | 2 | 7,2-8,4 | 20 |
| BMS 3S 30A | 3 | 10,8-12,6 | 30 |
| BMS 4S 30A | 4 | 14,4-16,8 | 30 |
| BMS 5S 15A | 5 | 18,0-21,0 | 15 |
| BMS 6S 15A | 6 | 21,6-25,2 | 15 |
| BMS 10S 15A | 10 | 36,0-42,0 | 15 |
More powerful screwdrivers also include batteries with high operating and pulse current. Accordingly, the BMS board must be selected based on the maximum pulse current. Usually this is 30 A or 40 A. If you choose a BMS board with a low current, then when you turn on the screwdriver, the motor may not start, since the starting current is usually high, and the protection circuit will be triggered, cutting off the power supply to the motor.
Selecting a charger
Since the battery is discharged during operation of the screwdriver, it must be charged in a timely manner using a special charger.
A distinctive feature of the charger for Li-Ion batteries is the combination of a current generator and a maximum voltage stabilizer. The current is constant throughout the charging time, and the voltage rises to 4.2 V when charging one battery, and does not rise any further. And the current value at the end of charging drops to zero. Usually the charger has an indicator, the color of which changes from red to green when charging is complete.
Chargers for Li-Ion batteries are selected based on the number of batteries connected in series in the battery and the required charging current. The maximum allowable voltage for one Li battery is 4.2 V. Therefore, the charger must output a voltage of 4.2 V multiplied by the number of batteries in the battery.
| The magnitude of the charger voltage depending on the number of Li-Ion batteries in the battery | ||||||||
| Number of batteries, pcs. | 1 | 2 | 3 | 4 | 5 | 6 | 7 | 10 |
| Memory output voltage, V | 4,2 | 8,4 | 12,6 | 16,8 | 21,0 | 25,2 | 29,4 | 42,0 |
For ease of selection, the table shows the output voltage that the charger should produce depending on the number of elements in the battery.
The charging current can reach the capacity of a Li-Ion battery, for selected batteries it is 3 A. But a powerful charger is more expensive, therefore, I decided, since a screwdriver is used rarely and not for a long time, it would be optimal to purchase a charger for a charging current of 1 A. This The charger will charge the battery to full capacity in less than three hours.
To connect the charger to the battery pack, you need to purchase a connector of the same type as on the charger. Typically this is a socket for a 5.5x2.1 mm plug.
Charging batteries with a standard charger from a screwdriver
If you have measuring instruments and a desire to use a native charger from a screwdriver, then you can purchase a special universal board for a Li-Ion battery, which provides current stabilization and voltage limitation.
Using trimming resistors, you will need to set the current and maximum voltage according to the table above, depending on the number of batteries in the battery. The stabilizer board provides, at an input DC voltage of 12.5 to 36 V, an output voltage of 4 to 38 V at a current of up to 5 A. The charging current must be selected based on the permitted power of the battery and the power of the standard charger or existing power supply.
There are also boards with a digital indicator built into it, showing the charging current or voltage. This board is twice as expensive, but you can monitor the charging parameters. In addition, the supply voltage can be supplied not only via the terminal block, but also via the USB connector.
All of the chargers reviewed will provide high-quality charging of the Li-Ion battery of a converted screwdriver, but I preferred a special charger. The fewer parts, the more reliable the system as a whole.
Lithium battery capacity indicator
Battery charge indicators are LED and digital. Digital ones show the voltage value and are not very convenient. You have to compare the voltage value with the state of charge of the battery. LED indicators are much clearer.
LED indicators must be selected based on the number of batteries connected in series. They are designated like BMS boards - 2S (two batteries), 3S (three batteries) and so on. There are also universal indicators in which, depending on the number of batteries, a jumper is soldered on the board.
If the battery is low, only the red outline will light up and you cannot operate the screwdriver. You need to charge the battery at least until one rectangular sector glows.
When charging to full capacity, all LED sectors light up. To prevent battery discharge, the indicator is connected via a button that cuts off the voltage supply to it.
The battery charge level indicator is not a mandatory device, but it is nice and you can always check whether the screwdriver will fail in operation. I recommend installing it.
Summary table for quick selection of a set of parts according to the screwdriver supply voltage
I decided to summarize all the above information on the selection of components for repairing a screwdriver or any other battery product into a general table. Based on the supply voltage of the screwdriver, you can select the required number of batteries, the type of BMS protection board, the charger and the battery charge level indicator.
| Table for selecting the number of Li-Ion batteries, BMS board, charger and indicator | |||
| Device supply voltage, V | Col. Li battery, pcs. | BMS board | U memory and indicator |
| 3,6 | 1 | BMS-1S-20А | 4.2V-1S |
| 7,2 | 2 | BMS-2S-20А | 8.4V-2S |
| 10,8 | 3 | BMS-3S-30А | 12.6V-3S |
| 12,0 | 3 | BMS-3S-30А | 12.6V-3S |
| 14,0 | 4 | BMS-4S-30А | 16.8V-4S |
| 16,8 | 5 | BMS-5S-15A | 21.0V-5S |
| 18,0 | 5 | BMS-5S-15A | 21.0V-5S |
| 20,0 | 6 | BMS-6S-15A | 25.2V-6S |
| 24,0 | 7 | BMS-7S-15A | 29.4V-7S |
| 36,0 | 10 | BMS-10S-15A | 42.0V-10S |
As is not difficult to notice, the number with the letter S (for example, 3S) in the type of BMS board, charger and battery charge indicator indicates the number of Li-Ion batteries connected in series.
Possibility of recovery
When it comes to a failed lithium-ion battery, the only way to get your screwdriver battery working again is to replace it with a new one. This is the best possible option in this case, since batteries of this type do not have any memory effect, and the reason for their breakdown is associated only with the chemical decomposition of the filler. However, the cause of the malfunction may also be hidden in a violation of the device’s control circuit.
Therefore, to accurately determine the cause of a breakdown, two methods are used:
- Install another, working control circuit, and try to start the device. If the verification method helped, then the reason lies precisely in the breakdown of the circuit.
- Using an adjustable charger, connect the jar to a current of 4 V and 200 mA. An increase in the nominal value on it to the specified 3.6 volts indicates complete serviceability. The cause of the breakdown must be sought either in neighboring batteries or in the control circuit.
To identify a faulty element, you need to check each bank of the screwdriver battery pack Source ytimg.com
Restoring the Makita screwdriver battery
Before you restore the battery of a Makita screwdriver, you first need to disassemble its housing. It consists of 2 halves connected with glue. If you gently tap the battery case with a rubber hammer, the glue will come off. In some places there may be problems with disassembly. Additional hand tools may be needed there. Next, you should separate the halves of the case, holding the terminals with a screwdriver.
In terms of performance characteristics, the Makita drill-driver is close to a network tool. Autonomous power supply is provided by 2 replaceable Li-Ion batteries. Computer charging technology allows them to be restored in just 22 minutes. At the same time, battery life is significantly increased.
Faulty banks must be replaced with similar new models. If they are difficult to find on sale, you will have to assemble one from two batteries. Factory welding can be contact welding, but during repairs you will have to create a connection by soldering.
Repair and replacement of battery components
When carrying out the procedure, another, more effective way to restore the performance of the battery is to replace the failed elements with serviceable ones. However, for this purpose you will need to purchase new banks or take them from another working battery. In this case, it is extremely important that the dimensions, as well as the electrical characteristics and type of elements being installed, coincide with those originally installed.
The procedure is carried out by cutting out old and soldering new elements into the chain. To do this you will need the following basic set of necessary consumables and tools:
- Wire cutters.
- Soldering iron.
- Solder or tin.
- A flux that does not give rise to a subsequent oxidation reaction.
Battery repair methods
Quite often, the battery is not fully charged, and its service life is short. This may not be due to a faulty battery, but because the contact plates on the battery or charger have sagged or oxidized.
How to revive a screwdriver battery: first, check the condition of the contact springs on the battery and on the charger
In this case, it is easy to restore the screwdriver battery. First of all, we check the condition of the plates. We clean them from plaque, dirt, oxides, and rub them until they shine. If the plates are bent, we return them to their former shape. We carry out similar manipulations with the contact plates on the charger (be sure to unplug it from the network). Then we check whether it helped or not. No, let's move on.
Video description
Video about repairing a failed screwdriver battery:
- The series connection of the batteries must be such that “+” is in contact with “-”. Otherwise it simply won't work.
If you change only some of the batteries in the screwdriver battery, a potential difference will arise between those already used and those not yet used. It can be eliminated through the alignment procedure. To do this, the following series of actions are taken:
- The assembled battery is placed on a full charge - 8-10 hours.
- The battery is left alone for a period of 24 hours.
- Next, the voltage on the banks is measured. It should be approximately the same everywhere.
- After this, the battery is charged and the device turns on at full power. In this case, the load factor on the screwdriver itself is taken into account so that it does not deteriorate.
- Then the “charging-discharging” cycle is repeated 2 more times.
Recommendation! To extend the battery life, it is necessary to erase the memory effect once every 3 months, using several consecutive charge-discharge cycles.
How to determine if repair is possible
If the screwdriver does not work due to the battery, you need to find out whether it can be repaired. First, the body, consisting of two halves, is disassembled. These parts, depending on the model, can be connected with adhesive or screws . In the second case, it is easy to unscrew them. The glued halves are separated by carefully inserting a sharp knife into the joint and screwing a self-tapping screw into it. With care, so as not to damage the parts, the knife is drawn along the joint and the parts of the body will separate.
Among the cans inside, you need to find the faulty one. To do this, take them out and lay them out on the table. This way you can freely approach the necessary contacts. Using a tester, the voltage of each element is measured. Experts advise recording the received data on paper or on a case. After measuring, the cans are again installed in the housing. The screwdriver is turned on and started to work until the power is lost. Then the tool is again disassembled, the voltages are measured and recorded. Cells in which these values after full charging are very low will show a significant drop. A difference of 0.5-0.7 V is considered very significant . In the near future, these elements will become completely weak and stop working. Therefore they need to be restored or replaced.
If you have a 12-volt tool, it’s easier to find faults; you don’t need to disassemble and reassemble twice. First, the voltage of fully charged cells is measured and the values are recorded. A 12 V light bulb is connected to the jars laid out on the table as a load, which will discharge the battery. Then they measure the voltage again. The area where its performance is lowest is faulty.
Sometimes, due to overheating, distilled water evaporates ; it is topped up using a syringe. In advance, a 1 mm hole is made with a drill in the upper or lower part of the non-working element. Fill the battery completely and leave it for a day. Charge after the parts are assembled into a bundle of 3-4 pieces. And do not touch for 7 days.
In some cases, the battery can be restored
Briefly about the main thing
Most modern models of screwdrivers are equipped with 3 types of batteries:
- Nickel-cadmium.
- Lithium-ion.
- Metal hydride.
Each of them has individual pros, cons and application features. All of them are a chain of cans connected in series. The failure of one of them leads to the inoperability of the entire battery. To identify the weak link, you need to perform a charge-discharge cycle and measure the voltage of each element.
The most common nickel-cadmium batteries are reconditioned by flashing and compression-compaction of the electrolyte. Lithium-ion ones can only be changed. In this case, replacing the batteries in the screwdriver battery is carried out by cutting out the old ones and soldering new ones into a common chain, followed by equalizing the potential through a series of “charging-discharging” cycles.
How to replace power supplies?
The most effective way to repair a battery is to replace a broken battery. You can purchase a new battery at any electrical store or remove it from another device.
Replacing a damaged can: step-by-step instructions
Step one: it is necessary to disconnect the faulty segment from the general chain. Since they are fixed together with a metal plate, it is better to use metal cutters for such purposes. In this case, it is necessary to leave a tape of the optimal length on each side in order to connect it with a soldering iron without any problems.
The plates on the non-working segment must be cut off near the base
Step two: now, at the optimal distance from other elements, you need to attach the new can to the chain. For such purposes you will need a soldering iron. Just keep in mind that the “minus” is connected next to the “plus” and so on throughout the chain. If the plate is not enough to connect the segments, then it is replaced with copper wire.
You must use a soldering iron to connect the battery parts.
Step three: Now all that remains is to assemble all the parts of the battery according to the same principle as they were located earlier.
Upon completion of the repair, the battery is again placed in the plastic battery box and closed with a lid.
You should be careful when working with a soldering iron, because the cans must not be overheated.
In exactly the same way, you can repair a lithium-ion battery. In this case, the process is complicated only by the presence of an additional board, which is disconnected before starting the process. Here it is no longer possible to restore faulty banks, so they are replaced.
How to disassemble a screwdriver battery
In general, the batteries of many power tools are built the same way. The voltage and charging currents are different, but the device itself is similar. Battery banks are packed in a detachable plastic case. The body is held together with several screws, with additional fixation using plastic latches.
After unscrewing the screws (special forms of screwdrivers may be required), the battery does not immediately fall apart. It is held in place by the latches. We carefully examine it, determining their location. We found the latches, lightly pressed the plastic in that place, and pulled the second part towards ourselves. No extra effort, the latches are plastic and fragile.
How to restore a screwdriver battery: what’s in the case
Some screwdriver bodies are of the “one-piece” type; they are connected with silicone or glued. We carefully remove it, and then repeat the manipulations of disconnecting the housing. The refurbished battery can be glued back together or electrical tape can be used.
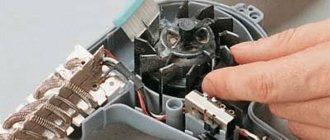
Basic analysis of a screwdriver
We will consider cordless tools because they are more versatile, and therefore in demand. Most likely, in front of you lies a tool shaped like a pistol. The plastic case always has holes for cooling the electric motor. If we make a cut, then we will see:
- gearbox;
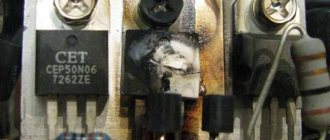
- speed controller;
- transistor designed to regulate speed;
- reverse;
- electric motor
Perhaps the most famous screwdrivers are Makita models, so we will look at how to disassemble a screwdriver using the example of this company:
- The first step is to remove the housing with the battery.
- The next step is to unscrew the screws that hold the two parts of the case together.
- We take out all the elements that were found in the tool body.
- We disconnect the gearbox and the electric motor.
- We remove the speed switch.
- Remove the reverse button.
Restoration with distilled water - fact or fiction?
Many craftsmen who are capable of restoring power tools claim that dried-out power sources cannot be “reincarnated.” Others say that it is possible, all you need is distilled water, a tool and 30-40 minutes of free time.
Sequence of distilled water:
- Using a thin bit and drill, make a small hole in the top of the battery can. If you drill into the middle of the element or the bottom, you can damage the power source. It will be impossible to restore it later.
- Using a syringe, fill the battery with distilled water to the maximum.
- Leave the battery in a clean and warm place for 1-2 days, do not cover the hole.
- Connect the cells filled with distilled water into one battery.
- Place the battery on charge until capacity is fully restored. After charging, check the voltage on each jar and, if necessary, add distilled water.
- After checking, close the holes with a glue gun. It is strictly forbidden to solder the holes - this can damage the battery cell.
- Place the battery back into the case, close the lid and recharge.
The home method with electrolyte works, but not always. Sometimes the internal structure of the battery is so damaged that even distilled water does not give a positive result.
Simple restoration: replacement of several elements
If operations with distilled water and “reflashing” nickel-cadmium batteries require time and skill, then to replace used elements you only need a multimeter, a soldering iron and new battery banks.
Before replacing, it is necessary to diagnose the battery and how to do this is correctly described above. The battery consists of individual elements that need to be desoldered. Low-power soldering irons are used for soldering, otherwise the high temperature can damage the power supplies. Low voltage items should be set aside or labeled.
Advice! If possible, it is better to use a soldering station with power adjustment or spot welding.
After identifying faulty power supplies, they simply need to be replaced with new ones, which are re-soldered into a common battery. The cost of individual cans is much lower than the entire assembly, so the savings will be obvious. After all the elements are assembled into the battery, it is necessary to carry out several charge/discharge cycles of the battery.
Screwdriver battery discharge current
It is also necessary to monitor such a parameter as the current strength that the battery can deliver. This parameter is called discharge speed or discharge current. Sometimes (with good parameters) it is indicated in amperes, sometimes it is indicated by the letter “C” with a number behind it. To convert the marking into ampere/hours, we multiply the figure by the amperage of the battery and get the maximum discharge current of the battery.
For example, for 1500 mAh batteries with C 3, the maximum discharge current is 3 * 1.5 A = 4.5 A, for batteries with C 12 there will be 1.5 A * 12 = 18 A. If the battery capacity is 3200 mAh, then you need to multiply by 3.2 A, that is, with the same C 3 and C12 we have 9.6 A and 38.4 A, respectively. The principle of calculation is clear.
An example of a description of batteries from one of the sites
What is the effect of battery discharge current? How much power your tool can develop. If the maximum current consumption of a screwdriver is, for example, 15 A, and the battery can supply only 5 A, then your tool simply will not be able to achieve the declared power. So choose battery banks with a discharge current no less than the maximum current consumption of your screwdriver.
Number of charge/discharge cycles
Another minor parameter that is worth paying attention to is the number of charges and discharges. It is indicated in cycles
Displays the “life” of the battery and indicates how many times the can can be charged/discharged without changing its properties.
Lithium-ion is more compact
It’s clear that the more cycles, the better. But the more cycles, the more expensive. In general, once again we will have to look for a compromise.
With or without plates
If you have already disassembled your battery, then you have seen that the banks are connected to each other by contact plates. When disassembling the battery, do not bite the plates, but try to keep them intact. They can be cleaned and reused.
Sometimes you can find batteries with the plates already soldered. Then you don’t have to worry about careful disassembly. Everything would be fine, but if this is AliExpress, then the quality of the plates themselves and their soldering is rarely normal. Often batteries do not hold a charge or are poorly charged precisely because of the poor quality of the plates and the batteries themselves.
You can solder the plates yourself
You can try to solder the plates yourself. But keep in mind that if the jars overheat, they will fail. You need to solder quickly, using a powerful 100 watt soldering iron and good solder and flux. First clean the contact pad and the soldering area on the plate, treat it with flux, then quickly solder it.