It happens that while ironing clothes, after the plug is inserted into the socket, the iron does not heat up. Because of this breakdown, there is no need to throw away the device and buy a new one, since most often the causes of the breakdown are very simple and standard, and their solution will not require special repair skills. In most cases, you can repair a device yourself that cannot heat up at home.
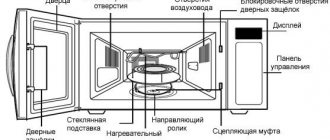
The main components of the iron and the tasks they perform
Main components
- An electrical wire that connects to a terminal block.
- Thermostat, which is responsible for regulating the temperature.
- A heating element.
- The sole is perforated with holes for steam to escape.
- Water supply system, which includes a boiler, supply keys, tubes, nozzle, etc.
Operating principle of the device
- A hidden heating element heats up the metal sole of the iron when the device is plugged in.
- The degree of heating is regulated using a bimetallic plate. As the temperature rises, it deforms and opens the contacts. The heating intensity is determined by the thermostat.
- When you press the supply button, the water poured into the boiler is transferred in drops to the sole, there it comes into contact with the heated surface and forms steam.
Some models from well-known manufacturers are equipped with an automatic shutdown board, an intelligent control system, an anti-scale cartridge built into the boiler and other components.
Thermostat
Useful tips on how to wash your Columbia Omni-Hit jacket in the machine and by hand
The soleplate temperature regulator is the most important component of the iron and one of the most susceptible to breakdowns; It is a mechanical trigger device driven by a bimetallic plate. There are no “magnets, like in a refrigerator regulator,” in the iron’s thermostat. Like the refrigerator thermostat, there is also a mechanical trigger, only of a different design. The principle of its operation is simple:
- The part with the movable contact is pressed against the fixed one by a reversible spring. The contacts are closed, the heating element is heating up. The degree of compression of the spring is regulated by the temperature setting knob.
- On the other hand, the movable contact is connected by a dielectric pusher rod to a bimetallic plate.
- The bimetallic plate, bending from heat, presses through the rod onto the movable contact until it overpowers the spring.
- The spring is thrown over and opens the contacts.
- The heating element turns off, the sole of the iron with the bimetallic plate cools down.
- The bimetallic strip is straightened. When its pressure weakens sufficiently, the spring is thrown back and returns the regulator to its original state.
The heating element heats up again, the cycle repeats. In old irons and some new ones, the thermostat is assembled according to the scheme with a free rocker arm (item 1 in the figure):
Diagrams of iron thermostats
Its disadvantages are 2 pairs of contacts susceptible to burning and large hysteresis, i.e. difference between the response and return temperatures of the regulator. Therefore, in regulators with a free rocker there is always an adjustment screw under the handle, which is turned if the iron heats too much (tighten it by 1-2 turns) or weakly (unscrew it the same amount). To access the calibration screw, you need to remove the temperature control knob. It sits on the axis by friction, but is held in the body by claws with stops, see fig. on right. To remove the handle, you need to turn it all the way to the minimum (at the first point) and pull it up.
Iron temperature control knob
Most modern irons are equipped with a unified double-spring thermostat, pos. 2: it works very clearly and almost never requires adjustment during operation. Its weaknesses, firstly, are the same as in the previous one. case, contacts, see below. Secondly, there is a ceramic rod (indicated in blue), which sometimes cracks. The rod length is 8 mm, and a new one can be made from an MLT-0.5 W resistor, pos. 2a. The resistor leads are bitten to a length of 1.5-2 mm, the paint is washed off with dichloroethane or a surfactant remover, and the conductive layer is cleaned off with sandpaper. If the resistance of the resistor is more than 620-680 kOhm, some people install it instead of the rod as is, the paint burns without smoke or stink. However, then the sole of the iron may unpleasantly “pinch” with electricity. And what is much worse, the resistance of a resistor with an unprotected conductive layer can decrease several times, and the leakage current through it can increase to a dangerous value.
How to clean contacts
There is no need to clean the burnt contacts of the iron temperature regulator with sandpaper, as many sources advise: they operate under high current and after cleaning with sandpaper they quickly burn again. In the regulators of modern irons, the contacts are thin-walled stamped, and in this case they burn through to holes. To clean the contacts, you need to wrap a nail file along the suede moistened with alcohol, insert it between the contacts and rub until the suede stops getting very dirty with carbon deposits. An alternative is to cut a thin wedge out of an ink eraser and use it to clean the contacts. Then - with the same wedge made from a pencil eraser. Finally, wrap the nail file in a rag moistened with alcohol instead of suede and use it to remove any adhering particles of the eraser from the contacts.
Determining the cause of the breakdown
Despite the differences in the designs of budget and expensive multifunctional models, all the main malfunctions of irons can be combined into three groups:
- The iron does not turn on (no indication).
- It turned on, but stopped heating.
- No steam is supplied and water does not splash.
In some models, the automatic shutdown system may break down (the control board has burned out). It is hidden in the handle of the device and can only be replaced at a service center.
Let's take a closer look at the main causes of iron failure and methods for eliminating them.
What is an iron?
What is it? Even if we start looking at old models, we can highlight the following components:
- Housing with built-in regulator.
- Base (sole).
- Spiral element.
- Electrical diagrams and connections.
The classic device has two removable parts - the base and the back wall.
Where might problems arise? The main faults are related to the device cable. To determine this problem you need to use a multimeter.
- Container for liquid.
- A sprayer for this very liquid.
The reservoir may be located in different places in different models. The second component is located on the “nose” of the iron. The operating principle of the device is as follows:
- The sole reaches a certain temperature.
- Water is supplied automatically.
- Water turns into steam and is thrown in by pressing a special key.
The iron does not turn on
If the iron does not turn on and does not heat up, the likely cause of the malfunction is wear on the cord and failure of the fuse.
Cord wear
Sometimes the defect can be seen visually - the cable winding is worn out, twisted, the wires are visible through the weaving, and their insulation is damaged.
To eliminate or eliminate this malfunction, you should:
- Get to the contacts by unscrewing the mounting bolts and removing the back panel.
- Trim the damaged area (if the defect is visible visually and the length of the cord allows). After cleaning the contacts, you need to reconnect the rest of the cable and check whether the sole starts to heat up.
- If there is no external damage, you should test the cord with a multimeter, and if there is no resistance, replace it with a new one.
If the cable is in good condition, you need to remove the housing to get to the base and key components of the device.
Thermal fuse has blown
If the cord is in order, the cause of the malfunction may be a failed thermal fuse. This element is built into the circuit and serves to protect the device. If the surface temperature of the heating element exceeds the permissible value, the fuse burns out. The element is located next to the thermostat, often hidden by a layer of insulation.
To check the functionality of the thermal fuse, you need to measure its resistance. If the value shown by the ohmmeter is zero, the element is faulty.
Common iron breakdowns
Preliminary inspection of the iron significantly reduces the scope of troubleshooting. It is necessary to inspect the housing and make sure there are no cracks or defects.
The most common is the lack of contact in the power cord. This usually happens due to frequent kinks and poor quality materials used in production.
The next most common problem is a breakdown of the temperature controller. At the same time, the warning light lights up.
The overheating fuse is the next element in line in terms of failure frequency. It forcibly opens the electrical circuit. Its failure is quite easy to determine; when the iron reaches a certain maximum, it continues to heat up to the physical limit.
The heating element completes the list of breakdowns. If the iron is in working condition and all indicators are normal, then this is the reason.
Worn out power cord
Abrasion of the winding, damage to the insulation and twisting of the cable can lead to malfunction of the iron. If damage is detected, you must disconnect the cord from the contacts. The damaged area is repaired or cut off. After this, it is connected back to the device.
If the damage is not visually visible, then the cable is checked with a multimeter. If there is no resistance, replace it.
Thermal fuse has blown
If the cord is working properly, but the iron still does not turn on, the problem may lie in the thermal fuse. It is included in the circuit and provides protection for the household appliance.
If the temperature is high, the fuse will blow. It is located near the thermostat. If, as a result of the test, the multimeter shows zero resistance, then the element should be replaced.
Malfunction of the heating element (heater)
If the heating indicator is on, but the iron does not heat, then the cause of the malfunction may be a burnt-out heating element. To confirm this, you need to test the element with a multimeter.
Important! Often, heating elements are tightly mounted into the sole and cannot be replaced. Therefore, if it malfunctions, you will have to buy a new device.
Thermostat malfunction
If the thermostat malfunctions, the light comes on, but the iron remains cold. To check it, the device is completely disassembled. After removing the housing, contacts and connections are checked for oxidation and breakage. Visible damage is removed with fine-grained sandpaper. The thermostat is checked for resistance. In this case, you will need to connect the device to the network. Therefore, all work is carried out very carefully.
Damage to the steam system
Clogging and damage to the anti-drip system leads to incorrect operation of the iron. Often the reason for this is the use of hard water, after which scale forms in the nozzles and tubes. It prevents the passage of steam and leads to the formation of leaks.
Steaming system
Important! To clean the steaming system, use a needle, citric acid, a special pencil and chemicals.
The iron turns on but does not heat
If the iron turns on (the indicator is on), but does not heat up, it means that current is supplied to the device. The cause of the breakdown may be a burnt heating element or thermostat. To determine the malfunction, you need to examine both elements.
Checking the serviceability of the heating element
As a rule, heating indicators are connected to the terminals of the heating element. Therefore, if the light continues to burn and the sole remains cold, the cause of the malfunction may be a burnt-out heating element. The element is usually tightly mounted into the sole and cannot be replaced.
To check the heater, you need to check its contacts with a multimeter. If there is no resistance, we can conclude that the part is faulty.
Checking the serviceability of the thermostat
If the iron does not heat up and the light is on, the problem may lie in a faulty thermostat. To get to this unit, the device must be completely disassembled.
After removing the housing, it is necessary to visually assess the condition of the contacts and connections for breaks and oxidation. If external damage is visible, it is necessary to clean it with fine-grained sandpaper. If not, determine the performance of the part by measuring the resistance, or checking the voltage with a screwdriver with an indicator, sequentially pressing it against the contacts. Since the iron must be plugged in to test with a screwdriver, extreme care must be taken when taking measurements.
As a rule, in models from well-known manufacturers, the thermal fuse is built into the gap in the contacts of the heating element on one side, and the thermostat is built into the gap on the other. For example, if your Philips iron does not turn on, one of the listed items may be faulty. In this case, there will be no resistance between the contacts of the heating element. Accordingly, to detect the true cause of the malfunction, it is necessary to ring each section, starting with the fuse (the likelihood of detecting a burnt-out thermostat with a working protective element is extremely low).
The iron stopped working: what to do?
To begin, we advise you to carefully inspect the power cable of your household appliance for burnt or darkened areas.
Similarly, you need to examine the condition of the iron plug, which may melt at the point of contact with the socket, clearly indicating the cause of the malfunction.
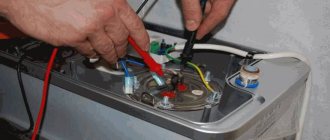
If the iron cord is clean, intact and even, and the plug does not have noticeable melted marks, the device will have to be disassembled to find the fault.
Disassembling the iron
After removing the thermostat knob, it is important to find all the mounting bolts that may be recessed in the plastic housing or hidden by design elements. Often such bolts are placed behind the back transparent cover of the iron, which is secured with latches.
If this is the case, then the latches need to be unfastened using a thin screwdriver, being careful not to damage the case or break the fasteners. It is difficult to provide specific instructions here due to the variety of iron models.
Having spent some time searching for bolts, we are sure that the reader himself will be able to get to the bottom of the insides of household appliances.
Note: in order not to forget how all the structural elements were attached, you can photograph the disassembly process with a camera or mobile phone.
We inspect the condition of parts and contacts
A simple visual inspection can reveal burnt, loose or broken parts of the product, which will clearly indicate the cause of the malfunction. It often happens that under the influence of high temperatures, contacts simply jump out of the fasteners and become unsoldered, disrupting the normal operation of the iron.
Checking the disposable fuse
If your iron model has a fuse (most likely there should be one), you will have to check it using a tester (multimeter).
If the fuse fails, you can simply remove it from the series circuit by short-circuiting the contacts using a piece of wire (this is not very correct and safe, but it will allow you to eliminate the malfunction for a while, just enough to iron your laundry or clothes once).
Checking the power cable
In order to get to the internal contacts of the power cable, we have to clean the contact block, ensuring access to the tester probes. Having placed one multimeter probe on the internal contact of the cable, we touch the contacts of the iron plug with the other probe, checking the circuit resistance.
Some testers have a special function for these tasks that sounds a sound signal when the circuit is closed. To put it simply, if the resistance is set on the tester, then if there is a contact, the numbers on the device’s display will begin to change.
It is important to ring both wires of the power cable!
If the circuit does not close along one of the wires, there is no contact, then the cause of the malfunction lies precisely in it. By visually inspecting the cord for kinks, you can identify and cut off the section where the contact is lost. In most cases, the wire breaks along the segment: from the entrance to the iron to the short circuit at the terminal block! If it is impossible to cut and shorten the power cable, it is better to replace it with a new one.
Checking the temperature regulator
Try turning the temperature control knob in both directions as far as possible. When the regulator operates, a characteristic click should be heard (if the iron is broken, there may not be a click).
This circuit element can also be examined by a tester if it is in the closed position. It often happens that the regulator contacts do not work due to plaque, tissue wetting or oxidation.
In this case, you need to clean the contacts with fine sandpaper, a fine file, a nail or a kitchen knife (in extreme cases, you can also clean the contacts this way).
Checking the contacts of the heating element
If you got to this point and couldn’t fix the problem (the iron doesn’t work and that’s it), bad news awaits you. The breakdown most likely lies in the heating element of the iron, which is pressed into the base.
It will be impossible to replace the heating element, and the only thing that can be done is to ring the contacts of the heating element going outside. If the circuit opens because the contacts of the heating element have simply oxidized over time, consider yourself very lucky.
After cleaning the contacts, the chain will be restored and the iron will work. If the breakdown lies in the internal heating element, you will still have to go to the store for a new iron.
Note: usually inspecting and repairing an iron is not difficult, even for those who are doing it for the first time. There are no special details in the circuit of the simplest iron. There will almost certainly be present:
- power cable
- block with contacts
- fuse
- Temperature regulator
- heating element.
If your home iron is a miracle of modern technology, with many additional functions and options, it is better not to undertake independent repairs, entrusting this task to the guys from the service center.
And this is especially true if the iron is still under warranty or if it costs a lot of money. In this case, it is not recommended to open the product case at all.
Be careful and pay attention to detail!
If service repair of an iron will cost much more than buying a new one, then read the article on how to choose a new iron, and try to find this time a really reliable and high-quality model that could serve you for more than one year. Well, this is an extreme case when it is impossible to repair an old iron or its repair is very expensive.
No steam is produced, no water splashes
If the iron has been in use for a long time, the owner may encounter a situation where the iron stops steaming. At the same time, it turns on regularly and maintains the temperature in accordance with the selected mode.
There can be two possible causes of malfunctions:
- blockage;
- failure of the anti-drip system.
If hard water is poured into the iron, after several months of operation, deposits in the tubes, nozzles, and holes in the soleplate can accumulate in such quantities that they block the steam output.
To remove the blockage, you need to descale the iron according to the instructions. A clogged nozzle can be cleaned mechanically using a sharp needle. If necessary, you can use the following descaling products:
- Citric acid, soda or vinegar poured into the tank in certain proportions.
- Chemicals: MAGIC POWER, Topperr, Top House, etc.
What's wrong with anyone
Tefal
The Tefal iron repair is unique. First, its body is removed along with the top cover. Second, the nose screw is hidden under the water dispenser cover (left and center in the picture); it is visible through translucent plastic. Third, to get to the pumps, you need to remove the top cover with the housing removed. Its screw is hidden under the buttons (on the right in the figure), and it must be unscrewed so that the cover can be removed.
Fastening the lid of the Tefal iron
Finally, Tefal is a leader in the production of cordless irons. They come in several types: with contacts on the platform, with a heat-accumulating sole, with a discardable (shooting) cord. The first two are unsuitable for amateur repairs, but the last one, which seems to be faulty, may turn out to be quite functional.
The cord from the iron is thrown away by a pusher operating from a separate trigger mechanism with its own bimetallic plate. That is, if you, for example, ironed the cuffs and want to heat up the iron further by inserting the cord, but it doesn’t work, then the iron has not cooled down enough. You need to let it cool further, insert the cord, turn the dial to higher heat and wait until the cord bounces off. It’s inconvenient, of course, which is why irons with a detachable cord are not in great demand.
Phillips
A special feature of Philips irons is their double body. For example, the popular Azur is first dealt with in the usual sequence, poses. And in the figure, but the back cover is secured with 2 screws from the bottom. Under the decorative casing with pumps there is an internal one with protection (pos. B), and already under it there is a massive sole (in fact, the third casing) with a thermostat and thermal pad, pos. IN.
Disassembling the Philips Azur iron
Bosch
Fastening the back cover of the Bosch iron
The design of Bosch irons can be considered typical, and disassembling Bosch irons is even easier than others: the back cover is on one screw and without tricky fasteners. To remove it, you need to unscrew the screw and pull back the input hose of the power cord (see the figure on the right), the cover will fold back together with the hinge, after which further disassembly has no special features.
Brown
Rusted iron steam generator
The congenital defect of inexpensive Brown irons is the thin-walled steam generator tank made of galvanized steel and the fastening of the thermostat casing with foldable legs made of the same. Both rust perfectly, see fig. on the right, after which repairing the iron loses its meaning.
How to make steam
Improper descaling of the iron
The same congenital defect of all steam irons without exception is scale. It is difficult to remove it from the non-removable tank of the steam generator, and in no case should you boil the iron in a frying pan with vinegar to do this, as in Fig. Acetic acid fumes will make the plastic brittle, corrode the nickel on the sole to the point of roughness, and if it is coated with Teflon, it will begin to peel off. Firstly, the iron must be disassembled down to the sole for cleaning, see for example. video on how to clean Philips 3240:
Video: example of disassembling and cleaning a Philips 3240 iron
Secondly, as already mentioned, it is better to use a solution of citric acid rather than vinegar. Thirdly, before cleaning, the heating element contacts together with ceramic bushings must be tightly wrapped with good soft electrical tape in 3-4 layers or, better, with heat-shrinkable tape. Fourthly, if the nozzles are clogged with scale, also pierce them with a toothpick before cleaning. And fifthly, after cleaning, thoroughly rinse the hydraulic system of the sole with clean water from top to bottom, pouring it into the steam generator tank. Then you can rest assured: the iron will serve as well after cleaning as before.
***
2012-2020 Question-Remont.ru
Display all materials with the tag:
Go to section:
Repair Tips
An equipment owner who decides to repair an iron at home may find the following tips useful:
- The case elements of modern models (Philips, Bork, Tefal, etc.) are held together not only by screws, but also by plastic latches. Therefore, you should disassemble the device very carefully so as not to damage the mount.
- When checking the temperature regulator, you need to make sure that it is turned on by turning the pin left and right. When turned off, it will erroneously show no resistance.
- If there is no replacement fuse, the burnt element can be removed from the circuit. The iron will still work, however, the next time it overheats, the heating element or thermostat will fail.
- To assemble the device in the required sequence (attaching the cover, body, handle, etc.), the key stages of the work should be photographed.
Compared to other household appliances, the iron has a fairly simple design. It can be repaired by a person with minimal skills in working with electrical equipment.
If the iron stops heating, you can buy a new one, but often the damage is not very serious and can be repaired yourself. If you know how to use a screwdriver and a multimeter, you can do it. We will talk about how to repair an iron with your own hands in this article.
The fuse and other faults are to blame
To fix your iron, you can refer to statistics that say that 50-60% of malfunctions occur due to the fact that the thermal fuse fails. This unit can be disposable or reusable. The fuses of the first group, like a kamikaze, operate only once. The unit is designed so that when the heating element reaches a temperature of 240 C, the circuit breaks. Further operation of the device without additional intervention becomes impossible.
More modern technologies involve the use of bimetallic parts. Such a thermal fuse is capable of turning off the iron in extreme situations, and then turning it on again. If the iron does not work for this reason, the easiest way is to throw away the unit and short-circuit the circuit. This can be done in different ways:
- using soldering;
- by crimping a metal rod;
- switching power wires.
In each case, it is necessary to achieve reliable contact.
Another common problem is a problem with the steam system. Sometimes in a Bosch iron the button that turns on the process is pressed hard, and no steam is supplied. Repairing a Bosch iron should begin by unscrewing the screw at the back and removing the back cover. Then you should carefully pull the two buttons that regulate the steam supply up. They are not secured with screws and are held on the bushings by friction. Next you need to unscrew the screw, after which the plastic handle should come off easily. Under the cover there are two pumps: one supplies water to the sprinkler, the other delivers water to the sole to create steam. The steam pump needs to be removed. There is a ball at the bottom, which sticks to the bottom of the chamber due to scale. To fix the problem, you need to push the ball into the chamber and reassemble the iron in the reverse order.
Whatever iron you have to repair, you need to remember safety and follow certain rules: turn on the device only when necessary; do not try to fix the problem with wet hands; During repairs, the iron must be placed on a stable, non-current and heat-resistant coating.
General device
Since irons are produced by many different companies, they differ slightly - in shape, heating speed, quality of spare parts, etc. But the general structure remains the same. Available:
- Sole with a heating element built into it. If there is a steamer function, there are a number of holes in the sole for steam to escape.
- Thermostat with a handle that allows you to set the required heating temperature for the sole.
- Container/reservoir for water used for steaming.
- There is a nozzle for spraying water and forcing steam out. There is also a steam intensity regulator. With its help, the frequency of automatic supply of evaporated water is set.
- The iron is connected to the network using an electrical cord, which is attached to a contact block located in the back under the plastic cover.
General structure of an electric iron
Once you have become familiar with what is where, you can begin repairing the iron yourself.
Case disassembly
Next, we will tell you how to disassemble the Philips Azur Ionic iron for repair or cleaning. Other models from the Dutch manufacturer that have been produced in recent years, for example, the Philips Azur Performer Plus, are disassembled in a similar way. To do this, it is enough to have a slotted and Phillips screwdriver on hand.
| Illustration | Procedure |
| Carefully remove the cover located at the back of the iron. It can be easily pryed off with a screwdriver. The red circle indicates the location of the mounting screw under the rubber plug, which is also easily removed | |
| Unscrew the mounting screw and remove the plastic cover | |
| Unscrew the two screws that secure the sole (see photo). You also need to unscrew the fasteners and remove the terminals holding the power cord | |
| Using a screwdriver, carefully pry up the plastic insert of the handle, moving it along the body on both sides until all latches are disconnected | |
| Remove the insert and unscrew the screw that secures the iron control board. Tilt it back and to the side | |
| This board will have to be replaced or repaired if the auto-shut-off function of the iron does not work | |
| To remove the top housing, remove the mounting screw located near the filler hole. | |
| Pull the upper up and back to reveal the plastic-lined sole | |
| Don't forget to take a photo of the location of the wires on the terminals so as not to confuse them when reassembling | |
| In order to get to the platform with the steam-generating compartment, you will have to unscrew three more mounting screws. Two near the connector and one in the nose | |
| Now you can clean the sole from lint, dirt and dust. Remove scale from inside the steam generator by pouring a solution of acetic or citric acid into it. Place the bottom of the platform in the same solution. When the chemical reaction stops, rinse the part thoroughly with running water and dry with a hairdryer. Reassembling the electric iron is done in the reverse order. |
So, if you are faced with the fact that the iron has stopped working, do not worry. In most cases, you can quickly disassemble and repair it yourself. For disassembly, diagnostics and repair, you just need to have a minimum set of tools and a multimeter.
What will you need for work?
To work, you will need a set of screwdrivers - Phillips and flathead. You will need a wide knife or an unnecessary plastic card to pry off parts of the iron with latches. To check the integrity of the parts you will need a multimeter (read how to use it here). You may also need a soldering iron if you need to change any spare parts.
Tools that may be needed when repairing an iron
That's all from tools, but in the process of work sometimes you need electrical tape or heat-shrinkable tubes, you may need sandpaper and pliers.
How to return a purchased iron to a store – Returning goods
How to return an iron to the store without problems? And what if the store doesn’t accept it? Now we will tell you about this problem, and you will see that it can be solved.
Let's consider two cases that differ in the order of registration, rules and actions.
- The iron is completely working, in good working order, but it does not suit you;
- The iron is faulty - there is a defect on the body, a manufacturing defect, a hidden breakdown that is not noticeable at first glance.
Let's consider the client's actions in each of these cases and advise how exactly to react if any objections arise from the administration of the outlet. We will describe each option separately.
How to disassemble an iron
The first difficulty faced by those who want to repair the iron themselves is disassembly. This is far from simple and obvious. The easiest way is to remove the back panel. There are several screws that are visible and are not difficult to unscrew. In addition to screws, there may be latches. So, having unscrewed all the visible fasteners, we pry up the cover with the tip of a screwdriver or an old plastic card, and separate the cover from the body.
Underneath there is a terminal block to which the cord is attached. If there are problems with the cord, you can no longer disassemble the iron. But if everything is fine with the cord, you will have to disassemble it further, and this may cause problems.
Some irons - Philips, Tefal - still have bolts under the cover. We also unscrew them. In general, if we see fasteners, we remove them.
Removing the back cover is the first thing to do when disassembling the iron.
Each manufacturer develops its own design, and it often changes from model to model. That is why difficulties arise. But there are several points that are found in almost any manufacturer.
You immediately need to remove the temperature control dial and the steam button, to do this you need to hold them in your fingers and pull them up. The buttons may have latches, so you may need something thin so that you can press them out a little - you can pry them off with a screwdriver.
To disassemble the iron you need to remove the buttons
Some irons, such as the Rowenta, as in the photo, have bolts on the handle (some Scarlet models have them). If there are any, unscrew them. There is also a screw hidden under the removed buttons; we unscrew that too. Then remove the top plastic parts. They are usually secured with snap locks. To make it easier to remove them, you can insert a knife blade or a piece of plastic (plastic card) into the lock.
There are usually a number of bolts under the covers. Having unscrewed them, we continue disassembling until the body and sole are separated. Unfortunately, it is impossible to give more precise recommendations - there are too many different designs. What can be advised is to act slowly and carefully. And several videos on how to disassemble irons of different brands.
Disassembly work
Despite the small dimensions of the device, disassembling it is not as easy as it might seem at first glance. The fact is that the fasteners are located under the decorative trim in hard-to-reach places.
The fastening latches are made of plastic, and in order not to break them, you should disassemble the iron with the utmost care and calm.
How to properly disassemble a Philips iron? Let's look at the procedure for performing the work using a Brown device as an example. The fact is that the designs of these two irons are the same, therefore their disassembly is carried out according to the same scheme. Before you begin disassembly, you need to prepare a tool, namely a Phillips and flathead screwdriver. Disassembly work is carried out in the following order:
- Using a screwdriver, unscrew the two bolts securing the back cover.
- The central pad running from the rear wall to the regulator is removed. It is pryed off with a flat screwdriver and can be easily removed.
- The temperature control knob is removed. When removing the handle, you should be careful, as there is a spring there (for the ratchet), it is important not to lose it.
- Next, the control unit is removed along with the heating element connector.
- The indicator is removed along with the power cord. The indicator body is attached with two latches to the iron body. To remove it, you will need a long screwdriver, with which you bend the latches one by one and remove the indicator.
- Next, the entire electrical part is removed; just pull it back with a little effort.
- The water spray plug is removed, behind which there is a fastening screw. It is unscrewed using a Phillips screwdriver.
- At the back, the two case fastening latches are detached and the sole is removed.
- After completing the troubleshooting work, reassembly is carried out in the reverse order.
This simple method is used to disassemble the iron. The main thing is to have a little time and patience. By the way, this disassembly procedure is also suitable for Bosch irons.
Only by completely disassembling the device will you be able to eliminate the problem that has arisen.
It is also necessary to consider how to disassemble a Scarlet iron. The disassembly principle in this case is slightly different from previous models. The sequence of actions is as follows:
- Using a knife or scissors, remove the protective cap at the back of the device, behind which there is a fastening screw.
- The screw head has a specific shape that cannot be unscrewed with a Phillips or flathead screwdriver. If you don't have a special tool, you can use scissors. It is recommended to replace the screw with a new one with a head shaped like a screwdriver.
- Next, remove the cover covering the hole for filling the water, and use a Phillips screwdriver to unscrew the bolt.
- The upper part of the handle and the back cover are removed, behind which the power cord connection contacts are hidden. After this, the remaining screws are unscrewed.
- The thermostat handle is removed using a knife blade and a little physical effort.
- Next, the facing part of the iron is removed.
- Using a Phillips screwdriver, unscrew the remaining fastening screws and remove the sole.
These are the steps that are used to independently disassemble a modern steam iron.
Disassemble imported steam iron
We avoid saying that disassembling a Tefal iron is easy; here are typical techniques.
- The first screw was chosen by the nose, the second - in the area of the steam boost buttons, the sprinkler (sometimes under the steam control knob). The screws are placed on the back. Sometimes you can find it under the back cover.
- The nose screw is sometimes replaced by teeth. In the area of the steam boost and sprinkler buttons, you need to find and unscrew the bolt. The rear screw is often visible to the naked eye, shown in the fifth photo. The screw needs to be unscrewed
- Removing the steam boost and iron spray buttons is not easy. Often there are teeth on the sides that fit into the elongated grooves of the handle. Carefully inspect the buttons, preferably with a magnifying glass under a light. Pick up the teeth (usually two) with screwdrivers and drag them towards you. The button should come off.
- The front screw is hidden by a decorative panel located above/below the front water sprinkler. If you find it difficult, pour water, press the appropriate button. A thin stream of water will shoot forward from the sprinkler.
- Each button drives a pump built into the tank. The piston can be removed. The need for thorough disassembly arises; the pump leaks and does not perform its functions.
- The steam flow regulator is removed or not removed - determined by the design of the model, the meaning of the work: it changes the flow area of the water injection channel. Affects steam boost.
- The temperature regulator is almost always removed; gently press it from below. It’s better to do it with one or two screwdrivers at once.
Devices Bosch, Brown, Philips
The procedure for disassembling these irons is the same, since the designs are very similar. Disassembly of mini-units is carried out according to a typical scheme.
After identifying and eliminating the breakdown, assembly work is carried out in the reverse order. Rushing during work will inevitably lead to damage to the elements of the device, so act slowly and patiently.
Irons Scarlet, Rowenta
In this case, the algorithm of actions is slightly different, so they act in a different way.
Having finished with the last stage, they begin to look for the breakdown. The most important thing when disassembling the device is accuracy and smoothness of action. Under no circumstances should you pull levers, knobs, or buttons with all your might. If something is stuck somewhere, then you first need to examine all possible obstacles, and then push them out or unscrew them. Insidious latches require special care, since these flimsy structures break “with pleasure” - simply and quickly.
Power cord
Failure of an electrical cord is a fairly common type of breakdown. With such damage, the iron may not turn on at all or work in fits and starts, and the sole may not heat up well. The cord may bend or curl, the insulation may be damaged at the bends, and some wires may fray completely or partially. If there is such damage, it is better to replace the cord, regardless of whether it is the cause or not. In any case, all places with damaged insulation must be insulated.
In case of any damage, any iron repair begins with checking the cord. To accurately determine whether it is in normal condition or not, you need to ring it. To do this, just remove the back cover. The terminal block to which the cord is connected will become accessible. You will need a tester or multimeter. We put it in the dialing mode, press one probe to one contact of the plug, and touch the second one to one of the wires on the block. When you touch the “correct” wire, the multimeter should make a squeaking noise. This means that the wire is intact.
Checking the integrity of the power cord
The color of the conductor insulation can be any, but yellow-green is necessarily grounding (it must be checked by installing a probe on a small metal plate at the bottom of the plug). The other two are connected to the pins of the plug. One of these two wires should be connected to the pin to which you pressed the multimeter probe. We repeat the same operation with another pin.
To be completely sure that the cord is in good working order, you need to wrinkle/twist it during testing. Especially in places where there are problems with insulation. If the squeak from such actions is interrupted, it is better to replace the cord. It must also be replaced if one or both pins “do not ring.” You may be lucky and you won’t need further repairs to your iron.
Defects in the supply wire
Before repairing the iron, you need to check the serviceability of the power cord. Most often, it cracks in places of frequent deformation - at the entrance to the case or near the plug. The malfunction may appear gradually when the indicator light flashes during ironing. This winking means that there is no normal contact and the terminals may be oxidized.
Another malfunction manifests itself more violently. If the wires rub against each other for a long time, the insulating layer may be damaged and a short circuit may occur. Outwardly, this is manifested by a strong bang, turning off other devices and a specific smell characteristic of burnt wiring.
For women who are especially impressionable, such situations hurt to the core. They perceive the breakdown as a natural disaster and react by calling their husband, the Ministry of Emergency Situations and the house management. The most correct option is the first one, because any man whose hands grow where they should can get the iron to turn on again. Otherwise, you should still contact your stronger half so that he can hand over the item for repair.
The Internet is filled with videos on iron repair. Many stories are devoted to flaws in the supply wire. If the cord is faulty near the plug, there is no need to disassemble the device. In the case where suspicion falls on the part that is hidden by the body, disassembly is indispensable. To carry out, for example, repair of a Philips iron with your own hands, you should remove the back cover. Behind it, the power cord splits into three wires. If the insulation is damaged, it must be restored. If the terminals become oxidized, you need to disconnect the wires and clean the problem areas.
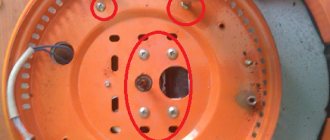
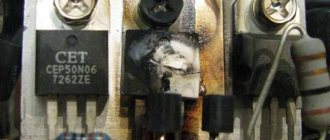
Checking the performance of the heating element
If the iron does not heat up at all, the heating element may have burned out. If this is the case, then it is worth buying a new iron, since a replacement will cost almost the same amount. But first of all, you need to make sure that the heating element is to blame.
These are the outputs of the iron heating element
In order to check the heating element, we get to the very sole of the iron. On it, closer to the back, there are two outputs of the heating element. We move the multimeter to the resistance measurement position (up to 1000 Ohms), and take measurements. If the numbers on the display are about 25o Ohm, then the heating element is normal, if more, it’s burned out. As has already been said, if the heating element burns out, it is not worth repairing the iron - it is more profitable to buy a new one.
Replacing the cord (cable) in the iron.
An iron is one of those electrical appliances that should be in every home. And although it does not cost fabulous sums, it is unlikely that anyone will exchange it for a new one at the first failure. Especially if such failures are associated with a banal break or fraying of the cord. After all, such a breakdown is quite common, since the iron is in motion during operation, and its cord can also be pulled to a distant outlet. And this is not to mention the fact that a moving wire may interest your pet or get hurt for some other household reason. But you definitely shouldn’t think about replacing the iron because of a faulty cable. Moreover, at the ITKey service center a special service is available for you to replace the cord in the iron. It is about her and the factors of this breakdown that we would like to talk about here.
How to detect a broken iron cable?
Of course, if abrasions and breaks in the cord become noticeable externally, then the cable must be replaced immediately in any case. But a break can also occur inside the cord or near its entrance to the iron and the plug itself. Therefore, the first step is to diagnose the breakdown
The best option for carrying out such an important step is, of course, to contact a specialist. But those who have the appropriate knowledge and a professional tester can check the cord for a break on their own by first unscrewing the back cover of the iron
If the reason for the iron’s failure to work is not a broken cord, then possible breakdowns may include:
- non-working plug;
- blown fuse;
- lack of voltage in the network;
- breakdown of the temperature controller;
- faulty heating element.
Therefore, before diagnosing the cord, you can try to check the position of the plug in the outlet and the outlet itself.
If everything is in order with the socket and fuse, we advise you not to use a homemade tester, but to contact a service center to identify the exact cause of the problem.
How is the iron cord replaced?
As mentioned above, the first step is to diagnose the breakdown. Next comes the repair itself, which may include:
- Replacement of a separate section of broken cable.
- Replacing the cord holder.
- Shortening the cord, that is, cutting it and resoldering it.
- Complete replacement of the cable with a new one.
After repairs, the operation of the restored or replaced cable is also checked. Therefore, we advise you not to risk carrying out self-repairs or continuing to work with a damaged cable, but to come with your device for prompt repair to the ITKey office, located next to the station. m. Vasilkovskaya (Kazatskaya St., 122).
What are the dangers of using a damaged cord?
When using a damaged cable, there is a possibility of:
- receiving an electric shock;
- accidental contact with water on the exposed part of the wire, which can also lead to electric shock;
- the appearance of a short circuit in the network;
- danger for an animal that decides to play with a damaged cable.
Therefore, it is better not to experiment using a broken but still working wire, but to immediately take it for repair. The main thing is to be careful and use any household device in compliance with the rules of its operation. And the ITKey service center wishes you that no problems spoil your mood!
Checking the thermostat
The thermostat looks like a plate with a group of contacts and a protruding plastic pin, onto which a disk is then placed.
This is the thermostat on the iron
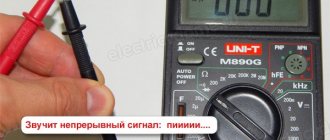
Two contacts fit to the plate. We install multimeter probes on them and check their functionality (call them). In the “off” position, the sound of the multimeter should disappear; when turned on and turned to any position, it should continue to sound.
The damage may be that in the “on” position there is still no contact - then the iron does not heat at all. There may be a different situation - it is not turned off by the regulator and/or does not respond to the position of the regulator. Both reasons are in contacts. And most likely they got burnt.
In the first case, carbon deposits may interfere, which can be cleaned off by inserting a piece of fine-grain sandpaper between the contacts and “sliding” along the contacts a couple of times. If you don’t have sandpaper, you can use a nail file, but you need to act carefully - the temperature settings depend on the bending of the plates. So you can’t bend them too much.
In the second case - if the iron does not turn off - the contacts may have become burnt or fused. Repairing the iron in this case consists of trying to separate them. But such a trick rarely succeeds. The solution is to replace it.
Thermostat from a different angle
There may be another point: when falling, the contacts could somehow interlock. When the sole of the iron heats up, the bending thermal plate presses on the contact groups, but the contacts cannot open. The result is the same - the iron does not turn off when heating. Repairing an iron is also similar - we try to restore mobility to the plates, trying not to bend them. If it doesn’t work, we change it.
Main types of faults and their elimination
Damage to the integrity of the power cord
The electrical cord is a common cause of iron failure. Since this is the most moving part of the device, the malfunction often consists of damage to the insulation when it is bent or curled. Therefore, the iron may stop turning on, or its soleplate may not heat up very well. If the power cord is nevertheless deformed, then first of all you should insulate its damaged parts.
After this, you need to test it with a multimeter. During ringing, the cord must be unbent in all directions, especially where there is or possible damage. It is also necessary to insulate the wires during operation - this will ensure safety from electric shock. If the device does not ring, the wire should be replaced.
The irons are equipped with a special flexible wire covered with a fabric sheath, so no other cords are suitable for the irons. To replace, you need to purchase a new special electrical cord.
But if you don’t want to buy an electrical cord, then it can be easily repaired by replacing the plug if the wiring is deformed at the outlet.
The device does not turn on
A common factor in this breakdown is the formation of carbon deposits on internal elements. Carbon deposits can be removed using sandpaper or a brush with fine, stiff bristles. If the iron does not turn off, then the internal contacts have probably become loose. They should be carefully separated, trying not to deform or damage their integrity.
The device turns itself off.
Every iron has a thermal fuse. When the iron overheats, the thermal fuse turns off. After the iron cools down, it turns on again. To get rid of this problem, you need to replace the thermal fuse. If after replacement the problem remains, then you need to look at the thermostat.
Thermostat does not work
The temperature control is a lever that is used to set the temperature range based on the fabric to be ironed. It adjusts the temperature to which the sole can warm up. In order for the iron to work, you need to apply voltage to the tubular electric heater (TEH), which is located in the sole of the device. For strong and fast heating, heating elements with high power are installed. If this power is not changed and supplied constantly, the soleplate of the iron will become very hot, and things will be seriously damaged when ironing.
Different types of fabric require different temperatures and different ironing settings. Therefore, irons have a unit for adjusting and changing the temperature. The Philips iron's thermostat operates thanks to a bimetallic plate. The plate consists of two strips welded together. When a certain temperature is set, these two strips expand, causing the plate to bend. If, after inspection, it is determined that the external appearance of the internal contacts is normal, then you will have to use a multimeter.
The inspection of the thermostat elements can be checked using an indicator to determine the phase, touching each of the contacts that cause suspicion in turn. If the indicator lights up when you touch one of the contacts, but not when you touch the other, this means that they are oxidized. But it is not necessary to check the contacts; you can immediately clean them with sandpaper. They do not always oxidize; sometimes they can simply become dirty from dust, dirt and lint from clothing. This problem can also be eliminated by cleaning.
If this is the only reason, then the iron should work. To properly clean the contacts, you need to take a narrow strip of sandpaper, place it between the elements that need to be cleaned, and rub them a couple of times.
Heating element does not work
If the iron is plugged in, the light is on, the temperature regulator is in the maximum position, and the soleplate does not heat up, then most likely the heating element has burned out. Two outlets of the heating element are located in the rear cavity of the sole of the iron. To check the heating element terminals, you need to use a multimeter. If a number greater than 250 ohm appears on the screen, then the heating element has burned out. To test, the multimeter should be adjusted to determine the resistance and connected to the terminals of the heating element.
If a figure close to 250 Ohms appears on the screen, then the heating element has not burned out. If a number appears on the screen that is much larger, then the heating element has failed. Only replacing the entire part - the sole - will help. If the light on the iron is turned on and the soleplate does not heat up, then the problem is in the electrical cord.
Water leaks from the appliance
The most common problem with a Philips Smoothcare iron is that instead of delivering steam, water leaks out of it. This problem causes the fabric to become wet and difficult to iron. And if the water flows out is not entirely clean, for example, with scale, then stains and streaks may appear on clothes.
The causes of this malfunction may be:
- cuff deformation;
- formation of a crack in the body of the water compartment;
- improper operation.
To fix this damage, new parts will be needed. If they are not there, you will have to purchase a new iron. If the fault is due to incorrect operation of the iron with a steamer function, then you need to make sure that the thermostat is at the required level, at which the soleplate heats up sufficiently, capable of turning water into steam.
The steam system is not working well
If the iron does not release steam, then you first need to clean the internal steam cavities using a special solution. The essence can be purchased at any hardware store or prepared yourself in the following proportion: 1 liter of water to 1 glass of vinegar. The sole should be placed in a bowl with a solution, boiled and cooled. Many irons have a self-cleaning feature.
In order to use this function, you need to fill the reservoir with water, set the thermostat to maximum temperature and turn on the iron. Then you need to wait until the iron turns itself off. Self-cleaning should be done after turning off the iron for the second time.
When pressing the self-cleaning button, the iron should be held over the sink, because steam will begin to escape from the channels of the soleplate along with all the dirt and dust inside.
Useful tips for extending the service life of your iron:
- Connect the device only to a grounded outlet.
- Regularly check that the electrical cord is not damaged.
- Unwind the cord completely before plugging in the iron.
- Do not touch the very hot sole of the iron - this is dangerous.
- Regularly descale your iron.
- Do not pour vinegar, perfume, starch, or chemical descaling agents into the water tank.
This is how you repair a Philips iron yourself. Disassembly and repair is not difficult. Even a novice electrician can cope with these faults.
Checking the fuse
A thermal fuse is installed approximately in the same area where the thermostat is located. It is used in case the soleplate of the iron overheats - it burns out if the iron heats up to dangerous temperatures. Usually this fuse has a protective tube attached to it and most often it is white.
Iron repair: fuse and its continuity
Find contacts, call. In normal condition, the fuse “rings”; if it is blown, there is silence. If you wish, you can move the handset and call directly - there may be a break/burnout in the connecting wire. If a fuse is blown, unsolder it, look for a similar one and install it in place.
There is no need to exclude the thermal fuse from the circuit - it will protect you from a fire in case of problems with the thermostat: it will simply burn out and the iron will not work. And although the iron will require repairs, your home will be safe.
Technical data for some types of irons.
Irons without thermostats consume power ranging from 320 W to 400 W. Rated voltage – from 127 V to 220 V. Heating element type – spiral. Weight in kilograms from 2.1 to 3.0.
Irons with thermostats. They consume power from 200 to 1000 W. Rated voltage from 127 to 220 V. Type of heating element - tubular and spiral. Weight in kilograms – from 0.65 to 2.55.
Irons with thermostat and humidifier. Power consumption – 750-1000 W. Rated voltage – 127-220 V. Type of heating element – tubular. The capacity of the water tank is 100-200 cm³. Weight – 1.5-2.0 kg.
Irons without thermostats have some disadvantages: the iron heats up much more slowly. Electricity consumption is higher. Due to its low power, the iron cools down quickly when ironing.
- If you slightly scorch the material while ironing, wet the stain with a solution of boric acid, then rinse in water at room temperature.
- Stains from a hot iron on white fabrics are removed with a mixture consisting of 0.5 tbsp. water and a few drops of ammonia.
- Wrinkles on trousers will last longer if you wipe them from the inside with a bar of soap and then iron them with a damp cloth.
- To prevent the iron from sticking to the laundry, its heated sole is wiped with paraffin.
Symbols of irons indicating the permissible ironing temperature.
- Iron with temperature indication. Explanation: caution when ironing, the permissible ironing temperature is indicated.
- An iron with a symbol for the thermostat with dots: with one, two, three dots. Explanation of the symbol: ironing is allowed with the regulator set to the maximum temperature (three points) for cotton, linen. Average temperature (two points) – for wool, natural silk. Minimum temperature (one point) – for artificial silk.
- The iron is crossed out. This means ironing is prohibited.
- Iron in a circle. The symbol means that caution when ironing, iron at a temperature not exceeding 140°C.
- Iron with a star. Indicates caution when ironing; iron at a temperature not exceeding 100°C.
Bosch rarely puts simple models on the market. Almost all devices are powered by steam and many of them are wireless. The products of this manufacturer are very widespread and are generally of excellent quality. But everything has its own expiration date, so some users after a while ask the question: how to repair a Bosch iron with your own hands? To answer this question, we need to go into some interesting details and figure it out. This is what we will do in this article.
Steam spray system
If almost no steam comes out of the iron, but there is water in the container, most likely the holes are clogged with salts. You can restore functionality with a simple technique. Pour water and vinegar (regular, table vinegar without dyes) into a dish with low sides (a frying pan or baking sheet will do). One glass of vinegar per liter of water. The second recipe is to add 2 teaspoons of citric acid to 250 ml of boiling water. Place the switched-off iron into the bowl with the prepared liquid. The liquid should cover the sole.
Cleaning the steam vents on your iron
Place the container with the iron on the fire, bring to a boil, and turn off. Wait until it cools down. Reheat. You can repeat this 3-4 times. Until the salts dissolve.
Disassembly
How to disassemble a Bosch iron? In order to understand what to do next, you need to learn how to disassemble the device:
- Find the screw on the back wall, unscrew it and remove the cover.
- Search the cabinet for hidden locks or protrusions. If there are any, carefully pry them off with a sharp object.
- Unscrew the remaining screws and remove the container.
- After dismantling the tank, inspect the entire internal structure of the device.
- Unscrew several screws on the protective cover and gain access to the electrical circuit.
Where to begin?
First, you must visually inspect the case for cracks, defects and traces of melting of the case. Perhaps the appearance will immediately show what exactly is causing the iron to break down. If the inspection does not yield anything, you need to completely disassemble the case to independently diagnose all the components.
Please note that disassembling the iron is sometimes quite difficult. This is due to the fact that every year manufacturers spend more time on the design of electrical appliances, creating invisible fasteners and holes for screws. Initially, prepare a set of screwdrivers and a knife that will be useful to you for further actions.
Examples of self-repair of irons
Recently I had to repair two faulty irons from the Braun and Philips brands. I will describe the problems that had to be fixed.
Braun electric iron repair
The iron did not heat up, the indicator did not shine in any position of the thermostat adjustment knob. When bending the power cord, there were no signs of the iron working.
After removing the back cover, it was discovered that the supply voltage was supplied through the terminal block. Access to the plug-in terminals was difficult. The wire markings corresponded to the generally accepted color markings. The iron had already been repaired previously, as evidenced by the broken left latch on the terminal block.
The appearance of the removed terminal block is shown in the photograph. It also has a neon light indicating the supply of supply voltage to the heating element.
The input contact busbars for supplying supply voltage were in some places covered with an oxide film of rust. This could not cause the iron to break down, which was confirmed by connecting it after removing traces of rust from the contacts using sandpaper.
After completely disassembling the iron, the thermal fuse and thermostat contacts were tested using a multimeter. The thermal fuse shows a resistance of zero ohms, and the thermostat contacts show infinity.
Inspection showed that the contacts were tightly adjacent to each other, and it became obvious that the reason for the failure lay in the oxidation of their surfaces. After cleaning the contacts with sandpaper, contact was restored. The iron began to heat up normally.
Power cord
One of the main malfunctions of the iron is the power cord, which you actually plug into the outlet.
Get to the junction of the contacts with the heating element and if there are no visible faults, use a tester to ring the cord to determine its functionality.
For dialing, you can use a homemade tester, consisting of a piece of wire, a battery and a light bulb. If the light comes on when the contacts are connected to both ends of the cord, move on.
If the power cord is the cause of the breakdown, you can try to shorten it by 10-15 cm (perhaps the problem area will be removed). Is your iron still not working? Replace the cord with a new one!
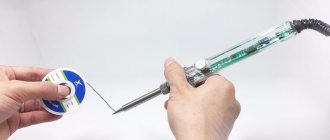
Cord repair
It is the cord, or rather its lack of integrity and non-working condition, that is to blame for almost every fifth iron breakdown. Therefore, in order to check whether this is the reason, you need to remove the back cover from the iron. To check the integrity of the cord, you can use a regular tester.
You can check if the cord is working by leaning one end of the tester with a light bulb against the plug, and leaning the battery against the other end of the cord. If the light does not light, then the problem is in the cord. It needs to be shortened and checked again.
And if the light is on after the experiment, then the reason is not in the cord, which means that the iron will need to be disassembled further. But before proceeding with further examination and study of all the elements of the iron for their functionality, it is worth using the recommendation, according to which it is better to draw a diagram for connecting all the wires, so that this will not become a problem when it is necessary to assemble the iron and restore it to its original state.
Temperature regulator
Second in line is the thermostat. We also check it using a continuity tester, which we attach to the contact group.
When the temperature control is turned toward the circuit closing direction, the electrical circuit should function. Is the light not on? We clean the contacts with sandpaper and check again. We immediately recommend watching the video repair instructions:
The thermostat is working, but the iron does not heat up? Let's start checking the thermal fuse!
Thermal fuse repair
First you need to disconnect all the wires from the iron, and only then start trying to examine the thermal fuse, which is only possible after disassembling the device.
It is this part of the iron that is to blame for half or even most of the cases when the iron refuses to turn on and work. To check this particular part for correct operation, you should connect the continuity wires to it on both sides: if the light bulb does not light up, then the fuse is to blame for the malfunction. A way out of this situation may be to remove this fuse and short-circuit this part of the electrical circuit. This should not be a cause for concern, because if you have a correctly working thermostat, the absence of a fuse cannot cause danger.
Thermal fuse
More often than the power cord, this element of the circuit fails. Its main purpose is to disconnect the electrical circuit if the temperature of the heating element exceeds the nominal value.
Using a continuity test, we determine the functionality of the fuse. If the reason for the breakdown of the iron is in it, we replace it with a new one, or remove it from the diagram altogether. During normal operation of the temperature controller, there is no need for a fuse.
Iron temperature in degrees
In temperature-controlled devices, the “points” correspond to a certain temperature (data in the table)
| Thermal mode of the iron | Minimum t (˚С) | Nominal t (˚С) | Maximum t (˚С) |
| 75 | 95 | 115 | |
| 150 | 130 | 155 | |
| 145 | 175 | 205 |
The heating of a household iron within the soleplate can vary by 10 °C.
How many degrees does the iron heat up to?
For fabrics that are most difficult to iron, it is necessary to use a maximum iron heating temperature in degrees equal to 205˚C. In this case, the heating rate will depend on the type of material from which the sole of the iron is made, and the power of the electrical appliance.
Heating rate depending on sole material
The sole is made from:
- Aluminum. Heating occurs very quickly, and cooling also occurs, but the material is short-lived. Hard elements on clothing can leave scratches in which burnt-on fabric particles become embedded.
- Of stainless steel. It heats up quickly, glides well over the surface, and is durable. The disadvantage is the heavy weight of the device.
- Ceramics. This coating is applied to a metal base. It glides perfectly, allows you to iron fabric in hard-to-reach places, and does not catch clothes. Heating and cooling take longer. Ceramic retains heat, so even when turned off, the iron remains on for 8-10 minutes. stays hot. The disadvantage is the fragility of ceramics, susceptibility to chips and damage. To extend service life, manufacturers use cermets.
- Teflon - reliably protects clothes from burning, but does not last long. The Teflon surface does not glide well over fabric, making ironing difficult.
- Sapphire is a specially developed alloy that gives the sole extra strength. Conducts heat well.
- Titanium is rarely used in the production of household irons. The metal will heat up quickly and take a long time to cool down. The surface strength is not inferior to steel.
Maximum temperatures in different models may vary, so before choosing a mode, you should read the instructions.
If the iron has only one heating mode, there is no spray and steam function, the temperature of the iron sole will be 115˚C (±10).
Irons with a drip system are slightly hotter - about 155˚C.
Electrical appliances with the possibility of steam processing reach temperatures of 175-205 ˚C.
Heating element (heating element)
Well, the last reason why the iron does not work is the failure of the heating element. If the equipment turns on, the light is on, but the sole does not heat up to the required temperature, most likely this is the problem. As in previous cases, we use a homemade tester to determine the performance of the product. The heating element is attached to the sole and if the attachment point is permanent, then most likely you will have to say goodbye to the purchase (if that is the reason).
If the heating element is connected to the soleplate using tips, you can try to repair the iron yourself by cleaning the contacts with sandpaper. Still not heating up? We send the equipment for recycling, because... a new part costs almost the full cost of the device!
Please note that if you throw the equipment in the trash, it would be better to disconnect the power cord and keep it for yourself. Perhaps this element will be useful to you in subsequent repairs, especially since it will not take up much space in the closet!
Features of the Philips irons
The electrical design of the Philips iron is simple and is almost no different from the circuits of other electrical household appliances. The main difference is the heating device and other auxiliary components. The diagram contains the following elements:
- electric heater;
- thermostat;
- thesistor;
- lamp;
- mains plug;
- thermal protection.
It follows from this that if you delve a little, disassembling and repairing a Philips iron will not be difficult.
Steaming system
If the malfunction is that the iron’s steamer does not work, then most likely it is necessary to clean the internal steam cavities. To do this, we recommend that you use a solution of water and vinegar in a ratio of 1 liter to 1 glass. Place the sole in a container (as shown in the picture), bring the water to a boil on the stove, turn it off and wait until it cools down. After this, we repeat the action 3 more times, which is enough to properly clean the spray bottle.
In stores you can see special products for cleaning scale, but we strongly do not recommend using them. This is due to the high cost of the funds and at the same time low efficiency compared to the traditional method! It should also be noted that on thematic forums there are many negative reviews about the fact that the iron does not work after cleaning with salt. This is due to the fact that salt crystals clog the steam supply holes, as a result of which you have to thoroughly clean the sole.
Another reason why the sprinkler does not work is that the steam button is broken. It can also be tested with a tester and replaced if necessary.
That's all the instructions for repairing an iron with your own hands. As you can see, the event is quite simple and even a novice electrician can do it! Finally, I would like to note that if the red indicator on the case is blinking, do not panic, because this may indicate a certain operating mode or automatic shutdown after heating. Read the instructions that come with the kit to understand the reason for the blinking. We hope that now you understand what to do if the soleplate of the iron does not heat up and how to repair the breakdown at home!
Related materials:
How does a steam iron work?
But where to look for all these secret screws? To do this, you first need to familiarize yourself with the structure of a modern iron with a steam generator (steamer). Its general diagram is shown in Fig.:
Diagram of an iron with a steam generator
An impact steaming system (with superheated steam) is installed only in certain models, because it is effective only in the thermostat position close to the maximum (three points). In good irons with shock steaming, the shock pump is blocked if the regulator is set to 1-2 points. What is always written about in the instructions, how, pray tell, does a normal housewife read the instructions for an iron? That is, if there is no steam boost, then perhaps to eliminate the “malfunction” you just need to turn the temperature regulator.
The positional protection module turns off the heating element if the position of the sole of the iron differs from horizontal: it was placed upright, dropped, etc. This is perhaps the only electronic innovation in irons. In high-quality irons, positional protection is the second most common source of breakdowns (after scale in the steamer, see at the end), but at home it is most often completely repairable.
How the Chinese soar
If you look at the soles of even cheap Chinese irons, it turns out that many of them have fictitious, fake drip humidification nozzles. In fact, when fully heated, a burst of steam is produced by pressing the steam button; in the same position of the thermostat, soft steam comes from the button with droplets, and for drip humidification in this case you need to press both buttons at once.
Carrying out repairs
How to repair a Bosch iron? In most cases, it is enough to get rid of the “contaminants”.
Cleaning:
- After disassembling the device, you need to remove the sole, blow it with a vacuum cleaner and clean it with a small brush to remove dust and small debris.
- Next, you will need to place the component in a bowl with water and vinegar or citric acid.
- Place on the fire together with the container, heat the bowl and boil the sole for five minutes. Repeat this procedure 3-5 times.
Important! Instead of water and vinegar, you can use a special descaling agent designed for pots and kettles. After the manipulations have been completed, the device is left to dry and awaits inspection within 24 hours.
It will be much more difficult to get rid of scale if the device runs on steam. Here, most likely, the problem is that the condensate holes are clogged.
Experts give the following advice:
- Use a cotton swab. Slide it into the holes and make several forward movements. You can also moisten it in an alcohol solution.
- Sprinkle salt on a cotton cloth and iron it.
Important! This proven method quickly restores the stainless steel soleplate.
- If the work does not go well with a ceramic or Teflon element, immediately go to the service center. This work can be done by any workshop.
- If the thermostat, fuse or other component has failed, try cleaning them from oxidized compounds with alcohol.
and reassembling the iron.