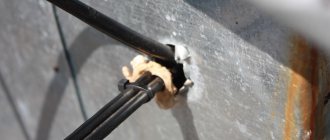
Hob connection diagrams
Manufacturers of hobs produce models that can be connected to electrical networks with a different number of phases. On the territory of Russia and the post-Soviet space, there are two standards: a single-phase network for 220 V, rarely - a two-phase network for 220 V and a three-phase network for 380 V. Electrical wiring in houses can have, depending on the number of phases and the years the houses were built, a different number of wires and colors. For example:
- Single-phase 220 V network: two conductors of the same color (usually in old houses). “Phase” or “zero” will have to be looked for with an indicator or tester; in new houses they use colored wiring, where “phase” (L) is indicated by a brown or red wire, “zero” (N) by blue or cyan, and grounding (PE) – yellow-green. In old buildings, the wiring is the same color, so you will have to use a probe to determine the neutral.
- Two-phase network for 220 V. Found only in new buildings and then rarely. “Phases” are indicated by black and brown wires, “zero” by blue, and “ground” by yellow-green.
- Three-phase network at 380 V. In this case, “zero” and “ground” have a traditional color, and the “phases” according to one standard are white, black, brown, according to another - yellow, red and green wire.
Because of these nuances, hobs are usually supplied without a power cord. Therefore, in addition to the wire for a dedicated power line, you will need to buy a cable to connect the built-in stove to an outlet.
Coloring of wire insulation for a three-phase network
How to connect an electric stove: diagram for a single-phase network
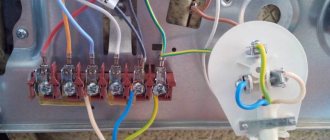
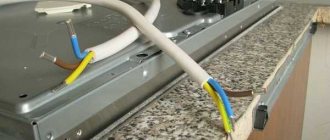
In principle, connecting the hob to a household electrical outlet with a voltage of 220 V is not difficult. On the back side of the stove you need to remove the cover, which is secured with latches or screws. Having removed it, we will find terminals for connecting the network cable (usually 6 pieces).
Terminal box on the hob
Terminals Nos. 1, 2 and 3 are for the phase wire (L), Nos. 4 and 5 are neutral (N), and the ground terminal (PE) is marked with a special symbol. But what if the dedicated power line has 3 wires and 6 connectors for connection? For such cases, as a rule, copper or brass jumpers are included. If you don’t have them, you can make them yourself from copper wire with a cross-section of 6 mm2. Set the jumpers as shown in the figure below and connect the network cable.
Connection diagram of the hob to a single-phase 220 V network
How to connect an electric hob with two phases
Two-phase hobs are rare, but in this case there are no connection problems. Just follow the connection diagram below exactly. Before applying voltage to the device, you must once again check that the wiring in the socket or wiring box matches the wiring in the plug.
Two-phase hob connection diagram Brass jumper (usually supplied with the hob)
How to connect your own electric stove to a three-phase network
Three-phase power is mainly used in country cottages, and to power the hob you will need a five-core cable with a cross-section of each conductor of at least 2.5 mm2. The connection is practically no different from the previous options and is performed as follows:
- Phase wires L1, L2 and L3 are clamped in terminals Nos. 1, 2 and 3, respectively.
- Terminals Nos. 4 and 5 are connected to each other by a copper or brass jumper, and the neutral wire N is connected to one of them.
- The corresponding PE ground wire is connected to terminal No. 6.
If the wires in the network and input cables are colored, then when connecting we simply follow their combination. If the house is old and the wiring is the same color, then you need to be careful and use an indicator or tester to determine the phase wires.
Connection diagram of the hob to a three-phase network
Connection options
There are three main ways to connect devices to an electric brush - by directly connecting the cable, using a socket, or through a terminal block. Each method has its own characteristics, advantages and disadvantages - below we will look at each method more carefully.
Directly
With this connection, the wire from the device is connected directly to the panel to the corresponding wires. The rules for connecting wires depend on the category of the device and are prescribed in the instructions. Unfortunately, the direct connection method has a number of disadvantages and limitations, so it is rarely used in practice:
- The main disadvantage of this connection is the fact that most modern cabinets/panels are not equipped with a built-in wire, since the type of electrical network can vary significantly from house to house. It is assumed that the buyer takes the device, and then calls an electrician, who determines the type of electrical network and selects the optimal cable.
- Even if the device has a built-in cable, a person without electrical experience may have difficulty connecting to the network. For example, most devices with a built-in cable have a four-wire wire (phase, phase, neutral, ground), which will be problematic to connect directly to a network consisting of three channels (phase, neutral, ground).
Note! In addition, the cable length of such devices is usually short - within 3-5 meters. Therefore, it may be impossible to connect the wire from the kitchen to the distribution panel in the hallway because the cable is too short.
Socket with plug
This method is the simplest and most universal, and with its help you can connect not only a cabinet or panel to an outlet, but also any other high-power devices (for example, powerful electric heaters for the home). To connect the outlet to the oven, use a 16-amp outlet, and for the hob, use a 32-amp outlet.
Preference should be given to devices made on the basis of ceramics, since plastic quickly becomes unusable. The number of holes in the socket must match the type of plug from the appliance. For single-phase networks, a plug with three prongs is used, and for three-phase networks, a plug with five.
Terminal block in junction box
To connect the wires from the device to the machine, you can also use a distribution box with clamp terminals. The principle of operation of the device is simple: wires are supplied to the device simultaneously from the automatic transmission and the cabinet/panel. The wires are inserted into special detachable contacts that connect the wires into a single line. Electricians recommend buying a 4-pin, 32-amp terminal box - this will allow you to connect both the cabinet and the panel.
The order of connecting the stove
Quite often there are kitchens where there is no outlet to connect the necessary equipment. Therefore, first of all, you need to clarify in advance at what voltage the hob and oven operate. In addition, you must carefully study the connection diagram recommended by the manufacturer and the connection locations on the devices themselves.
Hobs can operate at voltages of 220 and 380 volts. Household ovens only operate on 220 V. All terminals have jumpers installed at the factory to allow them to operate at single-phase voltage.
When connecting a hob and an oven to one socket, a separate circuit breaker is installed for them in the electrical panel, from which the power cable is laid. Their parameters are calculated in accordance with the expected load. Next, the cable is connected to the outlet and the devices can be put into operation. In some cases, instead of a socket, special terminal blocks mounted on the wall are used.
Hob connection diagram
Cable for an electric hob: what wiring is needed for connection
How to connect the hob
Electric oven power
How to install a power outlet
How to install a socket yourself
Connecting a powerful oven to the mains
When connecting ovens with a power of more than 3.5 kW (as a rule, they also have a built-in microwave), several other materials are needed:
- three-core copper cable VVGnG-Ls 3*6mm2
- socket and plug for 32A stoves (you can order a similar connector here)
- diffavtomat 32A
- PVS wire 3*6, if no connecting wire is included in the factory configuration
Here it is definitely necessary to lay a separate line from the electrical panel to the location where the oven is installed.
Connection to the electrical network is made through a powerful 32A socket.
In fact, the entire installation is similar to connecting a hob. How this is done, in detail with step-by-step drawings and photos, can be read in the article “Connecting the hob”.
Let's take a closer look at connecting the connecting wire directly to the oven.
Unscrew the protective panel from the back and connect the PVS 3*6 wire to the contacts. There is usually a hole at the bottom for this.
The insulation is removed from the conductors and the NShV tips are crimped. Next is the connection itself:
- Place the phase conductor (gray or brown) under the terminal with the letter “L”
- tighten the neutral wire (blue) to the terminal with the letter “N”
- grounding conductor (yellow-green) – under the screw terminal with the “grounding” symbol
If there are no markings on the terminals, or they are poorly visible, study the instructions and technical data sheet of the oven. There must be a drawing with a clear indication of where to connect which wires.
Next, you need to secure the wire with a clamp and put the protective contact cover in place.
After this, you need to check the functionality of the electric oven by connecting it to a power outlet. Only after making sure that it works can you safely insert it into a pre-prepared niche.
If, upon first connection, the backlight bulb immediately burns out, and everything else works properly (fan, heating elements), do not panic. It is quite possible that due to the temperature difference, after moving the purchase from the street to the house (in winter), condensation formed inside. And this caused the light bulb to burn out.
Or maybe it was just shaken during transportation. You shouldn’t immediately blame the wrong connection.
By the way, ovens use heat-resistant lamps, and you cannot use simple lamps like those in refrigerators to replace them.
They will simply burst when heated. Check the operating temperature on the base and packaging.
Modern household appliances
Progress does not stand still, and currently there are many household kitchen appliances that make cooking easier. Bulky gas stoves are being replaced by modern ones - induction stoves, electric ovens and hobs, which can be built into a kitchen unit, which gives more space in the kitchen and looks attractive. In this case, there are no gas pipes, which is an undeniable advantage: there is no unpleasant smell of gas, and the risk of fire is much lower.
Typically, the installation and connection of household kitchen appliances is carried out by professionals, since this is a complex and responsible process associated with the routing of electrical cables and the installation of sockets. But if you wish, you can do it yourself, the main thing is to approach the work responsibly and seriously.
https://youtube.com/watch?v=8pS69oVPeW8
The difference between an independent oven and a built-in one
Most apartments are equipped with an oven and hob suitable for cooking food. Furnaces are conventionally divided into independent and built-in. They have differences in mechanisms and installation. These are important points when choosing equipment.
Built-in electric ovens are usually built into a designated area. The electric stove is placed only above the stove itself, since they have the same power supply and control system. Together they create a complex. The stove has no buttons, and its modes cannot be adjusted. The burners will not be able to function without the control unit on the oven. To connect the oven, electric feeders are used, powered by central power grids. There is a large selection of different models of built-in ovens on the market. Having decided on the configuration and functionality, you can easily choose a good device.
Over time, built-in surfaces have begun to be replaced by independent domestic ovens that are easy to use and simple to place. Independent models allow you to place the oven anywhere in the kitchen, regardless of the location of the hob. They differ in that they have their own adjustment levers. Adjustment can be carried out using manual toggle switches, buttons and a sensor. These are independent devices, which makes their installation easier. The plug for the hob is separate, so they are connected to electricity separately.
The electric oven and electric stove can be installed in different places in the kitchen unit, and not under each other, as in the built-in version. For each device, you can choose the manufacturer that is preferable, selecting the functionality. Some people don’t need a hob at all if they regularly cook food using auxiliary household appliances, and the main cooking is done in the oven. In this case, you can buy a surface with a couple of burners, which will save money. Installation can easily be done with your own hands.
Which socket to install for the hob and oven? Tips for choosing
All sockets designed for a current of more than 25A are considered power sockets. According to the installation method, they are divided into:
- external, overhead. Installation of sockets of this type is carried out directly on the wall plane. They are convenient to use when laying cables in an open way. In addition, such sockets are the safest for installation in wooden houses and in rooms with high humidity. It is this type of sockets that has the best moisture and dust protection;
- internal, installed in special socket boxes, built into the thickness of the wall. They are most widespread in brick and panel houses, when finishing walls with sheet materials such as gypsum fiber board.
According to their purpose and design features, sockets are divided into:
- designed for operation in single-phase 220V networks;
- designed for operation in networks with three phases, 380V;
- having a separate contact for grounding or without it;
- with clamps that securely hold the connection to the plug. Fixation can be push-button or threaded, using a union nut;
- with integrated devices, such as RCDs, shutdown time relays;
- with curtains covering the outlet openings. It is very convenient to use this type in families with small children. It is impossible to insert any object other than a plug into such an outlet.
Before you buy a socket for an electric stove, you need to make a choice, which should be based on the following criteria:
- calculated maximum current. For ovens (power up to 3-3.5 kW) a value of 16 - 25A is sufficient, for a stove with a power of up to 7 kW - at least 32A, and for more powerful installations - 63A. In such sockets and corresponding plugs, the contact pins are thicker, the insulator material is more refractory;
- number of working phases. To connect to 220 V, a socket and plug with three contact groups are used, and for 380 V networks - with five;
- degree of protection. The protection of electrical appliances from influences is indicated by the IPXX code, where XX are numbers.
The first encodes the degree of protection against penetration of solid objects into the housing.
The second is the liquid ingress protection code. The higher the numbers, the higher the protection class.
For example, 00 - there is no protection at all, i.e. the contacts are open. And IP68 is the maximum degree of protection, which absolutely excludes the possibility of dust and water getting inside the socket and plug (even if completely flooded).
For household appliances operating in the kitchen, the minimum degree should be IP24 (it is impossible for objects larger than 12 mm (for example, fingers) to get inside and splash water, regardless of their direction).
The cable connects to the plug and socket in several ways.
The first method is to remove the cable core from the insulation by 0.5 cm, insert it under the clamp and clamp it with a screw. The second method is more reliable: the conductor is cleared of 1.5 cm of insulation, wrapped in a ring around the screw and pressed. The contact area will be larger, the contact will be more reliable.
If the cable core consists of many thin wires, then they must be processed with a soldering iron and tin solder or crimped with brass tubes.
The socket or terminal box should be attached to the wall close to the stove, securely, using screws or self-tapping screws, in such a way that the following conditions are met:
- liquid from the stove or sink should not come into contact with the socket or box;
- The socket (box) must be accessible to an electrician, but be hidden, not out of sight.
Absolutely everyone wants the latest and most comfortable appliances installed in their kitchen, which will allow them to spend less time on cooking. Progress, as we know, does not stand still, and the largest manufacturers are equipping the technology market with more and more interesting models
How to connect the hob and oven to the same outlet? Let's look at the whole process in more detail and pay attention to the most important nuances
CS-CS.Net: Laboratory of the Electroshaman
Small boxes ABB components for organizing the panel in the kitchen plinth
Attention! Some of the comments from this post were moved to an archived post because there were a lot of them and the page took a long time to load. If you didn’t find something, please go to this archived post! There were many interesting discussions there!
The post was inspired by several topics on MasterCity.ru and a bunch of angry debates, for which they could easily get themselves banned on the forum. Because I almost had to move to the mat. All these topics are united by one question: how to connect the cooker and oven in the kitchen ?
This post is intended ONLY for the case when you (or stupid craftsmen) have already laid the wiring and cannot be moved. In other cases, ALWAYS place a separate cable for the cooker and a separate cable for the oven.
“Yopt!”, an inexperienced reader will say, “What is there to write about?! I twisted the cable into the cooker, stuck the plug into the socket and forgot about it!” Well, as always, our theory and practice differ sharply. This feature is like this: first do it, and then fuck half the forum residents’ brains on how to get out of what was done incorrectly.
Situations often arise on forums when a person, thinking inertially due to the fact that he previously had one electric stove, lays one cable for a new kitchen during renovation. And then it turns out that the appliance being installed consists of a separate oven and a separate hob, which need to be powered somehow. And this is where the brain begins to INVENT. The very first solution that comes to mind is to cut the plug at the oven and attach its cable to the hob cable. This decision is completely wrong!
An example of a TERRIBLE connection of a cooker, oven and dishwasher to one cable (sent by izhplan)
Therefore, first we write it correctly. The following is correct. First, try to target certain models of cooker and oven in advance. You will still have to resolve this issue when ordering a kitchen. In general, the kitchen and electrics are sometimes indivisible things: before starting electrical work, you need to know where the built-in appliances will be (oven, dishwasher, microwave), how many there will be, what they are powered by. And only then design and lay the cables.
Secondly, study how these cooktop and oven models are connected. Typically there are the following options:
- Standard wire with plug. This is primarily typical for ovens with a power of up to 3.5..3.6 kW. They have a regular wire and a 16A plug. This plug should be plugged into a regular 16A outlet. Cutting off the plug usually results in complete loss of the warranty on the equipment. Conventional old-style electric stoves also have a wire and plug. Freestanding. The forks there are usually weak and barely hold on (remember those round black ones in the USSR?), and it is useful to replace them. Either on a solid cable (will be discussed below) or on an industrial connector =)
- A piece of cable. This is typical for some hobs. It seems that this is BOSCH - their cable is embedded directly into the panel, and it cannot be unscrewed or rearranged. You can either install an industrial connector on such a cable, or connect it directly to the cooker’s power cable via a terminal block (recommended). Some ovens come without a plug. If the oven power does not exceed 3.5..3.6 kW, a regular plug is placed on this cable and a 16A socket for the oven is used again. The exception is powerful ovens with a built-in microwave. They have a power of 4 kW, and they need to have a separate cable, like for a cooker. Well, also pieces of cables without plugs are equipped with gas cookers and ovens. Since their power is low, it’s understandable that we install plugs and don’t worry.
- Terminals or terminal block. This is most typical for cookers. This is the most convenient option. The power cable is routed directly under the terminals and left that way.
So. The correct cables for the cooktop and oven should be:
- For a single-phase cooker: cable 3x6, automatic C32 maximum. It should be released near the installation site of the cooker so that a tail of about 1.5 meters remains. And leave it that way. Later, it will either be connected directly to the hob terminals, or connected to its cable tail through the terminal block.
- For a three-phase cooker: cable 5x4 automatic C16..20 3P (minimum - 5x2.5, automatic C16 3P). The requirements are similar: release the tail and leave it.
- For an oven of normal power (up to 3.5..3.6 kW) - a 3x2.5 cable, a C16A circuit breaker and a regular 16A socket near the oven installation.
- For a high-power oven - a piece of 3x4 cable. However, there will not be a general option, and you will need to check the oven power locally.
It is important not to forget the following. ALL electrical, sewer, and water for built-in appliances (oven, dishwasher, washing machine) should NOT be located directly behind the appliances! Otherwise, the technology simply will not fall into place, but will run into communications. Conclusions should be drawn to the left or to the right of the technology. Power sockets are usually made in the kitchen plinth area - this is the space under the tables, usually no more than 100 mm high.
Now... let’s imagine that we (or our craftsmen) are stupid deer and laid only one 3x6 cable for the cooking room. What should I do now?
I already wrote about the wrong solution: cut the plug and place the oven on a powerful terminal block directly parallel to the hob. So what? The cable is thick, what will happen to it? And this is where the debate begins. An example can be found in this file: Varocnh.pdf (~500 kb) . I saved it as a souvenir, but the topic on the forum has already grown: https://www.mastercity.ru/showthread.php?t=176414.
My problem is that I can't even think of a clear example of why THIS is wrong. Well damn! It’s like wrapping a penis in stretch film instead of a condom and saying “what? The principle is the same - the shell is there! If you try to choose words so as not to get confused, then we are using a cable designed for a 16A plug and a 16A machine, and we are sculpting who knows what under a 32A machine. How will the inside of the oven behave? The cable itself? Maybe it will burn, maybe it won’t. Because it's short. And such a decision violates the guarantee.
Let this be an axiom! YOU CAN'T DO THIS! EVERY, EVERY branch from the main wiring, as soon as its cross-section has decreased, must have protection!
So how to implement this? It's simple! Set the machine to 16A. And next to it there is an outlet for connecting the oven. All business! However, we are specialists. And we do everything technically and carefully. Therefore, we need to solve several questions:
- How to make a branch from a 3x6 cable to the hob
- How to make a branch from the same cable with a reduced cross-section to an automatic oven
- How to close all this from unnecessary hands and eyes
- How to fit it all into the kitchen basement
The solution was proposed by one of the forum participants andrewkhv in the topic https://www.mastercity.ru/showthread.php?t=160262&p=3019415&viewfull=1#post3019415 (), but no one paid (or did not want to pay) attention to it. Addition from 2016. I pulled out the drawing and pasted it into the post, because MasterCity has completely gone bad and they lost a lot of information there.
The basic idea of connecting a cooker and an oven to one machine
Therefore, I will have to pay attention to this decision. In order to neatly place everything in the kitchen plinth, we take a small box for 2-4 modules from ABB. This series of boxes is very convenient for various small tasks. They are neat, and they have standard N and PE tires. Moreover, you can put two buses in one box at once, even if it only has two modules. Therefore, just in case, I will give the articles:
1SL2402A00 ABB LUC 12 402 Wall-mounted box IP40 2 mod. white without door 1SL2404A00 ABB LUC 12 404 Wall-mounted box IP40 4 mod. white without door 1SL2406A00 ABB LUC 12 406 Wall-mounted box IP40 6 mod. white without door
12502 ABB 12502 Zero tire for ABB boxes for 4-6 modules (12404-12406, 12424-12426)
UPDATE . ATTENTION! In 2015, such boxes are no longer available for order. And second ATTENTION: The zero bus is not normally attached to the “LUC 12 402” box (for two modules)! Fastening for the bus starts with a box for four modules. So if you took a box for two modules, then you can simply throw the PE bus to lie in it.
The essence of the solution is simple and terribly stupid! We use double clamps of ABB S200 series machines as a terminal block! These clamps can accept two wires on each side. This means that if we take a two-pole circuit breaker and clamp on its terminals the phase and zero from the incoming cable, and immediately the phase and zero from the cable going to the cooker, then all we have to do is put all the PE on the busbar (remember: PE cannot be switched, so about a three-pole forget the automatic machine!) - then all we have to do is remove the phase and zero with a smaller cross-section for the oven from the automatic machine ( ABB S202 16A ) and PE from the bus bar. And somewhere nearby, stick an overhead socket for the oven.
ATTENTION! This solution, shown below, ONLY applies if you made a mistake and forgot to run a new oven line when you did the new repair. Here I believe that in our shield, from where this line is powered, there is a correct circuit breaker for the cable (for 3x6 - 32A) and there is a residual protection device (RCD), which protects a person from electric shock.
If you want to hang the cooker and oven on an old wire/cable in an old house (Soviet panels with electric stoves), then there is no differential protection (RCD)! And in this case, you will have to make a small shield in the kitchen, where there will be an RCD for the hob and oven. In the same case, you can power other kitchen appliances from it, turning it into an RCD panel for several machines.
I didn't have quite what I needed on hand. But this is even more interesting. So, let's take this box for 4 modules. We take either a separate tire (if it’s difficult to get a regular one) or a standard one. And we take a two-pole machine. For me it turned out to be 25A, so attentive people, please do not swear! =)
And we shove everything into the body:
The simplest version of the workpiece for branching the cooking cable
Figuring out the connections. In extreme cases, machines from most manufacturers don’t care where to supply voltage. In the ABB catalog it is clearly written: voltage can be supplied from any side of the machine. Let's take advantage of this. Let our cooking cable fit so inconveniently that you’ll have to put it on top.
An example of cable installation for connecting a hob and oven
But one comrade from the comments even wrote a caption for the picture for those who are too lazy to think (many thanks to him; maybe there will be fewer questions):
Example of installation of cables for connecting a hob and oven (with captions)
And now the connections are closer. It can be seen that two wires were installed under the machine. And the PE was connected on a busbar. Voila! When using this method, you only have enough box for two modules! =)
Connections close up
In order not to climb with a ruler, I simply put such a box under my kitchen plinth. In my kitchen the legs are 100 mm. Please - a box for 4 modules will fit perfectly right under your kitchen plinth. And next to it is an overhead socket!
ABB LUC panel for 4 modules fits perfectly into a 100 mm kitchen plinth
If you have more free space under the kitchen (or somewhere in the shelves), you can take a box with 6 modules and get creative there.
A more spacious panel allows you to install an additional socket and another machine
For example, add another machine to a dishwasher, or socket a socket directly into the body of the panel.
Internal filling of the shield
But let's evaluate the MOST minimal version of such a device at Electric Installation prices. It will include: two tires for N and PE. Housing for two modules. And even one single-pole C16 circuit breaker. We count:
E1602 Box 1SL2402 mounted 2 modules without door without terminal block IP40 (ABB) x 1 pc = 175.38 E1611 Bus zero 12502 for 5 connections 80A for boxes 12424 12426 (ABB) x 2 pcs = 62.75 x 2 = 125.50 K6111 Automatic switch S201 C16A/1p/ 6.0kA on Din rail STOS201 C16 (ABB)x 1 pc = 199.23
Total: 500.11 ! Well, add here a PVS/VVG 3x6 meter for the cooking surface socket. Well, let's say it will be 1000 rubles in total. It’s because of a simple 1000 rubles that people on the forum are freaking out and starting a bunch of debates! But this is the price of their own safety. And, I note, no one is even forcing us to break tiles, walls, redo the backsplash or add a line to the oven. Although it would be necessary! It is enough to simply install one small box. And then they struggle!
UPDATE @31.03.2015 . But in the comment it so happened that I made a brief summary of the post. I'll add it here:
The task is to understand the MEANING of the whole idea. And when you understand the meaning, you don’t have to repeat literally the same thing.
The meaning is this: There is a fat cable. With a greasy guard that will protect just that greasy cable. How to attach a piece of a weaker piece to this cable? Directly? You can’t - the protection won’t work if the frail one burns: after all, it is designed for the fat one. This means we need to make some kind of protective device. Let's install AUTOMATIC! At 16A so that it protects our oven and its cable.
And then the installation tricks begin. Here we have a piece of LN-PE cable for 6 squares. The power supply to the cooker must be taken directly from this cable. And you also need to feed it to the machine, and from the machine take it to the oven. How can we do this? a) We can assemble a mini-shield. All zeros on one tire. All PE to another tire. Supply the phase to TWO machines. One is 16A for the oven, the other is 32A for the hob. That is, there will be an ordinary shield: a thick cable arrived and was divided into two machines. The machines supplied power to two loads.
b) Since our hob is already protected by an automatic device that powers its greasy cable (it is also designed only for the hob), one of the machines can be thrown out. Instead, branch the phase onto a busbar or terminal.
c) Let us remember that in small panels with 2..4 modules there is usually barely one zero bus. For PE. And remember that ABB and Siemens have double clamps on the contacts for two wires at once. And then we can connect phase and zero to the cooking zone through the machine immediately, directly. And PE through the bus.
Then we choose any of the three options. Or come up with your own based on the size of the shield, the availability of machine guns, tires and other things.
Attention! Some of the comments from this post were moved to an archived post because there were a lot of them and the page took a long time to load. If you didn’t find something, please go to this archived post! There were many interesting discussions there!
Connection methods
To supply power to the stove, you can use one of the following schemes:
- Single-phase. It is carried out when installing equipment in apartments where there is only a single-phase network with a voltage of 220 V.
- Two-phase or three-phase connection, used to increase power and at the same time increase the efficiency of this equipment.
It is not possible to determine in advance one of the schemes according to which the connection will be made. Therefore, manufacturers do not equip the hob with a standard electrical plug.
As for less powerful consumers, which are ovens, they are designed to operate from a household power supply with a voltage of 220 V. Therefore, such equipment is equipped with a standard Euro plug, which includes grounding contacts in its design. This configuration is possible for ovens whose rated current does not exceed 16 A.
The cross-section and materials of wiring in new buildings are already designed for the operation of devices with high energy consumption.
To install the stove yourself, as well as connect particularly powerful models of ovens, use a power outlet with a rated current of 32 A, which is necessarily equipped with a grounding contact. In appearance, such a device resembles a three-phase electrical installation product.
Connecting a panel without a plug
If a socket protruding a few centimeters does not suit you and you want to carefully hide everything in a socket box or junction box, then you can do this in two ways:
through GML sleeves
through the mounting box KlK-5S
First, let's decide on the wires. On many models, a connected cable already comes out of the panel, but it has 4 cores. And you only have three in your socket. What should I do?
The fact is that such hobs are simultaneously designed for both a single-phase 220V connection and a two-phase 380V connection. In this case, one half of the burners will operate from one phase 220V, and the other from the second.
Some people believe that the second phase is only used for control power. This is wrong. Power is distributed evenly across both phases. To connect the whole thing to the usual 220 Volts, simply remove one core to the side and insulate it.
What remains is zero (usually a blue wire), ground (yellow-green) and phase (brown, black or another color).
You can combine two phase wires into one through a lug. For example, in many Bosch panels, where the cable is not removable, this is how it was originally done.
There is also an option with a 5-core cable. Such panels are usually of high power from 7 kW and above. They are initially designed for 380V. To connect them to a 220V network, you need to connect two wires in pairs.
For example, connect the black and brown wires to phase, and the blue and gray wires to zero. The earth yellow-green remains single.
What type of outlet should it be?
Connecting the hob and oven to the network will be successful if you choose the right cables and sockets that meet certain requirements. They are purchased taking into account the power of the devices specified in the documentation. To find the current strength that the outlet will be designed for, you need to divide the power of the device by the mains voltage. The result obtained is increased by 5 units for reinsurance. Hobs operate at voltages of 220 V and 380 V, with a current of 25 A or 32 A.
The first question that buyers have when installing equipment is whether it can be plugged into a regular outlet. Some ovens have low power (up to 3.5 kW). They operate from a standard outlet. For an oven of this type, a 220 V cable and a 16 A socket are suitable. Electric panels have a power of 3.6-7 kW. This type of equipment requires a separate electrical line. In this case, a power socket designed for 32 A is equipped. The plug is not included in the kit, so it will have to be purchased separately.
For a built-in oven that operates with a voltage of 3.5 kW, you will need a three-phase 20 A socket. It can power equipment with a power of 3.6 to 7 kW. If the package does not include a three-phase plug, you should also buy one. Sockets and plugs of such devices are designed to provide grounding, and therefore have more than 3 pins. Connecting an ungrounded device voids the warranty of the equipment and poses a threat to the health of users.
For a built-in electrical cabinet connected to a panel, there is no need to install a special socket. For such equipment, a common power line is provided. If two devices are independent, then two sockets will be needed. The devices will have independent mounting points on the panel and separate cables. To install the socket you will need a cover box. Its characteristics must correspond to the current strength. For a 20 A socket, the unit plug and box must have identical markings. Socket boxes are designed for hidden and outdoor installation.
It is not recommended to buy cheap components for safety reasons. A low-quality product may melt, short out, or install poorly. The Euro socket must have ceramic “insides”. This material can withstand long-term high loads. External installation of sockets is usually used in wooden buildings, where the wiring is also open. This installation is carried out to protect residents from fire. Internal sockets are placed in aerated concrete, brick, and block walls.
Justification for separate connection
The PUE states that to power household loads whose power exceeds 3.5 kW, a dedicated cable with a separate circuit breaker must be used. This means that for power supply a radial circuit must be implemented.
In our case, the hob often has a power that is higher than one kilowatt. Despite the fact that the oven is a less powerful device, there are models that consume one and a half kilowatts or more.
Therefore, these two devices can be considered as a single whole not only from the point of view of functional purpose: cooking, but also load.
Installation operation
Under the hob lies the concept of an ordinary electric stove. Despite the small area of the stove, it must be installed in the kitchen furniture using all the safety measures provided. To ensure that nothing interferes with the production process, it is better to prepare the necessary tools in advance in the form of:
- electric drills
- jigsaw
- screwdrivers
- knife
- ruler, square, pencil
- sheet of cardboard
To cut out a space for the stove, you need to make a template on cardboard and transfer the parameter data there - the width and length of the stove body. You can measure them yourself or take them from the product data sheet.
On the countertop of the cabinet where the stove will stand, cut out the desired hole configuration along the lines of the template. Sometimes kitchen units include special floor cabinets into which a standard oven and stove can be inserted.
The next step is to create a kind of niche where the panel will be installed
Along the marked rectangle, starting from the corners, carefully so that unnecessary chips do not form, make holes with a drill, finish the work by cutting out with fine teeth with a jigsaw
The result is a window, the cooking panel is lowered there, the joints must be treated with special substances. You can choose a sealant or the seal needs to be silicone. To conveniently fit the equipment into the place created for it, it can be adjusted - expanded or narrowed with a tool. The kit should include clamps for more secure fastening of the panel to the tabletop. Finally, excess processing material must be removed.
How to install a hob. Installation method
Cooktops are a type of built-in household appliances; therefore, before connecting an electric stove, you need to understand the technology of this very “embedding”, in other words, installation of the product in a kitchen cabinet.
To complete the task yourself, you will need a small set of hand tools:
- electric drill;
- jigsaw;
- screwdriver;
- knife;
- ruler, square, pencils and cardboard.
Installation is carried out in three stages:
Marking the future cutout for the panel. It is necessary to accurately measure the width and length of the installation space using a ruler.
Attention! Measure not the cooking surface itself, but the body underneath it. You can sometimes check the correctness of measurements using information from the instructions
It is most convenient to mark according to a template, which is easy to make from cardboard. For some models, such templates may be included in the package.
Draw the lines of the future cut on the tabletop of the cabinet using a ruler and square. You can make an overlap of no more than 1 mm to ensure easy entry of the panel.
Installing a hob in a cabinet
Cutting a niche to install the panel. You need to start by drilling holes in the corners of the marked rectangle. The diameter of the drill must be at least 9-10 mm. Drill type - for wood or metal.
The next step is cutting out with a jigsaw. The jigsaw file should have a fine tooth and be intended for finishing cuts. To prevent the formation of small chips, future cuts can be sealed with masking tape.
Insert the jigsaw file into the drilled hole, press the sole firmly against the tabletop and then start cutting, carefully moving the jigsaw along the marking lines at low speed.
Installation and fastening of the panel. Insert the hob into the made window, and seal the junction of the working surface with the table top with a special sealant or silicone-based sealant. If necessary, the landing window can be expanded with a file or repeated cutting with a jigsaw.
At the bottom, securely fasten the panel to the tabletop using the clamps included in the kit. After fastening, remove excess sealant with a rag or cut off the protruding parts of the sealant with a knife.
Socket for oven and hob
Electric hobs and ovens consume a lot of power (from 2.5 to 10 kW). Therefore, according to modern electrical safety rules, an oven socket requires a separate dedicated power line from the panel.
Moreover, if the hob and oven provide for independent installation, then they will require two sockets, with separate connection points on the distribution panel.
Many people have a question: is it possible to connect an electric oven from an existing regular outlet that was previously installed in the kitchen for a kettle, microwave, etc.?
- It is possible, the main thing is that 3 conditions are met:
- the oven must have a power of no more than 3.5 kW;
- the socket is connected with a three-core copper cable from the panel with a cross-section of at least 2.5 mm2;
- in the electrical panel, replace a conventional circuit breaker with a thermal release with a differential circuit breaker with a rated current of no more than 16 A.
According to the third condition, some may experience inconvenience and minor problems. As a rule, many people still have one 16 A - 25 A circuit breaker for the entire socket group, plus one more for lighting.
If you replace the only circuit breaker for sockets with a differential 16 A and connect the oven through it, it will be practically impossible to use other electrical appliances while the oven is working and food is being prepared.
Here you will have to make your own choice, either in favor of saving (not installing new wiring, a separate outlet, etc.), or in favor of comfort and convenience. It is not recommended to leave a regular modular machine in the panel without protection against leakage currents when connecting the oven to an old outlet.
The installation height of the new socket under the oven should be no more than 90 cm from the floor. Although it is also often placed at the level of the kitchen legs.
The most important thing here is ease of use. For safety reasons, when wet cleaning and wiping the oven with a wet cloth, it must be disconnected from the power supply.
And crawling under the very bottom of the kitchen every time to pull out the plug is not always convenient. In addition, here you need to take into account possible situations such as water leaks and kitchen flooding. Therefore, the socket should still be raised 5-10 cm above the floor.
The main requirement for placing the outlet is not to place it directly behind the oven. You can install it on the left, on the right, or as mentioned above - under it, directly near the floor.
When you have decided on the location of the outlet, you need to connect it.
Connect the phase and neutral cores of the cable to the outermost contacts of the socket
In this case, it does not matter at all where the phase will be located, and where the zero is - on the right or on the left. Connect the grounding conductor (yellow-green) to the grounding terminal (usually the middle one)
Replace the frame or decorative cover.
Wiring Requirements
Particular attention should be paid to the quality of electrical wiring, on which the safety and correct functioning of the entire system depend.
The following factors are taken into account: The oven and hob are connected via grounding. The plug or socket for the oven must have 3 or 5 contacts (in the first case for a 220 Volt network, in the second - for 380 Volts)
In the tasks of the old building, this condition was not always adhered to. However, modern requirements are different, so a new cable will be required. Electrical wiring is connected to the distribution box only through an RCD (residual current device). Low-power equipment (up to 2.5 kilowatts) is connected to the existing electrical network (if it meets modern requirements). To connect powerful equipment you will need a dedicated line.
The optimal cable cross-section is 6 square millimeters. A wire with this cross-section will withstand a long-term load of 10 kilowatts. The recommended protection class for the machine is C32. If the panel power does not exceed 8 kilowatts, a cable with a cross-section of 4 millimeters and a circuit breaker with protection class C25 will be sufficient.
The correct choice of cable is VVGng or NYM. When purchasing a cable, take into account the diameter of the conductor. For a wire with a cross-section of 4 millimeters, the diameter will be 2.26 millimeters, and for a 6 mm conductor - 2.76 millimeters.
The data for the residual current device is one point higher than the rating of the circuit breaker. For a 32 Ampere device you will need a 40 Ampere RCD.
Sockets
The socket must be designed for the power of the devices and network parameters. They select according to the current value - for example, if the wiring cross-section is for 16 A, which is suitable for an electric oven with 3.5 kW, then you need a model specifically for this or a larger characteristic. In this case, if you take such a product for 16 A, then it will be enough, so you can put it at 20 or 32 A.
Sockets for high currents may differ in shape and holes; often the plug of the electric oven cord has a geometry for them, for example, for 32 A - three flat terminals. If the network is three-phase, then a product with 4 or 5 wires will be required. If the calculations are incorrect, the outlet will heat up and burn out may occur. Old Soviet models will not definitely fit - they are 6 A. You need to choose starting from type F and 10 A. For greater safety, you can choose a waterproof size with a lid (for example, IP 44 from splashes).
Socket placement
It is recommended to install the socket at a height of 30 cm from the floor for safety in case of flooding. Usually it is placed no higher than 1 m (SP 31-110-2003 clause 14.35). It is not advisable to install it under or above heating devices and boilers.
Approximate recommendations for distances: to window openings - at least 10 cm, door openings - 60, from the boiler tank, oven heating chamber - 60.
All advice on how to properly install an outlet is not specific and of a recommendation nature, but it is important to at least approximately take into account the rules and the appropriateness of the placement option. For example, it is reasonable to provide a gap of 10–30 cm from the floor for safety in case of flooding
The optimal height of sockets under normal circumstances is not lower than 90 cm (eye level), according to the European standard - 30 cm. In conditions of limited space and technical features of the kitchen, the rules may not be followed
But it is always important that the socket is not directly under or above the devices, but on the side, behind, in areas that are as protected as possible from heat flows and splashes. Often kitchen furniture does not have a back wall, so the socket is hidden there
Installing the Terminal Block
Connecting household appliances via a terminal block is considered more reliable. Contact here is ensured by clamping screws, which is more reliable than when connected through a plug and socket. The disadvantage of this connection is the relative difficulty of breaking the circuit. You will have to remove the cover, unscrew the bolts that hold the wires, and pull them out. Therefore, it is used only if there is a circuit breaker on the line. Moreover, it is desirable that it be bipolar and break both phase and neutral at once.
In terminal blocks of the “old” type - carbolite - the contacts are open; it is better to install such a block in a small box. In order not to overpay for the box, you can use a standard junction box. A three-pin block fits perfectly into a square one. If you need to connect the oven to a three-phase network, you will need to install an oblong model under the five-pin socket.
Option for installing a terminal block for connecting an oven
The box can be fixed to the wall surface. This option is suitable if the wiring is pulled after the repair is completed. If the cable is laid in a groove, it makes sense to recess the box into the wall.
When connecting, you will need to insert the wires stripped of insulation under the metal plates and tighten the contact with clamping bolts (screwdriver). In this case, you need to make a decent effort - so that the contact is good
Please note that the wires cannot be mixed up when connecting. The phase wire from the oven should be opposite the phase wire coming from the panel, the neutral (zero) should be strictly opposite to zero, the ground should be opposite the ground wire
It is important. be careful
Choosing a location for the outlet
Technically speaking, you can place sockets from devices anywhere in the kitchen. However, some places will be inconvenient from a practical or aesthetic point of view, so when choosing a place you need to be guided by the following rules:
- A hidden outlet would be a good option, since an open outlet does not look very aesthetically pleasing. For example, you can place the socket below at the level of the plinth - this way it will not be conspicuous.
- Another option for a hidden location would be to install an outlet in an adjacent closet. However, please note that the socket should not be located near the side walls, as this is a fire hazard.
- Some people place the outlet behind the cabinets - this approach is incorrect. Such a plug will be difficult to pull out of the socket, which will create a lot of unnecessary problems for the owner.
Note! It is recommended to attach the socket to the wall, although if the device is located in an adjacent cabinet, it can be placed directly on the floor of the cabinet.
Varieties
At the moment they are distinguished.
- Type:
- dependent;
- independent.
2. By heating or heating method:
- gas;
- electric.
The first option has a switch. You can turn on the equipment with just one button. Operation is only possible in conjunction with a hob, that is, paired with a stove. Regarding the independent type, it works in autonomous mode and is equipped with a separate control panel, which provides for each actively used function of the oven.
As for gas ovens, they are more suitable for those people who are accustomed to standard cooking devices. Regarding the connection, it should be noted that connecting an oven without a plug to work is quite difficult; it is best to entrust this process to specialists. This type of equipment is equipped with burner nozzles, which are located at the bottom of the oven.
If you have chosen an electric oven, you have made the right decision. As for the connection diagram for an electric oven, it is quite simple, which allows you to make the connection yourself, without outside help.
Common Mistakes
In conclusion, let’s look at the popular mistakes that a beginner can make when assembling an electrical network to connect an oven or hob:
- The wire is too thin. Electrical wiring should be selected according to the total power that will be connected to the cable. If you choose a wire that is too thin, it will begin to melt quickly, which will negatively affect the “health” of the equipment and the performance of the system.
- Ignore jumpers. Some people don't put jumpers on the devices because they think the panel/cabinet will work anyway. However, this is fraught with negative consequences that negatively affect functionality. For example, if you do not put jumpers on the panel, then some of the burners will not heat up.
Practice shows that people do not have problems choosing equipment and cables - they buy the right sockets, find a cable with the right cross-section, and so on. Problems most often arise when assembling the plug and socket, since improper assembly may cause the network to become inoperative. If you doubt your abilities, then it makes sense to seek help from an electrician so that he can correctly assemble the electrical network.
Connecting the hob to the electrical network: single-phase and two-phase options
The greatest number of questions arise if it is necessary to connect the cooking surface to a network whose voltage is 220 V. Situations are especially problematic when the number of panel wires does not match the number of cables in the network. As an example, we can take the Hansa electric stove. Such a device is connected via 6 wires.
Hob connection diagram - single-phase version
If the network includes 3 lines, then the problem of connecting such a panel can be solved quite simply. For connection in this case, special jumpers are used, which are quite easy to purchase at any specialized store. Sometimes they are sold complete with the device. If necessary, you can do them yourself.
How to connect the stove in this case? Before connecting the device to the power supply, it is recommended to carefully study the instructions. The step-by-step process for connecting a panel to a single-phase system is as follows. The first thing to do is to find the lid on the back of the cooking surface. Next you need to open it. To do this, you can use a regular screwdriver. The terminals are located under the cover.
In the event that there are 6 terminals, and there are only 3 cables in the apartment, it is necessary to connect the contacts. To perform this operation, you will need to connect 3 wires that correspond to the phases with each other. Next, one neutral cable is connected to another. There is no need to touch the earth. The result is 3 lines.
In some models, the device already has jumpers. In such a situation, it is easiest to connect the hob. You just need to connect the network wires and the contacts of the electrical appliance. Video materials on this topic will help you answer the question of how to connect an electric stove yourself.
Two-phase connection diagram for a 380 V electric stove
Two-phase slabs are very rare. Often, when installing such a device on their own, people encounter difficulties. However, there is nothing complicated about it. When connecting such devices to a three-phase network, one of the cables is insulated.
How to connect the hob to a three-phase power supply (380 V)
Before connecting the cooking device to a three-phase electrical network, you must prepare a special cable. It should contain 5 copper conductors. The cross-section of each element in this case is 2.5 mm²
Moreover, it is not so important what kind of cable it is. Both single-core and multi-core options are suitable for this.
Related article:
Before connecting the hob and oven, you must check the network for the absence of current. In this case, the jumper is used only for two wires, which are zeros. These cables are designated by the Latin letters N. Thus, the jumper is used for wires N1 and N2. It is worth noting that some models of hobs have digital line designations. In this situation, the zeros correspond to the numbers 4 and 5.
As for the phase wires, they must be connected to each phase (one at a time). The diagrams in the pictures help you understand how to connect an electric stove. It is also recommended to study the relevant video materials. As mentioned above, the color of phase wires may vary depending on the standard. The most common cables are red, yellow and green. When connecting, you should be careful, as there is a possibility of incorrectly connecting the wires to the plug.
With a three-phase network, the neutral (zero) is connected at the top, and the ground, on the contrary, at the bottom. In turn, the wires indicating the phases are located in the middle. This order must also be followed at the outlet.
Connecting the device to a three-phase 380 V network
Connecting the oven plug
If the oven comes with a factory plug, then it may not be collapsible, but solidly cast. And then cutting it off entails loss of warranty, be careful in this matter.
But as a rule, the latest models with an oven do not come with an installation plug, so you also need to connect it yourself. This is explained by the fact that in different countries, the oven can be connected to at least several types of completely different outlets.
And it is simply not profitable for the manufacturer to guess which plug will be needed where.
You strip the wire from the oven, crimp it with NShV lugs and pass it through the plug body. Phase and neutral (usually gray = brown and blue conductors) are placed on the outermost contacts of the plug.
Again, it doesn’t matter where it goes, phasing doesn’t matter here. Yellow-green grounding conductor - on the middle contact. To prevent the wire from dangling inside, secure it with a clamp and tighten the plug body.
Important note: when connecting wires to a plug, never rely solely on the colors of the core insulation . Be sure to unscrew the terminal block cover on the electric oven and check where the wiring is connected (the correct connection to the terminals is discussed below).
When for some reason there is no access to the terminals, or there is a warranty seal there, use a regular Chinese multimeter tester. The grounding conductor must be connected to the oven body.
And therefore, when connecting the probes in the insulation measuring mode to the core and to the housing, a sound signal should sound or zero should appear on the display. That is, resistance R=0 Ohm. This way you will find “ground”, the remaining two wires will be phase and neutral.
Common mistakes
Common problem: the panel is connected, but turns on and off spontaneously. The cause of this behavior is not necessarily due to incorrect installation.
The problem is caused by a variety of factors: child lock is turned on, water gets on the touch parts of the equipment, or accidentally pressing the wrong buttons. Some models are equipped with a cookware recognition function, and until there is a pot or pan on the panel, the stove will not heat up.
Another common problem: only two of the four available burners are functioning. Burners that are not working show residual heat (indicated by the letter H). The situation is caused by blocking that occurs when three-phase models are connected single-phase. The blocking is done programmatically.
Therefore, before tampering with the connection terminal block, it is recommended to study the documentation for the equipment in advance.
Electrical cooking appliances
Since this article will focus on connecting powerful electrical appliances that require special network operating conditions, we will consider their main types - hobs, stoves and ovens.
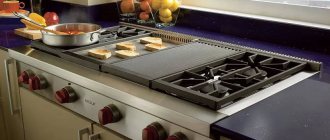
Hobs
The hob is a modern alternative to the top of a gas stove.
Glass-ceramic hobs are deservedly considered the best of electric hobs. You can also find combination hobs on sale, which include not only an electric heating zone, but also gas burners.
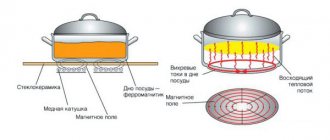
The youngest type of hobs is induction. In them, the heating element is replaced by an electromagnetic coil.
The advantages of electric hobs are their compactness, attractive appearance, variety of models and design solutions. In addition, they are easy to operate and can be installed in cramped conditions (in particular, above cabinets and drawers), and can also be used in buildings that are not connected to the gas supply system.
Ovens
Electric ovens provide much more even heating of food cooked with them than electric ovens. In addition, some modifications are equipped with a microwave function, which will save space in the kitchen. Electric ovens are easy to use and easy to adjust; they are usually equipped with a timer.
Oven
Electric stoves
The electric stove combines a hob and an oven. A modern electric stove differs from the gas stove familiar to the average person in the absence of burners and the presence instead of a heated glass-ceramic coating.
Given the obvious advantages of the household appliances described above, it cannot be denied that it does not always make sense to give preference to them. With the purchase and installation of energy-intensive electrical appliances, your costs for consumed electrical energy will increase significantly, and the electrical network of your home itself may require serious modernization, which is not always possible in an apartment building.
Choosing the right socket for the hob
In order to correctly connect the cooking surface to the electrical network, you need to select a suitable outlet. Today you can find a huge variety of different types on sale.
It is recommended to pay attention to special devices called power devices. They are made of durable plastic material and are most often designed for current strength exceeding 10 A
Sockets for connecting an electric stove
Such sockets for hobs and ovens are divided into two types: two-pin and three-pin. The connection process is carried out using the power plug and the socket itself. There is another connection option, which takes into account the direct connection of the hob to the terminal block of the distribution box.
If necessary, you can purchase a regular block and a separate installation box. In order to connect cables in such a terminal block, you must first strip the end of the copper wire. Then rings are made from it into which screws with plates must be inserted.
At the next stage, the prepared wire is fixed in the socket under the hob. The oven can be connected using the same circuit. You need to purchase a separate outlet for it.
To connect the oven use a separate socket
The cable fixed in the socket must be tightened using a screwdriver. The best option for installing a socket when installing an oven is to fix it below the level of the box. However, the electrical appliance should not be too close to the floor, as this may lead to a short circuit if the water supply leaks.
Connecting the hob and oven to the electrical network is carried out taking into account safety precautions
It is very important to strictly follow the installation algorithm. Any deviations from the instructions may lead to failure of the devices.
Features of connecting the panel and cabinet to the barrier block
There are two things to consider during the connection process.
The first of them is that the connection of the panel and cabinet to the linear terminal block, regardless of the design of the connection block of the device itself, is always performed according to a star circuit, which is shown in schematic form on the left side of the figure.
Connection diagram of line terminal block, hob and cabinet
The use of a loop circuit on the right side of the figure is not recommended due to the fact that the fixing elements of the hob terminal block are not initially designed to connect two wires to it.
The second feature is that, given the large currents flowing through the socket, it is necessary to ensure low contact resistance in the area where the panel/oven cables connect to the terminal block.
To achieve this effect do:
- reinforcement of individual cable wires with lugs (an example of such a component is shown in the figure below);
- the use of a special crimping tool for their installation.
Fork-type tubular cable crimp lug
The correct connection is additionally checked by the color of the insulation of the individual cable cores, their purpose is additionally controlled by the accompanying documentation of the device.
Connection diagram to the machine.
Connecting the hob
There are three main connection schemes. Let's look at them in detail.
When connecting cables to the socket and terminals of the electric stove, follow the color coding - this will allow you to avoid mistakes.
Three-phase 380V circuit (common in private homes and businesses)
Phases A, B, C – are connected to terminals L1-3 of the hob. In this case, it is necessary to remove the jumpers installed at the factory between terminals L1-3. Zero N is connected to terminals N1-2. Protective conductor PE – to the PE terminal.
Connecting the oven is much easier. Most often, such devices are already supplied with an electrical cord with a plug for connection, so the Euro plug is simply inserted into a Euro socket. To connect to machines or terminals, it is best to use a separate cable, since if you cut off the plug on the cable from the kit, this can significantly affect the warranty for this device.
The oven connection diagram is always single-phase:
- Phase L is connected to terminal L of the oven;
- Zero N is connected to terminal N;
- Protective conductor PE – to the PE terminal.
Single-phase circuit 220V
The most common option in apartments. As follows:
- Phase L is simultaneously connected to terminals L1-3. To do this, we install two copper jumpers between them (they are already included with the stove).
- Zero N is connected to terminals N1-2.
- Protective conductor PE – to the PE terminal.
You can access the terminals of the electrical surface through its back cover - it is unscrewed and removed.
Two-phase circuit 380V
It may also be that in a country house or apartment there are not three phases, but two: A and C are present, but B is missing. In this situation, the hob is connected to a 380V network using a two-phase circuit:
- A jumper is placed on L1-2 and phase A is connected.
- At L3 – phase C.
- The rest is similar to the previous options.
If for some reason you do not have jumpers, you can make them yourself from a wire whose cross-section is no less than that of the supply (i.e. 6 mm²).
For flexible wire, use insulated ring or fork lugs to ensure better contact with the terminal. They are pressed onto the core using special press jaws.
Gas cooker and/or oven
Everything is simple here. In gas devices, electricity is consumed only for ignition and, perhaps, some kind of automation, such as a gas detector. That is, the consumption is on the order of tens of watts. The devices are plugged into a regular electrical outlet; this outlet can be connected to one cable with any other devices. For example, you can hang a dishwasher, a chopper, a gas stove and a hood above the stove in one group of sockets (for one cable and a 16-amp circuit breaker). It makes no sense to connect a gas stove to a separate cable and a separate machine for any safety reasons.