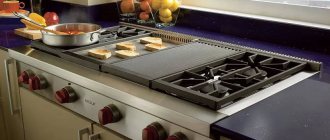
A built-in hob is an almost mandatory attribute of a modern kitchen. In recent years, most consumers prefer electric ovens, since they are ahead of gas equipment in many characteristics.
A separate outlet for the hob and oven and a dedicated line ensure the functioning of these powerful electricity consumers.
A little theory
Let's consider the power formula for the case when the voltage in the outlet is 220V, connecting these quantities:
P=I*U*cosφ
The letter P is power (in fact, in the passport or sticker on the panel of the oven or hob, the numbers before the letter W indicate power), I is the amount of current consumed (later it will become clear why this value is important), U is the network voltage (220 V), cosφ – power factor (equal to 0.95).
Thus, the current of the oven (at P=3.5 kW, according to formula 1) is 16.7A, the hob current (at P=7.2 kW, according to formula 1) is 34A.
The electrical network of the apartment (house) is protected from emergencies (such as short circuit, overload) using circuit breakers (automatic circuit breakers) and/or differential circuit breakers (definitely not RCDs).
When we go to the electricity meter to record readings, we see basically the same picture. These are automatic switches.
The size of the switches is characterized by the maximum operating current. Let's say, in new buildings they use automatic equipment 16A (16 amperes), 32A, 40A, an input automatic circuit is on average 50A.
Knowing all this, let's try to understand how to correctly connect to the power grid.
Let's consider two situations:
- the apartment (house) is being renovated, and
- repairs have already been completed.
1. So, repairs are being made. You should think about the fact that the kitchen will not have an electric stove, but rather an oven and a hob, at the stage of designing the residential electrical network. First of all, it is necessary to determine where these electrical appliances will be located in the kitchen furniture. After this step, the locations of the sockets are determined.
It is important to understand that you should not install the socket directly behind the oven or hob - in addition to the fact that you can make a mistake in the size of the depth (when the plug is plugged into the socket, the cabinet may not fit), the principle that applies, for example, during warranty repairs will be violated - First disconnect the power, only then dismantle it.
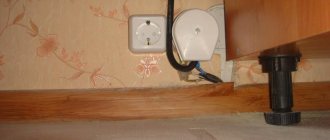
Therefore, it is better to place sockets in the cabinets adjacent to the left/right:
The installation height of sockets must be at least 30 cm from the floor. There is another location:
In this case, there is inconvenience of use (access is limited by the depth of the kitchen furniture; if there are lower furniture facades, their dismantling is necessary; the likelihood of “not fitting” into the size and not safe - the sockets are too close to the floor; the tap hose has broken and there is chance of being under voltage 220V).
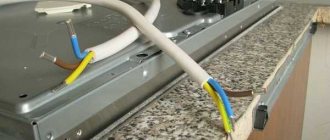
When making repairs, there is often a desire to use old electrical wiring. In the case of a hob, if the cable is old, at least copper 3 * 4 mm2, you can think about using this cable. If the old cable is aluminum of the same cross-section or copper of a lower cross-section, it is definitely better to replace it with VVG-ng-3*6.
In the case of the oven, we have already calculated that its current consumption is 16A. This implies that the cabinet is fully loaded with work. If the cabinet is powered from the same circuit breaker with other consumers (lighting, other electrical appliances) that also consume electricity, a network overload may occur and the machine will trip (let’s say an electric kettle and an oven are connected to the same outlet group, the cabinet consumes 16A, the kettle consumes 6.5A - total current is 22.5A, therefore, a 16A circuit breaker will turn off both the kettle and the cabinet). It would be more reasonable to provide a separate line for the cabinet, laid with a VVG-ng-3*2.5 cable, with its own 16A circuit breaker.
There is a situation when repairs have already been completed and instead of the planned installation of an electric stove, a decision is made to use an oven and hob. As we have already determined above, the best solution is a separate line (group) for the cabinet and for the hob. Even after renovation, it is often possible to draw a line under the kitchen furniture to the switchboard (with the installation of a separate machine).
Attempts to connect the cabinet together with the kitchen sockets do occur. But you need to be prepared for the situation with the electric kettle described above. The only thing that can be noted in favor of this method is that the actual power of electrical appliances may be slightly lower than the rated power, the load on the electrical cabinet is not always maximum (but do not forget about the holidays) - the main principle is that when the cabinet is working, nothing else is working, or look for a combination: percentage of cabinet power - you can turn on something else.
Plugging an oven and a hob into the same outlet is not effective, but it is dangerous.
The fact is that the cross-sections of the power wires of the cabinet and the surface are different. So the wire from the cabinet to the outlet should have a cross-section of 2.5 mm2, and for the surface at least 4 mm2. The circuit breaker for the hob 25A, 32A (depending on the specific model) is designed for sections from 4mm2. So, if the oven malfunctions, the surface automatic will simply not work, and this is fraught with fire (we will not consider the case when all the insulation burns, a short circuit will still occur, and the automatic will work).
How to connect the power cable yourself
So, we have chosen a way to connect our primary kitchen devices. But our power cables are connected conditionally. Let's find out how to do it for real. Traditionally, we will consider separately the oven and hob.
For an oven (with a power of no more than 3.5 kW, P = 3.5 kW), you need to purchase a piece of PVA cable 3*2.5 and a regular 16A household plug. The length of the cable must be such that after connection the cable is not strained
When connecting to a plug (let's agree that the cable has brown, blue and yellow wires), it is important to connect the yellow (yellow-green) wire to the ground terminal. The order of connecting phase and zero is as follows: the brown wire is the phase, the blue wire is zero. In a socket, the phase can be determined using a phase indicator (any household appliance does not respond to the phase-zero order - if the TV plug is inserted opposite to the current position, the TV will still work, however, it will be better to follow the operating conditions of this electrical appliance)
Next, remove the small plastic cover at the cable connection point.
In a socket, the phase can be determined using a phase indicator (any household appliance does not respond to the phase-zero order - if the TV plug is inserted opposite the current position, the TV will still work, however, it will be better to follow the operating conditions of this electrical appliance). Next, remove the small plastic cover at the cable connection point.
There we will see the connection for each cable core.
The connection is made as follows: L is phase, N is zero, the earth sign is yellow (yellow-green are the colors of earth from an electrical point of view) according to the colors of the cores
Very important: the colors of the wire cores in the plug with a ground-phase-zero combination must correspond to a similar combination in the connected device. If the phase in the plug is the brown wire of the cable, then in the oven it is the brown wire. Exactly the same with zero and ground - purely by color
Exactly the same with zero and earth - purely by color.
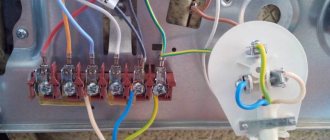
Cooking surface. As a rule, hob models are universal. This means connecting to both 220V and 380V. The transition to both one and the other voltage is realized by installing the appropriate jumpers. On most hobs, at the point where the power cable is connected (a conveniently accessible plastic cover), you can see a similar connection diagram:
In the case of an apartment, where the allocated voltage is 220V, the output is obvious (in the case of a private house, with a allocated 380V, electricians adapt the power output to the hob to 220V).
In order for the hob to operate on 220 V, jumpers must be installed according to line 3 of the connection diagram. For a voltage of 380V, select line 1. In practice it might look like this:
Or like this:
As for the power cable, it is better to use PVS 3*6 (except for the case when the cable in the socket has a smaller cross-section - which is 3*4mm2). In any case, it is recommended to adhere to the principle - the cross-section of the power cable cannot be less than the cross-section of the cable in the socket (the wire protruding from the wall to connect the hob). It can do more. As mentioned above, the hob is a large consumer of electricity. With a power of 7.3 kW (P=7.3kW), it is necessary to install a socket and plug designed for a current of 32A.
The combination of colors of cable cores with ground, phase and zero is completely similar to the case of an oven.
When connecting the power cables of the oven and hob, the brand of PVA cable was indicated. PVA is a flexible multi-core power cable in PVC insulation. But with a permanent connection to an electrical wiring cable (and this is in most cases a VVG-ng cable with monolithic inflexible cores), it would be more effective to use a cable of a similar brand. From the point of view of ease of connection, it is possible. From the point of view of operation, we are still dealing with household appliances, and they have some mobility. A monolithic cable is designed to be stationary; there is a possibility of core breakage, but not great. The probability of breakage of the connection points inside the device is already higher. Therefore, multicore cable (MCC) is more convenient in this case.
When performing work on electrical equipment, strictly follow safety precautions against electric shock.
Socket for hob and oven
Well, considering that the hob is a built-in appliance, it practically does not need an outlet at all. You can connect an electric or induction panel in the same way, only here you need to pay attention to the power consumption and take wires of the appropriate cross-section and connecting devices of the same characteristics and sizes. Well, if there is still a need to install an outlet, then it is better to take a high-quality one made in Germany or another European country, but not China. And it’s even better to install our domestic ones, they are somehow more designed for our domestic voltage, surges and outages, and we have always had quite powerful devices.
In general, to be honest, it is not necessary to make a socket on the hob; you can simply connect the wires by twisting them and soldering them, it is very reliable. Well, if you need an outlet, then it must withstand sufficient power, somewhere around 25-32 amperes, at 220 volts. The hob consumes up to 7-8 kW and requires a separate cable core with an automatic input device. Sockets can be with three or four contacts, single and two-phase, respectively. Based on the number of phases you have, you need to select a hob and an appropriate socket.
An electric hob is a fairly powerful consumer of electricity; it requires not only a good socket, but it is also advisable to run a separate electrical wiring line from the panel board, installing an individual switch for it, or a switch with safety plugs or circuit breakers.
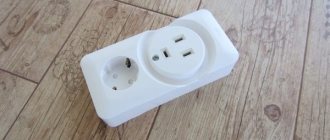
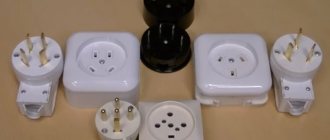
The socket must be grounded, now all plugs come as they say “Euro” - that is, they have thick contacts and a third grounding contact - this is what a “Euro” plug and a socket for it look like - the socket must be installed with a marking of at least 16 amperes.
Frequent connection errors
If, after connecting, the panel starts to work in an unknown way - it turns itself off, and after a few seconds it can turn on again. Do not rush to commit incorrect installation.
It is quite possible that the child lock is set in the program, water was spilled on the sensors, or the wrong buttons were accidentally pressed. Some models have a dish recognition function. Until you place the pan on the burner, it will not heat up.
Another common problem is that only two of the four burners work, and the rest show residual heat (the letter H is displayed). This is due to blocking during single-phase connection of three-phase models.
This way the power is limited by software.
Therefore, first thoroughly understand the documentation and only then go back to the connection terminal block.
Five common mistakes that can lead to failure of your panel or fire due to improper installation and connection: 1 Using a regular Euro socket and 16A plug for panels with a power of more than 3.5 kW.
2345
Sources – https://cable.ru, Kabel.RF
What type of outlet should it be?
Connecting the hob and oven to the network will be successful if you choose the right cables and sockets that meet certain requirements. They are purchased taking into account the power of the devices specified in the documentation. To find the current strength that the outlet will be designed for, you need to divide the power of the device by the mains voltage. The result obtained is increased by 5 units for reinsurance. Hobs operate at voltages of 220 V and 380 V, with a current of 25 A or 32 A.
Very high power devices may require a 40A outlet.
The first question that buyers have when installing equipment is whether it can be plugged into a regular outlet. Some ovens have low power (up to 3.5 kW). They operate from a standard outlet. For an oven of this type, a 220 V cable and a 16 A socket are suitable. Electric panels have a power of 3.6-7 kW. This type of equipment requires a separate electrical line. In this case, a power socket designed for 32 A is equipped. The plug is not included in the kit, so it will have to be purchased separately.
For a built-in oven that operates with a voltage of 3.5 kW, you will need a three-phase 20 A socket. It can power equipment with a power of 3.6 to 7 kW. If the package does not include a three-phase plug, you should also buy one. Sockets and plugs of such devices are designed to provide grounding, and therefore have more than 3 pins. Connecting an ungrounded device voids the warranty of the equipment and poses a threat to the health of users.
For a built-in electrical cabinet connected to a panel, there is no need to install a special socket. For such equipment, a common power line is provided. If two devices are independent, then two sockets will be needed. The devices will have independent mounting points on the panel and separate cables. To install the socket you will need a cover box. Its characteristics must correspond to the current strength. For a 20 A socket, the unit plug and box must have identical markings. Socket boxes are designed for hidden and outdoor installation.
It is not recommended to buy cheap components for safety reasons. A low-quality product may melt, short out, or install poorly. The Euro socket must have ceramic “insides”. This material can withstand long-term high loads. External installation of sockets is usually used in wooden buildings, where the wiring is also open. This installation is carried out to protect residents from fire. Internal sockets are placed in aerated concrete, brick, and block walls.
Connection via terminal block
This connection is made in two cases:
- if the connecting cable of the hob or oven does not have a plug;
- if a terminal block is installed on the device itself as an element of connection to the network.
Figure 4 shows both of these cases in schematic form.
Options for connecting the cable to the panel and oven
In the latter case, to connect, connect two terminal blocks with a cable: the device itself and the linear one, and the cable itself is not included in the delivery package of the device and must be purchased separately.
This option is labor-intensive to implement, but does not limit the distance between the cabinet/hob and the power cable exit point, and also allows you to very accurately select the length of the connection cable and avoid the formation of loops.
Most often, the functions of a linear terminal block are performed by a so-called barrier block.
One of the barrier block options
This type of terminal block got its name due to the presence of a protrusion-barrier separating the fastening components of the input and output sides of the device.
The block can be installed openly on the wall or mounted inside a cutting box, for which it is provided with appropriate mounting holes for screws or screws.
Choosing a socket and plug for the hob
Hobs consume on average 7-8 kW. This indicator corresponds to a current of 32-38A. At the same time, ordinary sockets and plugs for household electrical appliances are designed for a current of 16A-25A. Therefore, to connect electric stoves and ovens, special power sockets and plugs for hobs are used that support large cross-section cables (4-6 mm²).
There are several types of components on sale that meet these requirements. To connect hobs, the RSh/VSh-32 connector is most often used. There are two types of such sockets and plugs: for connecting to a single-phase network and for connecting to a three-phase network.
Attention! The socket for connecting the hob is selected based on the characteristics of a particular model. The power of the panels ranges from 3.5 to 10 kW. The higher the energy consumption, the more severe the demands placed on components and wiring.
Thus, having bought a new stove, it is not plugged into the first outlet that comes across. For uninterrupted and safe operation of the device, special components are required.
For induction hob
The average load of an induction cooker is 25-32 A, depending on the number and power of burners. Therefore, to connect the device, use a power outlet with a dedicated wiring line. The cross-section of the cable used depends on the load of the device: for a current of 25 A, a copper cable with a cross-section of 4 square meters is used. mm, for a load of 32 A - 6 sq. mm.
Important! For safe operation of the hob, electrical wiring with protective grounding is required. This means that for a single-phase network a three-core cable is supplied, and the power socket and plug set used has a third grounding contact.
For table top induction cooker
A tabletop induction electric stove is a low-power device that has a cord and plug for connection to a regular household outlet; there is no need to install a special power outlet. But first it’s worth assessing the condition of the socket box and electrical wiring. If the plug of an electrical appliance does not make good contact with the connectors, replace the socket. You also need to make sure that the electrical wiring is in good condition and that the connected cable has a cross-section of at least 2.5 square meters. mm.
For gas hob
A gas hob connection to the mains is required if the appliance is equipped with an electric ignition function. In this case, install a separate 16 A socket with grounding, connected to the circuit breaker on the panel.
The socket box is installed on the wall under the table top. If the cabinet has a blank wall under the stove, a hole is cut out in it for free access to the equipment.
Installation instructions
Installation of reinforced components for electric and induction cookers is trusted to specialists. But if you have experience, you can handle it yourself. Installation involves performing the following steps:
- Turn off the power to the cable you will be working with. After a power outage, be sure to check that there is indeed no current in the wire.
- In the selected location, using a puncher, make a hole for the socket cup (for a hidden power socket).
- The power cable is threaded into the socket box and the protective braiding is removed from it. The freed wires are stripped to 0.8-1 cm.
- Connect the wires to the socket mechanism. The yellow-green wire responsible for the “ground” is attached to the central grounding contact. “Phase” and “zero” are connected to the extreme contacts.
- After the wires are secured, the socket box is firmly fixed in the wall using gypsum mortar.
- When the solution dries, the mechanism is secured with screws and the upper insulating housing of the power outlet is installed.
At this point, the installation process is considered complete. Now connect the power and check if the equipment works.
This is interesting:
Connecting the hob and oven to the same outlet and is it possible to do this?
All about retractable sockets for the kitchen
All about sockets on the kitchen apron
Oven socket
Many people have a question: is it possible to connect an electric oven from an existing regular outlet that was previously installed in the kitchen for a kettle, microwave, etc.?
It is possible, the main thing is that 3 conditions are met:
- the oven must have a power of no more than 3.5 kW
- The socket is connected with a three-core copper cable from the panel with a cross-section of at least 2.5 mm2
- in the electrical panel, replace a conventional circuit breaker with a thermal release with a differential circuit breaker with a rated current of no more than 16A
According to the third condition, some may experience inconvenience and minor problems. As a rule, many people still have one 16A-25A circuit breaker for the entire socket group, plus another one for lighting.
If you replace the only circuit breaker for sockets with a differential 16A one and connect the oven through it, it will be practically impossible to use other electrical appliances while the oven is working and food is being prepared.
Here you will have to make your own choice, either in favor of saving (not installing new wiring, a separate outlet, etc.), or in favor of comfort and convenience. It is not recommended to leave a regular modular machine in the panel without protection against leakage currents when connecting the oven to an old outlet.
The height of installation of a new socket under the oven should be no more than 90cm from the floor. Although it is also often placed at the level of the kitchen legs.
The most important thing here is ease of use. For safety reasons, when wet cleaning and wiping the oven with a wet cloth, it must be disconnected from the power supply.
And crawling under the very bottom of the kitchen every time to pull out the plug is not always convenient. In addition, here you need to take into account possible situations such as water leaks and kitchen flooding. Therefore, the socket should still be raised 5-10cm above the floor.
The main requirement for placing the outlet is not to place it directly behind the oven. You can install it on the left, on the right, or as mentioned above - under it, directly near the floor.
Another safety point when installing an outlet: if there is a gas supply nearby, for example to a hob (let’s say you have a gas supply and not an electric one), then the outlet should be at least 60cm away from it.
When you have decided on the location of the outlet, you need to connect it.
Connect the phase and neutral cores of the cable to the outermost contacts of the socket. In this case, it does not matter at all where the phase will be located, and where the zero is - on the right or on the left. Connect the grounding conductor (yellow-green) to the grounding terminal (usually the middle one).
Replace the frame or decorative cover.
Errors
It should be said that if the connection is made by a non-specialist, then the risk of various problems and errors during operation of the oven increases significantly. Let's look at the most common cases of problems with such equipment. One of them is that the oven constantly knocks out the machine. There may be several reasons for this.
- It is possible that other household electrical appliances are connected to the network at the same time as this device, which simply increases the load on the network. You can try turning them off.
- The problem may be that there is a voltage surge in the network. That's why the RCD is triggered.
- Due to a violation of the wire insulation, electric current may enter the device body. Then the oven will short out if the main cable is damaged.
- Physical damage is caused by the plug, the cord itself, or the socket where the device is connected.
- The power selector may also fail. A sign of this will be the operation of the machine after some time of operation of the device.
- If there are problems with heating elements.
- If the fan breaks down and the oven simply overheats.
Another common problem is that the device does not heat up. First, you need to exclude such trivial problems as a broken surge protector, a faulty extension cord, a broken socket, a lack of voltage in the network, a broken power cord, a broken plug itself, and so on. After this, you should ring the elements of the device to determine the location of the breakdown. As a rule, the technician will find a problem either in the control unit of the device, the power switch, or when checking the heating elements. As a rule, the latter case is where the problem lies. It may also be caused by faulty wiring.
Another fairly common problem is overheating of the electric oven. As a rule, there is a malfunction of the thermostat. But such a problem can only be fixed by a specialist who has the appropriate equipment at hand. It also happens that the device gets very hot from the outside. In this case, most likely, we will be talking about a malfunction of the cooling fans. A specialist will fix this problem in an hour.
There are also other malfunctions. For example, the oven simply does not turn on. Then you should check the voltage supply to the electrical appliance. That is, sometimes the causes of oven malfunction can be a regular power outage or problems with the outlet. It also happens that the cord simply burns out. This problem especially often occurs when the cord is long and it burns out somewhere in a place that is not externally accessible to the user. If a problem occurs, you should immediately check the integrity of the cord in all places.
It also happens on modern models that even if a microcrack appears somewhere on the door, this will break the tightness of the structure. So if a problem occurs, you should very carefully examine the integrity of the device door. Another common error that users encounter is a broken temperature sensor. This element is extremely important because it protects the furniture that surrounds the oven from fire.
Another reason that can cause any error is a faulty control board. Let's say right away that this board cannot be repaired, it just needs to be replaced. And you shouldn’t try to repair it, since after soldering it still won’t work for a long time in normal mode. It should be noted that connecting an oven is a rather responsible process that must be approached with the utmost seriousness. You should not try to make a connection if you do not have basic knowledge in the field of electrical engineering, then it is better to contact specialists. And if you have such knowledge, connecting the oven will not be difficult in just a couple of hours.
In the next video you will see how to connect the oven.
General requirements
Before purchasing an oven and hob, allocate a specific place in the kitchen for them. A hole is cut in the countertop for the built-in panel. A special niche in the furniture is arranged for the closet. When installing the oven, do not allow the device to distort. To do this, check the surface on which the device will stand with a level. If the oven is placed crookedly, this will cause uneven heating and rapid wear of the equipment, causing breakdowns.
Check that there are gaps of at least 5 cm between the appliance and the walls of the furniture, and about 7-9 cm between the bottom of the appliance and the niche. When planning the location of new equipment, it is also taken into account that the hood and ventilation hole should be located near the oven, or better yet, above her.
Regarding the connection, the installation must comply with the requirements described below.
To the plug
Sometimes an oven or stove is sold with a plug. This element can be collapsible or solid. It is not recommended to remove the plug, otherwise if the device breaks down, you will be denied warranty service. In the latest models, the installation fork is often missing. This is due to the fact that in some countries the device can be connected to different types of sockets, so it is not advisable to equip it with any specific type.
The plug for an electric stove or oven is selected taking into account the power consumption of the device. For example, if the hob is 5 kW, and during the calculations you find out that you need a 32 A socket, then you will need a plug with the same parameters. The number of poles corresponds to the number of phases (plus zero and ground contacts). Plugs are purchased taking into account the network parameters. For powerful devices (more than 3.5 kW), a power supply of 220 or 380 volts is suitable.
To wiring
The safety and longevity of the devices directly depends on the quality and correct choice of wiring. If the lines are old, they must be replaced with new copper ones. When installing cables, the following factors are taken into account:
- the electrical wiring is connected to the junction box using a protective shutdown device;
- use three-core or five-core cables;
- You can plug in an oven with a power of less than 3.5 kW into a regular outlet only if the wiring is copper and has a cross-section of at least 2.5 mm²;
- for dedicated power lines, choose VVGng or NYM cables;
- 4 mm² copper wiring carries 5.9 kW and has a diameter of 2.26 mm, 6 mm² cable carries 7.4 kW and has a diameter of 2.76 mm;
- individual power lines are not combined with conventional socket or lighting lines.
To cable
A cable with three current-carrying cores is used to provide a voltage of 220 V. It is capable of supporting the operation of household appliances with various power parameters (3-10 kW). Sockets for 16 A, 32 A or 20 A are installed for it, depending on the characteristics of the devices. If the equipment must be connected to a 380 V network, then you will need to lay a five-core cable with a cross-section of 2.5 mm². With such a wire, you can provide a load of up to 16.4 kW.
Additional requirements are non-flammability, double insulation and moisture resistance.
To the circuit breaker
To protect the cable from loads, you will need a circuit breaker. The machine is selected depending on the cross-section and number of strands of copper wiring. For powerful equipment, it is recommended to purchase a class 32C switch. For devices with a load of up to 3.5 kW, a 25 A automatic machine is suitable, above this power - 40 A.
Installing the hob
The installation of an electric hob is carried out in accordance with the general requirements, regardless of the type of heating element using high frequency induction field or heating due to resistance to electric current. In terms of their external design, these types of appliances are practically indistinguishable, so the same tools and consumables are used to install them in the kitchen. If we talk about electrical panels of any kind, they will all be built into furniture. Those appliances that are located on the surface of the furniture are called electric stoves without an oven. We will not consider the process of how they are installed.
How to install the hob correctly? This question arises if the furniture suppliers did not cut the mounting opening on the kitchen countertop. If you decide to perform this operation yourself, then you will need the following tools: an electric jigsaw, a drill, wood drills, a ruler and a pencil, as well as a screwdriver and pliers. A step-by-step algorithm for performing work on installing a built-in hob is presented below.
- Determination of sizes. At the first stage, we determine the dimensions of the opening into which the device must be built. This information is reflected in the operating instructions for the equipment. If it is missing, then it is necessary to carefully measure the device’s seat. It is necessary to add 5 mm to the overall dimensions to ensure optimal clearance.
- Marking the opening. To perform this operation you will need a long ruler, a square and a pencil. The installation opening should be located no closer than 50 mm from the edges of the table. Otherwise, thinner areas of the tabletop may collapse, especially if it is made from low-quality chipboard. This concludes the preliminary work.
- Drilling holes. In the corners of the resulting rectangle, it is necessary to drill four through technological holes, without going beyond the marked contour. The operation should be performed with a wood drill with a diameter of 8–10 mm. It is necessary to drill strictly perpendicular to the surface of the tabletop, securely holding the drill in a vertical position.
- Cutting out the opening. We insert the blade of an electric jigsaw with fine teeth into one of the holes and make a cut on the table top according to the markings, pressing the tool tightly against the table surface. In a similar way, we cut the tabletop along the entire marked contour. After completing the work, we check that the dimensions of the mounting niche correspond to the seat of the electric hob.
- End processing. The ends of the mounting hole must be protected from exposure to water. To do this, you can use a special sealant or any other material that can protect the wood base of the countertop from the negative effects of moisture. The sealant included in the hob kit is glued to the edges of the mounting opening.
- The final stage. At the final stage of installing the hob, carefully place the device in the installation opening. Before this operation, you can apply a layer of silicone sealant to the area of the countertop that will be covered by the edges of the panel. The appliance must fit snugly to the surface of the countertop with minimal gap. We fix the panel to the tabletop using standard fixing clips.
At this point, the installation of an induction hob or other type of surface is considered complete. You just need to check that the device is securely fastened to the tabletop and you can move on to the next step. We have described how to install the hob, now we will describe the process of connecting it to the electricity supply network. These chapters of the article can be considered as a guide for those who are planning to independently connect an electric hob to the power supply. So, let's begin! The next section of our story will be devoted to the hob connection diagram.
Wiring Requirements
Particular attention should be paid to the quality of electrical wiring, on which the safety and correct functioning of the entire system depend.
The following factors are taken into account:
- The oven and hob are connected via grounding. The plug or socket for the oven must have 3 or 5 contacts (in the first case for a 220 Volt network, in the second - for 380 Volts). In the tasks of the old building, this condition was not always adhered to. However, modern requirements are different, so a new cable will be required.
- Electrical wiring is connected to the distribution box only through an RCD (residual current device).
- Low-power equipment (up to 2.5 kilowatts) is connected to the existing electrical network (if it meets modern requirements). To connect powerful equipment you will need a dedicated line.
- The optimal cable cross-section is 6 square millimeters. A wire with this cross-section will withstand a long-term load of 10 kilowatts. The recommended protection class for the machine is C32. If the panel power does not exceed 8 kilowatts, a cable with a cross-section of 4 millimeters and a circuit breaker with protection class C25 will be sufficient.
- The correct choice of cable is VVGng or NYM. When purchasing a cable, take into account the diameter of the conductor. For a wire with a cross-section of 4 millimeters, the diameter will be 2.26 millimeters, and for a 6 mm conductor - 2.76 millimeters.
- The data for the residual current device is one point higher than the rating of the circuit breaker. For a 32 Ampere device you will need a 40 Ampere RCD.
Note! Grounding an electrical household device is an essential condition for ensuring safety.
Installation location and rules
Before installing sockets, you should analyze the space in the kitchen, since there should not be a sink, drain or water pipes nearby. You cannot make a socket right behind the wall of the oven (where it can heat up), or mount it above the countertop level. According to European standards, a height of 15 cm above floor level is optimal. However, you should not take this recommendation literally. Usually they start from existing conditions and goals. The best location is considered to be the wall area below the working surface, if there is normal access to it. They also try to place the outlet away from the refrigerator and stove. Such measures reduce the risk of short circuit.
Some electricians suggest not installing separate power outlets, but instead powering the oven or panel using an extension cord. Do not follow such advice as it may create a fire hazard. The well-being of all family members depends on how correctly electrical equipment is connected.
Connection procedure
Regardless of the type of device, connecting the oven occurs in several stages:
The existing wiring needs to be assessed. You can only connect the oven if:
- Physical condition is good.
- The conductor cross-section is not less than required.
- There is a circuit breaker or at least a switch on the line. They are needed to de-energize equipment in an emergency.
If the existing wiring does not meet the requirements, it is necessary to lay a new route from the panel to the intended installation location of the oven. On this line you will need to place a machine of a suitable denomination. We will talk in more detail about the cross-section of wires and the ratings of the machines for them later.
What to do
First you need to prepare the oven for connection to the mains. The oven may have a power cord. Sometimes it ends with a three-prong plug (grounding), sometimes there is no plug. Depending on the connection method, you can install a plug on the cord, or you can do without it. You can even change the cord - this does not even affect the warranty.
It's all about what connection method you choose. You can - traditionally through a three-pin socket with a plug. You can use one that is not so convenient, but is considered more correct. Through the terminal block. Depending on the chosen connection method, connect the electrical wires (more on this below).
In some cases, a power cord with a plug is already connected to the oven
- Prepare a place for installing a built-in oven. Manufacturers usually recommend that cold air flows from behind and from below for ventilation. If the furniture has a back wall, a hole is made in it or it is completely cut out as much as possible. To ensure air flow from below, you can lay pads a few centimeters high on the sides (it is important that there is also an air gap at the top between the oven and the countertop. In addition, the side racks of the cabinet must be adjusted to the size of the oven - it must be secured to the sides with screws. This is the plan The picture will be in your instructions with exact installation dimensions
- The built-in oven is installed in place, we check the vertical and horizontal installation with a building level, and adjust if necessary. We open the door, there are holes on the side strips, we install screws in them that will hold the oven in place. To prevent the furniture walls from breaking when screwing in the screws, first make a hole using a drill with a diameter slightly smaller than the diameter of the screw.
That's all, actually. The oven has already been connected, but not everyone fully understands some of the nuances and, most likely, there are a lot of questions about the electrical part. Let's talk about them further.
Electrical connection
If everything is fine with the wiring, it was laid recently, there is a separate line for connection with a properly functioning grounding, and the oven is not very powerful - about 2.5 kW, no questions asked - put the plug in, turn it on and that’s it. But if the wiring is more than ten years old, you don’t know what condition it is in, what cross-section the wire is, it’s unknown, it’s better to run a separate line, do everything according to the rules and only then connect the oven. In this case, you don’t have to be afraid that something will happen to the wiring.
You can connect the built-in oven to a normal line. It is better if it is dedicated - only for this unit
The latest models of ovens have become not very “gluttonous” - the struggle for savings is yielding results. If you look at their characteristics, the average installation power for a built-in oven is in the range of 2.6-3 kW. But we are talking about rather expensive products. Equipment in the cheaper segment can have significantly more power. Models with pyrolytic cleaning will also be more powerful.
That is why it is recommended to connect the oven to a dedicated line with a large cross-section of conductors, on which a circuit breaker is installed. Recommended cross-section is 6 mm2. Such a conductor can withstand a long-term load of 10 kW, which is more than enough. It is recommended to install a class C 32 circuit breaker on this line. This has a very large safety margin - lines with such parameters are often installed at the entrance to a dacha or a house in a village. Its installation will require a substantial investment - both the cable is not cheap and the machine costs quite a bit.
Cross-section of copper wires Allowable continuous load current Maximum load power for a single-phase network 220 V Rated current of the circuit breaker Limit current of the circuit breaker Approximate load for a single-phase circuit
| 1.5 sq. mm | 19 A | 4.1 kW | 10 A | 16 A | lighting and alarm |
| 2.5 sq. mm | 27 A | 5.9 kW | 16 A | 25 A | socket groups and electric heated floor |
| 4 sq.mm | 38 A | 8.3 kW | 25 A | 32 A | air conditioners and water heaters |
| 6 sq.mm | 46 A | 10.1 kW | 32 A | 40 A | electric stoves and ovens |
| 10 sq. mm | 70 A | 15.4 kW | 50 A | 63 A | opening lines |
If your oven has a power much less than 8 kW (even when all available devices are turned on at the same time), you can lay the cable with a cross-section of 4 square meters. mm, and put the automatic machine at C 25. It will be no less reliable, but more economical. By the way, for greater safety when installing an oven, it is recommended to use two-pole circuit breakers. When triggered, they will turn off not only the phase, but also the zero, which in some cases is important (in the event of an insulation breakdown).
The cable can be used VVGng or NYM. The parameters are 3*4 or 3*6, respectively. Just be sure to measure the diameter of the conductor when purchasing - too often manufacturers, in an attempt to make products cheaper, skimp on copper. As a result, instead of the declared 4 sq. mm, we have, at best, 3, and this is no longer safe - the wiring can heat up, which can lead to a short circuit and fire. So, check the diameter of the conductor. For a cable with a cross-section of 4 sq. mm it should be 2.26 mm, for 6 sq. mm - 2.76 mm. Read more about how and what to measure, how to calculate here.
CONNECTING THE ELECTRIC STOVE INTO THE OUTLET
Initially, most electric stoves have a power cord, at the end of which there is a 32A - 40A power plug, the type common in our country.
If you already have a corresponding socket installed on your kitchen wall (see image below), you just need to plug the plug into the socket and push the electric stove into place, and that’s where the whole connection will end.
But, unfortunately, things are rarely that simple. The fact is that in the kitchen, to connect an electric stove, there is often only a cable outlet, sometimes it is hidden in the junction box, but usually there are just wires sticking out of the wall. In addition, the outlet or socket for an electric stove is not always located where you need it; read about how you can easily move it yourself - read HERE.
In addition, the plug installed on the stove may not fit your outlet on the wall, because there is no single, unified standard for power connectors for kitchens. Often, even identical connectors from different manufacturers do not fit together. Let's figure out how best to perform installation in such conditions.
Safety precautions
Now let's say a little about the safety rules when connecting a built-in oven. Caution must be exercised not only when working with electrical wiring, but also when connecting a built-in or separate oven. First of all, we are talking about personal safety.
Considering the fact that an electric oven has a fairly serious energy consumption, additional electrical wiring should be installed under it, using an undamaged and undeformed wire with a conductor cross-section that will conduct a current of 2.5 or 4 square millimeters.
But this will be relevant if you have to work with an oven whose power exceeds 3.5 kilowatts.
The connection of the current-conducting wire must be carried out exclusively through a separate machine, where it is easy to connect a hob that runs on electricity. The machine itself, which will work at home, should be selected depending on the value of the entire load that is supplied to it, and add about another 10% to this indicator.
To ensure that the subsequent use of such a device is safe, grounding must be done correctly. And if the house is private, then this will not be a problem. But if we are talking about a room in an apartment building that was built several decades ago, then here you will have to ground the individual core itself to the bus of the common electrical panel. If we are talking about equipment with not very high power, up to 3 kilowatts, and the wiring in the house is quite good and can fully cope with the loads, then ordinary European sockets can be used for installing ovens.
Pros and cons of this connection method
There is only one advantage and it is always visible - ease of use, because you no longer have to fiddle with carriers, trip over wires or worry that the tee will loosen the contacts of the socket and fall out of it.
In order to fully evaluate the possible shortcomings, you need to disassemble the device and see what wire is connected to it - most often it is wiring with a cross-section of 1.5 or 2.5 square millimeters. Such a cable will easily support the connection of one household device with a power of about 2 kW and, with some stretch, a couple of such devices. What saves sockets and wires is that several powerful devices are connected to one of them quite rarely - basically it is one device of 1-2 kW and several weaker ones.
Before you install an outlet or several from an existing one, you must take into account that each subsequent one is a connection of wires, which is an additional resistance to electric current. Even if you connect one powerful device, but to the last socket, there is a possibility that the previous contacts will heat up. The nature of electric current is such that it has a vibration effect on the wiring, as a result of which the contacts inevitably weaken over time. According to the rules, all electrical contacts in enterprises must undergo an annual inspection and tightening of bolted connections.
On the other hand, in living rooms the most powerful device is usually an electric heater - if it is not homemade, with contacts made unknown, then two sockets connected in series and their wiring can easily withstand it.
The third question is the kitchen - this is where the most powerful devices are usually assembled in terms of electricity consumption: dishwasher, microwave, electric oven, oven, electric kettle, toaster and others that “eat” from 1.5 kW. “Hanging” them on one wire is strictly not recommended, unless it is the weakest of them, for example, a microwave oven paired with a kettle or toaster.