A built-in hob is an almost mandatory attribute of a modern kitchen. In recent years, most consumers prefer electric ovens, since they are ahead of gas equipment in many characteristics.
A separate outlet for the hob and oven and a dedicated line ensure the functioning of these powerful electricity consumers.
Wiring Requirements
Particular attention should be paid to the quality of electrical wiring, on which the safety and correct functioning of the entire system depend.
The following factors are taken into account:
- The oven and hob are connected via grounding. The plug or socket for the oven must have 3 or 5 contacts (in the first case for a 220 Volt network, in the second - for 380 Volts). In the tasks of the old building, this condition was not always adhered to. However, modern requirements are different, so a new cable will be required.
- Electrical wiring is connected to the distribution box only through an RCD (residual current device).
- Low-power equipment (up to 2.5 kilowatts) is connected to the existing electrical network (if it meets modern requirements). To connect powerful equipment you will need a dedicated line.
- The optimal cable cross-section is 6 square millimeters. A wire with this cross-section will withstand a long-term load of 10 kilowatts. The recommended protection class for the machine is C32. If the panel power does not exceed 8 kilowatts, a cable with a cross-section of 4 millimeters and a circuit breaker with protection class C25 will be sufficient.
- The correct choice of cable is VVGng or NYM. When purchasing a cable, take into account the diameter of the conductor. For a wire with a cross-section of 4 millimeters, the diameter will be 2.26 millimeters, and for a 6 mm conductor - 2.76 millimeters.
- The data for the residual current device is one point higher than the rating of the circuit breaker. For a 32 Ampere device you will need a 40 Ampere RCD.
Note! Grounding an electrical household device is an essential condition for ensuring safety.
Let's sum it up
What to do if you are terribly far from electricians, like the Decembrists from the people? And do you understand ampere-watts like a grandmother with a cell phone? Come to us!
We will consult, understand the situation, select the necessary devices and cables. At least on a domestic scale, at least on an industrial scale, if necessary. We have been working with electricians for a long time, we know the subtleties and secrets that we will generously share with you.
READ MORE: How to connect a socket with a switch in one housing to a two-core wire
Call and ask!
Phone or ask an electrician.
There is an opinion that a plug and a block for an electric stove are not needed, they only take up space and interfere with work. Instead, the wiring from the distribution board is sealed with the cable coming from the electric stove. In fact, installing an additional connector is a prerequisite and guarantee of safe operation of the electric stove, which must be periodically de-energized if it is not in use or problems arise.
Cabinet location
Before connecting the oven, you need to prepare a place for it. Place the cabinet in a special niche in the furniture.
When preparing the site, the following parameters are observed:
- Avoid distortions of the surface on which the equipment will be installed. If the cabinet is installed unevenly, improper heat distribution inside the cabinet cannot be avoided. As a result, the equipment will break down.
- Provide gaps between the surface of the furniture and the oven. This is necessary to avoid excessive heating of the kitchen unit. The recommended distance from the furniture walls to the oven is 5 centimeters. The distance between the bottom of the niche and the base of the cabinet is from 8 to 10 centimeters, and between the wall and the back cover is at least 4 centimeters.
Safety regulations
When installing and operating power outlets, the following safety precautions must be observed:
- The connection must be made with the line at the input package completely de-energized.
- Use only high-quality materials from trusted manufacturers in your work.
- Place nests no closer than 50 cm from kitchen sinks, water, gas and sewer pipes.
- Be careful when connecting wires, check that the connection is correct before applying voltage.
Compliance with these rules will allow for proper installation; using the stove will not cause problems for many years.
Cable and circuit breaker
Since hobs and ovens are large consumers of electricity (their power starts at 3 kilowatts), you will need a dedicated cable to power them.
The optimal choice is a cable with three cores (necessarily with a green-yellow ground wire). The cable cross-section is selected according to the rating of the oven.
If the load is from 3 to 3.5 kilowatts, you will need a cable with a cross-section of 2.5 millimeters. The socket is needed for 16 Amperes, and the circuit breaker is needed for 25 Amps. If the power of the electric stove exceeds 3.5 kilowatts, the cable cross-section is 4 millimeters, and the socket is chosen for 32 Amperes.
List of preparatory work
Before making an electrical connection to an electric hob, it is necessary to carry out preparatory work. Their order should be as follows:
- • We lay the electrical cable from the panel.
- • Connect the outlet.
- • We install the circuit breaker and connect the wires.
- • Connect the flexible cable to the VP and the plug.
- • Check the functionality of the connection.
If the room has been renovated, then the installation is carried out using cable channels. According to safety regulations, hidden installation is preferable, but in a wooden house the cable is laid outside.
We install the socket taking into account the characteristics of the countertop. As a standard, it is mounted at a height of 90 cm from the floor. But you can place it under the bottom of the kitchen cabinet. When the preparatory work is completed, installation work can begin. Before doing this, we must turn off the protective switching device in the electrical panel. Lower the lever and make sure there is no voltage using a multimeter or an indicator screwdriver.
Hob fork
To supply electricity to the hob, a three-core copper cable is used. If you need 380 volts, you will need a cable with five cores. The cable cross-section is selected based on the existing load and according to calculations of the operating current. However, the cross-section should not be less than 4 square millimeters. The machine should be rated at 32 Amperes, and if a 6 mm cable is used, the machine should be rated at 40 Amps.
The peculiarity of the hob is its extremely fast heating. This circumstance is caused by the high power of the device, which can reach 7 kilowatts.
The plug is connected as follows:
- Buy a 220 Volt power plug (alternating voltage).
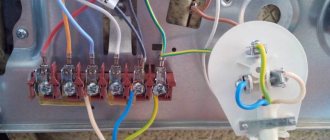
- Remove the protective panel. There are 6 pins on the inside of the plug that are used for connection.
- Terminals numbered 1, 2 and 3 are used to connect the phase conductor (L). These terminals are connected with a jumper.
- Contacts numbered four and five are used to connect zero (N).
- The sixth terminal is intended for grounding.
Note! If the phase conductor is connected incorrectly, the protective device (RCD) or differential circuit breaker will trip.
How to connect the oven
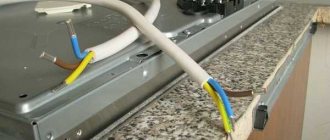
Quite often, devices - both Electrolux and Samsung - do not come with a plug, but only a power cable. What kind of socket and plug it needs determines the power of the device, and how to connect it depends on the wiring in the kitchen. The photo shows the cable connection.
- First of all, it is necessary to establish that the network parameters in the apartment meet the requirements of the device. The instructions contain a table of factory values, which indicates all the requirements, including which plug is needed.
- A load-bearing plug is attached to the power cable. Connecting the plug to a Samsung, Bosch or Electrolux oven is done in the same way. As a rule, wires are marked in different colors. If the wires are the same, the phase is set using an indicator screwdriver.
- The oven is mounted in a niche in such a way that there is a gap of 30 mm between the back wall and the wall, and 85 mm between the floor and the body. You need to make sure that there are no gas pipes between the device and the wall. The device heats up noticeably during cooking, and gas pipes, due to operating conditions, exclude thermal insulation.
How to connect a model without a cable
Some high-power devices are sold without a plug or power cable. It is believed that direct connection to the wiring is more economical and reliable, since it eliminates unnecessary contacts. If this method seems unsafe or too unusual, you can connect the plug to the oven. Which one is needed for the device needs to be clarified in the instructions.
- Install a Euro socket - 16 or 32 A.
- Remove the protective cover from the back of the case. There are three wires here: red, white and black. Green is also possible - grounding.
- Colored wires are connected to the terminal connectors; the colors of the cord must match the shade of the connector wires: black and red mean alternating current, green and white mean grounding.
- The wires are screwed to the connector and the joining areas are wrapped with insulating tape.
- Then install the protective shield on the housing and connect the device.
- The oven is placed taking into account the same requirements: a gap around the body, no gas pipes.
The model with a hob is connected in the same way. The photo shows an oven without a plug.
Hob connectors
Sockets for 220 Volt hobs are characterized by a special location and shape of the holes for the plugs. Switching is carried out in such a way as to avoid incorrect connection of the phase and protective conductor.
380 Volt sockets are stationary switching devices with five sockets. These sockets are suitable for three-phase loads. There is a neutral wire and grounding.
Before buying such a power socket, you need to make sure that the plug fits the contact holes: it can be easily inserted into the connectors. If only a small amount of force is required, this will not deform the conductive pins.
Connection instructions:
- Turn off the current supply to the power cable.
- We test the presence/absence of voltage in conductive elements with an indicator.
- We connect different phase wires to contacts 1 to 3. We connect the conductors independently of each other.
- We connect zero to the contact connector.
- We connect the grounding to the desired terminal, which is indicated by a six or a sign with a tree pattern.
Subtleties of choice
When understanding the question of how to choose an outlet for an electric stove, it is necessary to take into account that today it is a three-phase power outlet with grounding of the appropriate level. In addition, it is important to consider which stove is connected - a cooking surface or an oven for baking.
Important: the distinguishing feature of this equipment from classic household equipment is its high-quality interaction with high-power voltage, reflected in the thickness of the contacting conductors.
In addition, kitchen devices have many metal components, which are excellent conductors and, in the unfortunate event of events, harm the user. To prevent this from happening, you need to have an installation with sufficient grounding power. In equipment designed for use in the kitchen, the plug for the electric stove is equipped with a separate pin element. It is important to consider that this is not a three-prong plug, but a three-phase one with a zero element.
Connection diagrams
Connect the hob to the outlet in accordance with one of three schemes.
Single-phase circuit for 220 Volts
This option is common in apartment settings. The scheme is implemented as follows:
- We connect the phase wire (L) to terminals L-1, L-2, L-3. We place a pair of copper jumpers between the terminals.
- We connect the neutral wire (N) to terminals N-1 and N-2.
- We direct the protective conductor PE to the appropriate terminal.
The terminals are accessible through the rear panel. To do this, unscrew the screws.
Three-phase circuit 380 V
This is the second most common scheme. Most often used in a private home.
We connect like this:
- We connect phases A, B, C to terminals L-1, L-2, L-3.
- We connect terminals N-1 and N-2, PE in the same way as in a single-phase circuit.
Jumpers are not needed in a three-phase circuit.
Two-phase circuit at 380 Volts
Two-phase circuits are rare, but they do occur. In such cases, for example, A and C may be present, but B absent.
The hob is connected to a 380 Volt network as follows:
- We install a jumper on L-1 and L-2 and connect phase A.
- On L-3 we set phase C.
- All other actions are carried out in the same way as in other variants of the schemes.
List of preparatory work
Before making an electrical connection to an electric hob, it is necessary to carry out preparatory work. Their order should be as follows:
- • We lay the electrical cable from the panel.
- • Connect the outlet.
- • We install the machine, connect the wires.
- • Connect the flexible cable to the VP and the plug.
- • Check the functionality of the connection.
If the room has been renovated, then the installation is carried out using cable channels. According to safety regulations, hidden installation is preferable, but in a wooden house the cable is laid outside the plaster.
We install the socket taking into account the characteristics of the countertop. As a standard, it is mounted at a height of 90 cm from the floor. But you can place it under the bottom of the kitchen cabinet.
In general, all preparatory work has been completed. Do not forget to turn off the power to the line, for which we turn off the machine. We verify that there is no voltage using the available device.
Connecting a panel without a plug
An outlet that extends a few centimeters from the wall does not always suit the owners of the room. The solution is to hide the protruding elements of the outlet.
You can do this in one of two ways:
- Using GML sleeves (tinned copper sleeves).
- Using the KlK-5S mounting box.
We immediately decide on the conductors. On some models, an already connected four-wire wire is removed from the panel. However, in many cases there are only 3 wires in the socket box. Such surfaces are designed for both a single-phase 220-volt connection and a two-phase 380-volt connection. Half of the burners will be powered from one phase, and the other half from the second phase.
There is a misconception that the second phase is only needed to power the control. In fact, the power is equally distributed over both one and the second phase. To connect to 220 Volts, you need to insulate one of the wires.
It remains to connect the neutral (blue conductor), the ground wire (yellow-green) and the phase (black or brown wire). If desired, connect two phases into one through a tip.
Note! Some Bosch hobs with a permanent cable come with a tip by default.
Sometimes there is equipment with a five-core cable. Such surfaces are characterized by high power (more than 7 kilowatts) and are designed for 380 Volts. To connect the panel to a 220-volt network, you need to connect 2 wires in pairs. For example, black and brown wires are sent to phase, and blue and gray conductors are sent to zero. The earth (green-yellow color) will remain single.
Note! The specified connection does not entirely comply with the rules, since the protective conductor PE must have the same cross-section as the phase conductors. In the described case, the protective conductor will be twice as thin.
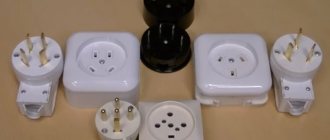
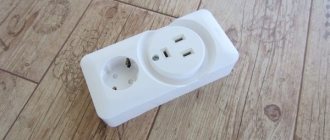
Power socket
Power sockets are installed to connect powerful electrical equipment to them: oven, fryer, electric stove. They differ from conventional sockets in that they have reinforced input and output terminals designed for currents from 25 A.
The contacts of such sockets do not heat up during operation of household appliances.
Power sockets come in closed (hidden) and open (furnace) installations. Closed installation sockets are mounted into the wall (internal socket), this makes them protected from damage. Open-mounted sockets are located on the wall, they are visible, and the installation is open.
Don't buy the cheapest outlet
According to the current strength, sockets are divided into:
- 25 A;
- 32 A;
- 40 A;
- 63 A;
- 125 A.
The power of the power outlet must correspond to the household appliances. Always purchase a kit - a plug and a suitable socket.
Common mistakes
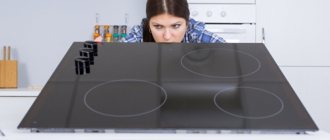
Common problem: the panel is connected, but turns on and off spontaneously. The cause of this behavior is not necessarily due to incorrect installation.
The problem is caused by a variety of factors: child lock is turned on, water gets on the touch parts of the equipment, or accidentally pressing the wrong buttons. Some models are equipped with a cookware recognition function, and until there is a pot or pan on the panel, the stove will not heat up.
Another common problem: only two of the four available burners are functioning. Burners that are not working show residual heat (indicated by the letter H). The situation is caused by blocking that occurs when three-phase models are connected single-phase. The blocking is done programmatically.
Therefore, before tampering with the connection terminal block, it is recommended to study the documentation for the equipment in advance.