When purchasing a kitchen free-standing electric stove, in most cases, to connect it, you just need to plug the plug into the outlet. But many people do not purchase a complete set, but only the upper part - the hob.
We suggest you consider how to connect the hob Electrolux (Electrolux), Zanussi, Bosch (Bosch), Gorenje, Hansa, Samsung (Samsung), Siemens, Ariston and others with your own hands, as well as the cost of such connection in specialized companies.
Operating principle of induction panels
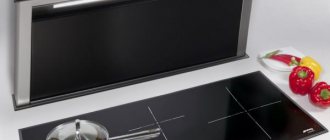
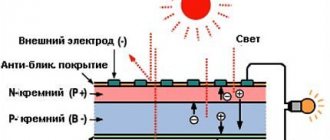
The induction surface is a regular ceramic panel with induction coils located inside. In each of these coils, when turned on, an electromagnetic field is generated, which causes the movement of molecules in the bottom of the dishes installed on the panel. At the same time, the high speed of molecules generates heat, which is used for cooking. If you remove the cookware from the hob, the movement of molecules in its bottom stops.
An induction surface from any manufacturer (AEG, Hansa, Gorenje, etc.) must be connected to a separate home electrical wiring line, which must be led directly from the switchboard and a specially installed machine. This line should end with a socket with a grounding contact, designed for a current of 32 to 40 A. The distance from the floor to the socket should be less than 0.9 m.
Important! To connect a surface with induction, it is prohibited to use existing sockets, the electrical cable to which is supplied from the kitchen junction box.
Before installing the induction hob and connecting it to the power supply, you must determine:
- its location:
- connection diagram;
- contents of delivery.
Final part
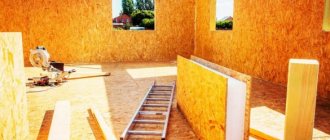
As you can see, there is nothing complicated about connecting an electric hob to power supply networks yourself. With minimal knowledge in the field of electrical installation work and the necessary tools, any device owner is able to cope with this task. Of course, laying a separate power line for the device and installing the equipment in the distribution panel will require higher qualifications, but in new houses this will not be necessary. In older buildings, it will be necessary to lay a separate line or change the entire internal wiring.
Requirements for the installation location of the hob
Before purchasing an induction hob, a potential buyer must determine the location where it will be placed. It is necessary to install an outlet not far from the selected zone, for which you will have to lay a separate line and connect it to a protective grounding device (RCD) . Also, when choosing a location, you must consider the following requirements.
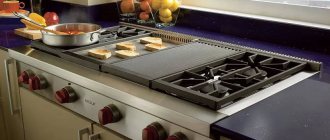
- The panel must be placed on a flat surface without any distortions. The most popular installation location is above the oven, but in compliance with the manufacturer's recommendations.
- There should be enough space around the panel for ventilation, since overheating of the device can lead to its failure. In this case, the induction surface is located at a distance of at least 75 cm from the hood. You also need to provide a gap of several centimeters between the back wall of the slab and vertical surfaces (wall, etc.).
- The hob should not be placed directly above the dishwasher.
Useful tips from the master
- Carry out installation with joint sealant.
- The socket must be able to withstand the power of the appliance. Otherwise, his work will put you in danger.
- Choose a socket from proven materials, do not skimp on it.
- Clean your panel frequently to prolong its life and prevent damage.
- To connect, draw a separate line.
- Use a multimeter to check the connection.
- When connecting yourself, it is better not to experiment and not pair devices from different manufacturers.
Selecting a power cable
When choosing the cable required to connect the induction cooker to the power supply network, you need to remember that according to the current SP31-110-2003 “Code of Rules for Design and Construction. Design and installation of electrical installations of residential and public buildings”, to connect electric stoves in residential buildings, it is necessary to use three-core copper cables with a core cross-section of at least 6 mm2. For this purpose, the domestic cable type VVGnG-Ls or its foreign analogue NYM is best suited.
If the connecting cable is not included in the delivery of the induction hob, then it must be selected based on the power that the latter consumes. The recommended cross-section of the connecting cable type VVGnG-Ls is given in the table below:
| Induction panel power, kW | Diameter of the copper core of the VVGnG-Ls cable, mm | Trip current of automatic load switch, A |
| up to 3.5 | 2,5 | 16 |
| from 3.5 to 5.5 | 4,0 | 25 |
| from 5.5 to 7.2 | 6,0 | 32 |
| from 7.2 to 8.8 | 10,0 | 40 |
Advice! When choosing a cable to connect an induction panel to the electrical network, you need to focus on the type of power outlet. Depending on the number of contacts in it, a cable with the corresponding number of cores is also purchased.
After selecting and purchasing the required cable, it must be equipped with a power plug and connected to the induction hob. In this case, the length of the cord should exclude both its strong tension and excessive sagging . But first you need to draw a separate line and install the appropriate socket or connect the stove in another way.
Connection with or without a socket
A specialized socket can be either three- or four-pin. An appropriate plug is also selected for it, with the help of which the induction panel is connected to the electrical network.
Attention! The user’s apartment can have two types of electrical wiring: three-phase with a voltage of ~380 V and single-phase with a voltage of ~220 V. The choice of electrical outlet connection diagram depends on the type of electrical wiring in the apartment.
Having laid the electrical cable from the apartment distribution board to the installation site of the socket, it is connected to the latter through an RCD, which is selected based on the power of the induction surface.
If for one reason or another it is not possible to install an outlet, the induction panel is connected to the mains directly. This can be done in two ways.
- Connection using GML copper crimp sleeves, selected for the cross-section of the cable cores. The connection points must be insulated using heat-shrinkable tubing or insulating tape. All this should then be carefully hidden in the installation box (socket box). It is imperative to take into account the fact that special pressing pliers are required to crimp the sleeves - the use of pliers is prohibited.
- Connection via a terminal block installed in the socket box. In this case, you need a terminal block designed for the rated current of the connected panel.
Important! The induction cooking surface is connected to the power supply network through an RCD and an automatic load switch (differential circuit breaker) with a leakage current of 30 mA.
Common Mistakes
- Connecting panels with a power of more than 3.5 kW to 16A sockets and plugs. Keep in mind that even very high-quality 16A products from European manufacturers should absolutely not be used for powerful panels. It’s not even worth considering substandard products from Chinese and many domestic manufacturers, even purely theoretically; in practice, they rarely hold currents of 10A.
Incorrectly selected sockets and plugs can cause damage to the panel - Attempts to save money on the purchase of a differential machine. Remember, a thermal cut-off device cannot guarantee the safe use of such a device, especially since many apartments do not have effective grounding.
The difavtomat increases the safety of operation of the hob - The cables are not of sufficient cross-section. We mentioned above what problems cables from unscrupulous manufacturers create. The calculation of the cable area depends on several factors: the type of conductive metal, the number of cores, the number of phases, and the duration of maximum consumption. Inexperienced consumers believe that the dependence is only related to power, but this is not so. To avoid making mistakes when choosing a section, always provide a margin.
Cable selection must be made based on panel power - Connecting the panel to the junction box of the apartment's general wiring. This is a very common mistake - there is no desire to cut individual grooves. Responsible electricians will never commit a gross violation of PUE standards, and connecting large additional consumers to old wiring falls into this category. More often than not, the cooktop will not work because the disconnect switch keeps tripping. If you replace it with a more powerful one, then there is a possibility of a short circuit in the wiring - the insulation heats up, melts or burns, the wires touch each other.
The hob and oven must have separate sockets
Always follow the existing rules and the hob will last a long time without problems.
Video - Connecting the hob to the mains
Connecting hobs must be done in strict accordance with the described technology. Changes may only be made at the request of the manufacturers. Such panels have recently become very popular; they make it possible to significantly increase the comfort of using kitchens of any size. The devices fit very functionally into the interior of a corner kitchen with a bar counter. How to properly decorate such a room is described in detail on the pages of our website.
Hob connection process
Having decided on the method of connecting the induction surface to the electrical network, you need to do this by connecting the plug to the cable, and the latter directly to the panel.
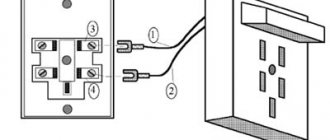
Connecting the cable to the plug
In general, the cable must be connected to the power plug as follows. First you need to remove the insulation from the cable cores and disassemble the plug body. Then you should crimp the ends of the wires with NShV type lugs. Then you need to connect the ends of the wires to the contact terminals of the plug according to the diagram below (phase and neutral - under the outer terminals, grounding - under the top screw). Then the plug must be assembled, fixing the cable with the clamp provided in the housing.
However, the cables that come with hobs can be of 2 types: three- and four-core . If the number of wires in the cable matches the number of contacts of the plug-socket pair, then the connection does not cause problems - you just need to connect the colored wires to the corresponding contacts of the plug, based on the fact that:
- brown and black wires are connected to the phase contacts (L1-L3);
- The blue wire is connected to pin N (neutral or “0”);
- The yellow-green wire is connected to the PE (ground) contact.
If the cable coming from the induction panel has 4 cores, and the socket for connecting it has three contacts, then they are connected as follows:
- the black and brown wires are twisted together and connected to the “Phase” contact;
- The blue wire is connected to pin N;
- The yellow-green wire is connected to the PE grounding contact.
The user may also encounter a 5-core cable, originally designed for connecting high-power induction panels (more than 7 kW) to a three-phase network with a voltage of ~380 V. In this case, to connect to a ~220 V network:
- brown and black wires are twisted together and connected to the phase contact;
- the blue and gray wires are twisted together and connected to contact N (neutral or “0”);
- The yellow-green wire is connected to the PE (ground) contact.
If the power cable is connected to the induction surface, the latter can be installed in its designated place and connected to a power outlet.
Connecting the cable to the induction surface
In cases where the user needs to independently connect the cable to the hob, this can be done using the diagram located on its bottom side . Moreover, each panel is equipped with a special terminal block for connecting the power cable. Depending on the brand of induction hob, the cable connection is carried out differently.
For Bosch brand panels:
For Electrolux brand panels:
For Zanussi brand panels:
On a note! When connecting the induction panel to a single-phase power supply, the phase contacts of the terminal block (L1, L2, L3) are connected to each other using special jumpers included in the delivery kit.
To connect the cable to the hob you need to:
- remove the protective cover, thereby opening access to the terminals;
- install the cable clamp included in the delivery kit;
- run the cable through the cable clamp and align the wires with the terminals according to the connection diagram, with the ground wire (yellow-green) connected first, then the wires going to the neutral (blue and/or gray), and only after that the phase wires (brown) are connected and/or black);
- All screws are tightened, the strength of all connections is checked and the protective cover is returned to its place.
Installing a panel into a countertop
Most often, the type of hob in question is mounted in a kitchen unit above the oven. In this case, you first need to cut a corresponding hole in the tabletop. Its dimensions and shape are usually given in the operating instructions.
Advice! You can also mark the hole in this way - simply attach the panel to the back side of the tabletop and trace its internal elements with a pencil or marker.
Having carefully cut out the hole, it is advisable to cover its edges with a material that will prevent moisture from penetrating under the hob (silicone varnish, foil, etc.). After this, the tabletop can be put back in place.
Before installing the hob into the countertop, you also need to prepare it - stick adhesive tape to its inside . In some models, instead of adhesive tape, the kit includes special plasticine, which must be stuck around the perimeter of the hole cut in the tabletop.
At the final stage, the hob along with the power cable is inserted into the hole in the countertop and, for a clearer fixation, pressed down on all sides with a little force. The panel is attached to the surface using standard fasteners.
Necessary equipment and tools
To connect the electrical panel, prepare the following equipment:
- screwdriver, knife;
- connecting cable designed for surface power (4-6 sq. mm);
- adapter clamp;
- tester for checking whether the connection phase matches the wire colors.
The kit usually includes a cable consisting of four main wires, indicating:
- phase (black and brown),
- zero (blue color),
- earth (yellow-green).
Note! The device is connected through a separate RCD circuit breaker, to which no other household appliances are connected.
Checking the functionality of the connected panel
Having installed the induction surface in place and connected it to the mains, they begin to check its functionality. To do this, you need to turn on the panel by pressing the “Network” button, after which it should be activated within one second. Then, after a few more seconds, a short beep will sound to confirm that the induction hob is ready for use. Each of the cooking sectors is activated by a separate button, after pressing which you can begin to adjust the power level.
Attention! Within several hours of operation after turning on the induction hob for the first time, an unpleasant odor reminiscent of burnt rubber may appear, but this is not a defect.
In the future, the trouble-free operation of the hob depends on how much it:
- exactly installed;
- securely fastened;
- protected from overheating (depending on the efficiency of the hood).
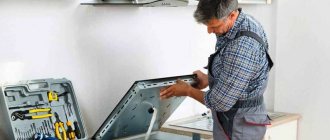
So, the process of installing and connecting induction cookers was described above, depending on the type of electrical wiring (three-phase/single-phase) and the available equipment (sockets, copper sleeves, terminal block). It must be remembered that working with electricity requires special knowledge and skills, so before connecting the panel yourself, you should carefully weigh your strengths. For your own safety and efficient operation of the hob, in some cases it is better to invite a qualified specialist.