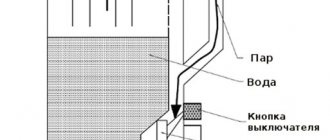
Standard diagram of a kitchen hood
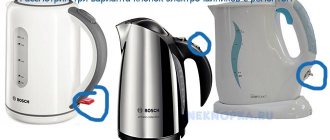
Equipment of any modification of the hood (Krona, Bosch, Asko, Elikor) contains standard components:
By installing a special application on your mobile phone, you can set the operating mode of the kitchen hood.
Typical causes of device malfunctions
To understand the causes of possible malfunctions with the hood, you need to know the principle of operation of the device. It is based on two-stroke indoor air purification:
The further cleaning process depends on the type of device design (combined, circulation, evacuating) and filtration elements.
What malfunctions may occur:
Dirty and clean filter
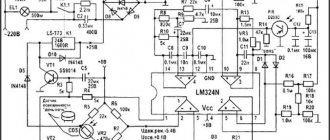
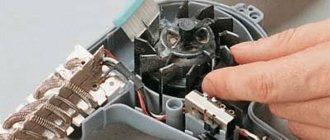
Switch board and button replacement
Also, the reasons for poor operation of the device may be a breakdown of the electronic interface, a malfunction of the exhaust fan, poor contact in the plug or socket, or loose terminals in the hood body.
In order to protect the device from power surges, it is worth purchasing a special voltage relay
Repairing a hood with your own hands is not difficult. It is enough to carefully study the mechanism of operation of the device, and the troubleshooting process will not be difficult.
Causes of breakdowns
Most often, malfunctions in the operation of hoods can be corrected independently.
First of all, you need to read the instructions for the device. Famous manufacturers such as Shindo Domestic, Faber. Turboair, France, Pyramid, Elikor and others indicate typical malfunctions and options for eliminating them in their instructions. The most common breakdowns are: decreased performance, inability to control speed, appearance of extraneous noise, disappearance of lighting, lack of response to switching on.
Motor failure is usually due to overheating. Working in conditions of hot steam removal at high power, the device, due to clogged grease filters, receives insufficient cooling, which leads to its heating and burnout of the windings. Therefore, it is necessary to monitor the condition of the grease filters and clean them regularly.
It’s easy to check if the filter is clogged - you need to hold a sheet of thin paper with the hood on to the filter grille and see if it is attracted to it - if not, then cleaning will be required. A clogged filter also affects the overall performance of the hood.
By operating the hood modes with dirty hands, you cause the control elements to become clogged, which leads to their failure. Therefore, it is advisable to carry out all manipulations with control and switching on with clean hands. It is also necessary to ensure that splashes or water do not fall on the surface of the control parts and in the middle of the device.
To protect against damage to electrical components, the use of protection devices is required - such as a circuit breaker, voltage control relay, voltage stabilizer. Their use will protect the device from power surges.
Service life and performance are also affected by correct installation. Installation and connection of the exhaust device must be carried out in accordance with all recommendations in the operating instructions. In particular, the distance from the stove should not be less than 65 centimeters, and the exhaust duct must correspond to the performance of the device.
Thus, if the hood in the kitchen does not work, and what to do is not clear from the instructions, first of all you can look for typical faults for the model being repaired.
How to disassemble the hood to wash it
To extend the life of the hood and maintain its functionality, it is necessary to regularly clean this device. After all, many people know that over time, this device forms fumes, grease, and plaque, which are quite difficult to remove. For this reason, it is important to know how to disassemble the hood in order to wash it.
When exposed to various vapors, the device quickly becomes dirty.
Before you start cleaning your device, there are a few steps you should take:
If you want to wash the hood, namely its important parts, then you must disassemble it. When disassembling, the following rules should be observed:
Chemical cleaning products
After all parts have been removed, you can begin washing the device. It is also necessary to clean all removed parts. When washing, you can use special cleaning agents - both chemical and homemade.
Source
Preparing for installation
Let's start preparing to install the hood ourselves by studying the instructions. It usually has a section called “Device Installation” or something similar. The procedure for installing the hood is clearly described there, with diagrams and drawings. In this section, masters should be interested in:
A self-respecting manufacturer will definitely include a mounting kit in the box.
If there are no mounting screws in the kit, then in the instructions you need to find recommendations on the diameter and length of the fastening elements, and then purchase them.
2. The diameter of the ventilation hole, if the hood needs to be connected to a stationary ventilation duct.
If the kitchen has stationary ventilation, it is highly advisable to connect the hood to it.
There are several advantages to this solution. Firstly, odors will be immediately removed from the room. Secondly, there is no need to install a carbon filter. The performance of a hood with a carbon filter will be lower than that of a device connected to the ventilation duct. In addition, the user is forced to constantly buy consumables: the carbon filter is not maintained. It should be replaced with a new one once every 3-4 months.
At the preparation stage, you need to approximately calculate the configuration and dimensions of the future air duct, and then purchase the missing parts from the nearest hardware store.
Hood installation
We will show the installation process using the example of installing an inclined hood. Such models have impressive dimensions and weight, so the manufacturer recommends mounting them to the wall using four screws. The fastening elements are 6 mm x 50 mm screws with a 10 mm head.
Lighter hoods are mounted using wall mounts, usually included in the package.
We will begin the work on installing the hood by determining the location for the fasteners. There are general recommendations for the installation height above the hob.
For electric stoves, the recommended distance is 60 cm, for gas stoves - 75 cm.
Before you begin calculations and markings, it is recommended to draw a line on the wall that coincides with the center line of the hob. Only in this case will the hood be guaranteed to be installed exactly above the stove, since their axial lines will coincide.
All calculations regarding the location of hole centers must be carried out from the center line.
Some manufacturers include an installation template in the documentation for their device. The user is required to do little: position the template at the desired height and mark the centers of future holes.
If the template is not found in the instructions, then you will have to act “the old fashioned way”, scrupulously measuring and calculating the locations for future holes.
The marking process is perhaps the most critical stage. The rule “measure twice, cut once”, or rather “drill”, is more appropriate here than ever.
After the markings are made, drill the holes.
and screw the fasteners into the wall.
The finished fastening system looks like this.
After tightening the screws, it is a good idea to check the accuracy using a bubble level and adjust it if necessary.
The hood is suspended using installed screws.
Check the horizon level again.
After this, we finally tighten the screws, pressing the hood tightly to the wall. The installation process is now almost complete. You can connect the device to the electrical network and check its performance in various modes.
The hood is a low-power energy consumer, so there are no special requirements for the electrical line.
If the hood is not supposed to be connected to the ventilation duct, then at the end of the work we install a decorative cover for the ventilation duct and consider the work completed.
Debugg
Almost all failures that occur in kitchen hoods are associated with broken contacts. Tracks on printed circuit boards may peel off, and windings in the motor may burn out. Without some knowledge of electrical engineering, it is quite difficult to eliminate such breakdowns.
If the hood does not work, you must first check that there is power in the outlet to which it is connected . If there is power in the outlet, the power cord or contact connections inside the appliance may be damaged.
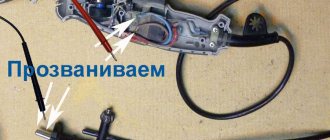
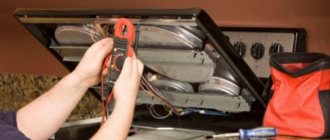
Therefore, you should check the integrity of the power cord and plug by inspecting them for breaks in the wire, stretching or melting. The contact connections inside the hood should also be checked.
If there is no visible damage, then you should check the switch through which electrical voltage is supplied to the hood. To do this, you need to use a tester to ring the power cord, connecting conductors and switch in different positions. In the case where there is no contact when the switch is in the on position, the cause of the malfunction should be sought in the switch itself.
When the hood light does not turn on
Switching speeds in modern hoods can be done using buttons, slide switches or sensors. The first two options are considered the simplest. Using buttons or movable levers, the necessary contacts are switched, which supply voltage to the motor windings. Due to their simplicity, such switches are quite reliable.
The maximum that can happen to them is burning or oxidation of the contacts. In terms of maintainability, buttons are considered the best option, since they can be replaced individually and not as a whole unit. To replace the button, it is enough to have skills in working with a soldering iron. If the slide switch is faulty, you can try to disassemble it and clean it. The maintainability of the sensors is low, so it is often necessary to replace the entire control unit, the price of which is considerable.
If the common contact on the button burns out, then as a result the speed switching system stops working, which does not allow the engine to start. To eliminate this malfunction, you need to resolder the burnt contact connection or completely replace the control unit.
To strengthen the soldered contact, a pre-stripped wire is soldered to it . On a hood with a retractable panel, a similar problem may be due to the fact that the limit switch located on the bottom does not work. To eliminate the breakdown, you just need to adjust this switch.
To make sure that the hood really does not work due to the lack of contact in the switch, you need to connect the conductors directly, without a switch, and turn on the hood into the power supply. If the device operates normally, the cause of the malfunction really lies in the switch and, therefore, it must be repaired or replaced. If any deviations from the normal operating mode of the hood are observed, then the problem should be looked for not only in the switch.
You should also pay attention to the presence of additional protective elements inside the hood . As a rule, they are represented by fuses. Therefore, it is necessary to check their integrity. The hood may not work due to the blown fuses. In this case, the fuses must be replaced.
If the power cord, all contact connections inside the device and the switch are working properly, and electrical voltage is supplied to the motor terminals, then most likely the electric motor itself is faulty.
Air duct installation
The removal of air masses from the room to the ventilation system can be carried out using a corrugated metal hose
or through an air duct assembled from plastic elements.
In any case, you will first have to assemble the desired duct configuration.
Then we connect it to the hood and stationary ventilation.
In order not to reduce the performance of the hood, the diameter of the air duct should not be less than the diameter of the outlet of the device.
It is recommended to securely secure the metal air duct with a clamp.
After installing the air duct, we install a decorative casing on the hood body. This is the final stage of work on installing the hood. Immediately after this, it can be fully exploited.
Features of installation of built-in and island appliances
As for built-in models, they are installed in special niches in kitchen furniture. Such hoods are secured using self-tapping screws screwed directly into the furniture material.
When selecting the length of the screws, it is important to follow the manufacturer’s recommendations so as not to inadvertently flash through the furniture wall.
The logic for installing an island hood is similar to that of a conventional hood, which we wrote about just above. The only significant difference is that the device is mounted not on the wall, but on the ceiling.
Installing a hood in the kitchen with your own hands
In modern houses and apartments, the presence of a spectacular hood above the hob has long become commonplace. And this is no coincidence: in addition to its purely design function, the hood also plays the role of a “cleaner”. Installing a modern kitchen hood gives you the opportunity to breathe air devoid of the tart taste of borscht, cutlets, fried potatoes and other dishes. To the question: “Is it possible to do without a hood?”, we will answer by asking you to imagine a small apartment - a studio in which the kitchen area and living room are combined. If you don’t install a hood in such a studio, then it’s easy to guess what kind of gastronomic air will permeate everything around you. Not to mention your neighbors, who will always be aware of what you are preparing for breakfast, lunch and dinner. To avoid this, we will tell you in detail how and how you can install a hood in the kitchen exclusively with your own hands.
How to eliminate weak cravings?
Another well-known breakdown is why the hood doesn’t work, it doesn’t pull. What to do?
We are looking for the reason in filters that have not been cleaned or changed for a long time. And in a mesh that collects fat. If it is a filter, clean it or change it, depending on the type and period of use.
Poor draft also happens because a vacuum has formed in the room, since all the windows have been closed. Then the hood sucks in air poorly or stops doing so altogether. Just ventilate.
And there may be no draft in the home ventilation duct. Bring a lighter with an open flame to the ventilation. If the flame does not stretch towards the channel, forced ventilation is needed.
Necessary tool
Before proceeding directly to the process called “Installing a hood,” you need to prepare everything that may be useful for this: additional materials and a tool kit. To comfortably install a hood in the kitchen with your own hands, you must have:
Note! Before you begin installing a modern kitchen hood with your own hands, before drilling, it is convenient and practical to build small “pockets” of adhesive tape to prevent crumbs and dust from getting inside the hood.
If the hood is selected correctly, then its width should be either equal to the slab or slightly wider than it. In order to install the exhaust system, it should not only be correctly placed, but also secured. It should be located exactly above the surface of the slab.
When deciding how to install a hood, before installation, you need to decide on the height, based on the housewife’s height. If a woman stands up straight, the bottom edge of the exhaust system should be slightly higher than her head. We do not recommend setting below this figure. If you set it higher, it won’t be critical.
Good to know! When answering the question of how to properly install a hood above your gas stove, you need to understand the following nuance: if there is a need to install the system higher than 90 cm from the hob, then you need to purchase a hood with increased power.
Let's talk about the topic: “Mounting for a modern hood.” The mounting of the exhaust system depends on its type:
Why and how often should you wash?
The air in the kitchen constantly contains not only ordinary dust, but also particles of fat that rise from a boiling pot or squealing frying pan along with steam. Passing through the grate of the hood, the fat settles inside it and accumulates layer by layer.
You can deal with external dirt quickly - simply wipe it off without allowing it to dry out.
If you do not clean the internal parts (metal grease filter, fan) from grease and dirt, the equipment will simply stop performing its function.
Partial disassembly is done once every month or two to remove and clean the hood filter. General cleaning is carried out annually, and sometimes more often if there is extraneous noise or other operational disturbances.
There is an opinion that a powerful engine will cope better with exhaust air removal. Increasing the hood leads to the overturning of the draft. In apartment buildings, such phenomena as aromas from someone else's kitchen, tobacco smoke from a neighbor behind the wall indicate the presence of a supermotor in you or him.
No amount of washing will remove the smell from the hood if it circulates back from the air duct. To quickly solve the problem, simply open a window or vent to change the direction of air movement.
Hood installation
When discussing how to install a hood over a gas stove, you should take into account the characteristics of the existing general ventilation.
There are only two ways to remove exhaust air:
It should be recognized that method No. 2 has many disadvantages. This hood requires the installation of a check valve. At the same time, it happens that the supposedly removed air returns to the apartment.
It is much more rational to use an additionally made window for the hood. In order to combat condensate formed inside the system, it is necessary to install a specialized aluminum damper.
Remember! The size of the window under the air duct should have a size corresponding to ¾ of the diameter of the air duct. To tighten the damper, you need to use a special spring that helps it open as air flows through it. This is how the process of self-regulation occurs.
Installing a hood in your kitchen requires taking into account one of the most important functional elements - an odor neutralizer . Today it is presented in three types:
Installing a built-in hood in a cabinet
Let's talk about how to install a hood in a kitchen cabinet on your own. For convenience and clarity, we will divide the process of installing a hood into a cabinet into a sequential algorithm of actions:
Tools required for this : jigsaw, drill and foam, sealant, screws and dowels.
To install a plastic air duct, we recommend using the same diagram. There is only one “but”: to ensure angles, it will be necessary to use special adapters, and place the pipes with a minimum number of bends (each turn is a loss of 10% of power).
Do not forget! Due to the fact that the kitchen is a place of high humidity, a cabinet made of wood quickly becomes unusable. In this case, the hood should be installed on the wall, without using a cabinet. To do this, you will need U -shaped frame: to make it you need a metal corner.
Having completed all installation work, you should connect the exhaust system to electricity, with the obligatory condition of grounding, and test its operation.
Attaching a wall or dome model to a wall
In appearance, the hoods above the stove of the wall-mounted and dome models are very different from each other, but at the same time, they both must be attached to the wall surface. To do this, their rear housing has four holes: two on each side. In addition, manufacturers supply their products with installation diagrams, installation instructions and templates, with marks for fastening locations.
All you need is to place the industrial template against the wall and make marks (if there is no template, you need to measure the distance between the holes and then transfer it to the wall).
Then everything is much simpler: you need to take a drill and make holes. Insert plastic plugs into them and hang the hood on the dowel - nails, checking the horizontal level of the installed system.
Take note! If this happens, then nail wooden blocks to the wall. Then attach the exhaust system to them. But, do not forget that over time these bars will become covered with a layer of soot and fat.
There is also a second way to install a hood in the kitchen with your own hands behind the pipes. To do this, you need to use screws - studs (or plumbing studs).
How are these studs attached? They have a thread for screwing into the wall. Their use will allow you to secure the kitchen hood, moving it away from the wall (at the same time, the studs are available in various sizes, and all the nuts are made for a bit or an octagonal wrench).
How to connect the hood to electricity
Due to the fact that the power consumption of hoods is rarely more than 1 kW , it is possible to connect them using standard sockets (preferably with grounding).
With old and dilapidated wiring, you need to ground the wire yourself. You cannot attach it to the surface of water or heating pipes: you can get an electrical injury, not only to your family members, but also to your neighbors (with fatal consequences).
Take note! To pull the grounding wire, you need to go to the panel and find a busbar with wires attached to it, or a pipe to which a stranded wire is screwed. You can also connect your own stranded wire to them (but without touching those that are already installed). For normal operation, the cross-section should be 2.5 mm. The conductor must be stranded copper with a non-flammable sheath.
For ease of installation, many kitchen hoods are equipped with a plug at the end of the wire. They are very easy to connect: you only need an outlet.
But, there are also models whose cord has wires at the end rather than a plug. This is done so that the consumer himself makes the decision on how to connect the system: either using a plug or using a terminal block (by the way, Wago terminal blocks are perfect).
Features of cleaning hoods made of different materials
It is much easier to clean a metal hood than a plastic or tempered glass one.
Stainless steel
You can remove grease from stainless steel quickly and easily using any available means. The material will withstand boiling and strong chemicals. The maximum that can happen is that the surface will darken.
It is not recommended to clean stainless steel with abrasive powders and metal brushes. The appearance of the metal will suffer, scratches will appear, from which dirt will be more difficult to remove during subsequent washing.
Made of aluminum
An aluminum hood can be washed with soda, laundry soap, table salt, and mustard. Acids actively oxidize the metal, causing dark spots to appear on the grate. Alkali dissolves aluminum and renders the mesh unusable.
In the dishwasher, the filter is washed separately from the dishes at temperatures up to 65 degrees. Dishwasher tablets are not used.
Made of plastic
Plastic can be soaked and washed in the dishwasher at low temperature, but cannot be boiled or scraped with metal objects. Plastic is resistant to chemical compounds. The steam generator is used only for heat-resistant plastics.
Glass
Glass parts require careful handling. It is better not to rub them with powders, but to use liquids, pastes and gels. Apply the detergent composition with a sponge or soft brush. Provided daily cleaning, you can get by with a glass cleaning spray.
Air duct for kitchen hood
The palette of air ducts used for kitchen exhaust systems differs greatly in three parameters:
Products used to install kitchen hoods are flexible (corrugated) or made of solid, smooth and hard plastic.
Exhaust pipes are made of several types of plastic:
To connect to the hood, the first three types of plastics listed above are used: they are resistant to high temperatures and have decent rigidity.
Air ducts, in turn, have two types of sections:
The rectangular plastic channel has a more compact size, it is easy to disguise it under a suspended ceiling, and it is more convenient to install.
The round shape of the pipes promotes better air passage and has a low noise level.
Air duct sizes for hoods
Do not forget that when buying a PVC air duct, you should also buy adapters . They are needed to connect the plastic tube to the hood. In addition, they are used for air duct bends and the possibility of attachment to the general ventilation system of the entire house. Therefore, if you decide to use corrugation, you can save on unnecessary adapters.
You should know! The length of the PVC pipe should not be more than three meters . Otherwise, the performance level of the exhaust system will decrease with each additional meter of its length. Each piece of bend also has a bad effect on the performance of the hood, so you should try to avoid ninety-degree angles . You can make no more than three bends and bending points .
The diameter of the plastic pipe should be selected strictly according to the cross-section of the ventilation hole:
How to attach corrugation to the hood and ventilation
If you intend to install a hood using an aluminum corrugated hose, then you need to decide on the method of attaching it to the body and to the ventilation. For this purpose, you need to purchase a clamp of the required size (there are metal and plastic).
In addition to the clamp, a special ventilation grill with a hole at the top for connecting the air duct tube is useful. At the bottom it has a hole to remove “dirty” air from the kitchen using natural circulation during the time the exhaust system is not functioning.
Note! To secure the corrugation, you need to use a grille with a protrusion: in this case, a small side surrounds the hole. It is on this that the corrugation is put on, and then it is secured with a clamp of the required size. The corrugation should also be secured to the hood: also using a protrusion.
How to attach an air duct to walls
Plastic air ducts have special fasteners in the form of a latch. They are first mounted into the wall using dowels. Most often, only one fastening is sufficient for an area of up to 60 cm. It is into these latches that pipes are inserted during installation, with little effort.
When you want to attach to the ceiling , use exactly the same fasteners. If it is necessary to maintain a certain distance from the ceiling, this type of fastening is not suitable. Then you will need to take perforated hangers (plasterboard), fix them to the ceiling, and then attach the PVC air duct to them with small screws.
The corrugated air duct should be secured to the wall using a clamp or plastic ties.
Where and how to remove the air duct
As a rule, the air exhaust system from the hood is carried out into the ventilation hole (this is where the natural process of general house ventilation takes place, and draft is present).
But this is not a competent approach, because a significant part of the grille turns out to be closed by the air duct, and a full exchange of air mass is not possible through the remaining tiny hole.
You should know! Installing a hood in the kitchen requires connecting the air duct to a separate channel dedicated to it.
These are the two main methods of installing well-functioning ventilation with a long period of operation.
How to take it outside
First of all, in order to bring the air duct into the wall, you need to make a hole in the wall. It is the production of the hole that is the main difficulty of this work.
When the hole is ready, you need to insert the “body” of the air duct into it, and close the remaining gaps with a solution. From the outside, the hole must be covered with a grill (to prevent dirt, unnecessary objects, birds, etc. from getting into it).
To prevent street air from blowing into the apartment, it is necessary to install a check valve - in the figure below we have indicated it with a beveled line:
If you carefully examine the picture, you will notice that the non-return (non-return) valve is a light plate made of plastic or metal. It is fixedly fixed at two points to the pipe (top and bottom), and the “petals” are supported by a weak spring.
When the exhaust system is not working, the valve blocks the access of air masses from the street. As soon as the hood is turned on, the plate, thanks to a spring, returns to its place.
Remember! If you decide not to install a check valve, then in winter the kitchen will be very cold due to the icy outside air entering the apartment.
So that the hood does not interfere with natural ventilation in the kitchen
Using a regular tee and check valve, you can install the exhaust system in such a way that it cannot interfere with the natural ventilation of the kitchen area. To do this, it will help you:
How should this be installed? You must attach a tee to the ventilation grille: connect the air duct from the hood to its lower inlet, and install a check valve on the free outlet so that it closes when the air flow passes from the pipe, as shown in the picture:
Let's talk about how such a system functions.
When the hood is at rest, the “petals” of the valve are bent, and the air flow from the kitchen area enters the ventilation duct, passes through the grille and the open outlet of the tee.
As soon as the system is turned on, the air flow from the hood rotates the valve plate, and the air flow enters the ventilation system. When the hood is turned off, the springs again open the passage of air through the tee.
Take note! From the outside, such a system is not entirely attractive, and, of course, it should be disguised. But, it is the only way to connect the hood to the only existing ventilation outlet, while maintaining air exchange.
Output to the ventilation duct
In many modern panel houses of various series, you can often find both separate and combined ventilation ducts. To find out which ventilation duct is in your home, you should contact your service company for information.
You should know! If you can smell food from your neighbors in the house, it means there is a single network in your house. Then connecting your exhaust system to this single network will automatically complicate life for your neighbors below.
Many modern hoods are capable of operating in various power modes. If there is a single ventilation duct in the house, you should not turn on the hood at full power.
By connecting the exhaust system to a single exhaust duct, you will deprive your kitchen of natural ventilation. It will be possible to install a special combined grid, but it will not be able to solve the problem entirely. The fact that there is natural ventilation when the hood is not working will not go away, but the quality of the exhaust system will sharply decrease: the removed air will be able to flow back to you.
Important note! It is better not to occupy the natural ventilation channel, but to vent the hood to the street through the outer wall of the house.
Why doesn't the hood turn on?
Intensive use of the hood sooner or later leads to its failure. If a problem arises, you can contact a specialist, or you can try to eliminate the cause of the breakdown yourself. The main thing is to find this reason. In the case when the hood does not turn on at all, there may be several reasons.
The hood may not turn on due to:
- lack of connection to the power grid;
- malfunction of the switch button;
- power plug malfunction;
- blown fuses;
- internal damage to electrical wires;
- electric motor malfunction.
If there are any malfunctions, you should also check the filters. They may need to be cleaned or replaced. Very often, dirty filters become the cause of hood failure.
If the hood does not remove odors
Summary
Having chosen a hood by carefully selecting it to match the color and design of the kitchen unit, you are faced with a choice: turn to professionals for help in installation, paying a substantial fee for installing a kitchen hood; or hang it yourself, after reading our article.
The most important thing when installing a kitchen hood is: objectively assess your strengths and the possibility of receiving help from household members; evaluate the instrumentation before starting work; understand the instructions included with the hood and believe in yourself.
Source