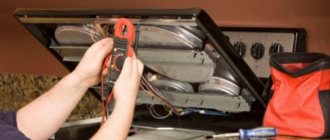
The ability of metal parts to heat up in an alternating magnetic field has been used in everyday life for more than 40 years. Appliances installed in the kitchen for cooking have a modern design, high-quality ceramic coating and high efficiency due to the direct heating of metal utensils.
Induction single burner hob
Despite the significant advantages of induction heating devices over conventional electric stoves, it is not always possible to repair such products on your own.
Complex microprocessor control of induction installed in such devices requires a sufficiently highly qualified technician who repairs this household appliance. The absence of direct heating of the element emitting a magnetic field almost completely eliminates the possibility of faults such as “burnt out conductor”. Therefore, if there are any serious deviations in the operation of this device, or the device does not turn on at all, then if you want to repair this device yourself, you will need:
- minimal knowledge in the field of electronics;
- diagnostic devices, soldering iron and soldering materials;
- having a lot of free time;
- moral readiness for the fact that after attempting to independently repair such a complex device as an induction cooker, the device may be completely damaged.
Once you have everything you need, the first thing you should do is identify the main reasons why modern induction cookers fail.
Types of breakdowns
Types of induction cooker breakdowns can be both simple and complex. For example, reasons for partial inclusion of a product include:
- The socket into which the induction oven is connected is not working. To verify this, a known working electrical device is connected to it.
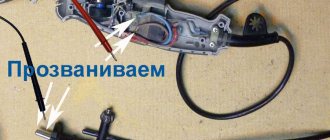
- The power wire has burnt out. This sometimes happens if the manufacturer for some reason installed a defective cable. To check, a multimeter is used, which tests each wire for resistance. Zero on the multimeter scale indicates that there is a break in the cable. This means that it will have to be completely changed. If you don’t have a multimeter at hand, take another cable and install it in place of the old one, plugging it into the socket. When the panel works, it means that you are on the right path to fixing the problem.
- Broken contacts. Quite often there are cases when they burn. To believe this, you need to open them, clean them with alcohol and reinstall them.
- Damaged fuse. This small element burns out during power surges. And if there are power surges on the line into which the house is powered, then most likely this is the reason for the non-functioning kitchen appliance. In this case, the fuse is replaced with a new one.
- Non-functional transformer. This is one of the most important elements of induction cookers, which is responsible for the currents inside the coils. It, like all other electrical parts of the stove, is checked with a multimeter for the presence of resistance. The nominal value of this indicator is indicated in the product passport. If zero appears on the multimeter display, then a short circuit has formed between the windings of the transformer. If “infinity”, then a gap has appeared in the circuit.
Below is a list of common defects in induction cookers that affect the functioning of the device.
The burner doesn't work
This happens for two reasons:
- A break in the electrical circuit in the area from the coil to the transformer, located under the glass-ceramic surface. Usually the contacts either burn out or the connecting wire breaks. In the first case, stripping is carried out, in the second, the wire is soldered or completely replaced. If it is difficult to solder wires to a contact (you don’t have the skills to work with a soldering iron), then you will have to take the hob to a service center.
- The coil has burnt out. In this case, you should not replace the device yourself due to the complexity of dismantling and installation.
Induction cooker does not turn on
When the stove does not turn on, the culprit may be transistors or a diode bridge. In this case, it is not recommended to repair the product yourself. It's better to take the panel to a workshop.
The design of an induction hob is simple. Therefore, many ordinary people, naively believing that they can handle the repairs on their own, arm themselves with screwdrivers and other tools to repair the device.
The result is a disassembled structure, which is subsequently assembled by craftsmen. Therefore, limit yourself to checking the socket, plug, cable and fuse.
In other cases, let professionals deal with breakdowns.
Electric stove repair
An electric stove is the most powerful electrical appliance in the house. The operation of the device is influenced by quite serious operational factors:
- Heat. This factor renders the insulation unusable, which simply dries out.
- High current will damage the switches.
- Contaminants that appear during the cooking process fill the contacts, disconnecting them from the power supply.
Expert opinion
Romanova Ksenia Petrovna
Interior design expert and fabric store manager
But the design of the device and the connection diagram for the burners are not the most complex, so they can be easily understood. As with the induction panel, the first thing to examine is the socket and cable to ensure their integrity.
If the electric stove operates on a 220-volt network, then the socket is checked by simply turning on another electrical appliance or lamp. If you are using a 380-volt outlet, you will have to measure the voltage between all three phases.
The same measurements are made on the terminal blocks of the plate. If the device shows a lack of voltage, then the reason is the power cable, which needs to be replaced.
Household electrical appliances, including electric stoves, are equipped with grounding circuits. If there is none in the model you purchased, then you should definitely check whether there is a phase on the body.
For this, a single-pole voltage indicator is used. Since the body of the plate is painted, the indicator is attached to the screws with which the assembly is carried out.
If the indicator shows that a phase is present on the housing, then it means that some section of the circuit is broken, and the voltage will flow when it comes into contact with open, non-insulated parts and areas.
If the supply network is working properly and no defects are found, then you need to determine the extent of the damage. This could be a burner (and more than one), an oven (if there is one), an indication, mode switches, etc.
- To check the proper operation of the burners and oven, their heating elements and wiring are checked before connecting.
- The operating mode switches are checked for faults in each mode. The process is lengthy, because the burners (one at a time) will have to be turned on in each mode, cooled down, and then proceed to checking the next mode. It is recommended to check all positions several times.
- The absence of an indication on the panel, which indicates that the burner is working, does not always indicate that a serious breakdown has occurred. Most often the light bulb simply burns out.
In electric ovens, the contacts are subject to severe current loads. Therefore, there are no solders or twists in the panel design, only special connectors that are connected to each other by crimping.
But even such contacts weaken over time. The so-called transition resistance appears in them.
Under the influence of a current load, the terminal heats up to high temperatures, its surface oxidizes, as a result of which the contact begins to weaken. It is easy to find such a contact; it usually turns black and a burning smell of insulation appears.
Expert opinion
Romanova Ksenia Petrovna
Interior design expert and fabric store manager
This connector cannot be used in the power supply circuit of an electric stove. It is cut off, and a new one is installed in its place, after which the wire insulation is restored.
Please note that regular tape insulation is not used here. Under the influence of temperatures it will quickly melt.
For this purpose, special tubes made of fiberglass are used.
Heating elements (heating elements) rarely fail. But if all other parts of the stove and wiring are intact, then they should also be checked.
To do this, the heating elements are disconnected from the supply network, and then a test is performed with a multimeter. If the device shows zero and several ohms, then this indicates that there is a short circuit inside the element. That is, two sections are in contact with each other. If the device shows infinity, it means that the filament has broken inside.
Special features for installing an induction panel
As I said, an induction panel works a little differently than regular electrical panels. There is a separate article about this. How an induction cooker differs from other electric models.
The magnetic fluxes generated by the panel elements extend not only towards the dishes, but also downwards and to the sides. This creates additional rules and the installation of an induction hob changes somewhat.
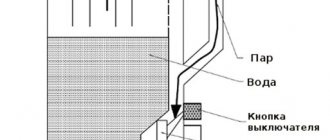
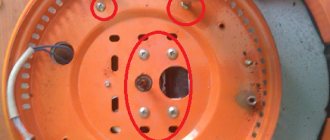
1. Firstly, the thermal plugs that stand under the panel elements get hot, which means it is necessary to provide ventilation under the panel. Ventilation gaps of 6-10 cm must be made as shown in the figure. These gaps cannot be closed or blocked.
Installing an induction hob: ventilation gaps 2. Secondly, despite the thermal plugs that block the spread of magnetic waves under the panel, it is not recommended to store metal utensils under the panel. 3. Thirdly, the induction panel has a fan in its design. It stands at the bottom of the panel and provides cooling for heat traps (if any) and induction coils. This fan is partially open and it is necessary to prevent small household items from falling into it, of which there are a lot in the kitchen. Therefore, there is no need to store anything under the induction hob. Just a ventilation gap and that's it.
induction cooker fan 4. Fourthly, modern induction panels well protect the surrounding space from the magnetic induction currents of the panel. However, it must be taken into account that during operation of the panel there may be a negative impact on mobile phones, television antennas, metal utensils and even bolts and screws with ferromagnetic properties in the area of the panel operation.
5. In addition, there is a fifth, sixth and tenth feature, but this is the operation of induction panels, which are radically different from the use of a simple electrical panel. For example:
- Do not turn on the burner if there is no cookware on it;
- Do not cook with the lid open;
- The diameter of the cookware must exactly match the diameter of the burner;
Related article: Placing sockets in the kitchen: how to arrange kitchen sockets
The following sounds are heard when the panel is operating:
- crackling (wrong dishes),
- buzzing (fan operation),
- whistling (more than two burners are on),
- clicking (power switching),
And all these sounds are normal.
Features of repair of induction cookers
Recently, induction cookers are gaining the same popularity as other types of this type of kitchen appliances. However, like any device, sometimes they fail.
Although the service center will help the owner quickly solve this problem, a person who understands the structure of the stoves will be able to fix the breakdown on their own. Moreover, in this case there will be significant savings in money.
What kind of cookware can an induction cooker see?
Cookware that meets the following requirements is suitable for induction cookers:
- effective energy consumption from the vortex field. This parameter is determined primarily by the material. Not all materials are compatible with induction cooktops. The best option is steel;
- The bottom fits too tightly to the work surface.
It is recommended to use stainless steel containers. Cast iron options and other magnetic alloys are also suitable. In addition to the material of manufacture, the following characteristics of the cookware should be taken into account:
- bottom thickness. It is advisable to use containers with a bottom thickness of 3 mm or more;
- minimum container diameter 12 cm;
- flat and smooth outer side of the bottom. If the bottom is not polished well, the efficiency of the hob will decrease.
Frequent malfunctions
Most often, the consumer is faced with the fact that one or more burners do not turn on, the stove makes strange sounds, does not heat up well, or stops working on its own. The essence of the most common situation is that the stove does not heat well.
This cannot even be called a breakdown, because the problem arises if the bottom of the container being used has shifted relative to the center, or its diameter is much smaller than the hob.
If one or more burners stop working, you need to check whether their power is maintained, since overheating may cause several parts to fail. Insufficient heating can also occur due to an incorrect switching sequence.
As a rule, to start an induction cooker, you must first select the burner you are using using sensors, and then set the required power on it.
If the order is broken, then nothing will work. When the touch surface does not respond to touch, the problem may be simple contamination. After cleaning, you need to check again - if it doesn’t help, then you should inspect the connecting cables connecting the inductor circuit and the control panel.
When the temperature of the hob is no longer displayed, the problem may be a broken temperature sensor. Sometimes breakdowns occur in the fan, whose main task is cooling.
The solution may be to repair the temperature sensor. If the ventilation system stopped working at all, then this could happen either because the motor was burned out, or because the control circuit was broken.
Sometimes the hob turns off on its own. This can happen if you use the wrong cookware - one made from a material that is not marked “for induction cookers”. It is worth mentioning that you should not use all containers made of non-magnetic materials, that is, aluminum, copper alloys, and stainless steel.
Heaters can turn off on their own for several reasons specified in the instructions. For example, by a timer signal or upon reaching a two-hour operating period. Also, the burners will stop working if no further action has occurred within 10 seconds after they were turned on.
An induction cooker makes noise when the heater power in the device is too high or when cooking is carried out in unsuitable containers. For example, noise occurs when the bottom of a pan is too thick or thin or has a diameter that is too small.
When the fuse burns out, the hob becomes impossible to activate at all. This happens either if it cannot cope with the load, or the transistors are short-circuited. Overheating of the hob can be caused either by contamination or excess liquid.
The winding overheats when the entire structure is not placed on a hard surface, and the equipment begins to sag under the weight of the utensils used.
If the induction cooker clicks during cooking, then you should first study the instructions - for some models this “accompanying effect” is considered the norm. You should also not worry if the device hums, crackles or squeaks - these sounds are produced by induction coils when interacting with the dishes.
When the surface of the induction hob, as well as what is underneath it, becomes very hot, it is worth checking whether metal objects, such as cutlery, are placed in the cabinets.
Finally, if the machine knocks out during startup, then first of all you should check its condition. Otherwise, the problem will be either in the connection or in the heating element.
Possible causes of malfunction
To avoid breakdowns, you must follow the operating instructions and regularly clean the hob.
The following factors may affect the operation of the equipment:
- Incorrect connection. The error occurs because each manufacturer uses different color coding. The user is confused about the identity of the wires. The result is faulty electrical wiring cables.
- Fuse failure. The reason is constant voltage surges. Fuses that do not match the equipment model quickly burn out. Most often, weak elements are installed by the owners of the equipment themselves.
- Device overheating. The cooling fan operates when the ambient temperature exceeds 50°C. Make sure the vents are open and the cooling system is working properly.
- Control module defective. Due to electronic failure, the module does not send commands to all other devices. You can repair the programmer only if you have its detailed diagram. Most often the board is replaced.
- Temperature sensor malfunction. To determine the condition of the hotplate temperature sensor, test programs are activated. It is important that the burner fits tightly to the glass-ceramic surface. If the sensor is working, it is recommended to replace the burner unit.
Many induction cookers have a safety mechanism. If the wrong diameter or material of the cookware is used, the panel has the ability to automatically turn off. The same thing happens if you remove a pot or frying pan from the burner - the surface will not heat up.
Preparation for repair work
After all possible causes of problems have been checked, you have to move on to repairs. Preparation necessarily begins with the stove being disconnected from the power supply, in this case electric.
By the way, before doing this, you should find out whether the outlet itself is working. This can be done using another, uniquely working device.
Next, the surface is dismantled in order to be able to work with the induction system itself.
The first step is to visually assess whether everything is in order with the elements. For example, soot, changed shade and other traces should immediately alert you. Next, a full check of all components begins.
Contacts, cables and fuses are assessed using a multimeter - if resistance is detected in sections of the circuit, broken elements are replaced. The induction coil spirals are checked for cracks and contact between individual turns.
Expert opinion
Romanova Ksenia Petrovna
Interior design expert and fabric store manager
Temperature sensors are again monitored using a multimeter. At the next stage, the wiring running from the induction coil to the generator is tested.
Next, using an ordinary powerful light bulb and a magnifying glass, you will need to find out whether cracks have appeared on the control board. The latter can provoke a break in the paths carrying current.
Upon completion, the base of the non-working burner is inspected separately, if there is one.
How to repair?
To repair an induction cooker yourself, you must immediately prepare diagnostic tools, a soldering iron and soldering devices. As a rule, the cause is either improper operation, a manufacturing defect, or liquid getting inside the housing.
If the stove does not turn on, the culprit may be a faulty power cord or a problem with the plug. Repair in these situations is carried out as follows: the stove is disassembled, the wire is cut at the entrance to the household appliance, after which the copper strands are stripped. Having assessed the condition of the conductor using a multimeter, it is necessary to remove that part of the wiring that is still in the housing.
Finally, the power cord is installed and the pair of main conductors is correctly connected to the grounding conductor. The plug is also cut off and replaced with a collapsible three-pin product.
When the cause of the breakdown is a damaged fuse, it will be enough to disassemble the device, replace the failed part and return the induction system to its original state. To return the control module or touch panel to operation, you will also have to purchase a working element and replace it.
Loose pressure springs are even easier to repair - they just need to be tightened to the level required, according to the instructions.
A break in the wires connecting the coil and the electrical network can be eliminated if their ends are professionally soldered. It will be enough to replace a burnt out coil with a new one, but it is better to entrust this process to a specialist.
It is also worth mentioning that if used incorrectly, cracks may appear on the glass-ceramic surface. In this case, independent repair is impossible, so the only solution is to replace the glass by professionals.
In general, basic equipment repairs are easier to carry out using a specific algorithm. First, the electrical wire is inspected for kinks, breaks and abrasions.
If they are present, the cable is simply replaced with a new one. If the wire is in order, then the hob is dismantled.
After unscrewing the mounting strips, you will have to lift the panel and disconnect the wires, after which it can be finally removed. A multimeter is used to evaluate the condition of the fuses and transformer.
If necessary, parts are replaced with new ones. Next, all the wires are checked - first visually, and then again with a multimeter.
Torn or damaged components are replaced with new ones.
Experts recommend contacting a workshop if serious malfunctions of the control unit are identified.
Alternatively, it could be faulty electronic components, microcracks on the printed circuit board, or problems with the fan. Without sufficient skills, you should contact a specialist who can cope with the task.
From the video below you will learn a lot of information about the structure of the stove and its repair.
When to contact customer service
It is quite difficult to independently eliminate malfunctions associated with defects in the control unit. Such breakdowns include:
- failure of high-voltage transistors and other electronic components;
- microcracks and mechanical damage to the conductive tracks of the control module printed circuit board, etc.;
- Unstable operation of the fan (works jerkily, does not turn on and/or does not turn off, etc.).
Important! The fan does not turn off when the maximum heating power of the burners is set, or the air temperature around it exceeds +50°C. And it does not turn on if the minimum power level is set, or the air around the device is heated to less than +50°C.
If you identify malfunctions that cannot be repaired yourself, you must contact the service department to call a qualified specialist who has all the necessary spare parts. This will allow the breakdown to be repaired in the shortest possible time, while keeping the rather expensive unit intact.
Do-it-yourself repair of hob malfunctions
The hob is one of the most important appliances in the kitchen, and like any other equipment, it is susceptible to breakdowns, but it’s quite easy to repair it yourself. If a malfunction is discovered during the warranty period, your stove will be repaired free of charge.
Expert opinion
Romanova Ksenia Petrovna
Interior design expert and fabric store manager
But if the breakdown occurs several years later, you can try to repair the hob yourself, since contacting specialists may cost little less than buying a new stove.
In this article, our specialists have listed all the malfunctions of hobs and step-by-step disassembled the process of repairing faults with their own hands.
Troubleshooting and error codes
Despite the high reliability of induction panels, the consumer may encounter defects, to eliminate which it is necessary to first carry out diagnostics and identify the cause of their occurrence. To facilitate this process, leading manufacturers equip their products with self-diagnosis systems that are able to independently indicate the cause of malfunction of induction cookers (hobs) and inform the owner about this by displaying the corresponding error code on the information display of the control panel.
Unfortunately, there is currently no unified classification of breakdowns. Each manufacturer codes the same faults differently (see the table for examples).
| Types of faults | Fault codes for induction electric stoves | ||||
| Electrolux | Bosch | Oursson | Miele | Gorenye | |
| Heating panel overheated | E4 | E-22 | E0; E3; E:10; EA | E | F15 |
| The internal elements of the stove have overheated | E1 | E-25 | E3; E6 | EF35 | F85 |
| Mains voltage exceeded | E5 | ER-26 | E:07; E7; E:08; E8 | ER | F16 |
Important! Repairing induction electric stoves is quite complicated in many cases. To do it at home, you need not only the skills to perform plumbing and electrical installation work, but also thorough knowledge of an electronics engineer.
The user can begin repairs on his own only if he is fully confident that he knows how to fix the problem. Otherwise, it is better to contact customer service.
Electric hob
The hob does not turn on - the most common malfunction of electrical panels; the device is plugged in, but does not work at all, or only one of the burners does not heat up. Do-it-yourself repairs can be broken down into the following stages:
- We check the voltage in the socket; due to heavy loads, the socket contacts often burn out.
- We check the plug and cord for mechanical damage - they may simply short out or even break the circuit. Most often, damage is observed where the panel is connected to an outlet. If we find damage, we replace the cord.
- Turn off the power, remove the fasteners and dismantle the surface from the countertop. We disassemble the surface and move on to the next step.
- We take a multimeter and check the transformer, the next step is to check the thermal fuse. If there is no resistance or if it differs significantly from that declared by the manufacturer, replacement parts are necessary; they are sold in many electronics stores.
- One burner on the hob does not work - you need to check all the wires, as well as their connections to the burners, thermostat, switches, and control panel for an open circuit. If the fault is not visually visible, all contacts are in their places, take a multimeter and check each connection.
If you do not have a multimeter, you can use an indicator screwdriver for repairs, which can be used to check the presence of voltage in all parts of the circuit. We also recommend watching a video that will help you repair the hobs yourself.
See also -
How to install a hob into a countertop with your own hands
Electrical panel faults
The main problems that users of electric hobs may encounter are the following:
- The fuse has blown - due to a power surge. The low price of a new fuse and the simple replacement process makes it easy to repair this fault yourself. For the future, we recommend purchasing a device that will protect your electrical network from power surges.
- If one or two burners do not work . We check the wire supplying voltage to the heating element. Under the influence of temperature, it is unsoldered. Repair is very simple, just solder it in place with a soldering iron. If the circuit is not broken, your heating element itself has burned out, you will need to buy a new one and replace it. Before changing, make sure there is a circuit between the heating element and the control panel; the cause of the malfunction may be poor contact.
- The sensor does not work - the hob does not turn on. One of the rare and most difficult malfunctions of touch hobs. You can again check the circuit; if there is no break, then you will have to replace the touch panel completely, but it is better to have it repaired. The reason may be improper operation or care with prohibited means. Only a specialist who is well acquainted with electronics can repair it at home.
- The burner does not heat up well or does not work at all . The reason is poor contact with the heating element, thermostat or thermostat - we check the presence of electricity in the circuit between these segments.
- The hob gets very hot, works and does not turn off - the thermostat is faulty. The thermostat cannot be repaired; you should buy a new one and replace it.
- The glass ceramic surface is cracked . We find out the reason, if you didn’t drop anything heavy, we contact the service under warranty, this is a typical factory defect, the manufacturer will repair it for free. If you yourself are to blame for the crack, you will have to send the panel for repair; it is quite difficult to replace it yourself. Please note that repairs to replace glass are very expensive, so operate the panel according to the instructions.
See also -
How to connect a hob with your own hands
Gas stove
Well, the last option for equipment that can fail is a gas stove. If your gas hob is not working, there are not many reasons for the malfunction. Usually problems arise with the piezoelectric element and the nozzle from which the gas is supplied.
What kind of lighting do you prefer?
Built-in Chandelier
So, for your attention, the causes of breakdowns and how to repair the hob with your own hands:
- The piece doesn't light well. In this case, you need to check the electric ignition of the burner for blockages. If the ignition is really clogged, wash it and after washing, wipe it thoroughly with a dry cloth.
That's all the main malfunctions of a gas hob. Sometimes incorrect operation can be caused by improper installation of kitchen appliances. We recommend that you familiarize yourself with how to properly connect an electric hob with your own hands!
Finally, I would like to summarize that most often an electric hob does not work due to a failed fuse or broken contact. The control unit that breaks down least often is difficult to repair yourself. We hope that now you know why this equipment breaks down and what to do to repair it yourself!
Expert opinion
It-Technology, Electrical power and electronics specialist
Ask questions to the “Specialist for modernization of energy generation systems”
What to do if the touch plate does not turn on Of course, the cause of a device breakdown is not always a short circuit, but before starting repair work, it is necessary not only to carry out certain diagnostic actions, but also to have a detailed history. Ask, I'm in touch!
The induction cooker does not work - reasons and do-it-yourself repairs
The ability of metal parts to heat up in an alternating magnetic field has been used in everyday life for more than 40 years. Appliances installed in the kitchen for cooking have a modern design, high-quality ceramic coating and high efficiency due to the direct heating of metal utensils.
Induction single burner hob
Despite the significant advantages of induction heating devices over conventional electric stoves, it is not always possible to repair such products on your own.
Complex microprocessor control of induction installed in such devices requires a sufficiently highly qualified technician who repairs this household appliance. The absence of direct heating of the element emitting a magnetic field almost completely eliminates the possibility of faults such as “burnt out conductor”.
Therefore, if there are any serious deviations in the operation of this device, or the device does not turn on at all, then if you want to repair this device yourself, you will need:
- minimal knowledge in the field of electronics;
- diagnostic devices, soldering iron and soldering materials;
- having a lot of free time;
- moral readiness for the fact that after attempting to independently repair such a complex device as an induction cooker, the device may be completely damaged.
Once you have everything you need, the first thing you should do is identify the main reasons why modern induction cookers fail.
Common Error Codes
Sometimes owners of such equipment may notice strange symbols on the sensor. The panel flashes red - something is wrong with the equipment. It will be useful if the owners understand the error codes and their meanings. Using the example of stoves produced by Bosch and Hansa, the symbols look like this:
- F - inconsistency of dishes for a given panel;
- E1 - excess heat level around the unit;
- E3 - electrical power failure;
- E4 - exceeding the maximum power of the burner;
- E5 - network error;
- E6 - lack of connection with the power unit.
If the error persists for a long time, you need to call a repair specialist. Calling a technician is especially important for faults of type E3, E5, E6. When submitting an application on the website or by phone, you must indicate the error code. Then the master will arrive with the tools already prepared.
Insufficient power
If an induction cooker does not produce rated power during operation, the reason for this is not always the device itself. Very often, a decrease in the power of a given electrical device may be due to:
- discrepancy in the voltage supplied to the home electrical network;
- using the wrong utensils;
- activation of electronic protection as a result of winding overheating.
If there are significant voltage deviations in the 220 V network, the induction cooker can not only work unstably, but also completely fail. If it is known that the voltage is often inconsistent in a given area, it is recommended to install a stabilizer for induction cooktops.
When installing a voltage stabilizer, you should choose a model whose power should exceed the rated power of the stove by at least 10%.
Using cookware whose bottom diameter significantly exceeds the values recommended by the manufacturer can also lead to unstable operation of the household appliance. A pot or pan that is too small can also cause the unit to lose power.
During cooking, you must ensure that the utensils are positioned exactly in the center of the cooking surface. If the cookware is shifted relative to the center of the induction field, this will lead not only to a noticeable decrease in power, but also to an increase in the negative impact of magnetic radiation on the human body.
The plate also has built-in protection against winding overheating, but a decrease in the power of the device as a result of such a function is very rare. All induction cookers are equipped with a forced ventilation system, which does its job perfectly.
Overheating of the winding may occur when the plate is not installed on a hard surface. In this case, the stove may sag under the weight of the dishes and its own weight, which will certainly lead to blocking of the air intake holes in the device body.
Also, the protection can be triggered by a decrease in the fan rotation speed as a result of hair, threads or nylon fishing line being wound around the motor shaft. If a decrease in the power of the induction cooker occurs for this reason, then it is enough to disassemble the device and clean the blades and fan shaft of dirt.
How does an induction heater work?
The principle of operation is not based on heating metals by induced eddy currents. Any metal that comes into contact with a high-frequency magnetic field becomes intensely heated. REPAIR OF FRYERS. To do this, several conditions must be met:
- The material must effectively absorb the energy of the vortex field. Therefore, cookware for such stoves is made of ferromagnetic metals. Most often it is steel.
- The oscillation frequency of the alternating magnetic field must be no less than 20–60 kHz; for this, appropriate generators are used.
- The area of action of the induction field is very compact, so the metal (in this case the bottom of the cookware) should be as close as possible to the inductor.
From the point of view of the physics of the process, this is a high-frequency transformer.
The role of the primary winding is performed by an inductor through which a high-frequency current flows. The secondary winding is nothing more than the bottom of the dish, in which, when exposed to an alternating magnetic field, the same currents arise as in the coil. Due to this, strong heating of the metal occurs.
Let's look at one more condition:
The surface area of both coils (and they are structurally flat) should be as equal as possible.
Only in this case is the balance of energy transfer ensured. What is it for? In empty space (above the inductor), eddy currents operate idle. The “extra” energy of the magnetic field begins to overheat the primary coil. In addition, the excess temperature load is transferred to the output stages of the high-frequency generator. If the cooling radiators fail, the circuit fails and repairs to the induction cooker components are required.
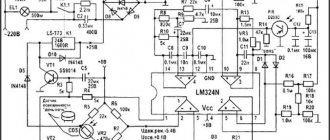
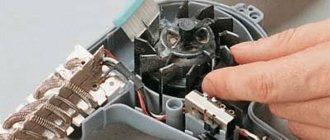
Induction heater device
The illustration shows the main components of the heating element (conditionally without the top “winding”), that is, there is no cookware.
- A temperature sensor monitors the degree of heating and turns off the power in critical modes.
- The coil (primary winding) is a massive copper conductor tightly laid in a spiral.
- Ferrites placed in the housing form a ferromagnetic complex together with the coil.
- The printed circuit board of the high-frequency alternating current generator is equipped with an output stage heat sink, with forced cooling (fan) https://tehnobytservis.ru.
- The generator housing provides effective airflow to the entire circuit.
The most common breakdowns of hob surfaces
Repair of hobs can only begin after the true cause of the malfunction of the device has been established. Let's start with the electrical panels.
First you need to see if all the burners or just one are not working. If all the burners do not work, then the test should begin by checking the voltage in the outlet.
Then we check the electrical plug and cord. Next, there should be a fuse in the panel itself.
We check him too. These are the simplest faults, and they are also the most common.
It is best to check these faults using a multimeter. If at least one burner is working, then you can skip the check in the above paragraph.
Expert opinion
Romanova Ksenia Petrovna
Interior design expert and fabric store manager
This means the voltage is safely reaching the hob. Most often, failure of electrical panels occurs for the following reasons:
- Failure of the heating element.
- Failure of switching parts of the electrical circuit (switches, switches).
- Control unit malfunction.
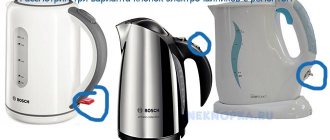
Why is the induction cooker humming?
The stove may make uncharacteristic sounds for one of the following reasons:
- dishes with a thin bottom are placed on the burner;
- maximum power is set;
- The dishes placed on the large burner are too small;
- the bottom of the dish is multi-layered, which causes vibrations;
- The contents of the pan make noise.
If the stove hums constantly, the control unit may need to be repaired or replaced. Malfunctions of the induction cooker in catering establishments are eliminated by a service center specialist.
The most serious problem is the situation when the induction cooker burns out and cannot be repaired. In such a situation, all that remains is to purchase a new unit.
Removing the heating elements
In most cases, repairing an electric hob involves replacing faulty heating elements. It will not be difficult to purchase such a spare part in a store, especially if the part in the surface of a well-known brand is changed.
For example, repairing an Ariston hob can be done without even visiting a service center in person. A new heating element can be ordered in the online store, and the purchase will be delivered to your door by a transport company.
The heating element can be accessed after the bottom cover of the surface is removed. This can be done using a slotted or Phillips screwdriver.
The location of fasteners differs significantly depending on the model. For example, repair of an Electrolux hob is carried out after dismantling the cover, which is held on by screws located at the corners of the product.
If an electric stove is being repaired, in which heating is carried out due to installed heating elements, then the malfunction of such an element can be determined using a multimeter. To do this, just switch the device to resistance measurement mode, and then connect the probes to the leads of the heating element.
A burnt-out element will have an “infinity” resistance, so further repairs of the electric hob must be carried out with the obligatory removal of the faulty part. As a rule, such elements are held on 3 or 4 clamps, which are a bracket that presses the heater as a result of tightening the threaded connection.
Repairing an Electrolux hob may differ significantly, but the principle of restoring such a hob remains the same. That is, you will need to remove the old heating element to install a new element in its place.
0
Repair of internal panel wiring
If an electric stove is being repaired, then one of the common causes of breakdown is a break or burnout of the wire leading to the heater. This happens if the wire is not tightly screwed to the heating element.
In this case, it is enough to connect the burnt-out internal conductor connected to the heating element to fully restore the functionality of the hob. The charred insulation on the wire must be removed.
To do this job efficiently, it is recommended to completely replace the cable of wires that go from the switch or thermostat to the heating element. Repair of a built-in hob can also be carried out by replacing only one conductor.
In this case, you will need to select a conductor whose cross-section should be no smaller than the wire being replaced. Otherwise, such repairs will be temporary.