A vacuum cleaner is not the most complicated household device. Therefore, no matter what happens to it, there is almost always a need to check the vacuum cleaner motor.
Whether it is a lack of traction or weak power, a reluctance to turn on or extraneous sounds - any of these problems can be caused by incorrect operation of the engine or its breakdown.
Of course, you need to check more affordable things first. For example, if there is no response to being plugged into the network, the integrity of the cord, the serviceability of the socket and the power button.
If the draft is weak - the integrity of the hose and power adjustment. If everything is in order, then it’s time to move on to the motor.
Algorithm for checking the motor of a Samsung vacuum cleaner
- Secure the vacuum cleaner motor so that it holds firmly and does not deform from pressure.
- To check, take a power cord with a plug and two terminals, which must be installed in the place where you removed the working terminals when dismantling the engine.
- Start the engine and if you see powerful sparks, you need to change the brushes.
If the motor shows no signs of life at all, then you need to look for the break point. First, try to inspect the motor visually. Very often a break occurs at the attachment point, and you will see it. And if you’re even luckier, you’ll even be able to strip and solder the torn wire without having to disassemble the motor for the Samsung vacuum cleaner. In any other case, you will need to completely disassemble the vacuum cleaner motor and check the armature for interturn short circuit. How to disassemble the motor of a vacuum cleaner? The main thing is to carefully unscrew the central nut, and then you just need to remove all the parts strung on it from the shaft. Next you can start checking the anchor.
- To check you will need a tester. We check the resistance between the armature lamellas with a tester, touching the adjacent lamellas with probes. If the resistance is twice that specified as the norm, then such an armature has a break. There is also a special interturn short circuit indicator, which signals in red if there is a break. The rules for setting up the use of the device are described in detail in the instructions for the interturn short circuit indicator. You should also check the resistance between the lamellas and the armature body. The display should show an infinity indicator.
- Then you need to check the starter winding terminals in continuity mode. If the circuit is broken, the motor needs to be rewinded or a new motor for the Samsung vacuum cleaner is needed. In the specialized store ALM-zapchasti you can purchase an original engine for a Samsung vacuum cleaner and any other household appliance.
In general, given the hassle of checking a vacuum cleaner motor and the availability of spare parts, many immediately opt for a complete replacement of the motor assembly without trying to disassemble the motor and see what’s wrong. This is exactly what is recommended for all home craftsmen who have no experience in repairing electric motors, but are able to carry out simple mechanical assembly work. For everyone else, it’s better to immediately contact a specialized repair service. Let's hope these tips help you and get your vacuum cleaner working like new again!
Good day everyone! Help others! Yesterday the Vitek 1600W vacuum cleaner was damaged, i.e. it just refused to turn on. I disassembled the case, checked the power from the cord to the contacts of the winding coil - yes, from the contacts to the button - yes, the button is working, power comes to the motor, but it does not turn. The brushes are visually normal. I think the engine has burned out (The question is what is the best way to check it with a multimeter and finally calm down. Thank you all in advance.
Features of checking the armature of an angle grinder with a tester
The diagnostic procedure will help to accurately determine the faulty part of the electric motor. A device that is available in the tool arsenal of many amateur electricians will allow you to check the armature of an angle grinder with a tester. Using the tester, you can check not only the armatures of angle grinders, but also the stator windings of other electric motors. In the video below you can see one of these homemade measuring devices in action.
When the tester is connected to the network, the indicator lights up. A red light without applying a technical device to the armature means the device is ready to perform the test. The working active surface of the measuring device has two points of contact with the test surface. One of them is a generator coil, the second is a communication curl coil. When checking the armature of an angle grinder with a tester, it is necessary to place this surface next to the groove being examined. Make sure that the sensors do not extend beyond the armature plates on both sides at the same time.
If the electrical part is in good condition or rewound, then when it is checked by a tester, the indicator opposite each of the grooves will light green. If there is a malfunction in the armature of the angle grinder, in particular, an interturn short circuit, a red light will appear on the device indicator at its location. Be careful when performing the diagnostic procedure to ensure correct contact of the surfaces when checking the angle grinder armature with a tester. Mechanical damage, which can be noticed visually without testing with a multimeter, should not be excluded as the reason for the failure of an angle grinder. They can be both significant and small. You may notice damage upon inspection after disassembling the angle grinder. It is necessary to diagnose such faults before checking the armature for an interturn short circuit.
Article on the topic: How much does a car vacuum cleaner cost?
If you do not have experience in disassembling power tools or preparing to work with measuring instruments for testing an armature with a multimeter and are not confident in your own abilities, you should not interfere with the design of the angle grinder. Do not experiment to avoid damaging the angle grinder. In this case, to find the cause of the breakdown of the power tool and check the armature of the angle grinder with a tester, it is better to contact a service center or qualified mechanics who specialize in equipment repair.
Prevention of breakdowns
Vacuum cleaners break down more often than other household appliances, which is due to the installation of high-speed commutator motors in them. Motor cooling is based on airflow, so the operating time of the device without an air jet of proper pressure is no more than 10-15 minutes. If you do not turn off the vacuum cleaner in time, serious malfunctions will arise that require major repairs. To avoid these consequences, you should adhere to certain operating rules based on compliance with operating modes.
- The degree of filter contamination affects how hot the engine gets. To ensure normal functioning, the filter element must be regularly cleaned of debris and dust.
- Moisture must not be allowed to enter the engine, so it is better to systematically change the filter to a new one rather than wash it in water. In addition, this significantly reduces throughput and can cause overheating.
- The vacuum cleaner requires specialized care. Experts recommend replacing the lubricant on the bearings at least twice a year and checking the degree of wear of the graphite motor brushes annually.
- When the first signs of a malfunction occur, you need to move on to eliminating them, which will guarantee long-term operation and stable operation of the vacuum cleaner for many years.
So, a vacuum cleaner is an important household appliance that is used almost daily. Despite the simple design, breakdowns occur quite often in both foreign and domestic models. The cost of repairs in service centers is often unreasonably high, given the fact that some problems can be eliminated in a few minutes by simply replacing the damaged part. However, most of the work can be done independently.
What to do?
After you have managed to identify the cause of the brushes burning, it is important for you to understand your correct actions should be .
If the problem is related to wear on the brushes, they must be replaced immediately. It is better to replace the springs on which they are supported.
If the cause of the malfunction is in the armature , then its winding will have to be completely replaced. Such repairs are difficult to carry out independently at home. You can try, but it's easier to just replace the entire part. It won't cost much.
In the case of the stator, the situation looks the same as with the armature. If you can rewind its winding yourself, then this will be the most correct and economical solution to the problem. Otherwise you will have to replace the part.
If you find a fault in the collector, then its repair should begin by cleaning the contacts from dust and carbon deposits. Immediately check the operation of the commutator brushes. If they operate in standard mode, then no contamination should accumulate on the contacts.
Article on the topic: How to use a Thomas vacuum cleaner with an aqua filter
Important! You can clean the contacts using sandpaper. The smallest grain size is suitable so as not to scratch the part during cleaning.
Using a screwdriver set to minimum speed, you can do the cleaning yourself. Place sandpaper on the base of the screwdriver and carefully move along the contacts. If the commutator brushes are faulty, they must be replaced immediately to prevent the breakdown from happening again in the future. Serviceable brushes should promptly remove carbon deposits and dust accumulating on the device.
You can deal with worn brushes, bearings, fallen mounting screws or a dirty inner surface of the engine with your own hands.
It will not be possible to restore the functionality of a motor whose winding has been broken at home (by carefully examining the armature, you will notice damaged wires and broken contacts - signs of a broken winding).
Rewinding the rotor winding is carried out only by service center technicians , but, as practice shows, it is more profitable (both in terms of money and time) to replace a faulty motor completely than to repair it.
Depending on the model of Samsung vacuum cleaner, purchasing a new motor will cost from 1,700 to 2,600 rubles. The manager of an online store selling spare parts and components will help you choose the right engine option (alternatively, you can ask a Samsung service center specialist for help).
The necessary information about the model of the vacuum cleaner can be found in the passport or plate attached to the body of the household appliance. If possible, the model and serial number of the motor can be checked on a plate attached to the housing of the removed faulty electric motor.
Article on the topic: How to choose a manicure vacuum cleaner
How to check the vacuum cleaner motor for serviceability
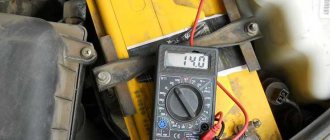
Even before you begin the time-consuming operation of disassembling the motor in search of a malfunction, check whether there is voltage to the vacuum cleaner motor. To do this, you need to remove the cover and measure the load at the input terminal with a multimeter. Checking the operation of the start button, the serviceability of the semistor and the fuse on the motor housing will help prevent deep disassembly of the unit.
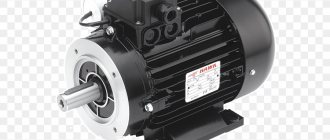
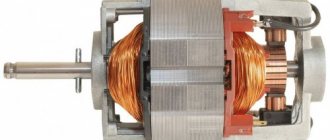
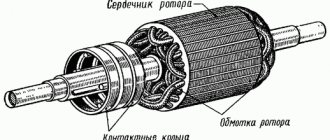
Vacuum cleaners have synchronous commutator motors. They operate from single-phase current with a voltage of 220 V. The device consists of a rotating part combined with a shaft - the rotor (armature) and a stationary part - the stator. The collector receives voltage from the network through a transfer unit from graphite brushes. During normal engine operation, the brushes spark moderately. Increased formation of sparks is a reason to inspect the technical condition of the vacuum cleaner engine. How to check a vacuum cleaner motor yourself with a multimeter?
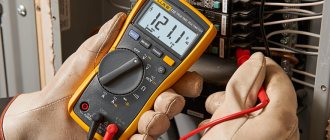
The inspection is carried out visually and instrumentally. A multimeter is used as a tester - a universal device for testing any device that uses electric current. They can measure the resistance of the vacuum cleaner motor in the circuit. This is a convenient way to find an open in a line using a closed circuit.
The meaning of another operation, dialing, is to determine the presence of contact between two wires. Before ringing the vacuum cleaner motor with a multimeter, the mode switch is set to “buzzer” mode. When taking measurements, a sound signal is given for a positive result. This is how they check the serviceability of the fuses and the serviceability of the circuits. This method is used to find a short circuit - when 2 or more wires are soldered together.
In order to find the resistance of the vacuum cleaner motor winding, you need to measure the indicator between adjacent lamellas and it should be the same. In this case, the vanishing resistance of the strip is small; two instruments are used for measurement, an ammeter and a voltmeter. Both of them work in a multimeter. To do this, a 20 Ohm resistor is installed in series with the measurement object. The result is determined by simultaneously taking readings from an ammeter and a voltmeter. Resistance is calculated using the formula R=U/I.
To measure the integrity of the vacuum cleaner motor windings, look for a pair and ring each one in turn, measuring the resistance. The indication “infinity” means a break; it is impossible to determine the location of the damage - a continuity test of the vacuum cleaner motor showed that it is unsuitable for further use. If one output works in different pairs, then a short circuit has been found.
There are additional ways to check the vacuum cleaner engine for serviceability. A breakdown to the housing is determined if at least one wire in contact with the housing shows 0. The measurement between the housing and the copper plates should be equal to infinity. If, when measuring the resistance between the rotor lamellas, the resistance in two adjacent plates is 2 times greater than in the other contacts, you need to look for a break.
Interturn closure cannot be determined at home. But if all the measurements have been carried out, and the electric motor does not start, perhaps this is exactly the case when the malfunction is determined by a special device.
How to check a commutator motor - the most common breakdowns
To identify and troubleshoot problems, you will have to disassemble the power tool itself or the electric motor of other household devices according to these instructions. Just before you start disassembling, pay attention to the sparking in the contact-brush mechanism.
If it is elevated (as in the figure for the lower brush), this may indicate wear or poor contact of the brushes, or, less often, an interturn short circuit in the commutator.
In most cases, the cause of breakdowns of commutator motors is wear of the brushes and blackening of the commutator. Worn brushes must be replaced with new ones of the same shape and size, preferably original ones, of course. They are very easy to change - you either need to remove or move the lock or unscrew the bolt.
In some models, it is not the brushes themselves that are replaced, but the assembly with the brush holder. Don't forget to connect the copper lead to the contact. If the brushes are intact, then stretch the springs pressing them.
If the contact part of the collector is darkened , then it must be cleaned with fine sandpaper (zero sandpaper).
Article on the topic: How to clean the hepa filter of a zelmer vacuum cleaner
Sometimes a groove forms when the brushes contact the commutator. It needs to be turned on a machine.
In second place in terms of the number of malfunctions is bearing wear. The need to replace them in a power tool is indicated by chuck runout and increased vibration of the housing during operation. How to check and replace bearings is described in detail in this article. In the most advanced cases, the armature and stator begin to touch during rotation; at a minimum, the armature will have to be changed.
Algorithm for checking the motor of a Samsung vacuum cleaner
- Secure the vacuum cleaner motor so that it holds firmly and does not deform from pressure.
- To check, take a power cord with a plug and two terminals, which must be installed in the place where you removed the working terminals when dismantling the engine.
- Start the engine and if you see powerful sparks, you need to change the brushes.
If the motor shows no signs of life at all, then you need to look for the break point. First, try to inspect the motor visually. Very often a break occurs at the attachment point, and you will see it. And if you’re even luckier, you’ll even be able to strip and solder the torn wire without having to disassemble the motor for the Samsung vacuum cleaner. In any other case, you will need to completely disassemble the vacuum cleaner motor and check the armature for interturn short circuit. How to disassemble the motor of a vacuum cleaner? The main thing is to carefully unscrew the central nut, and then you just need to remove all the parts strung on it from the shaft. Next you can start checking the anchor.
- To check you will need a tester. We check the resistance between the armature lamellas with a tester, touching the adjacent lamellas with probes. If the resistance is twice that specified as the norm, then such an armature has a break. There is also a special interturn short circuit indicator, which signals in red if there is a break. The rules for setting up the use of the device are described in detail in the instructions for the interturn short circuit indicator. You should also check the resistance between the lamellas and the armature body. The display should show an infinity indicator.
- Then you need to check the starter winding terminals in continuity mode. If the circuit is broken, the motor needs to be rewinded or a new motor for the Samsung vacuum cleaner is needed. In the specialized store ALM-zapchasti you can purchase an original engine for a Samsung vacuum cleaner and any other household appliance.
Testing commutator motors
Here things are a little different. You need to start with pairwise testing of the collector lamellas. Moreover, the resulting indicators should be almost equal to each other.
We also test for breakdown on the hull - we place one probe on the anchor, the other on the hull. Resistance values in such measurements should tend to infinity (very high resistance).
Pay attention to the integrity of the stator winding. Place one probe on the stator surface and the other on the winding terminal. High resistance values are also advantageous here.
The video shows the repair of the LG vacuum cleaner motor:
Almost any problem with the vacuum cleaner can be caused by a faulty motor. Whether the vacuum cleaner does not want to turn on at all, or simply weakly sucks in debris, demonstrating power below the rated level, the engine may be to blame. Not to mention extraneous sounds, rumble and howling: only the engine is capable of such sounds in a vacuum cleaner. How to check the motor of a vacuum cleaner and see if it is working?
To begin, the vacuum cleaner should be disassembled and the engine removed. The instructions for the vacuum cleaner may well serve as disassembly instructions, since there is nothing overly complicated in this procedure. Most importantly, be sure to photograph the wiring diagram so that after reassembly you do not cause a short circuit. It may also happen that you need a new motor for a Samsung vacuum cleaner. On a specialized website it is easy to select a motor using the online selection of mechanisms or the help of a consultant (for example, here - https://alm-zapchasti.com/cat/pylesosy/motory). But first try to check the motor - it may be possible to repair it! And the ALM-zapchasti service masters will help you with this.
How to diagnose and fix the problem?
Reasons for vacuum cleaner breakdown
Sometimes the problem is the cord. You've probably noticed that when you put it away, the cord actively dances. Because of this, cracks and creases may appear, then there is no contact, and the vacuum cleaner stops turning on. Take a good look at the cord, especially the end where it enters the housing. And a fork so that there is no damage, creases or other defects on it. If the washing vacuum cleaner does not work because of this, buy a new cord
When you cannot find the reason outside, you need to look for it inside. That is, disassemble the vacuum cleaner:
- Open the case and remove the panel that contains the power buttons and cable wrap.
- Inspect the entire cable, up to the point where it enters the board.
- Plug in the device.
- Check if there is voltage on the line.
- And inspect the cable for defects.
Prevention of breakdowns
Vacuum cleaners break down more often than other household appliances, which is due to the installation of high-speed commutator motors in them. Motor cooling is based on airflow, so the operating time of the device without an air jet of proper pressure is no more than 10-15 minutes. If you do not turn off the vacuum cleaner in time, serious malfunctions will arise that require major repairs. To avoid these consequences, you should adhere to certain operating rules based on compliance with operating modes.
- The degree of filter contamination affects how hot the engine gets. To ensure normal functioning, the filter element must be regularly cleaned of debris and dust.
- Moisture must not be allowed to enter the engine, so it is better to systematically change the filter to a new one rather than wash it in water. In addition, this significantly reduces throughput and can cause overheating.
- The vacuum cleaner requires specialized care. Experts recommend replacing the lubricant on the bearings at least twice a year and checking the degree of wear of the graphite motor brushes annually.
- When the first signs of a malfunction occur, you need to move on to eliminating them, which will guarantee long-term operation and stable operation of the vacuum cleaner for many years.
So, a vacuum cleaner is an important household appliance that is used almost daily. Despite the simple design, breakdowns occur quite often in both foreign and domestic models. The cost of repairs in service centers is often unreasonably high, given the fact that some problems can be eliminated in a few minutes by simply replacing the damaged part. However, most of the work can be done independently.
The winding has broken
There is nothing surprising about a winding break; this is the most common malfunction in the operation of electric drives. A breakdown can occur in both the stator and the armature.
If one phase in the winding breaks, then there will be no current in this place, but in the second phase the current indicator will be overestimated. This can be measured using the same multimeter in ammeter mode.
In general, this failure is equivalent to a loss of phase. For example, if a break suddenly occurred while the drive was in operation, the engine begins to sharply lose power and overheat. If the protection on the unit is working correctly, it will turn off. Solving the problem basically requires rewinding.
In a situation where a break has occurred in the rotor, the frequency of current oscillation will be equal to the frequency of voltage oscillation and slip. External signs: strong buzzing and vibration, decreased drive speed.
All these are just causes of breakdowns, but they can only be detected if you ring each winding of the electric motor and measure their resistance.
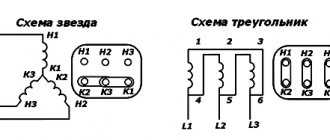
The starting and working windings are connected in those single-phase motors that operate at an alternating voltage of 220 V. The starting winding must produce a resistance that is 150% greater than that of the working winding.
To quickly check the performance of the electric motor, you can also use a function on the multimeter called “Dialing”. If the circuit is working properly, you will hear the characteristic sound of the device, and in some models there is also a light indicator. But if there is a break in the circuit, you will not hear any sound.
Various types of electric motors
Various electric motors are used in technology. And the choice of diagnostic method depends on the type of engine. Examples include the following electric motors:
In the first case, diagnostics are quite simple. As a rule, these motors have only two windings. Therefore, in order to check the correct functioning of the engine, it will have to be disassembled.
We test the coils using an ohmmeter (switch the multimeter to the required mode). The resistance of the working winding should be 50% less than that of the starting winding. Be sure to test the coils for breakdown on the body. This resistance must be very large.
If the indicator is small, you will have to rewind the stator.
Peculiarities
Electricity is supplied to the armature windings of the electric motor using a commutator unit. During operation of the apparatus, the armature rotates, contact appears, the number of revolutions is quite large, this leads to strong friction. The brushes form a “sliding” contact that converts mechanics into electrical energy. Their main task is to remove and supply current to the collectors. Electric current is also removed from the slip rings. The main thing is that the brushes are installed correctly. The kit includes tips with wires aimed at a high-quality fastening mechanism of the bolts located on the brushes.
There are different types:
- graphite – aimed at simple switching, consisting of graphite;
- carbon-graphite - characterized by weak strength, they are often used on equipment with minimal loads;
- electro-graphite – are high-strength, withstand medium contact conditions;
- copper-graphite - have good strength, have strong protection that protects against gases, as well as various liquids.
There are also improved models of brushes in a plastic case. In appearance, they are no different from the above, only they have protection in the form of a housing or a plastic shell.
How to check the vacuum cleaner motor for serviceability
Even before you begin the time-consuming operation of disassembling the motor in search of a malfunction, check whether there is voltage to the vacuum cleaner motor. To do this, you need to remove the cover and measure the load at the input terminal with a multimeter. Checking the operation of the start button, the serviceability of the semistor and the fuse on the motor housing will help prevent deep disassembly of the unit.
Vacuum cleaners have synchronous commutator motors. They operate from single-phase current with a voltage of 220 V. The device consists of a rotating part combined with a shaft - the rotor (armature) and a stationary part - the stator. The collector receives voltage from the network through a transfer unit from graphite brushes. During normal engine operation, the brushes spark moderately. Increased formation of sparks is a reason to inspect the technical condition of the vacuum cleaner engine. How to check a vacuum cleaner motor yourself with a multimeter?
The inspection is carried out visually and instrumentally. A multimeter is used as a tester - a universal device for testing any device that uses electric current. They can measure the resistance of the vacuum cleaner motor in the circuit. This is a convenient way to find an open in a line using a closed circuit.
The meaning of another operation, dialing, is to determine the presence of contact between two wires. Before ringing the vacuum cleaner motor with a multimeter, the mode switch is set to “buzzer” mode. When taking measurements, a sound signal is given for a positive result. This is how they check the serviceability of the fuses and the serviceability of the circuits. This method is used to find a short circuit - when 2 or more wires are soldered together.
In order to find the resistance of the vacuum cleaner motor winding, you need to measure the indicator between adjacent lamellas and it should be the same. In this case, the vanishing resistance of the strip is small; two instruments are used for measurement, an ammeter and a voltmeter. Both of them work in a multimeter. To do this, a 20 Ohm resistor is installed in series with the measurement object. The result is determined by simultaneously taking readings from an ammeter and a voltmeter. Resistance is calculated using the formula R=U/I.
To measure the integrity of the vacuum cleaner motor windings, look for a pair and ring each one in turn, measuring the resistance. The indication “infinity” means a break; it is impossible to determine the location of the damage - a continuity test of the vacuum cleaner motor showed that it is unsuitable for further use. If one output works in different pairs, then a short circuit has been found.
There are additional ways to check the vacuum cleaner engine for serviceability. A breakdown to the housing is determined if at least one wire in contact with the housing shows 0. The measurement between the housing and the copper plates should be equal to infinity. If, when measuring the resistance between the rotor lamellas, the resistance in two adjacent plates is 2 times greater than in the other contacts, you need to look for a break.
Interturn closure cannot be determined at home. But if all the measurements have been carried out, and the electric motor does not start, perhaps this is exactly the case when the malfunction is determined by a special device.
Various types of electric motors
Various electric motors are used in technology. And the choice of diagnostic method depends on the type of engine. Examples include the following electric motors:
In the first case, diagnostics are quite simple. As a rule, these motors have only two windings. Therefore, in order to check the correct functioning of the engine, it will have to be disassembled.
We test the coils using an ohmmeter (switch the multimeter to the required mode). The resistance of the working winding should be 50% less than that of the starting winding. Be sure to test the coils for breakdown on the body. This resistance must be very large.
If the indicator is small, you will have to rewind the stator.
Motor repair for a Samsung vacuum cleaner and 3 ways to unscrew the armature fastening nut
The material in the previous article talks about the consequences that can arise as a result of cleaning construction dust and debris with a regular household vacuum cleaner, even from such a brand as Samsung.
We recommend that you read it carefully. The consequences of such errors can be eliminated without disassembling the engine, when it remains intact.
However, it is likely that it has defects that require disassembly. Therefore, we continue to tell you how to repair a vacuum cleaner motor with your own hands and unscrew the armature fastening nut in three ways with a detailed explanation of them with diagrams, photographs and a video.
Based on local conditions, you can use any of them to perform routine repairs.
How to call: conditions
Before checking the electric motor for malfunction, you must make sure that the cord and plug of the device are absolutely in good working order. Usually, the absence of a disruption in the supply of electric current to the device can be judged by a glowing indicator lamp.
After making sure that electric current is supplied to the electric motor, it is necessary to dismantle it from the device body, while the device itself must be completely de-energized while performing this operation.
Checking the armature and stator of the electric motor is done with a multimeter. The sequence of measurements depends on the model of the electrical unit, and before ringing the electric motor, you should make sure that the measuring device is in working order.
The most common “breakdown” of multimeters is a decrease in battery charge, in which case you can get distorted results of resistance measurements.
Checking asynchronous engines
It is asynchronous motors that are most often used in household units that operate on 220 V. After removing the motor from the equipment, you need to measure the resistance between the motor terminals:
- Select resistance measurement function and range up to 100 ohms.
- Connect the lugs to the terminals of the connected winding. Between the middle and the extreme, the normal value is 30-50 Ohms, between the middle and the other extreme 15-20.
It is also important to check for current leakage:
- Select the resistance measurement function with a range of 2000 kOhm.
- Connect each terminal in turn to the motor body.
- There should be no values on the display. If you are using an analog multimeter, the needle does not deviate.
If problems are identified, you will have to disassemble the device to conduct more thorough investigations. An interturn short circuit often occurs. To identify them, a range of 100 Ohms is selected, after which each stator circuit is called. A strong deviation of one reading from another indicates a short circuit in the winding.
Video on how to test a motor with a multimeter:
Checking collector motors
Such motors are used in DC circuits. Before testing the electric motor with a multimeter, it is best to completely disassemble the motor.
On the multimeter, select the resistance measurement function with a range of 200 Ohms. Typically, the stator of an engine of this type has two independent windings, and they need to be tested.
What indicator is considered normal is written in the technical documentation for the engine, but serviceability is indicated by low resistance. If the engine is very powerful, the stator resistance will be very small. In motors with normal power, the winding resistance can be in the range of 5-30 Ohms. To make a continuity test, you need to touch the terminals of the windings with the tips of the multimeter probes. If there is no resistance in at least one circuit, there is no need to use the device.
The rotor of a commutator motor has many windings, but testing the armature is easy. Checking a commutator type motor with a multimeter:
- Select the resistance measurement function and the range of 200 ohms.
- Place the probe tips on the manifold so that they are as far apart as possible.
- If the tester display shows some numbers, without removing the probes, you need to turn the rotor a little so that the other winding connects to the probes.
- If the readings are almost equal, the armature is fine.
It is also useful to check the device for electrical leakage.
Detailed video on how to check a commutator motor with a multimeter:
Now you know how to check the winding of an electric motor with a multimeter and will be able to test various equipment. Even if you want to know how to test a pump with a multimeter, this article will be useful to you, because gas pumps also have an electric motor. You can also check the engine of your home washing machine. In short, if you know how to use a tester, you can be “friends” with a wide variety of equipment.
Which electric motors can be tested with a multimeter?
There are different modifications of electric motors, and the list of their possible malfunctions is quite large. Most problems can be diagnosed using a regular multimeter, even if you are not an expert in this field.
Article on the topic: How to choose a manicure vacuum cleaner
Modern electric motors are divided into several types, which are listed below:
- Asynchronous, three phases, with a squirrel-cage rotor. This type of electric powertrain is the most popular due to its simple design that allows for easy diagnostics.
- Asynchronous capacitor, with one or two phases and a squirrel-cage rotor. Such a power plant is usually equipped with household appliances powered from a conventional 220V network, the most common in modern homes.
- Asynchronous, equipped with a wound rotor. This equipment has a more powerful starting torque than motors with a squirrel-cage rotor, and therefore it is used as a drive in large power devices (lifts, cranes, power plants).
- Collector, direct current. Such motors are widely used in cars, where they drive fans and pumps, as well as power windows and wipers.
- Collector, alternating current. These motors are equipped with hand-held power tools.
The first stage of any diagnosis is a visual examination. If burnt windings or broken parts of the motor are visible even with the naked eye, it is clear that further inspection is pointless and the unit must be taken to a workshop. But often an inspection is not enough to identify problems, and then a more thorough check is necessary.
Further disassembly
Removing the top engine mount cover
It is simply put on top and crimped around the perimeter in four places.
Dents created at the factory can be carefully smoothed out using pliers.
Then the cover is simply pulled back by hand and removed from the engine housing.
Air pump wheel
There is a fan under the cover. It shows slight damage to the plastic part of the case.
Inside the cover, the layers of dust remaining after purging the engine are clearly visible. They can also be seen in the photo of the fan near the inlet blades.
It stuck to the washer and under it.
Unscrew the mounting screws with a screwdriver.
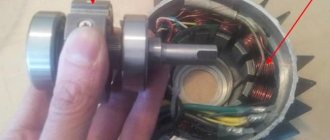
Dismantling the anchor
Fastening is carried out:
- screws through the upper tab with a compartment for the upper bearing race;
- projections with grooves in the cover;
- lower bearing race.
Screws securing the rotor to the motor stator
We gain access to them immediately after removing the plastic fan housing.
Let's promote them
At the same time, pay attention to the amount of construction dust inside the housing that remains even after it has been blown out from the outside.
Protrusions of the mounting plate that fit into the grooves of the stator housing
They are located next to the mounting screws and provide additional fastening to the rotor.
Using a flat screwdriver, carefully guide them toward the exit from the grooves.
Then we hold the mounting plate with our fingers through the internal holes or hang it on a support. The rotor is still held in place by attaching the outer race of the lower bearing. By the way, it turned out to be additionally glued.
The protruding end of the threaded shaft axis must be protected from damage with a piece of dry hardwood board and struck with a hammer. The rotor will be knocked out of the stator.
Visual inspection
On the rotor, traces of carbon deposits from graphite dust formed as a result of burning brushes and glue on the bearing race are clearly visible.
I tried to remove contamination from the plates in the traditional, careful way: wash with alcohol or its solution using a cotton swab.
The carbon deposits stuck quite strongly to the metal and dissolved very poorly. I had to work with steel bluen. The photo below shows the preliminary result of cleaning, which requires additional polishing of the surfaces.
But, for carrying out electrical measurements this is quite enough. Then comes the cleaning of the grooves between the collector plates from debris, dust and carbon deposits that can bypass the rotor winding chains. At first he worked as a bluer, and then as a scraper made of non-coniferous wood.
Removing the brushes
Place a screwdriver on the fastening screw one by one and turn it out.
We carefully remove the brush by hand and inspect it.
Traces of soot with the formation of layers of graphite dust are visible to the naked eye.
The same picture is observed on the second brush. Traces of sparking are clearly visible on the end surface.
This allows us to conclude that an external inspection of the commutator and an electrical check of the condition of the rotor and stator windings are necessary.
This cannot be done through a closed engine casing: it requires disassembly and removal of the armature.
Application of a multimeter
Now we need to check the possibility of a break in the stator windings. On the multimeter scale, set the switch to the resistance measurement sector. Without knowing the measurement value, we set the maximum value for your device. We check the functionality of the tester.
We touch each other with our probes. The arrow of the device should show 0. We carry out the work by touching the terminals of the windings. When an infinite value is shown on the multimeter scale, the winding is faulty and the stator should be rewound.
We check the possibility of a short circuit to the housing. Such a malfunction will cause a decrease in the power of the angle grinder, the possibility of electric shock and an increase in temperature during operation. The work is carried out according to the same scheme. Turn on the resistance measurement on the scale.
We place the red probe on the winding terminal, and attach the black probe to the stator housing. If the winding is short-circuited to the housing, the resistance value on the tester scale will be less than on a working one. This malfunction requires rewinding of the stator windings.
It's time to take measurements and check whether there is an interturn short circuit in the stator winding. To do this, the resistance value on each winding is measured. We determine the zero point of the windings by measuring the resistance for each of them. When the device shows the lowest winding resistance, it should be changed.
Preparing the multimeter
First, turn on the multimeter and see if there is an indication in resistance measurement mode. The multimeter should show 1 at any position of the selector within the resistance measurement sector. Secondly, we connect the wires to measure resistance. We connect the black wire to the Com socket, the red wire to the socket with the designations of amperes, volts, ohms. We do everything in accordance with the article How to properly connect wires to a multimeter. Checking the multimeter. We set the selector to any limit from 2 to 2000 KOhm and close the probes. A zero should appear on the instrument scale, which will change to one after the probes are opened. If something goes wrong, the multimeter needs to be brought to life. Usually fresh batteries are enough.
Visual inspection of the breakdown
Any tool, even the best quality one, is susceptible to breakage. Especially if it is intensively exploited. If the grinder breaks down, you are unlikely to be able to repair the tool yourself. However, a preliminary inspection can be carried out without special skills.
Most often, the anchor fails in angle grinders. The failure may be mechanical. Upon visual inspection, uneven wear of the brushes will be visible, as well as their burning. In addition, if the anchor is faulty, the angle grinder will vibrate and heat up.
There are electrical breakdowns. These include:
- damage to the armature winding;
- the presence of a short circuit in the turns;
- broken resistance between the core and the winding.
Such faults can be identified using special measuring instruments, for example, a multimeter.
Commutator synchronous motors
They are used in household devices (mixers, washing machines, electric drills, etc.), therefore they are designed to operate from a 220V network. Their “heart” is an armature consisting of a stationary stator and a winding on the shaft. If the cause of the problem lies there, the check should begin with a visual inspection.
When found:
- burnt out or broken windings;
- burning smell;
- active sparking;
- melted collector lamellas;
- bearing failure;
- disconnecting wiring;
If at first glance the defects are not noticeable, for a more accurate examination you will have to arm yourself with a multimeter. The verification takes place in stages:
- Ring the paired terminals of the stator windings to the lamellas. The resistance readings on each should match.
- Check the resistance between the armature body and the lamellas - ideally it tends to infinity.
- Ring the terminals to check the integrity of the winding.
- Check the condition of the circuit between the armature winding terminals and the stator housing.
The presence of a breakdown in the housing is a sign that the engine requires replacement of broken parts and complete repair. In this case, it is prohibited to connect it to the network.
Testing commutator motors
Here things are a little different. You need to start with pairwise testing of the collector lamellas. Moreover, the resulting indicators should be almost equal to each other.
We also test for breakdown on the hull - we place one probe on the anchor, the other on the hull. Resistance values in such measurements should tend to infinity (very high resistance).
Pay attention to the integrity of the stator winding. Place one probe on the stator surface and the other on the winding terminal. High resistance values are also advantageous here.
The video shows the repair of the LG vacuum cleaner motor:
Almost any problem with the vacuum cleaner can be caused by a faulty motor. Whether the vacuum cleaner does not want to turn on at all, or simply weakly sucks in debris, demonstrating power below the rated level, the engine may be to blame. Not to mention extraneous sounds, rumble and howling: only the engine is capable of such sounds in a vacuum cleaner. How to check the motor of a vacuum cleaner and see if it is working?
To begin, the vacuum cleaner should be disassembled and the engine removed. The instructions for the vacuum cleaner may well serve as disassembly instructions, since there is nothing overly complicated in this procedure. Most importantly, be sure to photograph the wiring diagram so that after reassembly you do not cause a short circuit. It may also happen that you need a new motor for a Samsung vacuum cleaner. On a specialized website it is easy to select a motor using the online selection of mechanisms or the help of a consultant (for example, here - https://alm-zapchasti.com/cat/pylesosy/motory). But first try to check the motor - it may be possible to repair it! And the ALM-zapchasti service masters will help you with this.
Typical vacuum cleaner breakdowns
The main reasons why vacuum cleaners stop functioning correctly are wear, misuse and power outages. The table below contains the most common faults and the signs by which they can be identified.
| Problem | Signs | Cause |
| Weakness or failure of the debris suction function | A growing hum that wasn't there before | The garbage bag or container is overfilled, a blockage in the hose or the internal cavity of the device, deformation of the gasket or seal, lack of a tight connection between the hose and the housing, wear of the O-ring, displacement of the brush roller |
| Stopping the engine | Smell of burning and subsequent stoppage of operation of the device | Wear, improper operation, power outages |
| Lack of power | The vacuum cleaner does not turn on | Failure of the cord or its connection to the housing, damage to the internal wiring, activation of the protective mode due to overheating, failure of the electric motor |
| Charging problems | Quickly draining battery | Reduced power capacity due to manufacturing defects or poor quality assembly, power outage |
| Cord jam | Fixing the cord in one position | Malfunction of the winding drum (most often deformation of the spring) or the auto-winding mechanism |
| Dust bin indicator malfunction | The indicator does not reflect the filling of the bag | Piston system stopper, indicator spring damage |
Doesn't turn on/off
If the device does not turn on, then the technicians look for the reason in one of three options:
- lack of power supply - there is no power in the switch, plug, socket, the wire is frayed, the power supply circuit of the device is broken;
- overheat protection;
- electric motor failure.
In the first case, any owner familiar with the electrical field will be able to find an open circuit in the power supply circuit. If you don’t have the tool necessary to check the voltage, it’s better to contact a specialist.
The reasons for overheating protection triggering may be violations of operating conditions:
- long-term operation of the unit with an overfilled dust collector;
- insufficient network voltage;
- long cleaning in a hot room.
Most vacuum cleaners have a special relay that turns off the device when it detects overheating. In this case, you need to wait a little until the electrical appliance cools down, after unplugging it from the outlet. Failure of the electric motor requires its repair or replacement - for this you need to contact qualified specialists.
Source
Choosing a new engine
When choosing a new motor, it is important to consider some parameters:
- vacuum cleaner model;
- identical shapes of the old and new motor;
- the presence or absence of a skirt under the impeller;
- engine power indicated on the motor or body of the vacuum cleaner - it ranges from 1600W to 2200 W;
- shape of the holes for the motor holder.
- correspondence of the dimensions of the old and new engines and their impellers.
The vacuum cleaner has become one of the most useful and reliable human assistants. This unit can last a long time with proper care and attention. The user only needs to know and put into practice a few simple rules:
- give the device a chance to rest;
- keep the filters clean;
- change dust collectors on time;
- do not allow impacts on the body and do not use harmful detergents;
- Wipe metal elements dry with a washing vacuum cleaner;
- monitor the rhythm of operation of the unit.
In addition, you should remember that each vacuum cleaner comes with instructions. And before operating any equipment, you must carefully study it in order to learn all the intricacies of use and maintenance inherent in this particular model.