The electric kettle has become an indispensable attribute of any kitchen and is a top seller in comparison with other household appliances. This device is widely used both at home, in the kitchen, and in the office. But unfortunately, like any electrical appliance, the kettle breaks down after some time of use. Since the price of this water heater is not too high, it is easier to buy a new one than to repair it. But if you consider yourself a DIYer, you can try to repair the electric kettle yourself.
Products without cord
This device has a base-stand on which the block and power connector are connected.
Connection to the electrical network is carried out thanks to a cord that is connected to this very stand. Due to this design, it is possible to pick up the kettle without removing the plug from the socket. There are modifications that are installed in a fixed position on the base. However, modern products can be placed facing any direction. The base also has a special compartment for storing excess cord. Cordless kettles contain:
- filter;
- steam outlet;
- indicator for determining the liquid level;
- power connector;
- base;
- bimetallic disk.
Electric kettle device
- Electric kettle stand. The design has 3 electrical contacts, two of which are located in the grooves (they are copper plates) and serve to supply voltage to the kettle, and one is located in the center and serves as a grounding conductor.
- Heating element (heating element). It can have either an open type (curved or spiral) or a closed type (like a metal disk). At the ends of the heating element there are leads for supplying voltage to them; small contacts are welded to them, onto which terminals are placed.
- Electric switch. Serves to protect and turn on an electrical appliance. There is a thermal relay installed inside that can protect the device during network overloads and overheating of electrical wires. There is a thermostat that turns off the device if the heating element overheats.
- Indicator. LED light located on the base of the kettle or on the power button. Indicates whether the electrical appliance is currently working or not.
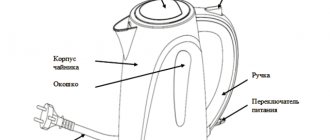
- Frame. Mainly made of plastic, this option is available to everyone, as it is inexpensive compared to others; metal and glass (more expensive models). The stand consists of the same material as the electric kettle itself.
- Kettle flask. The cheapest and simplest models do not have it. In more expensive versions, the flask is located inside the kettle so that it does not touch its walls, which ensures that high temperatures are maintained for a long time. Consists mainly of metal or glass.
Main surprise
Boiled water causes allergic reactions. It is difficult to name the percentage of people susceptible to the disease. Kashpirovsky considers half of the planet to have an aggravated reaction. Treats almost 100% of those who apply. Some (the impudent ones) are sent back. Let local hospitals try it out.
The regulation of the immune system is poorly understood by science. A sane person who has experienced angioedema will be careful not to reject the slightest possibility of cure.
Most people's mornings begin with a cup of invigorating drink - coffee or tea.
To prepare it, as a rule, an electric kettle is used, since it heats the water to the desired temperature in just a couple of minutes.
However, what if one fine morning everything went wrong?
You habitually press the kettle button, but it does not lock, or it seems to turn on, but there is no contact, and the kettle does not work. Problem? Even some! Someone will say: buy a new kettle, and that’s the end of it. How much does it cost there - mere pennies...
In fact, if the power button for an electric kettle is broken , then this is not a death sentence for the entire device. Practice shows that even a person very distant from the world of electronic boards and various chips can repair this unit.
You just need to follow simple rules and have a general understanding of the subject of repair.
Operating principle of an electric kettle
First, let's look at how a kettle works in general and what goes where. And it works like this:
- First, the electrical plug is plugged into a 220V AC outlet.
- The mains voltage is supplied via a cable to the stand and XP 1 contacts; they are located quite deep so that a person cannot touch them.
- The electric kettle has a recess in its base; it contains contacts that close after the device is installed on the stand.
- After turning on the button on the kettle, the current will pass through the thermal switch St 1 and after the water boils it will automatically turn off.
- St 2 is a thermal protection switch, it is always in operation, but is only activated when the empty kettle is switched on by mistake.
- Well, the last stage is the supply of voltage to the heating element, abbreviated as heating element.
- HL is a light bulb that signals a person whether the electric kettle is on or not.
Replacing the heating element: the electric kettle does not turn on
A burnt heating element is the most common cause of device failure. It can happen for many reasons:
- constant overheating of the heating element;
- network drop;
- the presence of a large amount of scale.
Regardless of the model, repairing an electric kettle yourself begins with diagnosing and checking for other reasons why it may not turn on. First of all, you need to check the socket itself, if everything is in order, then check the cord for integrity, and only then proceed to disassemble the case.
What kind of damage can the kettle be returned to the seller?
If the purchased product does not meet the declared quality or malfunctions in its mechanisms are identified during operation, according to the Law on the Protection of Consumer Rights, the product can be returned to the seller and get a refund. To do this, certain conditions must be met.
- — the kettle has not been used, its appearance, factory seals and labels, as well as its presentation remained completely intact
- - availability of a sales receipt or other document evidencing the purchase (in the absence of such documents, it is possible to refer to the testimony of witnesses)
- — on the day of contact there is no similar replacement product available for sale
- — satisfaction of the request for the return of money must occur no later than 10 days from the date of presentation
- — you must have a civil passport with you to draw up a certificate of return of the kettle.
If the purchased kettle is under warranty, its repair can only be carried out in warranty workshops, the list of which is given in the warranty card. Independent disassembly of the device and an attempt to eliminate the malfunction entails termination of the manufacturer’s warranty obligations.
A simple conclusion follows from this. It makes more sense to use the warranty than to try to fix the kettle yourself. There is no point in hoping that the workshop will “not notice” any traces of an autopsy. For a professional who repairs household appliances every day and for many years, one glance is enough to determine whether the kettle has been disassembled or not. In addition, there are various tricks on the part of the manufacturer that are aimed at avoiding such situations. They are not visible to the eye, but are clear enough to be used to determine (and prove) the fact of unauthorized disassembly.
All defective goods are subject to return or exchange, at the request of the buyer. The only exceptions may be complex technical goods that are subject to examination for manufacturing or warehouse defects. The teapot, of course, does not fall into this category.
If controversial issues arise, the seller is obliged to conduct an expert examination of the goods at his own expense. The buyer has the right to be present during the examination. If, as a result of the examination, it is proven that the teapot (or other product) is defective due to the fault of the buyer, then he will be obliged to reimburse all expenses for the examination.
Prevention of breakdowns
To avoid malfunctions, you must adhere to the following recommendations:
- comply with all requirements of the operating instructions;
- regularly clean the internal surfaces of the kettle from lime deposits (scale);
- Do not bend the electrical cord that connects the device to the AC mains.
Attention! Do not try to revive the kettle by connecting the heating element directly to the power supply. This is life-threatening!
Repairing an electric kettle that is not working is within the capabilities of any user. However, experts believe that the right decision is to purchase a new device.
The principle of operation of electric kettles, device and electrical circuit
An electric kettle is a household appliance with a fairly simple design in terms of its type of device and operation. Today on the market you can find many different models of electric kettles, but it should be noted that they all function and do their job according to the same principle. As a rule, for different models of electric kettles, depending on the presence of various additional functions, the circuits may differ slightly from each other.
An electric kettle consists of several different parts. The structure of such devices, as a rule, consists of:
- A special housing that acts as a reservoir for heated water. It is worth noting that in some models the liquid reservoir is not the body, but a special removable flask.
- Heating element. In electric kettles, such elements can be open or, on the contrary, closed. In addition, the heating elements used in teapots can be disk or spiral.
- A special stand, which is equipped with a connector that allows you to connect the kettle to the mains power supply.
- A thermostat that turns off the power to the device when the water boils (located directly under the device’s power button).
- A special block, which is a connector for powering the device (located on the bottom of the device in the side or central part).
Models of electric kettles that are equipped with a special thermostat have more contact groups. This feature must be taken into account when carrying out their own repairs. Thermostats allow you to heat water in different modes while using the electric kettle, as well as keep it hot for a long time.
The operating principle of electric kettles that operate from the electrical network is quite simple. When such a device is connected to the electrical network and the power button is pressed, the heating element begins to heat up. Thanks to this, the water in the kettle’s reservoir boils or is heated to the temperature set by the user (in models with an installed thermostat).
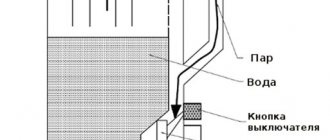
When water is heated, when it boils, a large amount of steam begins to form in the body of the kettle, which, through a special channel equipped with a steam-permeable hole, begins to be supplied to a special bimetallic thermostat plate. Thanks to the action of steam, the metal begins to gradually expand and act on the lever, thereby opening the contact groups and turning off the equipment.
The power button does not lock
Frequently pressing the button with force leads to wear on the contacting surfaces, and the button no longer locks. This defect is one of the most common that occurs during the operation of grinders.
In the following video, the Makita model grinder does not have the button locked in the required position . After disassembly, the worn surfaces on the button and the fixing groove on the body of the angle grinder are clearly visible. Repairs are made in two ways.
Replacing the worn button with a new one
Here you should remove the radius of curvature on the fixing groove and align the landing plane under the button. In this case, the processing is carried out very carefully with minimal removal of plastic material. The properties of plastic, as a fragile soft material, make it possible to select a machining mode with low tool speeds, which allows you to regulate its optimal feed when eliminating surface defects.
With worn button fix
The author is right that it is not always possible to find a new button to replace a worn one. The button restoration method is relevant, especially for craftsmen working outside the scope of specialized retail outlets. Important: clean the seating surface of the button with a file no more than a few tenths of a millimeter, and just level the contact surface of the “tendril” of the button without removing excess material.
These methods are one-time in nature; the next such breakdown may lead to the replacement of parts with new ones.
Disassembly nuances taking into account the model
Before starting repair work, it is necessary to conduct a preliminary inspection of the kettle for operability and eliminate all sorts of trivial issues that could cause a malfunction (connection to the power supply, activation of the power button, correct position, installation of the device directly on the stand itself). If, after a preliminary check, the device still remains faulty, then it is necessary to dismantle all components and find the cause of the breakdown. How to disassemble an electric kettle? It is recommended to disassemble models of electric kettles that are equipped with a closed heating element as follows:
- Remove the cover located on the bottom of the device. In this case, you need to take into account the fact that on older models, the fastening elements are located in the upper part.
- In more modern models, during disassembly, it is necessary to remove the top cover, which is secured in two grooves located at the base of the handle.
- The grooves should be carefully released, and then the bolts located under them should be unscrewed. In some models, the top handle is removed directly along with the lid.
- Then you need to turn the kettle over and remove the fastening elements at its bottom.
- Using a screwdriver, unclip the special fixing elements that are located around the perimeter of the bottom of the kettle.
After dismantling the bottom for damage, using a tester, you should inspect the heating element of the kettle. In models equipped with a disk heating element, the heating element does not come into contact with water. Therefore, at this stage, if the heating element is in a faulty state, you can determine the breakdown by ringing it with a tester. As a rule, the heating element in a kettle fails due to the appearance of broken spirals in the tube.
To check the thermostat for any malfunctions, you need to remove the screw located at the bottom of the kettle handle. Then the handle must be carefully removed and the screw removed under the power button. The connection points to which the thermostat is connected must be checked with a multimeter. After ringing, if the malfunction was not detected, you need to remove the assembly itself. To do this, first dismantle the cover itself, and then remove the part. To remove the cover, you need to lightly press it with your fingers and push it forward.
To properly disassemble the old model of electric kettle, you need to unscrew the screws located on the bottom of the device and dismantle its side part to gain access to the heating element, as well as the thermostat. In the case where the power button is located at the top of the kettle, the device must be completely disassembled. To check the open heating element, you must first dismantle the cover.
If the heating element is in working condition, and it was not possible to identify its malfunction, then the stand should be inspected. To do this, you need to disconnect it from the power supply, turn it over and remove all the bolts. Then you need to dismantle the lower part of the stand and inspect its elements.
How to fix an electric kettle with your own hands
The fairly simple design of electric kettles allows you to fix many of their malfunctions yourself, without contacting service workshops. But you can start repairing it yourself only if the warranty period for the electrical device has already expired. Let's look at some of the most common problems that can be easily solved if you have a simple tool at home and, without fail, an electrical measuring device.
If the kettle begins to leak, you must first of all identify the place where its seal is broken. It could be:
- leakage along the gasket installed at the junction of the disk heating element with the inner walls of the housing;
- water leakage in the place where the open-type heating element is attached;
- flow along the glass of the level gauge, which shows to what level the water in the kettle is filled.
- presence of a crack in the body of the electric kettle.
In the first case, the cause of depressurization of the flask may be a leaky gasket, or scale getting under the gasket. For any of these options you must:
- Remove the bottom lid of the kettle.
- Disconnect the top cover, which is usually held on by latches and can be easily removed.
- Remove the heating element along with the gasket by pushing it out by hand.
- After removing the rubber gasket from the disk heating element, thoroughly rinse the kettle itself, its heating element and the sealing ring. If the latter has abrasions, tears or excessive wear, the gasket must be replaced with a new one.
- It is good to dry the heating element with all the parts attached to it with a hairdryer.
- Reassemble in the reverse order, and after filling the kettle with water, place it on a dry cloth for 15 - 20 minutes. If leaks no longer appear, we can assume that the defect has been eliminated.
This process can be seen more clearly in the following video.
Video: Fixing leaks in an electric kettle with a disk heating element
If an electric kettle with a heating element in the form of an open spiral has a leak at the place where the heating element is attached, you must:
- Remove the bottom cover of the electrical device housing, as well as the cover on its handle to provide access to the heating element mounting nuts.
- If the fastener is loose, you need to tighten it and check if the problem is resolved.
- If the tightness is not restored by tightening the fasteners, you need to dismantle the top cover of the kettle and, unscrewing the fastening screws, remove the spiral along with the gasket.
- Thoroughly clean the surface of the heating element adjacent to the gasket and the sealing ring itself from scale. If necessary, replace the gasket.
How to disassemble a kettle with an open spiral heater and remove the heating element along with the gasket can be seen in detail in the following video.
Video: How to remove a spiral heating element with a gasket from an electric kettle
Leakage of the kettle along the glass of the level gauge may be the result of wear of the silicone gaskets or the appearance of microcracks in the plexiglass itself. And if the problem with the gaskets is solved quite simply (by replacing them), then to get rid of the cracks you will have to resort to using glue.
For gluing plexiglass (or plexiglass), professional adhesive Acrifix 116 or 117, vinegar essence, moment glue “Moment”, as well as adhesive compositions Cosmofen or Colakril can be used.
If there are cracks in the body, it is better to purchase a new kettle, since any glue that you try will be in contact with water, which is undesirable for health. The process of eliminating a leak on the glass of the level gauge can be seen in the following video.
Video: Eliminating leakage of a kettle on the glass of a level gauge
The reason that the electric kettle does not turn off when boiling may be:
- unclosed or loosely closed top cover;
- clogging of the hole for supplying steam to the bimetallic plate of the thermostat;
- faulty button or thermostat.
After checking whether the lid is tightly closed, use a toothpick to clean the steam outlet hole, which is located under the lid at the junction of the handle and the body. If the problem is not resolved, you need to remove the bottom cover of the kettle, and then proceed according to the following algorithm:
- Remove the bottom cover of the electric kettle body and the cover on its handle. A bimetallic plate, which should, when arched, turn off the button or electricity access to it, is available both on the button and under the terminal box of the kettle, where the thermostat is usually located.
- Make sure that the contacts are intact and that they can open under the action of the bimetallic strip. If the contacts are stuck to each other, or the pin that should open them has melted, you need to restore the functionality of this system, and if it is impossible to eliminate the breakdown, replace the problematic part - a button or thermostat.
- Reassemble the device in reverse order and check if this problem is resolved.
Another problem that may arise when using electric kettles is when the water has not yet boiled, but the device is already turned off. This defect can occur due to scale formed on the heating element, which prevents the transfer of heat to the water and heats the coil itself. If the coil overheats, the thermal fuse or thermostat at the base of the kettle is triggered. In this case, you need to descale the kettle, for which you can use:
- special household chemicals “Antinakipin” or Major Domus;
- Coca-Cola, which contains phosphoric acid;
- citric acid at the rate of 1 tbsp. spoon for 500 ml of water;
- baking soda 3 - 4 tbsp. spoons per 1 liter. water.
These solutions need to be boiled in a kettle and held for 15 - 20 minutes, after which boil clean water in it 3 - 4 times for rinsing.
If there is no scale on the heating element, you need to check the thermostat contact. It may be too close to the bimetal pusher and just needs to be bent back a little, as demonstrated in the following video.
Video: What to do if the kettle turns off without boiling
There are times when the kettle does not turn on, this means that there is a break in its electrical circuit somewhere. It may be associated with burning and oxidation of contacts. To eliminate the malfunction, you need to find the location of the rupture, as was already described earlier about fault diagnosis.
If the electric kettle does not heat water, but its light is on, this may indicate a break in the nichrome spiral of the heating element or burnout of its leads. In the first case, the heating element will need to be replaced, and in the second, the contacts will need to be cleaned.
A situation may arise when the electric kettle button does not lock. The cause of such a breakdown is a slipped or burst spring. To eliminate the defect you must:
- Remove the lid from the handle by unscrewing the screws under the top lid of the kettle and prying it with a screwdriver to release its latches from the grooves.
- Remove the button by disconnecting the wires from it and unscrewing the screw.
- After disassembling the button, replace the spring that came off.
- If the spring is broken, the easiest way would be to replace the button with a new one, because it is unlikely that you will be able to find a similar spare part.
- Reassemble the kettle in reverse order.
Replacing the disc heater
Electric kettles with a disk heater are especially vulnerable to the formation of rust, which corrodes the metal, damaging their surface and compromising the seal of the electrical appliance. With such a defect, the device is not operational. The only way out is to replace the disk, which requires:
- Remove the bottom of the kettle by unscrewing the screws (in some models it is also held in place by latches).
- Remove the top cover.
- Putting your hand into the kettle, squeeze out the heating element along with the silicone gasket.
- Disconnect all components and parts installed on it from the disk.
- Connect the terminal block, thermostat and other elements to the new heating element and assemble the kettle in the reverse order.
How to replace the spiral
To check the serviceability of a spiral heating element, you need to measure its resistance. If the multimeter shows one or infinity, the heating element needs to be replaced. To do this you need:
- Remove the bottom, lid of the kettle and the cover on the handle to get to the screws securing the heating element.
- Disconnect the supply wires from the spiral terminals.
- Unscrew the three screws securing the heating element and remove it from the kettle.
- Place a silicone gasket on the new heating element (can be removed from a burnt-out coil if it is not scuffed or damaged) and, installing it in the mounting hole, tighten it with screws.
- Reassemble the device in reverse order.
The process of replacing the spiral is clearly shown in the following video.
Video: Replacing the spiral heating element of an electric kettle
How to connect an electric kettle directly
Connecting the electric kettle directly is carried out as a temporary measure if the power button fails. If it cannot be repaired, and at the moment there is nothing to replace it with, you just need to disconnect the wiring that goes to the button and connect them together with a twist. When connected directly, the device will no longer turn off automatically, and you need to ensure that it is turned off so that the heating element does not burn out .
An electric kettle today is available to people with different incomes, who can simply buy a new device if the old one breaks down. But if this is not possible at the moment, you can easily fix it yourself without spending money on paying for the services of a repairman.
Electric kettle stand repair
The reason for a non-working electric kettle may also be hidden in the stand. There's nothing special to break there. There is only a contact group and leads from it, to which the electrical cord is connected. All this can break here - the wire falls off or the contact point oxidizes.
There is nothing particularly broken in the stand of an electric kettle
In most kettles, the wires from the cord are not soldered. Contact is achieved using copper contact connectors, which are placed on the terminals of the contact group. We carefully examine it and give it a good tug. If there is an oxide film (it is dark) or burnt areas, remove everything and clean it to clean and smooth metal.
If the contacts are clean but “moving”, remove it, press it with pliers and insert it into place. If the kettle is no longer under warranty, you can solder the contacts for reliability.
Although outwardly similar, cylindrical contacts may be different. Available with movable contacts between plastic protrusions
And also, it is worth taking a close look at the contact group. Despite the fact that they are similar, their structure may be different. There are those like in the right photo - with movable contacts that are located between cylindrical plastic protrusions. When pressed (with a toothpick, the end of a screwdriver, etc.), the contacts should move smoothly down. After the force is removed, they should return to their original position. Perhaps an oxide film or other contaminants are preventing the contact from moving, which is why the kettle does not work.
The second type of contact is with a pin in the center. There are usually fewer problems with it, but we look here too. You never know what could happen.
We remove even minor traces of dirt
In any case, we check for the presence of a dark film. This is an oxide deposit that acts as a dielectric, worsening contact. We remove dirt and plaque during repairs.
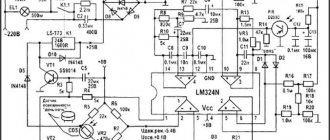
Switch, temperature sensor: the point of view of an electric kettle repairman
The photo shows from the bottom position. A shiny circle with a cut is a mechanical sensor. Thanks to the bimetallic plate, seizing the moment, the electric kettle turns off. The water boils and an increased amount of steam begins to be released. There is a small hole in the housing located under the switch, covered with a circular loose plastic plug (see photo). The plate is installed, located above the gate pair. Boiling begins and the temperature rises sharply. After a moment, you can hear a click. The tongue of the plate, made up of a pair of metals, bends sharply upward. Looks like a bimetallic relay.
Now the switch. Not so simple. The part has no visible connections, except for the metal bracket shown in the photo on the side. The upper movable part is attached to it. When we turn on the kettle, the tip of the switch rests on the tongue of the round plate with a cutout, and the bracket is compressed. Thanks to the design, the parts retain their initial position indefinitely. Click! The slightest tug releases the bracket, returning the switch to its original position.
Let's examine the bottom of the body. Here are:
- circular connector;
- rolled spiral;
- LED divider resistor rated 14 kOhm.
While the switch is dormant, the LED glows blue. Full voltage of 230 volts is applied. The photo clearly shows: the resistor was burnt, the contacts were inserted into the clamp terminals, one did not withstand inspection. I had to solder it. The divider resistor is connected in parallel with the rolled heater. The electric kettle turns on - the glow changes to orange. Dual LED (school teachers left out?), unlike typical use, both shades work simultaneously while the water is boiling. The addition of electromagnetic waves of different shades produces orange. It is difficult to list the shades that form the superposition (the repairman is deeply indifferent).
Remove the resistor, or it will burn out - nothing bad will happen. The LED will simply stop changing hue, tracking changes in the position of the switch. Color is not related to water temperature. It is easy to notice that there is no thermal fuse. We believe there is simply no protection. Those who wish can equip the part with a metal case, next to the ring connector. Provide protection against empty switching. This kettle may cause a fire if not protected. We recommend adding a thermal fuse to the device. Place it not somewhere in the center, but around the perimeter of the heating element, increasing reliability.
The resistance of the heating element is 30 Ohms. The photo shows through fractions the power values on a metal surface of 220 and 240 V. Enough to understand what can break. The design of the electric kettle is simple, even a kettle can be repaired, but... It was easy to remove the lid and put it back! We hope that readers will solve the question on their own; we find it difficult to answer. But we will show you how to disassemble the switch for those who want to clean the contacts. The gap distance is tiny, steam is in the air. Just look at the two screws from the photo: they are covered with rust, although the electric kettle has not been properly used.
Operating principle and electrical diagram
Before you begin diagnosing or repairing a household kettle, you will need to find out what components it consists of and how it works. Despite the abundance of offers under different brands, all electrical devices in this category have a similar design. They include the following parts:
- frame;
- power indicator;
- a heating element;
- control system (power button, thermostat);
- stand with power cord and contact group.
Connections in the internal communication circuit are made using plug-in terminals, or, less commonly, soldering. After placing the kettle filled with water on the stand and pressing the key, the supply circuits of the device are closed. This is accompanied by a light indication indicating that everything is working. If at this stage there is no contact between the stand and the bottom of the device, the switch is faulty, nothing will work.
Next, a heating element (spiral or disk) installed at the bottom gradually brings the water in the tank to a boil. After boiling, the automatic switches off the power to the heater (the light goes out with a characteristic click). If there is not enough water in the kettle or it is accidentally turned on empty, the protection system should also work, de-energizing the power circuits.
Arrangement of electric kettle components
Both the old models with spiral heating elements and the new ones with disk-shaped heating elements remain similar in principle of operation and the presence of main components. They will definitely contain a heating element, a power button and a protection unit. Without them, the kettle will not work.
Overheat protection system
This unit is necessary to meet fire safety requirements. If it were not there, then if the water level was insufficient and an empty kettle was turned on, a fire would certainly have occurred. And so a special contact group will de-energize the heating element.
As a working tool, it uses a special plate made of 2 metals that reacts to heat. The normal position is closed; when overheated, the bimetal is deformed, breaking the power circuit, turning off the heating element. Manufacturers of household appliances use a number of standard solutions for this unit. And all use bimetallic sensors, which are reliable and efficient.
The only drawback of thermal protection is the need to wait until the working part cools down and returns to its original position. After this, the kettle is ready for use again.
Automatic shutdown system when water boils
Another critical unit, without which normal operation of the kettle is impossible. A procedure that we are so accustomed to that we don’t pay attention is the automatic switching off of the device after heating the water. It is no coincidence that manufacturers in their operating instructions focus on pouring liquid into the flask to a clearly marked level (corresponding to the nominal capacity). The operation of the circuit breaker under the influence of a jet of steam depends on this.
Power indicator and backlight
Each model has a power indicator light: without it it is difficult to determine the status of the device. This is a light bulb interlocked with the contacts of the “main” button. Backlighting is an optional feature. Some manufacturers include it as an additional option. It works synchronously with turning on (off) the kettle.
The most common faults
The following malfunctions are typical for electric kettles:
- Failure of the heating element. The cause of the defect is scale formed on the heating element, which makes it difficult to transfer heat to water, and the coil itself heats up. Heating elements of the spiral type are more susceptible to such damage than disk heating elements, which require more time to form a critical layer of scale. The reason for the burnout of the heating element can also be a violation of the operating rules, for example, if the kettle was plugged in, forgetting to pour water into it.
- The electric kettle power button is broken. There are two possible reasons for this: the formation of carbon deposits and oxidation on the contacts of the button, or a break in the rod connecting it to the power supply terminals.
- Leakage in the housing of an electrical appliance. This malfunction is more typical for kettles with a plastic body, as well as those equipped with a disk heating element. In the first case, the breakdown may be a consequence of deformation of the kettle due to overheating at the place where the heating element is attached, and with disk heaters, the cause is corrosion along the seam connecting the disk to the body of the electric kettle. Often the cause of such a breakdown is a deteriorated seal or cracked glass of the water level indicator.
- Premature shutdown of an electrical appliance. This malfunction is a consequence of scale. The water does not have time to boil, but the heating element has already overheated and the thermostat disconnects the device from the network.
- Failure of the thermostat. The design of electric kettles with a thermostat contains additional components and parts - a thermometer, temperature sensors, a memory unit, an electronic board and a control panel. The more parts a device has, the lower its reliability and the higher the likelihood of any of them breaking. In kettles with thermostats, the regulator itself most often fails, in which the contacts oxidize or burn.
Breakdowns that allow you to return the electric kettle to the store
You can return a faulty electric kettle to the store during the warranty period if during this period its significant shortcomings have appeared, namely the following faults:
- irreparable damage;
- periodically repeated breakdown of the same unit;
- a breakdown that cannot be repaired without disproportionate costs close to the cost of the kettle itself;
- a malfunction that requires a long time to eliminate, as a result of which the device cannot be used for more than 30 days throughout the year.
There can be a variety of malfunctions here, but the most serious of them are leaks not associated with mechanical damage and leaky gaskets, but arising due to deformation of the housing or damage as a result of corrosion processes.
Significant breakdowns include the failure of the heating element, provided that the kettle was used correctly and there is no scale on the heating element.
Electric kettles are household appliances that are included in the list of technically complex goods. Therefore, you can return them back to the store with a refund of the money paid only if they are of inadequate quality. When contacting the store with a written complaint, you need to indicate a breakdown that is often repeated or requires costs. comparable to the cost of an electric kettle.
The seller has the right to offer the buyer to contact the service center, but if the breakdown has not been fixed within 20 days, the store is obliged to return the money or exchange the device for a new one. The seller also has the right to appoint, at his own expense, an examination of the product, which will determine whether the breakdown was caused by the user or whether it is caused by a manufacturing defect. In the first case, the buyer must reimburse all costs for the examination. In the event of a defect due to the fault of the manufacturer, you can demand not only a refund, but also compensation for moral damages. Moral damage can only be claimed by a court decision.
Troubleshooting
The need for ringing arises when any component of the electrical circuit breaks down (the device does not turn on, the reasons are unknown, and trivial errors such as a non-working socket or loose installation have been eliminated). The work is carried out using a special device - a multimeter, as well as screwdrivers selected according to the type of screws, and a sharp knife with pliers or pliers. In this case, the following points are sequentially checked:
- The performance of the flexible cord and stand contacts. It is difficult to repair a burnt stand without the appropriate experience, and its breakdowns are visible to the naked eye, but to save time, the contact group is always checked. At this stage, one end of the tester is applied to the plug, the other to the springy contacts (most often they are located in the center). Detected faults, such as a burnt or insufficiently thick cord, carbon deposits on the surface of the brass contact, are eliminated if possible, after which the group is called again. If there are no problems on all three lines (2 current-carrying lines and ground), repairing electric kettles becomes more complicated; the body has to be disassembled.
- The performance of the heating element power supply terminals at the base of the housing. At this stage, you need to disassemble the kettle, as indicated in the instructions, and check the contacts of the outer and inner copper rings in turn. If there is no ringing, the power supply block is completely disassembled to remove carbon deposits, reassembled and checked again.
- Power button functionality. One probe of the tester touches the contact of the wire that supplies current to the button, the second touches the power wire of the heating element. The button is checked in the off and working state; if there is no sound signal about serviceability, in the second case it needs to be repaired or replaced (if necessary, power the kettle directly).
- The performance of the heating element. One probe is directed to the power contact, the second to the connection point with the wire from the power button. If the circuit breaks, you need to replace the heating element with a new one, which is not always possible.
In addition to checking the circuit with a multimeter, the actual resistance of the heating element is assessed. To perform this operation, it is enough to remove the bottom of the kettle, turn on the tester in measurement mode and point its probes at the output terminals. If there is a significant deviation from the value calculated or declared by the manufacturer, the heating element needs to be cleaned or replaced.
Check the functionality of the flexible cord and stand contacts. Check the contacts of the outer and inner copper ring.
See if the power button works
Carry out diagnostics of the heating element operation
How does an angle grinder work?
The design of the grinder consists of the following main parts: electrical and mechanical . In the mechanical component of the angle grinder, the main character is a bevel gearbox , which reduces the speed to an acceptable value. In an electric the commutator motor determines the operation of the angle grinder, where power is transferred to it using a special switch. Of course, its failure interrupts the supply of electrical energy from the network.
Repair of power indicator and backlight
For ease of use, the kettles are equipped with a power indicator. It can be made on the basis of a neon light bulb or LED. It can also be equipped with backlighting. In this case, the indicator can be combined with the backlight.
Electric kettle with light Polaris PWK 1767CGL
The indicator allows you to determine whether the kettle is properly installed on the stand or whether it is plugged into the outlet. It also performs some diagnostics. After all, if the light is on, but the water is not heated, this indicates a poor contact or a malfunction of the heater.
Electric kettle power indicator
The power indicator may be a neon light bulb or an LED connected to the terminals of the heating element. The light bulb is usually connected through a current-limiting resistor of about 200 kOhm. Malfunctions are extremely rare and usually breakage of conductors. The light bulb is checked by replacement, and the resistor is checked by a tester.
When using an LED, a rectifier (diode) and a current-limiting resistor are used. All together they form the so-called driver. The parts are checked by a tester.
LED lights
LEDs are chosen for illumination, as they have a high brightness. Neon is not suitable in this case. As in the case of indication, power is provided by the driver. The diagram is simple and is given below:
Simple LED Driver
Failures are rare and the weak link here is the LED.
What needs to be checked before repair?
Before repairing an electric kettle, it is worth checking the obvious things:
- The plug must be inserted into the socket and the corresponding start button must be pressed. Often the problem concerns the plug and socket. Sometimes the connector moves from side to side. It turns out that there is no power supply from electricity.
- Incorrect fixation. This happens sometimes, but rarely. It is better to exclude this from the rules.
When these reasons have been verified, but the unit has not started working, it is worth continuing work. If an electric kettle breaks, how to fix it? To avoid creating a more complex breakdown, you need to follow simple steps.
Features of work
Most models of electric kettles today turn off on their own after the water boils. There are modifications with manual shutdown. Before first use, it is recommended to fill the product with water and bring it to a boil. It is also necessary to wash the kettle at least 2 times before use. If the products have not been used for a long time, you should do the same steps. Modern devices are made of heat-resistant plastic or stainless steel.
Before cleaning electrically powered devices, you must unplug them. If they are cold, wash the outer surface with a damp cloth. The use of abrasive substances is prohibited. Water is heated thanks to the presence of a special element inside the kettle. It is attached to the body. Fixation is achieved using:
- threaded bushing;
- metal nuts;
- screws holding the housing to a watertight seal.
Often such seals cause leaks. In the latest models on the market, the disc element is closed and located at the bottom of the water compartment. This is done to make cleaning surfaces simpler and easier. This measure also ensures better descaling. In various models, seals are made in the form of:
- gaskets;
- washers;
- bushings
A safety device is provided in almost all models. It is responsible for turning off the device after the water boils. This element is triggered if someone turns it on without first pouring water. In addition, modern products are designed in such a way that the user can visually control the amount of liquid poured.
To connect to the power supply network, there is a cord or wire, the feature of which is flexibility. At one end there is a plug, and at the other there is a power connector block. It has sockets that provide contact. A coiled power cord is provided to save desk space. It is also good for families with small children, as it is less accessible to them.
The kettle does not turn off
If after boiling the water the device does not turn off and continues to heat the liquid, this can lead to combustion of the heating element. There are several reasons for this malfunction. Shutdown occurs at the moment when the steam rises due to boiling and reaches the channel through which it passes to the thermostat. The shutdown may not occur due to a broken lid, a channel clogged with scale, or a breakdown of the thermostat itself. But if the first reasons can be dealt with using special means or traditional methods for removing plaque, to repair the thermostat it is necessary to remove the bottom cover of the housing and completely disassemble the device in order to replace it.